Last month we looked at the overall picture that is BlackBerry development and dived a little deeper into the web development option. Now it’s time to push on and move up one stage of sophistication and capability to RAD – Rapid Application Development. Obviously if all you want to do is allow the user to visit your website then you don’t need the additional facilities provided by RAD, and the approach described last month will be all you need, but how far can you go with the RAD approach and how easy is it? The only way to answer this question is to examine the tools that allow us to build a RAD application.
Before moving on to the practice of BlackBerry RAD development let’s take a look at the overall architecture. The key idea is that a RAD application is a way of connecting to web service and making use of its facilities. A web service can implement a very general form of interaction, both taking data from the client and returning it. In this sense it is clear that it can be used to implement more sophisticated applications than are possible with just a web page, even if it is push delivered. So before you proceed much further you have to know something about creating a web service. You can do this either using Java or .NET, and in either case it is surprisingly easy. The web service you create is entirely general and can be used by clients other than a BlackBerry RAD application.
By the same token, if you have an existing web service then all you have to do to port it onto a BlackBerry device is to create a RAD client. The RAD client is a special BlackBerry application that is executed under a special runtime environment provided by the BlackBerry Mobile Data System Runtime (or MDS Runtime). The RAD part of the equation is provided by either a plug-in for Visual Studio (2005 or 2008) or a standalone MDS Studio tool. Either of these allows you to design the client’s user interface and produce an application that can be installed and used just like a native JavaME application. The actual coding of the client is done in JavaScript with the support of many additional classes and facilities. I’m going to use the Visual Studio plug-in to demonstrate how it all works, but the MDS Studio tool follows the same principles.
Populate the form using drag-and-drop
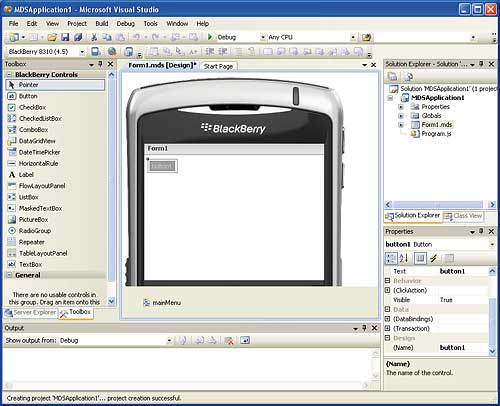
To get started make sure you have Visual Studio 2005 or 2008 installed and download the correct version of the plug-in. The download installs itself when you run it and there is usually nothing to configure and nothing else to download and install. The plug-in includes the runtime, a BlackBerry simulator and everything you need to develop and test an MDS application. Once the plug-in is installed start Visual Studio running in the usual way and select New Project. You should discover that you now have an additional project type “BlackBerry” and a new BlackBerry MDS Runtime Application template. Select this template and click OK and you will see a form within a representation of a BlackBerry device. If you open the ToolBox you will find it populated with a range of BlackBerry controls – most of which should be familiar from other environments. If you now place a button on the form you are well on the way to your first MDS application.
To add some code you simply double-click on the button to be transferred to the JavaScript code module and a ready-made event handler for the button click event. If you start typing some code you will immediately notice that Intellisense prompting is active. In this case we can just display a dialog box with a suitable message to demonstrate how easy it all is:
function Form1_button1_Click()
{
	Dialog.display("Hello World");
}
The only question you might have is, “what is the Dialog class?”, and the answer is that it is one of the many additional JavaScript classes supplied by the MDS runtime – more of which later.
To see this simple program in action all you have to do is exactly what you would do to debug any Visual Studio program – click the green Start Debugging button or use the command Debug,Start debugging. At this point the program is checked and a BlackBerry simulator appears along with a status window that shows you as each stage of getting your application to run is completed. The application is push loaded to the simulated device as it would be to a real device and the form you have designed appears open ready for use. If you click the button you will see the dialog box open with the usual message. To make using the simulator easier to use it is worth making sure you are using a mouse with a centre wheel because this can be used as if it were the device’s track wheel and clicking it selects the current object. Also notice that the first time the simulator opens it is slower than subsequent times.
If you explore the simulator you will find that your application has been installed along with the other standard applications just as it would be in a real device. As well as making use of the standard BlackBerry features, you can also use the Visual Studio debugger to set breakpoints, step through the program and examine the values in local variables.
From this point of view of entering, building and debugging a program there is very little new to learn, but there are a few things that need to be said about the user interface and the JavaScript facilities. So rather than concentrating on the task of implementing a web service and getting it to work with the client – something that is well covered in the documentation – let’s look at these other issues.
The first thing to take account of is that there isn’t much screen real estate to work with and you only have two basic layout options – to use a flow or table layout. The flow layout works much like a web page, while the table gives you a coarse grid that you can use to position other controls. You can increase the area of the user interface by using auto-generated scrollbars and by using multiple forms. Forms can be created by right-clicking on the project in the Solution Explorer, right-clicking and using Add a new Item. You can use the designer to customise the form and to show the form you simply use its display method. By changing the visibility of controls on forms you can make forms adapt to the data they have to display. Controls can also be bound to data sources such as a collection class or variable and the data can be filtered.
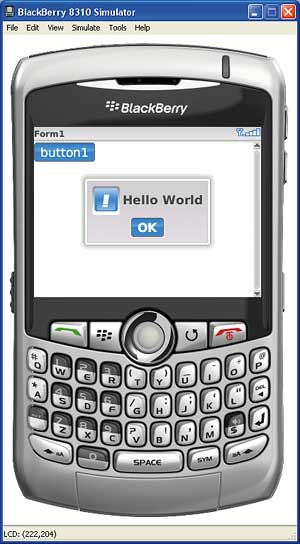
The simulator in action
As well as the usual JavaScript objects you also have a large number of MDS classes that greatly extend what you can do. For example, the Dialog class that we encountered in our earlier example is an MDS class that implements a simple dialog box. New in version 4.5 is the location object which provides GPS data, and the network object which indicates the type of data connection. There are also classes for collections, system objects and data stored on a device such as contacts. You can also add custom classes to a project using a simple editor to add fields.
Once you have created the custom class you can create instances of it, for example:
var MyObject = MyClass.create();
MyObject.myField = "Some data";
Dialog.display(MyObject.myField);
Instances or variables in general can also be made persistent, i.e. stored in the device’s flash memory by simply adding a persistent global variable to the Globals.mds file, again a special editor is provided for the job.
In most MDS applications getting data from a server is a key element, but using a web service makes this almost trivial. All you have to do is create the service using C# or VB say, add a web reference to the MDS project and then use the methods and classes provided by the service within the MDS application. An alternative approach is to use a push method which allows you to expose an MDS Application method to a remote .NET program running on the server so that it can be called to supply some data. In either case this is not difficult and is well described in the documentation and sample projects.
Once you have a working application there is a publishing wizard that generates a “bundle”, i.e. a .jar file, which contains the MDS Runtime application ready for deployment to live devices.
The RAD route to creating a BlackBerry application has the two properties that every programmer hopes for in a development system – it is simple and it is powerful. Once you grasp the basic idea of using the form designer together with JavaScript augmented by a class library, designing the client seems like no problem at all.
Next month we will look at the final approach to developing a BlackBerry app, using Java.
Mike James has over 20 years of programming experience, both as a developer and lecturer, and has written numerous books on programming and IT-related subjects. His PhD is in computer science.
Comments