This article explores how re-usable fragments of JSP can be packaged as custom tags in tag files. A practical application, solving a web page layout management problem, serves as the hands-on example and illustrates JSP tag creation techniques.
Working with JSP 2 Tag Files
Prior to JSP 2, tags had to be written using the Java programming language. The API for tag creation is quite complicated, and the interaction with embedded scripting code is very difficult to manage. Figure_1A illustrates the creation of conventional tags.JSP 2 is the first version of JSP to support extension using tags written in JSP itself. This mechanism is called tag files in JSP 2. Tag files are just JSP files with the .tag file extension. Each tag encapsulates a re-usable piece of JSP code. Figure_1B illustrates the creation of tag files.
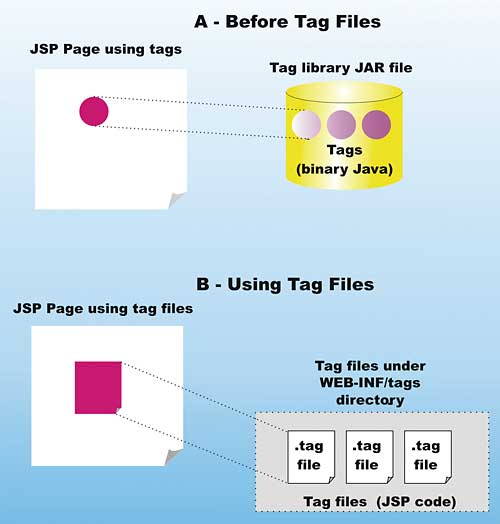
Figure 1: Writing tags before and after JSP 2
Tag files must be placed in specific locations on the server in order for the JSP container to find them. Two locations are possible, one is typically used during development, and the other for production JAR files. Table 1 reveals the two locations.
Table 1: Tag file locations |
|
| Usage Scenario | Location |
| During development | Under the /WEB-INF/tags directory of the web application. A TLD (Tag Library Descriptor) need not be created in this case. |
| Final production JAR library file | Under the /META-INF/tags directory of a JAR file. A TLD must be created when tag files are bundled in JAR files. |
In this article, it is assumed that you’ll place all your tag files under the WEB-INF/tags directory. This is the most convenient location when creating, modifying, and testing tag files.
Setting up a working JSP 2 environment
If you do not have a JSP 2 compliant application server, you’ll need to download a Tomcat 5.x release. They are available from jakarta.apache.org/site/binindex.cgi.If you are running Java 2, download the latest 5.0.x release. If you are running Java 5 (formerly 1.5), download the latest 5.5.x release of Tomcat.
The Tomcat 5 servers fully support the JSP 2 specification, including full support for JSTL, EL, and (of course) tag files.
Flexible Web Page Layout using Tags
The web application example in this article will use custom tags in the creation of an electronic catalogue. Three different layouts will be supported as illustrated in Figure_2. Each layout provides a different appearance to the end user. However, the operation of the catalogue remains the same. The user may click on one of the product categories displayed in the “menu pane” and see all the products displayed in the “listing pane” of the layout. Ideally, the web site designer or JSP developer can easily switch between the different layouts by simply using a different tag.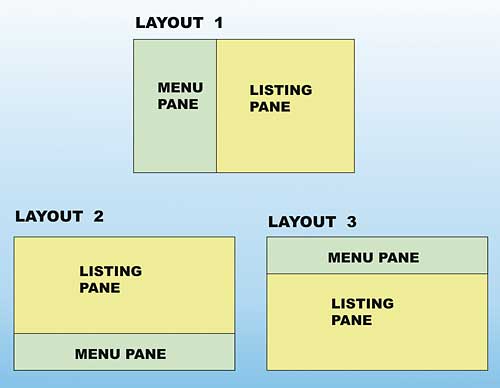
Figure 2: The three layouts supported in the creation of the electronic catalogue
The rest of this article shows step-by-step how to build such a set of custom tags. The most frequently used features and techniques for creation of tag files are demonstrated.
Printing horizontal and vertical menus
First, the focus will be on the menu pane of the application. Here, a list of categories is printed either horizontally or vertically. Each category is a hyperlink, and clicking on it will cause the catalogue to display the items in the category. At this point, however, do not worry about hyper-linking. First, after installing the application, try the URL:http://localhost:8080/vsjtag/ testmenu.jspThis test program uses a single custom tag, called menu, that simply prints the two categories vertically.
Take a look at testmenu.jsp:
<%@ taglib prefix=”c”
uri=”http://java.sun.com/jsp/jstl/
	core” %>
<%@ taglib prefix=”tags”
	tagdir=”/WEB-INF/tags” %>
<html>
	<head>
		<title>
VSJ Examination of JSP 2 Tag Files
		</title>
	</head>
	<body>
		<tags:menu/>
	</body>
</html>
The first taglib directive includes the core JSTL tags, part of every JSP 2 compliant container. The second taglib directive shows how you tell the container to look for your tag files under the /WEB-INF/tags directory. Note that all of the custom tags are prefixed by the tags prefix. In the body of testmenu.jsp, the custom <tags:menu/> tag is called.
A very simple tag
If you look under /WEB-INF/tags, you will find the source code of menu.tag. This is what you will find:Software<br/> HardwareNote that this tag is trivial. It does not have any active JSP element. In essence, the static text is “included” into testmenu.jsp. In fact, either the <%@ include %> directive, or the <jsp:include> action could have been used instead. However, this trivial tag shows how to create a tag file and how to use a tag file with minimal complications.
Tag file only directivesThere exists a set of JSP directives that can only be used within tag files. These include <%@ attribute %> to specify attributes for tags, <%@ variable %> to create variable in the calling JSP page, and <%@ tag %> to specify tag specific options. You will see the use of these directives in the examples. |
Adding an attribute to a tag
Next, an attribute will be added to the tag. Since the menu may be printed horizontally or vertically, an orientation attribute is added to the tag. The new tag with the additional attribute is called menup. Find the source code under WEB-INF/tags as menup.tag:<%@ taglib prefix=”c”
uri=”http://java.sun.com/jsp/jstl/
core” %>
<%@ attribute name=”orientation” %>
<c:choose>
<c:when test=”${orientation
eq ‘horizontal’}”>
Software Hardware
</c:when>
<c:otherwise>
Software<br/>
Hardware
</c:otherwise>
</c:choose>
In this implementation, you see the use of JSTL’s <c:choose> construct to select between the two orientations, and to print the appropriate menu. Note the use of the attribute directive. This is one of the many directives that can only be used within tag files. It tells the container to expect an attribute for the tag. If you look at a test page for the menup tag, you can see how the orientation attribute is given a value. A test page is available at testmenup.jsp:
<%@ taglib prefix=”c”
uri=”http://java.sun.com/jsp/jstl/
	core” %>
<%@ taglib prefix=”tags”
	tagdir=”/WEB-INF/tags” %>
<html>
	<head>
		<title>
	VSJ Examination of JSP 2 Tag Files
		</title>
	</head>
	<body>
		<tags:menup
			orientation=”horizontal” />
		<hr/>
		<tags:menup
			orientation=”vertical” />
	</body>
</html
In this test, the menu is first printed horizontally, and then vertically. Both times, the menup tag is used, but with a different value for the orientation attribute.
Access the test URL using:
http://localhost:8080/vsjtag/
	testmenup.jsp
The resulting page shows the menu printed both ways, as in Figure_3.
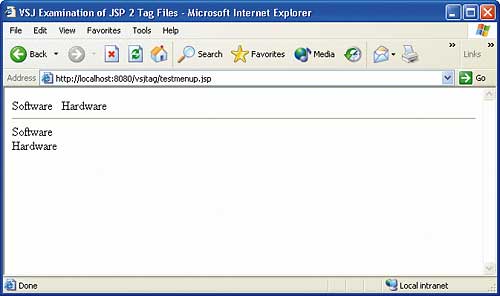
Figure 3: Horizontal and vertical menus
Creating a menu of varying length
Thus far, the categories in the menu have been limited to two: Software and Hardware. While this keeps things simple in the tag files, it isn’t very realistic. Ideally, it should be possible to call the menu tag and supply it with as many categories as needed. JSP 2’s dynamic attributes can be used to achieve this.Specifying dynamic attribute for a tag file
Dynamic attributes are attributes that are not yet known at the time of tag file creation. This means that, unlike the orientation attribute of the menup tag, an <%@ attribute %> directive cannot be used to declare the attribute in advance. Instead, the container can provide the attributes in a Java Map data structure (a Map in Java is a list in which each entry has a String “key” associated with a “value” object). To see how dynamic attributes can solve our menu problem, see the menupd.tag tag file in the WEB-INF/tags directory:<%@ tag dynamic-attributes=
”menuItems” %>
<%@ taglib prefix=”c”
uri=”http://java.sun.com/jsp/jstl/
core” %>
<%@ attribute name=”orientation”
required=”true” %>
<c:choose>
<c:when test=”${orientation eq
‘horizontal’}”>
<c:forEach var=”item”
items=”${menuItems}”>
${item.value}
</c:forEach>
</c:when>
<c:otherwise>
<c:forEach var=”item”
items=”${menuItems}”>
${item.value}<br/>
</c:forEach>
</c:otherwise>
</c:choose>
The dynamic-attributes attribute of the <%@ tag %> directive is used to specify the name of the variable that will hold the map containing all the dynamic attribute values. The map will be contained in the menuItems map. The <%@ tag %> is a directive that can only be used within a tag file. All the attributes of this menupd tag will be in the menuItems map except for the explicitly specified attribute(s). In this case the orientation attributes is such a required attribute, and it will not be part of the menuItems map.
In the body of the tag, JSTL’s <c:forEach> tag is used to iterate through all the entries in the map. Each time through the iteration, the current map entry is assigned to a variable called item. Inside the loop, item.key can be used to obtain the name of the associated attribute while item.value can be used to render the actual attribute value. Since the categories are all specified as attribute values, only item.value needs to be rendered. To see how a tag with dynamic attributes is used, take a look at the testmenupd.jsp page:
<%@ taglib prefix=”c”
uri=”http://java.sun.com/jsp/jstl/
	core” %>
<%@ taglib prefix=”tags”
	tagdir=”/WEB-INF/tags” %>
<html>
	<head>
		<title>
	VSJ Examination of JSP 2 Tag Files
		</title>
	</head>
	<body>
		<tags:menupd
			orientation=”horizontal”
			item1=”Software”
			item2=”Hardware”/>
		<hr/>
		<tags:menupd
			orientation=”vertical”
			item1=”Software”
			item2=”Hardware”
			item3=”Books” />
	</body>
</html>
Note the additional item1/item2/item3 attributes in the menupd tag. In fact, the name of these attributes can be called anything since the tag does not check them. Only the value is used to print out the categories. You can try adding more attributes and see that the tag can handle as many categories as you need. Test this page by going to the URL:
http://localhost:8080/vsjtag/
	testmenupd.jsp
The resulting page shows the menu with dynamic categories printed both ways, as in Figure_4.
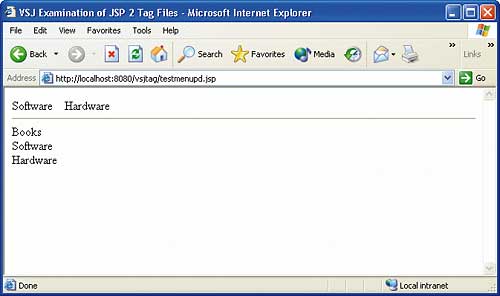
Figure 4: Dynamic menus
Dynamic attributes are often used in the creation of tags that replace or mimic HTML tags. Since most HTML tags can take a lot of optional attributes, using dynamic attributes allows you to deal only with the set that the user actually specifies.
Designing three different layouts
Turning our attention away from the menu implementation, let us look at the tags that display the different layouts. These tags are in the WEB-INF/tags directory, and are layout1.tag, layout2.tag, and layout3.tag respectively. layout1.tag is shown here, the other two are similar.<%@ attribute name=”menucolor” %>
<%@ attribute name=”bgcolor” %>
<table border=”1”
bgcolor=”${bgcolor}”>
<tr>
<td bgcolor=”${menucolor}”
width=”30%”>
</td>
<td width=”*”>
<jsp:doBody/>
</td>
</tr>
</table>
This tag has two attributes, menucolor and bgcolor, that affect the colour of the menu pane and the listing pane respectively. An HTML table is rendered by this tag, with substitution of the attribute values at the appropriate places. The interesting aspect of this tag, however, is the existence of the <jsp:doBody/> tag.
Tags that process a tag body
A tag can use the <jsp:doBody> action, an action that is only allowed in tag files, to ask the container to render the body content of the tag. To see how this works, take a look at the testlayout1.jsp:<%@ taglib prefix=”tags” tagdir=”/WEB-INF/tags” %> <html> <head> <title> VSJ JSP 2 Tag File – Layout Test Layout 1 </title> </head> <body> <tags:layout1 bgcolor=”yellow” menucolor=”lightgreen”> The listing<br/> pane is<br/> here </tags:layout1> </body> </html>Note how the layout1 tag’s two attributes, bgcolor and menucolor, are specified. Note that this tag now has a body, as highlighted, and this body will be rendered at the location of where the <jsp:doBody/> action is within the layout1.tag.
Try out testlayout1.jsp using the URL:
http://localhost:8080/vsjtag/
	testlayout1.jsp
This will result in a display of the layout as in Figure_5, in which you also see the testlayout2.jsp and testlayout3.jsp in action. You can examine the JSPs, and the associated tag implementations, on your own.
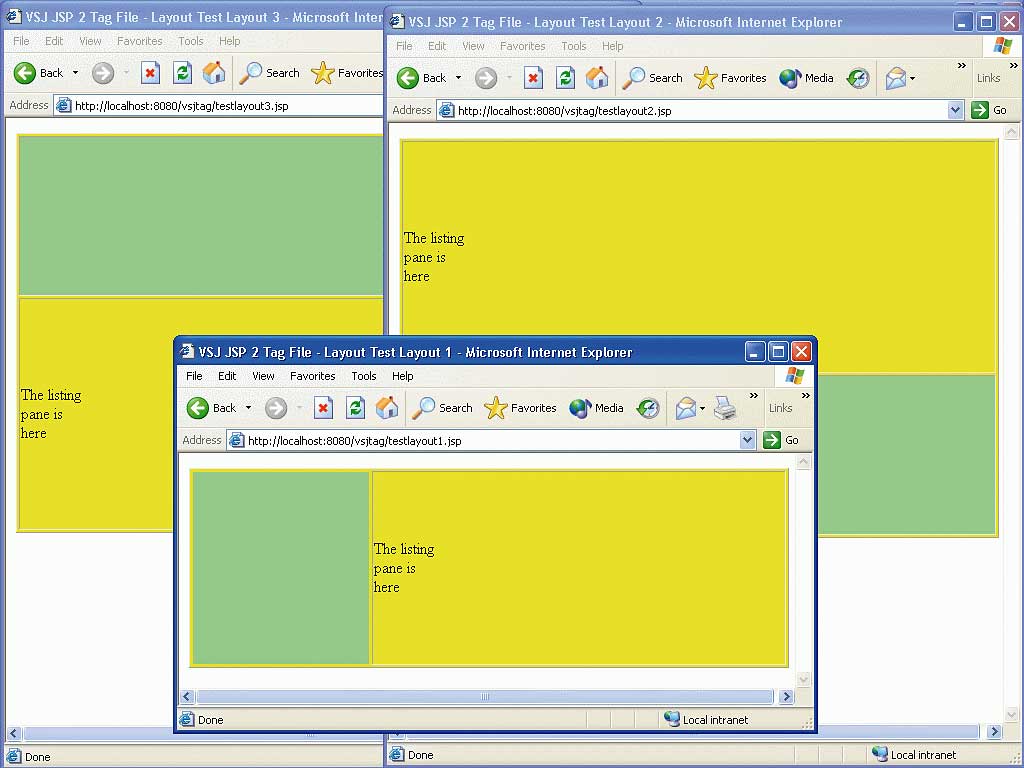
Figure 5: Three different layouts [Click to enlarge]
Adding Menus to the Layout
The layout1.tag does not display a menu in the menu pane. Since the listing pane is already rendered using the body of the layout1 tag, you need another way to pass another body of JSP code into the tag for rendering. This is done by passing a fragment of JSP as an attribute to the tag. The tags that implement this are layout1f.tag, layout2f.tag, and layout3f.tag respectively. You can find these tags under the WEB-INF/tags directory.Using JSP Fragments as Tag Attributes
The listing below shows layout1f.tag, the other tags are similarly implemented:<%@ attribute name=”menucolor” %>
<%@ attribute name=”bgcolor” %>
<%@ attribute name=”menu”
fragment=”true” %>
<table border=”1” width=”600”
height=”200” bgcolor=”${bgcolor}”>
<tr>
<td bgcolor=”${menucolor}”
width=”30%”>
<jsp:invoke
fragment=”menu”/>
</td>
<td width=”*”>
<jsp:doBody/>
</td>
</tr>
</table>
Note how the menu attribute is specified as a fragment via the fragment attribute. The calling JSP page can then supply a JSP fragment as the value for this attribute. The other highlighted section, the <jsp:invoke> action, is where the rendering of the fragment occurs. This approach allows you to supply multiple JSP fragments to your custom tags. To see how this is used, see the testlayout1f.jsp, testlayout2f.jsp, and testlayout3.jsp respectively. testlayout1f.jsp is shown here:
<%@ taglib prefix=”tags”
	tagdir=”/WEB-INF/tags” %>
<html>
	<head>
		<title>
			VSJ JSP 2 Tag File -
			Layout Test Layout 1f
		</title>
	</head>
	<body>
		<tags:layout1f bgcolor=”yellow”
				menucolor=”lightgreen”>
		<jsp:attribute name=”menu”>
			<tags:menupd
				orientation=”vertical”
				item1=”Software”
				item2=”Hardware”
				item3=”Books” />
		</jsp:attribute>
		<jsp:body>
			The listing<br/>
			pane is<br/>
			here
		</jsp:body>
		</tags:layout1f>
	</body>
</html>
Nesting JSP tag file invocations
In the preceding code, in order to specify the menu attribute as a JSP fragment, the <jsp:attribute> standard action is used. Note how the original body is specified using the <jsp:body> standard action. Using this technique, it is possible to call a tag that may take multiple fragments of JSP for different attributes. Note that the value of the menu attribute is actually a call to our tag file <tags:menupd>. This illustrates how custom tag file invocations can be nested one inside another. You can try this JSP page out using the URL:http://localhost:8080/vsjtag/ testlayout1f.jspFigure_6 shows how the result looks. There is also a corresponding testlayout2f.jsp and testlayout3f.jsp for your exploration.

Figure 6: The result of nested tags
Adding Hyper-links to Menu
The final set of JSP test pages puts everything together and add some new code. The code additions include those shown in Table 2.Table 2: Code additions |
|
| New Code | Description |
| menupdurl.tag | changing menupd.tag to support a list of clickable hyper-links instead of static text |
| fetchContent.tag | create a tag that will decode incoming action request parameter, and set a variable to the appropriate category listing (simulated, in production this implementation can query a database) |
| testlayout1s.jsp | using layout 1f, display the final clickable catalog (testlayout2s.jsp and testlayout3s.jsp are similarly included) |
Using JSTL <c:url> and the EL string function
First, let’s take a look at menupdurl.tag in the WEB-INF/tags directory:<%@ tag dynamic-attributes=”menuItems” %>
<%@ taglib prefix=”c” uri=”http://java.sun.com/jsp/jstl/core” %>
<%@ taglib prefix=”fn” uri=”http://java.sun.com/jsp/jstl/functions” %>
<%@ attribute name=”orientation” required=”true” %>
<c:choose>
<c:when test=”${orientation eq ‘horizontal’}”>
<c:forEach var=”item” items=”${menuItems}”>
<c:set var=”tpStr” value=”${fn:split(item.value,’|’)}”/>
<c:url value=“${pageContext.request.pathTranslated}” var=”tpURL”>
<c:param name=”action” value=”${tpStr[1]}” />
</c:url>
<a href=”${tpURL}”>
${tpStr[0]}</a>
</c:forEach>
</c:when>
<c:otherwise>
<c:forEach var=”item” items=”${menuItems}”>
<c:set var=”tpStr” value=”${fn:split(item.value,’|’)}”/>
<c:url value=“${pageContext.request.pathTranslated}” var=”tpURL”>
<c:param name=”action” value=”${tpStr[1]}” />
</c:url>
<a href=”${tpURL}”>
${tpStr[0]}
</a><br/>
</c:forEach>
</c:otherwise>
</c:choose>
This is a modification of the menupd.tag shown earlier. It makes use of the JSTL <c:url> tag to create the hyper-links. An EL function for string processing is used to split the incoming menu item values into two parts. The first part will be the name of the category, the second part after a separator “|”, will be the four letter code used as a request parameter in the URL created. Apart from this, the logic of this code remains the same as the original menupd.tag.
Handling incoming action request parameters
The fetchContent.tag implementation will examine an attribute called action, and set a variable to different values depending on the action. In real application, this tag may perform a database search. The incoming action attribute should specify the category of products to search for, then this tag would search a database for all the products that match. The code of fetchContent.tag is:<%@ taglib prefix=”c” uri=”http://java.sun.com/jsp/jstl/core” %>
<%@ attribute name=”action” %>
<%@ variable name-given=”pageContent” scope=”AT_END” %>
<c:choose>
<c:when test=”${action eq ‘soft’}”>
<c:set var=”pageContent”>
<h2>A list of all software available</h2>
</c:set>
</c:when>
<c:when test=”${action eq ‘hard’}”>
<c:set var=”pageContent”>
<h2>A list of all hardware systems available</h2>
</c:set>
</c:when>
<c:when test=”${action eq ‘book’}”>
<c:set var=”pageContent”>
<h2>A list of all books available</h2>
</c:set>
</c:when>
<c:otherwise>
<c:set var=”pageContent”>
<h1>Welcome to the VSJ mall!</h1>
</c:set>
</c:otherwise>
</c:choose>
Passing values to the calling JSP via tag file Variables
In the preceding code, note the first use of the <%@ variable %> directive. While attributes are used to pass data from a JSP page into a tag, variables are used to pass data out to the calling JSP. The scope AT_END tells the container that the variable called pageContent should be made available and synchronized at the end of the execution of this tag. During execution, each tag has its own context and any variables created must be explicitly synchronized by the container if they are to be accessible outside the tag.In the preceding code, the action attribute is used to determine the HTML text that the pageContent variable will be set to. This is accomplished via the JSTL <c:choose> construct.
To see how these two new tags are used, see testlayout1s.jsp:
<%@ taglib prefix=”tags”
	tagdir=”/WEB-INF/tags” %>
<html>
	<head>
		<title>
			VSJ JSP 2 Tag File -
			Layout Test Layout 1f
		</title>
	</head>
	<body>
		<tags:layout1f bgcolor=”yellow”
				menucolor=”lightgreen”>
			<jsp:attribute name=”menu”>
				<tags:menupdurl
				orientation=”vertical”
					item1=”Software|soft”
					item2=”Hardware|hard”
					item3=”Books|book” />
			</jsp:attribute>
			<jsp:body>
				<tags:fetchContent
			action=”${param.action}” />
					${pageContent}
			</jsp:body>
		</tags:layout1f>
	</body>
</html>
Note the new value for the item1, item2, and item3 attributes of the menupdurl tag. These values encode both the category names, and the value of the action request parameter, separated by “|”.
The <tags:fetchContent> tag is used to determine what to render in the listing pane. The request parameter, action, is passed as an attribute. After execution of the <tags:fetchContent> tag, the pageContent variable will be available in testlayout1s.jsp. The value of this variable is then rendered using EL. To try out this final version, use the URL:
http://localhost:8080/vsjtag/
	testlayout1s.jsp
Figure_7 shows the final resulting page. You may want to click the hyper-links in the menu. The content pane should change accordingly.
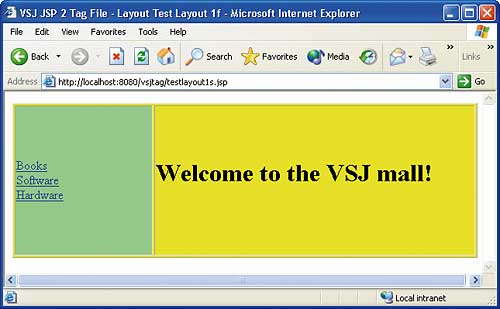
Figure 7: The completed page
You should also examine and try out testlayout2s.jsp and testlayout3s.jsp to test the other two layouts.
Conclusions
The tag file mechanism in JSP 2 is a long-awaited addition to the JSP standard. It allows non-Java programmers to create re-usable JSP tags easily. Any JSP code may be wrapped up as a custom JSP tag, bundled in a tag library, and then re-used in other projects.A set of directives, available only within tag files, enables the specification of attributes for passing data into the tags, as well as passing data from the tag using variables. Attributes can be pre-specified or dynamic. Dynamic attributes enable the use of an unlimited number of attributes with names not known in advance. The body of a custom tag can contain other custom tags. Complete JSP fragments can be passed into a custom tag as an attribute.
Tag files, in combination with JSP 2’s Expression Language (EL) and standard tag library (JSTL), put this new JSP standard light-years ahead of previous versions, furthering the goal of rapid web application development.
Sing Li is a consultant, system architect, open source software contributor, and freelance writer specialising in Java technology, embedded and distributed systems design. He has authored or co-authored several books on the topic, including Professional Apache Tomcat (Wrox), Professional JSP 2 (Apress), Early Adopter JXTA (Wrox), and Professional Jini (Wrox).
Comments