An active page is more like a desktop application complete with buttons, textboxes and all of the surface features of a desktop user interface. I’ve previously argued (see www.itarchitect.co.uk/articles/display.asp?id=316) that markup languages typified by HTML and more recently XAML aren’t suited to the creation of active pages in any way, shape or form. If you need something to “do” something then the natural approach is to be “procedural”, and this is the core paradigm of programming – writing code that specifies what is to happen and when.
For a reason that isn’t entirely obvious we have been captivated by the simplicity and apparent power of HTML so much that we feel the need to take it as a starting point and then introduce procedural elements piecemeal. This is dangerous stuff as the result is often a complete mess analogous to spaghetti code. One solution is to get rid of as much of the code as possible, and this is essentially ASP.NET’s approach. It separates out the code from the HTML in a “code behind” file and then runs the majority of the code on the server rather than the client. This serves up almost pure HTML to the client, and this solves all of the problems of browser incompatibilities.
Well of course it does no such thing as the HTML has to be customised for each browser based on which make and version it claims to be. Even code behind can be a bit of a mess because the namespace is divided between the HTML and the code. Put simply, names can come into existence as the result of HTML or of the procedural code. In most cases you can’t be sure where to look to discover the meaning of a name, and the HTML and the code can both control the state of a property, which is not good for readability. There are just too many ways and places that the same thing can be implemented, and interactions between parts of the system tend to be diffuse.
You can see ASP.NET as an attempt to banish the code and keep the HTML, but this can’t succeed because the HTML needs the code. Why not try moving in the opposite direction – let’s ban the HTML and just keep the code. This can be entirely successful because code doesn’t need HTML at all. For a reason that I’m not sure I understand, the reaction whenever I suggest this is one of shock and horror.
Long live code
There are many reasons why this approach is better, but the main one is simply that it is more possible than removing the code from the HTML. That is – an active page can be created without a single line of HTML, but without code a page is static. My guess is that the reason for the shock/horror is that firstly it isn’t generally realised that HTML is redundant, and secondly it raises issues of browser scripting compatibility. However, in practice a code-only approach is not only possible, there is more than one architectural way to do it, and it’s fairly easy. When it comes to code compatibility the problems are no more serious or challenging than raw HTML – just a little less well-known. If the no-HTML approach were to be adopted, then browser implementers would work as hard to make their products code compatible as HTML compatible.So how can we get rid of HTML? There are two general approaches. The first is to treat the HTML page as a canvas and simply use code to draw on it. Of course to do this you need a browser plug-in to implement something like SVG (Scalable Vector Graphics), or use a ready-made environment such as Flash. The second approach is to simply use JavaScript, or whatever scripting language you care to use, and the DOM (Document Object Model) to create a user interface in a procedural fashion. Both JavaScript and the DOM are central to the loose collection of techniques that have become known as Ajax, and it seems sensible to simply extend Ajax to something new by forbidding, or at least minimising, the use of HTML. This approach is called Spartan Ajax for obvious reasons. As the DOM is a collection of JavaScript objects it makes sense to attempt to be as object oriented as possible, as this makes the whole approach even more powerful and easy to use.
So Spartan Ajax encompasses the whole of the Ajax approach and philosophy, and adds the requirements of minimal HTML and maximal object orientation.
Goodbye HTML world
This is all fine in theory, but you might well still be mystified as to how to put the concept into practice. The basic principle is amazingly easy to demonstrate. We could banish HTML altogether because some browsers (but sadly not all) will read a .js file and start running the code at once. However, it seems churlish to turn down the availability of a ready-made form, so the minimal HTML file is:<html> <head> <script type="text/javascript" src="Form.js"> </script> <title>Spartan Testbed</title> </head> <body> </body> </html>This is the only HTML you will see in this article. Now we can focus our attention on the Form.js file. The active code, i.e. what you can think of as the “main program”, is contained in the window’s onload event handler:
window.onload=function()
{
	... main program
}
You could put code in other window event handlers, but this is mostly unnecessary because the idea is to run the code when the window is loaded, and keep running the code until the user is finished with the application. Notice that classes used in the main program are declared outside of the event handler.
As a simple example of how it all works, what could be better than a traditional “Hello World” application, only in this case it’s more a “Goodbye World”. The JavaScript that constitutes the main program is:
var button1=document.createElement(
	"button");
button1.style.position="absolute";
button1.style.top=25;
button1.style.left=50;
button1.style.width=150;
button1.style.height=100;
button1.value="Click Me";
button1.onclick=function()
	{
		window.alert(
			"Goodbye HTML World");
	}
document.body.appendChild(button1);
This uses the DOM to create a button, then customises its properties, sets a click event handler and then adds it to the DOM hierarchy. You could make the code shorter by defining a variable equal to button1.style and use it to reference the properties of the style object. When the page is loaded the button appears on the form, and the user can click it to display the alert. You can use the same technique to create and work with any number of others of the standard DOM objects, and you can use only slightly more sophisticated techniques to create new objects.
The advantages of this approach include: only one technology to deal with, a single naming environment, a single file – no code behind, in front or mixed in – and it’s completely transparent. However it isn’t particularly pretty (and after all, style is important), and what happed to our intention to be as object oriented as possible? We can do better by wrapping it in a JavaScript class.
Creating wrappers
We have only one really fundamental problem with this approach and this is the distinction between a DOM class and a JavaScript class. However, in JavaScript a DOM class is represented by a JavaScript object. This means that you can add properties and methods as for any standard JavaScript class. For example:button1.myvar="my own data";
button1.mymethod=function()
{
window.alert(button1.myvar)
};
Using this fact, and taking care how we use references, we can create convincing wrappers even if the classes used aren’t pure JavaScript.
For example, to wrap a DOM button we could start off with something like:
button=function(parent)
{
	DOMObj=document.createElement(
		"button");
	DOMObj.style.position="absolute";
	parent.appendChild(DOMObj);
	return DOMObj;
}
This is almost a standard JavaScript object constructor that simply creates a new DOM button, sets its positioning to absolute and then appends it to a parent object already in the DOM hierarchy. Notice however that this constructor returns DOMObj and not the default “this” reference. This makes the new JavaScript object an instance of the JavaScript class that represents the DOM object. By the same reasoning any variables or methods that you create have to be part of the DOM object, so they too must use the DOMobj reference rather than “this”.
You can add other default properties such as position in the constructor, or insist that the user sets all of them after the object has been created. You could also implement a two-stage object creation – create the DOM object and then add it to the hierarchy using something analogous to a “controls collection”. However, specifying the parent object is flexible enough for most applications.
To create and customise a button you would now use:
button1=new button(document.body);
button1.style.top=25;
button1.style.left=50;
button1.style.width=150;
button1.style.height=100;
button1.value="Click Me";
Adding the event handler is just as easy:
button1.onclick=function()
{ window.alert("Goodbye HTML World");}
An alternative approach to this is to create the instance and then customise the properties by implementing constructors, which take a set of important properties used in the creation of the instance. For example:
button1=new button(
	top,left,width,height);
The immediate advantage of an object-oriented approach becomes obvious as soon as you need subsequent buttons:
button2=new button(document.body);…and so on.
Extending DOM based classes
This is a good start, but to be really useful it would be an advantage to be able to add properties and methods to the class wrapping the DOM object. This turns out to be fairly easy, but there is a twist in the technique:DOMObj.myvar="My data";
DOMObj.mymethod=function()
{
window.alert(this.myvar);
}
These lines should be added within the object constructor before the:
return DOMObj;Notice that both new properties and new methods have to use the DOM.Obj reference, but if a method wants to use an instance property it has to use just the “this” reference – notice the parameter of the window.alert method. With these definitions you can check it all works property using two separate instances:
button2.myvar="button2";
button1.myvar="button1";
button2.mymethod();
button1.mymethod();
If you try this you will discover that the two instances work correctly and print the appropriate instance values of the variables.
Get and Set
One of the practical problems that we are going to have to solve is the simple fact that different browsers implement the DOM in slightly different ways. You might think at this very early stage we have no such problems, but in fact the examples as given only work with Internet Explorer. If you try them out on other browsers you will discover that the Buttons appear and function but they don’t have captions. The reason is that FireFox, NetScape and Opera behave differently depending on how the button object is created. If you create a button using createElement, then changing its value property has no effect on its display. This seems like a bug, or at least an undesirable behaviour, to me. Trial and error reveals that setting the button’s innerHTML works for FireFox, NetScape, Opera, IE and perhaps others. So the solution is to change:button1.value="Click Me";…to:
button1.innerHTML="Click Me";This works, but how is the innocent programmer to know to use innerHTML rather than value? What if there’s a browser that works only with the value property? You could set both but this is getting messy. A better solution is to provide set and get accessor functions for all of the DOM and JavaScript properties. The latest version of JavaScript does support function get and function set, and you can use these to implement active property access. Of course, the problem is that the current crop of browsers doesn’t support the latest JavaScript, so we need a different solution for the moment. The best we can do is to implement generic get and set functions. This sounds either a very difficult task or a very tedious one.
The brute force method would be to write a get/set pair for every DOM property you want to support. The apparently difficult alternative is to somehow use the “this” reference to access a property passed as a string parameter. In fact it’s fairly easy to create a generic get and set function because JavaScript is interpreted and it has an eval function, which interprets any string as if you had typed it. Thus a get function can be implemented as:
DOMObj.get=function(prop)
{
	return eval("this." + prop+ ";");
}
To see how this works, suppose prop is set to “value” and the instance is called “button1” then the string concatenation gives “this.value;” when this is evaluated it becomes a reference to “button1.value” and this is what the function returns. With this definition you can write statements like:
window.alert(button1.get("value"));
Once you have the general idea the set function is only marginally more complicated:
DOMObj.set=function(prop,value)
{
return eval("this." + prop + "=" +
	"'" + value + "';");
}
Assuming that prop is “style.top” and value is 25 the string is this.style.top=’25’ and if this is button2 the whole thing evaluates to button2.style.top=’25’. You can now set the properties of button2 using:
button2.set("style.top",25);
button2.set("style.left",250);
button2.set("style.width",150);
button2.set("style.height",100);
button2.set("value","New Text");
Of course the setting of the value property only works with IE. To make it work on a wider range of browsers we can modify the set, and if necessary the get, to deal with the special cases. For example, if the property is value then we need to change the innerHTML as well as value:
DOMObj.set=function(prop,value)
{
	switch (prop)
	{
		case ("value"):
			eval("this.innerHTML='" +
				value + "';");
			break;
	}
	return eval("this." + prop + "=" +
		"'"+ value +"';");
}
A switch statement is used to allow for expansion as we discover additional inconsistencies and need to handle additional special properties. At this point the natural temptation is to start to modify the underlying DOM properties to regularise them and make them look more like object models in other class libraries. For example, why not add a Top property that automatically sets the style.top property? This is an attractive idea, but as soon as you start to move away from the definitions in the DOM you might well be causing problems for the future. An alternative style for the set function is to use the assignment as the parameter:
DOMObj.set2=function(assign)
{
	return eval("this." + assign+";");
}
Using this property sets are written in the style:
button2.set2("value='New Text'");
This has some advantages, but you have to remember to use single quotes around string values, and it makes testing for particular properties that need to be handled separately more difficult.
Finally it is worth mentioning that the properties are all stored in an associative array, so a seemingly much simpler solution to the problem of getting a property at runtime is:
return this[prop]= value;This works as long as prop is a string set to the name of a property. A neater solution, but if you try using it on nested properties such as style.top it doesn’t work because the array reference has to be written as this[style][top]. If you are prepared to do the extra work to split nested property names then this approach has some advantages.
Nesting objects
There are many more techniques to be discussed, including building collections of objects, event handlers that can deal with multiple event sources and, of course the XML, Jason and other Ajax aspects. To round off, however, let’s look at how we can use the no-HTML object-oriented approach of Spartan Ajax to build a new control. This is a simple slide strip style picture viewer. First we need a div object because the div is one of the most basic ways of creating a unit of layout:DivAbs=function(
parent,left,top,width,height)
{
DOMObj=document.createElement("div");
DOMObj.style.position="absolute";
DOMObj.style.top=top;
DOMObj.style.left=left;
DOMObj.style.width=width;
DOMObj.style.height=height;
parent.appendChild(DOMObj);
return DOMObj;
}
This is just a straightforward application of the basic principle outlined so far. The topmost object is the FilmStrip and this first creates a div object to hold the pictures:
	FilmStrip=function(
		parent,left,top,width)
	{
	Strip=new DivAbs(
		parent,left,top,width,null);
	Strip.style.background="black";
	Strip.style.overflowX="scroll";
The key here is that the overflow is set to use scroll bars in the x direction – this automatically allows the user to scroll the filmstrip without having to explicitly implement anything. Notice that the height of the div is left as null, which results in the default height. Next we are going to load some pictures into the div and to do this we might as well use another class:
PhotoFrame=function(parent,file)
{
	image=new Image();
	image.style.position="absolute";
	image.style.margin=5;
	image.src=file;
	parent.appendChild(image);
	return image;
}
With the PhotoFrame class we can now start loading pictures. The first is used to set the height of the div:
	Strip.image1=new PhotoFrame(
		Strip,"DSCF0280.JPG");
	Strip.style.height=
		Strip.image1.height+25;
	Strip.image1.style.left=0;
The following pictures are loaded in the same way but spaced out in horizontal line using the position and width of the previous picture:
	Strip.image2=new PhotoFrame(
		Strip,"DSCF0281.JPG");
	Strip.image2.style.left=
	parseInt(Strip.image1.style.left)+
	parseInt(Strip.image1.width)+10;
	Strip.image3=new PhotoFrame(
		Strip,"DSCF0282.JPG");
	Strip.image3.style.left=
	parseInt(Strip.image2.style.left)+
	parseInt(Strip.image2.width)+10;
	Strip.image4=new PhotoFrame(
		Strip,"DSCF0283.JPG");
	Strip.image4.style.left=
	parseInt(Strip.image3.style.left)+
	parseInt(Strip.image3.width)+10;
	return Strip;
}
…and so on.
Clearly it makes more sense to define an Image array property which could be used like an image collection and loaded using a loop. To create a FilmStrip you need just one statement:
var Film1=new
	FilmStrip(document.body,10,20,350);
The result is a scrollable display of all of the pictures you have specified – see Figure 1.
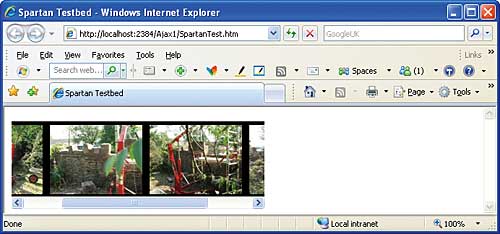
Figure 1: A scrollable filmstrip object
It works as listed in IE and FireFox, but not in NetScape and Opera. To make it work in all four browsers you have to use:
Strip.style.overflow="auto"…because NetScape and Opera don’t seem to support the overflowX and overflowY properties. Making your code browser compatible is mostly about discovering which properties are supported by the majority of browsers and staying within these limits.
The Filmstrip object can be developed further so that it automatically loads the pictures and responds to the user clicking on one of the thumbnails by loading a full-sized version. It’s all a matter of following the basic philosophy of wrapping DOM objects in Java classes and adding properties and methods.
Where next?
Spartan Ajax is a bit extreme, but where a page is mostly active rather than just text with some special effects it has lots of advantages. It is also a natural style of page creation to use when creating an Ajax application that aims to be loaded once and to refresh only the parts that need refreshing rather than loading complete new pages. Finally you might ask, why bother coding layouts when there are HTML editors that you can use to place buttons interactively? This really isn’t the right question. Ask why there are no interactive form editors that generate Spartan style JavaScript? A good IDE would make code as interactive a design tool as HTML.Dr. Mike James’ programming career has spanned many languages, starting with Fortran. The author of Foundations of Programming, he has always been interested in the latest developments and the synergy between different languages.
Comments