Dragging text
As well as acting as a simple data field display device, a textbox can also act as a text editing box. If you set MultiLine to true and enable scroll bars, what you have is a text window that is very similar to NotePad. The user can enter text, select areas of text, and even cut, copy and paste. If you want to draw the user's attention to errors in the input (for example), you can use the same selection system. The properties SelLength, SelStart, and SelText allow you to control and discover what the selected text is. SelStart specifies the start of the selection in terms of number of characters from the beginning of the string, and SelLength is the length of the selection, again in characters. SelText is the selected substring and you can assign to it to change the contents of a selection.
If you want to stop the user from selecting a section of the textbox's content and copying it to the clipboard, you need to take control of the selection properties. As you can't turn off the selection facilities, you have to force a reset of the selected area:
Private Sub Text1_MouseMove(Button_
		As Integer, Shift As Integer, _
		X As Single, Y As Single)
	Text1.SelLength = 0
End Sub
Not very elegant, but it works!
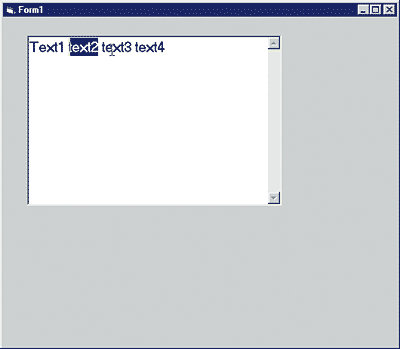
Now that we know about the selection properties, it would be nice if the user could drag selections within the text box in the same way that Word or any other full word processor does (see Figure 1). At first I thought this would be easy, but in fact it's fairly difficult, and my solution isn't very satisfying - if you can think of a better way of doing the same job, please let me know.

Figure 1: You can drag a word anywhere in a standard textbox
The problem is that, as just described, you can't switch off the user's ability to select regions of text, and if you're going to let them drag a selection, that is more or less what you have to do. My solution to this paradox is to code the Mouse event handlers to change the way that the selection works. The basic idea is that by default the user can select text in the usual way but if a mousedown event occurs within an existing selection a drag is initiated. To do the drag we need to remember the original selection and try to track the cursor as it is moved until the user releases the mouse button, i.e. until the next mouseup event.
To record the old selection and mark the drag state we need some variables and an initialisation routine:
Dim oldLen As Integer
Dim oldstart As Integer
Dim drag As Boolean

Private Sub Form_Load()
	oldLen = 0
	oldstart = 0
	drag = False
End Sub
The MouseDown event handler simply tests to see if the mouse down has occurred within the previous selection. Notice the subtle point that we have to use the previous selection values because the mouse down event actually starts a new selection!
Private Sub Text1_MouseDown( _
		Button As Integer, _
		Shift As Integer, _
		X As Single, Y As Single)
	If Text1.SelStart >= oldstart And _
	Text1.SelStart <= (oldstart + oldLen - 1) Then
		drag = True
		Text1.MousePointer = vbCrosshair
	End If
End Sub
The oldstart and oldlen values get set to something meaningful within the MouseUp routine, which is automatically called when they finish marking out the selection. To let the user know that we have started a drag operation the cursor is changed to a crosshair.
Once a drag operation has been started, as signalled by Drag set to True, all of the work is done in the MouseMove event handler. At first you might think that all you have to do is to make use of the mouse X,Y coordinates to work out where the user is dragging the selection to, but this is not the case. A few minutes' thought reveals the difficulty in trying to convert an X,Y position into a position within the character string that the textbox is displaying. Somehow we have to make use of the selection variables themselves. The problem is that SelStart and SelLength behave in a complicated way during a drag operation. If you click on a location SelStart is set to that position in the text and SelLength is set to zero. Then as you drag to the right SelLength increases and SelStart remains fixed. So to convert this behaviour into dragging a single location all we have to do is to set SelStart to SelStart+ SelLength and SelLength to zero every time the mouse moves. In this way the dragging of a selection (i.e. an area) is converted into dragging a single location.
This would be fine, except that it fails if you try to drag to the left of the starting location. In this case the length of the selection increases and the start location moves to the left. In this case all we have to do is to zero the length. Putting all of this together gives:
Private Sub Text1_MouseMove(_
		Button As Integer, _
		Shift As Integer, _
		X As Single, _
		Y As Single)
	If drag And Button = vbLeftButton Then
		If Text1.SelStart >= _
			oldstart Then
			Text1.SelStart = _
				Text1.SelStart + _
				Text1.SelLength
		End If
		Text1.SelLength = 0
	End If
End Sub
Finally we need to code the mouse up event handler to actually do the move of the selected text. The first thing to do is cancel the drag state:
Private Sub Text1_MouseUp(_
		Button As Integer, _
		Shift As Integer, _
		X As Single, _
		Y As Single)
	Dim s As String
	Dim t As String
	Dim i As Integer
	If drag Then
		drag = False
The actual string manipulation consists of setting the original text to null and then inserting it into the string at the correct location:
		t = Text1.Text
		i = Text1.SelStart
		s = Mid(t, oldstart + 1, _
			oldLen)
		t = Mid(t, 1, oldstart) & _
		Mid(t, oldstart + oldLen + 1)
		If i > (oldstart + oldLen) _
			Then i = i - oldLen
		t = Mid(t, 1, i) & s & _
			Mid(t, i + 1)
This isn't simple, and I have to admit to having made more than one attempt at writing the code. The biggest problem is that deleting the original text alters the position at which the insertion has to occur, if the insertion point is to the right of the original position. I also wasted hours because I didn't notice that the SelStart value was zero-based, whereas all of the string functions use a one-based index!
Now the text string can be returned to the text box and reselected:
		Text1.Text = t
	End If
	oldLen = Text1.SelLength
	oldstart = Text1.SelStart
Notice that the setting of oldLen and oldstart have to be performed outside of the IF statement because we need these values even if the user is only selecting a range and not dragging.
Finally the mouse pointer can be returned to its original shape:
	Text1.MousePointer = vbIbeam
End Sub
After all of this delicate juggling with selection regions and properties, you might be surprised to discover that it works. It isn't ideal and doesn't quite copy what happens when you drag in other applications. For example, the selection disappears while you are dragging and the cursor that marks the current location during the drag isn't very clear. The cursor situation might be improved by actually getting rid of the cursor icon during a drag because the location is marked by the insertion point in the Textbox.
There are a few other things that need to be improved if you plan to actually make use of this technique. For example, what happens when you drag to a position within the selection isn't allowed for. In this case you're likely to see nothing happen, or not quite what you expected! Also, you can drag off the end of the textbox string and onto the next line, which causes some problems in getting back to a sensible position. Both should be easy to sort out.
Images in a textbox
The second advanced use of a textbox is nowhere near as complicated and detailed as the dragging routine. In fact it is yet another use of the GDI, but it still takes a standard textbox where no textbox has gone before.
There are lots of occasions when it would be nice to include a small icon or picture in a textbox. This is made slightly difficult because the basic textbox wasn't intended for use with graphics. The textbox control doesn't have an hdc but we can easily get one using the GetDC API call and then the rest is easy. However, there are some slight problems, so let's actually try it out.
Starting with a new project, drop a textbox, a picturebox and a button control onto the form. The first things we need to add to the code are the declarations for the GetDC and ReleaseDC API calls.
Private Declare Function GetDC _
		Lib "user32" _
		(ByVal hwnd As Long) As Long

Private Declare Function ReleaseDC _
		Lib "user32" _
		(ByVal hwnd As Long, _
		ByVal hdc As Long) As Long
Once we have the textbox's DC, we are going to bitblt an image onto it so we also need the BitBlt API call:
Private Declare Function BitBlt _
		Lib "gdi32" _
		(ByVal hDestDC As Long, _
		ByVal x As Long, _
		ByVal y As Long, _
		ByVal nWidth As Long, _
		ByVal nHeight As Long, _
		ByVal hSrcDC As Long, _
		ByVal xSrc As Long, _
		ByVal ySrc As Long, _
		ByVal dwRop As Long) As Long
When the form loads we need to set the picture box to pixel co-ordinates and load a suitable image:
Private Sub Form_Load()
	Picture1.ScaleMode = vbPixels
	Picture1.AutoSize = True
	Picture1.Picture = _
		LoadPicture(App.Path & _
		"\Face03.ico")
End Sub
Notice that the picturebox is really only being used to hold the bitmap, and you can just as easily use another source for the bitmap. If you don't want to see the picturebox on the form, simply set its visible property to false. To copy the bitmap to the textbox all we have to do is:
Private Sub Command1_Click()
	dc = GetDC(Text1.hwnd)
	result = BitBlt(dc, 0, 0, _
			Picture1.ScaleWidth, _
			Picture1.ScaleHeight, _
			Picture1.hdc, _
			0, 0, vbSrcCopy)
	result = ReleaseDC(Text1.hwnd, dc)
End Sub
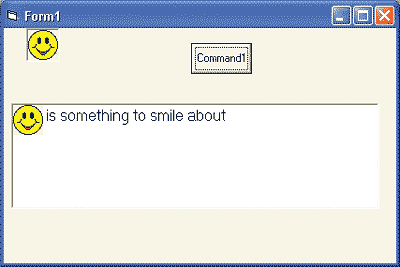
Now if you run the program and click on the button you will see the smiley icon appear in the textbox (see Figure 2).

Figure 2: A bit too soon to smile!
If you click on the textbox, you'll see the first problem immediately - the picture vanishes when the text box is refreshed. The reason is obviously that when you click on the textbox, the text cursor is set to the end of the text and wipes out the image on the same line as the text. To deal with the problem, you simply have to put the code that copies the image in the textbox's mouse down routine.
A more interesting problem is co-ordinating the bitmap's position relative to the text in the textbox. The problem is that the bitmap is positioned using pixel co-ordinates but the text is sized using points and positioned automatically. If you are working with a picturebox, then you can use the TextHeight and TextWidth functions to discover the size in the picturebox's co-ordinates of any text string. A textbox doesn't have TextHeight and TextWidth functions because it doesn't support graphics - but there is nothing stopping us using the picturebox to discover the size of the text in pixels and then using this information in the textbox!
So to position the icon at the end of a line of the line of text we would use:
Dim X As Long
dc = GetDC(Text1.hwnd)
t = Text1.Text
X = Picture1.TextWidth(t)
result = BitBlt(dc, X, 0, _
		Picture1.ScaleWidth, _
		Picture1.ScaleHeight, _
		Picture1.hdc, _
		0, 0, vbSrcCopy)
result = ReleaseDC(Text1.hwnd, dc)
If you place this code in the textbox's mouse down event handler and in the Text1_Change event handler (complete with a refresh call), you will discover that the icon moves along the line as you type in. If you want to change the default font in the textbox you need to make sure that the picturebox is using the same text using code something like:
Picture1.Font.Name = Text1.Font.Name
Picture1.Font.Size = Text1.Font.Size
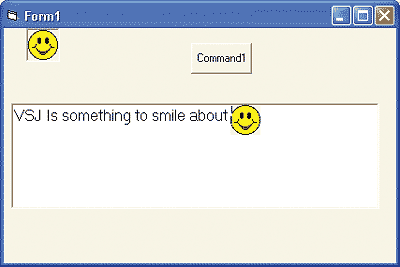
You can generalise these techniques to position the bitmap at a fixed location even in multi-line text (see Figure 3).

Figure 3: A smiling face at the end of an important message!
All you have to remember is to leave a gap in the text large enough for the bitmap to fit in. Not difficult in theory, but hard work keeping track of the numbers in practice.
Ian Elliot is a development programmer with I/O Workshops Ltd, a consultancy which solves real world problems for clients with widely varying requirements.
Comments