Instant messaging, either local within an Intranet, wide-area inside an enterprise, or global over the Internet, is quickly becoming a 'killer application' for P2P technology. Unfortunately, most P2P networks existing today either have a proprietary development system, or complex open source APIs and operation models that take weeks or even months to understand. If only there were a way to get on-board the P2P train quickly, and absorb the intricate lower-level details at one's own pace.
This article introduces a one-afternoon solution to writing an instant messaging application based on the JXTA network. The P2P application we'll create will be called the VSJ World Wide Messenger (wwm), and will enable users to send instant messages to one another without any centralized server support.
Instant IDE development using the IMBean
Our development cycle is greatly shortened in this case because all the complex code involved in communicating with the P2P network and handling the messaging protocol is eliminated from the application, as it has been factored into a reusable, drag-and-drop deployable, JavaBean. We will demonstrate the easy-to-use API of this bean, and show how you can use this bean in modern IDEs to quickly create IM-based applications.The VSJ World Wide Messenger will be housed in a Java class called uk.co.vsj.jxta2.wwm.ui.VSJChat. This class mainly manages the GUI, delegating to the JavaBean all of the communications work.
The bean we will be using is called IMBean (Instant Messaging Bean), it is an application-specific JavaBean in the EZEL library. EZEL is EZ Entry Library for JXTA, and is an open source project hosted at ezel.jxta.org.
The IMBean is located in the imbean.jar file, in the beans directory, included with the source code distribution. This bean can be used immediately by adding it to the JavaBeans palette of your favorite IDE. Figure 1 illustrates what the IMBean can do for us.
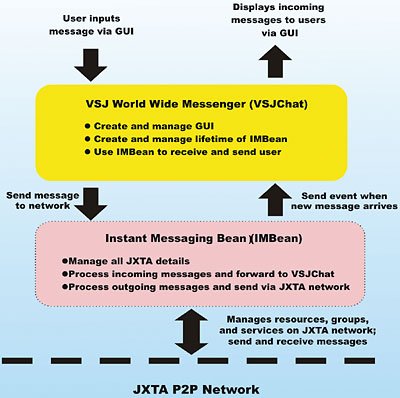
Figure 1: Facilities provided by the IMBean
IMBean takes care of all the instant messaging plumbing for us. The only tasks we have to perform in our own code are to:
- Accept user input (outgoing messages) and send it via the IMBean
- Hook up an event handler to receive incoming messages
- Add the IMBean to your IDE project (method varies depending on the IDE you use, usually a drag-and-drop into the GUI designer)
- Create a UI element to accept input messages from user (i.e. JTextField), a UI element to display all messages (i.e. JTextArea), and a UI button to send messages
- After the initialization method of the GUI, add code to call the initBean() method of the IMBean to "boot" the bean
- In the actionPerformed() handler of the UI button, retrieve the input message and call the IMBean's sendMessage() method to send the message
- Hook up an event handler for IMBean's MessageReceivedEvent (usually by selecting the Events tab in the IDE's properties panel when the IMBean is selected); in this handler, access the incoming message via the event's getMessageText() and getSender() methods, add this incoming message to the message display UI element set up in step (2)
Now, let's take a more in-depth look at these steps, using actual code in an actual IDE (NetBeans 3.5). If you are not using an IDE, you can follow the steps by examining the source code supplied.
Installing the IMBean
Step (1) in the procedure requires installing the JavaBean, this is done via the top level menu "Tools->Install New JavaBeans…" selection in NetBeans 3.5. Select the imbean.jar file (from the code distribution) to install, and place it into the sparsely populated "Beans" palette. Once the bean is on the palette, drag and drop it into the GUI we create in Step (2), shown next.Assembling the GUI
We use the drag-and-drop graphical editor to create the GUI in step (2). The GUI for our VSJChat application will be created using the NetBeans GUI editor. The layout is shown in Figure 2, together with the type and name of each GUI component.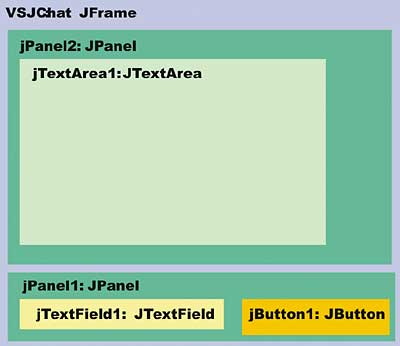
Figure 2: The GUI for the example
The class we are creating is located in the uk.co.vsj.jxta2.wwm.ui package. It is generated by NetBeans when we select "New->JFrame Form" from the context menu. Create the GUI shown in Figure 2 using drag-and-drop Swing components from the GUI editor's palette.
The skeletal code generated by the IDE is:
package uk.co.vsj.jxta2.wwm.ui;
public class VSJChat extends javax.swing.JFrame {
	/** Creates new form VSJChat */
	public VSJChat() {
		...
	}

/**This method is called from within the constructor to
* initialize the form.
* WARNING: Do NOT modify this code. The content of this
* method is always regenerated by the Form Editor.
*/
	private void initComponents() {
		chatBean1 = new
			org.jxta.ezel.beans.imbean.IMBean();
		jPanel1 = new javax.swing.JPanel();
		jTextField1 = new javax.swing.JTextField();
		jButton1 = new javax.swing.JButton();
		jPanel2 = new javax.swing.JPanel();
		jTextArea1 = new javax.swing.JTextArea();
		setTitle("VSJ P2P World Wide Messaging
			- 100% Java Edition");
		addWindowListener(new
			java.awt.event.WindowAdapter() {
			public void windowClosing(
			java.awt.event.WindowEvent evt) {
				exitForm(evt);
			}
		});
		jPanel1.setLayout(new java.awt.BorderLayout());
		jTextField1.setColumns(40);
		jTextField1.setFont(new java.awt.Font(
			"Dialog", 0, 10));
		jPanel1.add(jTextField1,
			java.awt.BorderLayout.CENTER);
		jButton1.setText("Send Message");
		jPanel1.add(jButton1, java.awt.BorderLayout.EAST);
		getContentPane().add(jPanel1,
			java.awt.BorderLayout.SOUTH);
		jPanel2.setLayout(new java.awt.BorderLayout());
		jTextArea1.setEditable(false);
		jTextArea1.setFont(new
				java.awt.Font("Dialog", 2, 12));
		jTextArea1.setFocusable(false);
		jTextArea1.setMinimumSize(new
			java.awt.Dimension(500, 400));
		jTextArea1.setPreferredSize(new
			java.awt.Dimension(500, 400));
		jPanel2.add(jTextArea1,
			java.awt.BorderLayout.CENTER);
		getContentPane().add(jPanel2,
			java.awt.BorderLayout.CENTER);
		pack();
	}
/** Exit the Application */
	private void exitForm(
		java.awt.event.WindowEvent evt) {
		System.exit(0);}

/**
* @param args the command line arguments
*/
	public static void main(String args[]) {
		...
	}

	// Variables declaration – do not modify
	private org.jxta.ezel.
		beans.imbean.IMBean chatBean1;
	private javax.swing.JButton jButton1;
	private javax.swing.JPanel jPanel1;
	private javax.swing.JPanel jPanel2;
	private javax.swing.JTextArea jTextArea1;
	private javax.swing.JTextField jTextField1;
	// End of variables declaration
}
Note that all the code for the GUI element, including layout and initialization, is generated by the IDE. Since we drag-and-dropped the IMBean onto the GUI editor, the code to initialize the IMBean is also generated automatically.
Booting the IMBean
In Step (3), we must add initialization code to "boot" the bean. This is done by modifying the generated constructor for VSJChat, shown in the code below.public VSJChat() {
mySenderName = "noname";
myGroupName = "netpeergroup";
localInit();
}
public VSJChat(String peername,
String groupname) {
mySenderName = peername;
myGroupName = groupname;
localInit();
}
private void localInit() {
initComponents();
try {
chatBean1.initBean(
mySenderName, myGroupName);
} catch (Exception ex) {
ex.printStackTrace();
}
chatBean1.setSenderName(
mySenderName);
chatBean1.setAlias("NOALIAS");
chatBean1.setTopic("ALL");
jTextField1.requestFocus();
}
We have created an extra constructor that takes two string as an argument, and factored out the common initialization code to a private localInit() method. Calling initBean() with a sender/peer name and a group name will start the JXTA platform with the associated peer name in the specified group, although this level of detail is not vital to our understanding of how IMBean works. All we need to know is that it will allow us to join existing IM sessions with the supplied user name. It is also in the localInit() method where we can set other available parameters of the IMBean such as its alias and topic properties. These properties are not used by our simple VSJChat application, but other applications may use these properties to provide additional functionality (filtering of messages, etc.).
Sending Messages via the IMBean
In Step (4), we need to wire up the "Send Message" button, called jButton1 in our generated code. Using the GUI editor in NetBeans 3.5, we highlight the jButton1 component and select the Events tab of the property sheet, and then click on the customizer for the event name called "actionPerformed". We then input a handler's name, "SendClicked" in our case. This will create a handler method for us in VSJChat automatically. The code generated includes the listener subscription code:jButton1.addActionListener(new
java.awt.event.ActionListener() {
public void actionPerformed(
java.awt.event.ActionEvent evt)
SendClicked(evt);
}
});
The SendClicked() method is also generated. We fill in the method to grab the user's input and send message using the IMBean as shown below.
private static final String
	CHAT_SEP = "> ";
private static final String CR = "\n";
private static final String
	EMPTY_TEXT = "";
private StringBuffer curMsgs = new
	StringBuffer(EMPTY_TEXT);
	...
private void SendClicked(
	java.awt.event.ActionEvent evt) {
	try {
		String latestMsg =
			jTextField1.getText();
		chatBean1.sendMessage(
			latestMsg);
		curMsgs.append(mySenderName +
			CHAT_SEP + latestMsg + CR);
		jTextArea1.setText(
			curMsgs.toString());
		jTextField1.setText(
			EMPTY_TEXT);
		jTextField1.requestFocus();
	} catch (Exception ex) {
		ex.printStackTrace();
	}
}
To facilitate the sending of messages, we will also send a message whenever the user has finished typing a line and presses the Enter key. This can be done by handling the actionPerformed() event of the jTextField1 component. Again, using the GUI editor, selecting the jTextField1 component this time, we call the handler TextFieldComplete(). This registration code is generated.
jTextField1.addActionListener(new
	ava.awt.event.ActionListener() {
	public void actionPerformed(
		java.awt.event.ActionEvent
		evt) {
		TextFieldComplete(evt);
	}
});
And we can fill in the TextFieldComplete() method to simply call SendClicked() since pressing Enter is equivalent to clicking the "Send Message" button.
private void TextFieldComplete(
	java.awt.event.ActionEvent evt) {
	SendClicked(evt);
}
Handling Incoming Messages from the IMBean
In the last step, Step number 5, we need to handle the incoming messages from the IMBean. The IMBean supports two models of message handling – event handling and polling. Depending on your application, you can use either method. We will be using the event handling approach.Note: If you are using the polling model, you can check to see if an incoming message is available at any time by calling IMBean's getAvailableMessages() method. If messages are available, they can be retrieved one at a time using the getChatMessage() method.
To add a listener to the IMBean's MessageReceived event, we can use the IDE by highlighting the IMBean component in the component hierarchy display, and selecting the "event" tab in the property sheets. We will call this event handler "messageHandler". The code generated by the IDE includes the event subscription code, shown below.
try {
	chatBean1.addMessageListener(new
		org.jxta.ezel.beans.imbean.
		MessageListener() {
		public void messageReceived(
			org.jxta.ezel.beans.imbean.
			MessageReceivedEvent evt) {
				messageHandler(evt);
			}
		});
	} catch (java.util.
		TooManyListenersException e1) {
	e1.printStackTrace();
}
The IDE also generates a skeleton for the messageHandler() method. Here, we fill in the logic to retrieve the incoming message and update the messages displaying jTextArea.
private void messageHandler(
	MessageReceivedEvent evt) {
	curMsgs.append(evt.getSender() +
	CHAT_SEP + evt.getMessageText()
		+ CR);
	jTextArea1.setText(
		curMsgs.toString());
}
This completes the coding for the VWWM application. We can now compile the code and test the IM application.
Compiling and Running VSJChat
If you have followed along using your IDE, you can go ahead and build the application. Otherwise, the source distribution has a compile.bat file in the code/src directory that you can use for compilation.Note: The code has been tested against the June 8, 2003 JXTA 2 stable release JXTA_2_1_00 (latest available at the time of writing). You should have this JXTA 2 platform installed on your machine before building and testing the application.
Configuring a JXTA network for testing
The JXTA platform is designed to be highly generic and flexible, adaptable to a variety of networking topologies and application environments. This often makes it appear to require complex configuration.When you first run VSJChat, the JXTA GUI configurator will pop up and ask you for configuration parameters. After this initial configuration, the configured state is stored in a .jxta directory and future restarts will only prompt for a Secure User Name and Password.
For simple VSJChat testing, we will configure the test scenarios over a LAN.
Configuring VSJChat over a Private LAN
The JXTA configuration we will create is illustrated in Figure 3.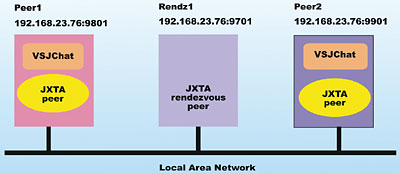
Figure 3: The JXTA chat configuration
We can see in the figure that we are pointing two edge peers (called peer1 and peer2) to a peer acting as a known rendezvous (called rendz1).
Note: JXTA uses a peer network of "rendezvous" machines to handle distributed communications. A JXTA peer starting up must connect to a rendezvous before starting message transmission. The JXTA platform offers discovery mechanisms to automatically locate a "rendezvous", we will not use them in this scenario to simplify the testing. Although we've set up a dedicated peer for rendezvous in this test configuration, it is not strictly necessary. Any peer can become a rendezvous at any time on the JXTA platform. In fact, under JXTA 2, a peer will become a rendezvous automatically if it fails to locate any available rendezvous after a configurable time period, we are avoiding this adaptive behavior to make our testing more predictable.
Assuming that you're simulating all 3 peers on the same machine during testing, the following are the different configurations that you will need for each peer. You can configure for three different machines by changing the IPs below. The hypothetical IP we will use for my single test machine is: 192.168.23.76.
First, create the rendezvous peer, which can be started using the runit.bat file under the code/test/rdvnode directory of the distribution. If you look into the runit.bat file, you will see that it actually starts the uk.co.vsj.jxta2.wwm.RunRDV class – the code in this class creates a JXTA group, and runs it as the group's rendezvous. For this peer, enter the configuration shown in the table below when prompted by the configurator:
Configuration for Peer : rendz1 |
||
| Configuration Page | Field | Value |
| Basic | Peer Name | rendz1 |
| Basic | Use proxy server | not checked |
| Advanced | Trace Level | user default |
| Advanced | TCP Enable | checked |
| Advanced | Multicast | not checked |
| Advanced | Manual | not checked, select IP of machine (i.e. 192.168.23.76 in my case), leave port at 9701 |
| Advanced | Enable Outgoing connections | checked |
| Advanced | Enable Incoming connections | checked |
| Advanced | Public address | enter your IP (i.e. 192.168.23.76 in my case), and port at 9701 |
| Advanced | HTTP Enable | not checked, and everything else in this section is left as-is |
| Rendezvous/Relays | Act as Rendezvous | checked, leave everything else on this page unchecked |
| Security | All | enter a user name and password and remember them, you will need them every time JXTA starts |
You can start the first peer, called peer1, by running the runit.bat file (customized first) in the code/test/peer1 subdirectory. Use the configuration shown below:
Configuration for Peer : peer1 |
||
| Configuration Page | Field | Value |
| basic | Peer Name | peer1 |
| basic | Use proxy server | not checked |
| advanced | Trace Level | user default |
| advanced | TCP Enable | checked |
| advanced | Multicast | not checked |
| advanced | Manual | not checked, select IP of machine (i.e. 192.168.23.76 in my case), use port at 9801 |
| advanced | Enable Outgoing connections | checked |
| advanced | Enable Incoming connections | checked |
| advanced | Public address | enter your IP (i.e. 192.168.23.76 in my case), and port at 9801 |
| advanced | HTTP Enable | not checked, and everything else in this section is left as-is |
| Rendezvous/Relays | Act as Rendezvous | not checked |
| Rendezvous/Relays | Available TCP Rendezvous | enter the IP 192.168.23.76, and port 9701, this points to the rendz1 node that we've setup to be a rendezvous |
| Security | All | enter a user name and password and remember them, you will need them every time JXTA starts |
To configure peer2, use the same setting as peer1 except the change identified in the table below. This peer can be started via the runit.bat file in the code/test/peer2 directory.
Configuration for Peer : peer2 |
||
| Configuration Page | Field | Value |
| basic | Peer Name | peer2 |
| advanced | Manual | not checked, select IP of machine (i.e. 192.168.23.76 in my case), use port at 9901 |
| advanced | Public address | enter your IP (i.e. 192.168.23.76 in my case), and port at 9901 |
If you started the peers in the order above, you should now have peer1 and peer2 running VSJChat. Try typing in some messages, you should see something similar to Figure 4.
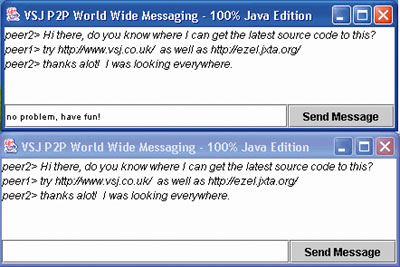
Figure 4: VSJ Chat in action
If you like, you can start additional instances of new peers running VSJChat.
Note: To run VSJChat over the Internet see the release notes in the README.TXT in the code/test directory, included with code distribution, which has tips for configuring the application for the public JXTA network.
VSJChat is built using IMBean. IMBean is one of the application-specific JavaBeans available as part of EZEL. IMBean is built on JAL (the Java Abstraction Layer). Let us take a brief look at how these pieces fit together.
EZEL architecture
Figure 5 illustrates how application-specific JavaBeans, such as the IMBean, relates to Project EZEL, JAL and the JXTA platform.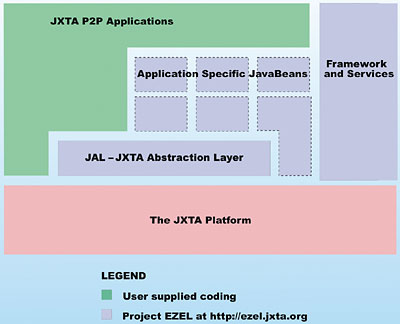
Figure 5: Beans EZEL, JAL and JXTA
It shows that IMBean is an application specific JavaBean in the EZEL library. It relies on JAL to facilitate its design and to buffers itself against JXTA API changes, and uses the raw JXTA 2 platform only as necessary to get the work done.
Also in the figure, we can see that JAL provides an effective insulation between applications, the JavaBeans, and the harsher programming environment of the raw JXTA platfom. JAL provides a significantly simpler programming model.
Both JAL and the application-specific JavaBeans collaborate with EZEL's framework and services to form EZEL proper – an easy-to-use entry library for JXTA developers.
For maximum flexibility of design and programming, the JXTA 2 platform API remains available to the application developers as well as bean implementers – juxtaposed with EZEL.
JAL programming model
The IMBean that we used is almost completely coded using JAL. You can browse the simple source code of IMBean at ezel.jxta.org. JAL simplifies JXTA programming by hiding the JXTA specific objects such as pipes and advertisements from the developer. Instead, it abstracts the common elements that are often found in other P2P system.The programming model is quite simple, and consists of the following steps:
- Boot the peer
- Find out what other peers are available
- Start sending messages to other peers
The main programming interface for JAL is the net.pkg.jal.Peer interface. This interface specifies the methods that all Peer implementations must provide. JAL itself provides an implementation of a peer called EZMinimalPeer. Here is the definition of the Peer interface:
public interface Peer {
// start up
	public void boot(String name)
		throws Exception;
	public void boot(String name,
		String group) throws Exception;
// announce availability
	public void publish()
		throws Exception;
// peers information
	public String getName();
	public String[] getPeers()
		throws Exception;
// send and receive messages
	public boolean sendMessage(
		String name, Message msg)
		throws Exception;
	public boolean broadcast(
		Message msg) throws Exception;
	public Message receiveMessage()
		throws Exception;
// message handling
	public Message newMessage();
	public void pushObject(Message msg,
		String tag, Object obj)
			throws Exception;
	public Object popObject(
		Message msg, String tag)
		throws Exception;
// group handling
	public void createGroup(
		String name) throws Exception;
	public void joinGroup(String name)
		throws Exception;
	public String[] getGroups()
		throws Exception;
	public void createAndOrJoinGroup(
		String name) throws Exception;
	public void leaveGroup(String name)
		throws Exception;
// information utility
	public boolean
		searchGroupWithName(
		String name) throws Exception;
	public boolean
		searchPeerWithName(String name)
		throws Exception;
	public void displayPeers()
		throws Exception;
	public void displayGroups()
		throws Exception;
	public void displayServices()
		throws Exception;
	public String getPeerStatistics();
}
Complete P2P applications can be created simply using the methods in this interface. The group handling methods are optionally used, because by definition all JXTA peers boot into a default group called netpeergroup. The displayXXX() information utility methods print directly to the console, and are typically used in debugging and diagnosing problems. The message handling methods enable you to attach any serialisable Java object to the message and send the message. The attached object(s) are tagged with a String name, and can be easily retrieved at the receiver end.
Conclusions – IMBean is much more than just IM
Using the IMBean from Project EZEL, we have seen how to easily create a P2P instant messaging application using an IDE. While the exercise is certainly interesting on its own, readers are urged to ponder its greater implications.There is nothing in IMBean's API interface that restricts it to GUI-based chat applications. In fact, stepping back a little, you can easily think of hundreds of other uses for IMBean's features that do not involve chatting or a GUI. Consider a "lowest airfare spotting system" that enables flyers worldwide to report and share their instantaneous sightings on the various web-booking systems. Or a spontaneous buy-and-sell network of people offering and bidding for goods or services? The possibilities are limitless. Consider also that, starting with JXTA 2, the platform is scalable to literally thousands of users joining and leaving the "group" in an ad-hoc manner. They can all be using your P2P application, without the need for a single centralized server!
With EZEL, IMBean and JAL shielding the complexity and continual evolution of the JXTA platform, developers can now focus on the design of their P2P applications without bothering with complex low-level API details. Yet, all of the new features and enhancements of the new platform releases are immediately available to the application.
Sing Li is a consultant, trainer and freelance writer specialising in Java, Windows NT and distributed object technologies. His most recent publication is Early Adopter JXTA: Peer-to-Peer Computing with Java from Wrox Press.
Comments