Office and XML are no strangers to each other. In fact XML integration has been a feature of Office since Office XP. Innovations in Office 2003 allowed you to save your documents as XML and even associate a custom XML schema with your document. The 2007 Microsoft Office system takes things a whole lot further; XML is really at the heart of this release. Do not fear though, backward compatibility is enabled through the “Microsoft Office Compatibility Pack for Word, Excel and PowerPoint 2007 File Formats”. This free download allows users of Microsoft Office 2000, Office XP, or Office 2003 to open, edit, and save files using the Open XML File Format.
In this article we take a look at the fundamentals of the Open XML File Format and explore some key scenarios where building a solution around the new file format makes your life a breeze.
Open XML Architecture
Every Office Open XML format file is a collection of discrete document parts, connected via relationships and packaged together in a ZIP container as specified by the Open Packaging Conventions (OPC) described in Part 2 of the ECMA standard.Most parts are XML documents conforming to a specific reference schema. For native binary content types (e.g. a JPEG or WMA file) it doesn’t make sense to convert to XML, so these parts are stored in their native format. It is also possible to store your own custom XML parts (you don’t even have to specify a schema). Thus content, resources and metadata exist as discrete, addressable document parts within a single container document.
Let’s clarify a little terminology:
- A “Package” is the main ZIP container that hosts all the document parts.
- “Part” is a generic term for items stored within the container, be they resources, content or metatdata, XML or binary. Within a package, parts are organized into folders.
- “Relationship”: Rather than relying on the physical layout of parts within the package, relationships are used to impose structure. Relationships connect packages to parts and individual parts to other parts. The entire package can be navigated by starting at the “root” (package) level, and traversing relationships to arrive at the part you require.
- /[Content_Types].xml – lists the content type of every part in the package
- /_rels/.rels – specifies top-level relationships between package and parts
Let’s try and make all this a little more concrete. If you have Word 2007 available (if you don’t, you can download a free trial), create a new blank Word document. Enter your name on the page, save the file to a convenient location and close Word. The first thing you’ll notice is the new file extension, .docx. Open XML File Format documents have an x appended on the file extension. “Macro enabled” Office Open XML File Format documents have an “m” (for macros) appended to the file extension. Macros will not execute in documents without the “m” extension. View a more comprehensive list of Office Open XML extensions.
Change the file extension of your new Word document to .zip and double click the file to open in Windows Explorer. You should see something that looks like Figure 1.
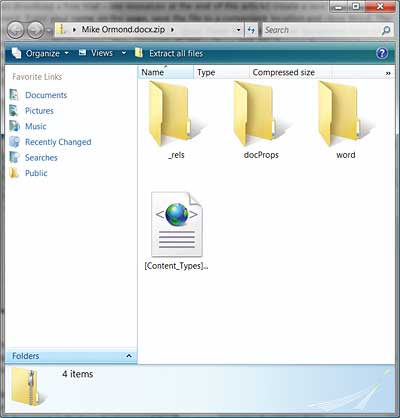
Figure 1: Opening .docx as .zip
Navigate to the .rels file in the _rels folder – this contains the top-level package relationships – and open the file. Notice that this is an XML file with a <Relationships> element containing a number of <Relationship> child elements. One (and only one) of these will be of type “…/officeDocument”. This is the relationship for the main document part and the Target URI will be “word/document.xml”. If we follow this path and open the word folder, you will find document.xml and also a sub-folder called _rels. At each level in the folder hierarchy, the _rels folder contains the relationship parts for document parts at that level. So, for example, in the word/_rels folder you will find a part called document.xml.rels which contains all the relationships from document.xml to other document parts.
We could carry on exploring Open XML File Format documents with Windows Explorer, but a better tool for this purpose is the Open XML Package Explorer (Figure 2).

Figure 2: The Package Explorer
Open an Open XML File Format document in Package Explorer and the Document Inspector TreeView shows you a relationship-centric view of the document parts (you can also switch on display of relationship IDs and folder names). You can open XML parts in the XML editor, inspect properties and even validate documents.
Package Explorer is a useful tool for inspecting and modifying Open XML File Format documents interactively, but what about tools for coding Open XML File Format solutions? System.IO.Packaging and System.Xml are about to become your new best friends.
System.IO.Packaging is a collection of classes that support the storage of multiple objects in a single container. Specifically, it provides classes to work with Office Open XML files and their components. So, for example, there are Package, PackagePart and PackageRelationship classes mapping to the package, part and relationship entities described previously. These classes allow you to open an Office Open XML document, navigate through its relationships, get document parts, modify them delete them, save them etc.
Scenarios
The Office Open XML File Formats open up a wealth of new and exciting possibilities. I’ve selected just three key scenarios that are extremely difficult if not impossible to achieve with binary format documents. They become achievable and sometimes trivial with the transparency provided through the Office Open XML format. In each of the requirements I’ve assumed that we’re talking about some form of bulk processing (typically on the server) or at least processing which, for some good reason, is being carried out without the relevant Office client application. For each of the following examples, I’ve added a reference to the WindowsBase assembly (this is where System.IO.Packaging lives) and added the relevant using statements.Server Document Generation
Requirement: Generation of Microsoft Office documents from custom dataExample: The order processing process for my company requires the bulk generation of customer invoices using data pulled from back end systems.
In Office 2003 it was certainly possible to generate Office documents on the server by creating XML documents conforming to the relevant reference schema (WordprocessingML, SpreadsheetML). However, this is somewhat cumbersome, and it’s not possible to represent all types of document content in XML (e.g. an Excel chart).
Office Open XML File format documents, on the other hand, are full fidelity. Anything you can do in the Office client application can be represented. In addition, Word 2007 introduces a very powerful and convenient mechanism for document generation; content controls. As well as being a document structuring feature, content controls also support the notion of data/view separation by providing the capability to databind to our custom XML.
We know you can store your own custom XML parts within any Office Open XML document (a feature known as the custom XML store). Content controls can be databound to elements in the custom XML store via Xpath binding expressions. This separates data from presentation and makes it simple to modify document content by switching out a custom XML part for a different one. The pattern then, is to create a template document in Word, including the static content, structure, formatting and content controls that represent the final document. Binding expressions on the content controls are then set up, mapping to nodes in a custom XML part we’ve inserted in the custom XML store (the Word 2007 Content Control Toolkit is a good tool for this). Each time we want to create a new document, we simply take a copy of the template and replace the custom XML part with a new one containing the data we require. When this document is opened, the content controls bind to our data creating a new document.
Let’s take the example of generating invoices. An invoice may require the following data:
<Invoice>
	<Customer>
		<CustomerCompanyName>
			</CustomerCompanyName>
		<CustomerName></CustomerName>
		<Address>
			<Street></Street>
			<Town></Town>
			<City></City>
			<County></County>
			<Postcode></Postcode>
		</Address>
	</Customer>
	<Order>
		<OrderID></OrderID>
		<PurchaseDate></PurchaseDate>
		<Product></Product>
		<Quantity></Quantity>
	</Order>
</Invoice>
I create an “Invoice” XML document such as the above and insert it into the custom XML store (this can be done manually, through the Word Object Model, or using the Word 2007 Content Control Toolkit). Having laid out the content controls in my document, I bind these to the XML elements using XPath expressions. Again I can do this manually, or using the Word Object Model, but by far the easiest way is the Content Control Toolkit which has drag and drop support for mapping content controls to elements in your custom XML part.
Having created our template, we can go ahead and generate some invoices. Our server code will look something like this:
1. Extract the invoice data and generate the “Invoice” XML document:
private XmlDocument
	GenerateInvoiceXml()
{
	using (SqlConnection con =
		new SqlConnection(…))
	{
		//Code here would extract
		//invoice data as XML Document
	}
	return xDoc;
}
2. Copy the template file to a new file with a unique filename:
private string
	GenerateTemplateDocument(string
	UniqueIdString)
{
	//Code here would create new
	//“template” file with unique
	//filename
	//Left out for brevity as it’s just
	//a generic file copy
	return newFileName;
}
3. Using the System.IO.Packaging Package class, open the new file we’ve just created:
using (Package myPackage =
Package.Open(fileName, FileMode.Open,
	FileAccess.ReadWrite))
4. Navigate to the main document part by iterating over relationships of type:
http://schemas.openxmlformats.org/
	officeDocument/2006/
	relationships/officeDocument
I’ve set up a constant for this (docRelationshipType):
foreach (PackageRelationship docRel in
	myPackage.GetRelationshipsByType(
		docRelationshipType))
{
	Uri documentUri =
		PackUriHelper.ResolvePartUri(
		new Uri(“/”, UriKind.Relative),
		docRel.TargetUri);
	PackagePart documentPart =
		myPackage.GetPart(documentUri);
Note there will only be one relationship of this type in a valid document, so we can break out of this foreach after the first iteration.
5. Navigate to our custom XML part using a similar pattern to the above but this time we’re looking for a relationship of type (“…/customXml”):
foreach (PackageRelationship cusRel in
documentPart.GetRelationshipsByType(
	xmlRelationshipType))
{
	Uri customXmlUri =
		PackUriHelper.ResolvePartUri(
		new Uri(“/”, UriKind.Relative),
		cusRel.TargetUri);
6. Replace the existing custom XML part with a new part populated with the data we generated in step 1. Delete the existing part and create a new one with the same URI. Save our XML document into this part. We also need to recreate one relationship from the custom XML part to its properties part:
myPackage.DeletePart(customXmlUri);
PackagePart customXmlPart =
		myPackage.CreatePart(
			customXmlUri,
			“application/xml”);
xDoc.Save(customXmlPart.GetStream());
Uri uriDataRelProps = new Uri(
		“itemProps1.xml”,
			UriKind.Relative);
customXmlPart.CreateRelationship(
		uriDataRelProps,
		TargetMode.Internal,
		strCustomXMLPropsRel);
This is one possible approach. Another would be to start with a template without a custom XML part and create the part, relationships etc from scratch.
7. Close the package and we now have a new document that when opened displays our invoice data.
Using this technique it is very easy to generate complex Word documents, dynamically bound to custom data using the data/view separation capabilities of content controls and Office Open XML’s custom XML store.
Content Inspection & Removal
Requirement: The ability to scan the contents of a collection of Microsoft Office documents to check for the presence of, and potentially remove, specified entities (e.g. user comments, custom code, etc).Example: PowerPoint documents are uploaded to our SharePoint server for publication. As each document is uploaded, it should be checked for the presence of slide comments. If comments are found, they should be removed before publication.
A common business requirement is the need to inspect documents and potentially remove certain types of content prior to publication or archiving. In fact, the latest versions of Word, PowerPoint and Excel have built-in functionality to do just that; the Document Inspector. The transparency provided by the Open XML File Format also makes it straightforward to inspect and remove document content without the need for the relevant client application.
In this example, we want to write some code to inspect PowerPoint documents, checking for slide notes and removing them prior to the document being uploaded to our SharePoint repository. We could perhaps hook this through an event in SharePoint Server or use the built-in workflow capabilities to execute our inspection code – the important part is the code we’re going to execute.
In this case the pattern is to open the PowerPoint document package and find the main document part (typically this will be ppt/presentation.xml but we will use the standard, and correct technique of navigating the package relationships to find it). From there we iterate through the individual slides checking if each has an associated notes part. If it does, we delete the relationship and the notes part before moving on to the next slide.
1. Open the package and get the main document part:
using (Package pptPackage =
Package.Open(fileName, FileMode.Open,
		FileAccess.ReadWrite))
{
	foreach (PackageRelationship
		documentRelation in
	pptPackage.GetRelationshipsByType(
				docRelationshipType))
	{
		Uri documentUri =
		PackUriHelper.ResolvePartUri(
		new Uri(“/”, UriKind.Relative),
			documentRelation.TargetUri);
		PackagePart documentPart =
			pptPackage.GetPart(
			documentUri);
2. Iterate through the collection of slides:
foreach (PackageRelationship
	slideRelation in
documentPart.GetRelationshipsByType(
			slideRelationshipType))
{
	Uri slideUri =
		PackUriHelper.ResolvePartUri(
		documentPart.Uri,
		slideRelation.TargetUri);
	PackagePart slidePart =
		pptPackage.GetPart(slideUri);
3. For each slide, get the related notes, delete the relationship and the notes part itself:
foreach (PackageRelationship
	notesRelation in
	slidePart.GetRelationshipsByType(
			notesRelationshipType))
{
	Uri notesUri =
		PackUriHelper.ResolvePartUri(
		slidePart.Uri,
		notesRelation.TargetUri);
	slidePart.DeleteRelationship(
		notesRelation.Id);
	pptPackage.DeletePart(notesUri);
	break;
}
4. Close the package and we have a modified version of the PowerPoint document with all slide notes removed.
Document Profiling
Requirement: The ability to associate user-defined metadata with documents and easily extract that data as part of document processing.Example: As part of our document workflow, metadata about the author, contract, customer etc. is captured. When the document is stored in our document repository, the metadata is recorded for the purposes of tagging & indexing.
Often it is desirable to extract document metadata at key stages in a workflow. Perhaps we need to extract the data to be used by the workflow itself (e.g. to enforce a records management policy), or perhaps we want to use the data for search and indexing purposes. Either way, we want to be able to bulk process documents and extract custom properties.
These properties may be core, extended, custom or SharePoint properties, or even a custom XML part we’ve inserted for the purposes of storing our own metadata. It’s quite likely they could be a combination of these different types of metadata. To keep things simple, I’m going to assume we’ve stored out metadata as custom properties in an Excel document. You can access / create custom properties from the Document Information Panel. Select “Advanced Properties” and click on the “Custom” tab (see Figure 3).
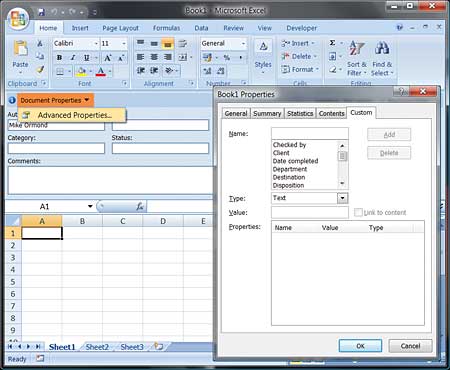
Figure 3: Custom properties
1. Open the package and get the custom properties part. This time we iterate over relationships of type “…/custom-properties” as this is a top-level relationship (and there will be only one of them in a valid document):
using (Package exPackage =
	Package.Open(docName,
	FileMode.Open,
		FileAccess.ReadWrite))
{
	foreach (PackageRelationship
		cpRelation in
	 exPackage.GetRelationshipsByType(
	customPropertiesRelationshipType))
	{
		Uri documentUri =
		PackUriHelper.ResolvePartUri(
		new Uri(“/”, UriKind.Relative),
			cpRelation.TargetUri);
		PackagePart cpPart =
		exPackage.GetPart(documentUri);
2. If there is a custom properties part in the document, set up the relevant namespaces and load the custom properties part into an XML document:
if (cpPart != null)
{
NameTable nt = new NameTable();
XmlNamespaceManager nsManager =
	new XmlNamespaceManager(nt);
nsManager.AddNamespace(“d”,
	customPropertiesSchema);
nsManager.AddNamespace(“vt”,
	customVTypesSchema);
XmlDocument xdoc =
	new XmlDocument(nt);
xdoc.Load(cpPart.GetStream());
3. Iterate through the list of properties we want to fetch (requiredProps) and extract its value from the XML document. Add to a Dictionary of property name / value pairs:
foreach (string propName in
	requiredProps)
{
	string searchString =string.Format(
“d:Properties/d:property[@name=’{0}’]”,
		propName);
	XmlNode xNode =
		xdoc.SelectSingleNode(
		searchString, nsManager);
	if ((xNode != null))
		propDictionary.Add(propName,
			xNode.InnerText);
}
4. At the end of this we have a Dictionary object with our property name / value pairs to do with what we will.
Conclusion
These three examples demonstrate the power of the Office Open XML File Format in tackling a whole swathe of typical document management challenges. And there are many others that spring to mind: document assembly, user interface customization, corporate re-branding, etc.I’d encourage you to take a look at the 2007 Microsoft Office system, take a look at the Office Open XML File Formats in particular, and keep an eye out for situations where they may make your life much easier than it has been in the past.
Mike Ormond is a Developer Evangelist at Microsoft who focuses on web technologies and Office development. You can read his thoughts on his blog at http://blogs.msdn.com/mikeormond or send him your thoughts at [email protected].
Comments