This article examines the web application development automation facilities provided by NetBeans. We will demonstrate how these features can save significant time and tedium over the manual way of doing things. More specifically, we will see how the NetBeans IDE:
- intrinsically recognises and understands deployable application units
- manages development of large web applications with ease
- assists in creation and testing of JSPs and Servlets
- makes web application deployment and testing a one-click operation
- automates the maintenance of application context descriptor
- facilitate the creation of the deployment descriptor (web.xml)
- provides direct access to RDBMS data via JDBC
- utilises protocol analysis tool for debugging requests and responses
- understands XML and provides vital validation and checking facilities
- optionally maintains and validates strut configuration files
Integrated Support for Web Application Development
Many IDEs grew up in an age when everyone was developing fat-client standalone applications on PCs. These IDEs excelled in specific tasks that make an application developer's life easy, including rich drag-and-drop support for building GUIs, automatic code generation and maintenance for application logic, visual local data access design, etc.In this Internet age when most application development is now done for scalable web-based applications, developer demands for the supporting features of an IDE have changed greatly. NetBeans grew up during the Internet age, and necessarily provides a rich set of automated capabilities that can facilitate the rapid development of web applications.
Before we can examine each of the capabilities, it is important to understand NetBeans' operation model for the coding, testing, and debugging of web-based applications.
NetBeans Web application development model
The following list of activities comprise the iterative development cycle for web applications:- Creation of JSPs and Servlets (or Java code), and other web resources (static pages, images, etc.) that make up the web application.
- Creation of deployment descriptor (web.xml) for the application, specifying deployment requirement and external resources.
- Preparation of the application for deployment, typically archiving the application in a WAR file.
- Deployment of the application on a test server.
- Testing the application using a browser.
- Correction of any problems and repeat from step 3.

Figure 1: Directory organisation for web applications
The deployable unit, from the <application root> down, in Figure 1 is called a web module in NetBeans.
Another important way that NetBeans speeds up the development cycle is by having a default, built-in, always available Tomcat server for test deployment. The use of this server for testing requires almost no setup, saving developer time. In addition, deployment (and forced redeployment) of web module(s) to this server instance is completely automated, requiring only a single click on the IDE. This again saves significant developer time, and avoid tedious and error prone manual setup/deployment.
To appreciate these time-saving features, we need to work with a real web application.
Working with a non-trivial example
The web application example we are using comes from a 2002 VSJ article on the struts framework. This web application implements the VSJ Service Center, and consists of 11 Java code files, and 6 JSP pages. It makes use of the Struts 1.0 controller servlet and depends extensively on the Struts JSP tag libraries. It also updates an external database via JDBC, in this case the Microsoft Access database. This application is large enough for us to get a good feel of how to use NetBeans for non-trivial web applications.The project is bundled as vsjservice.jar in the code distribution. Unarchive it into your local drive. We'll assume that the directory is called c:\vsjservice in the following exploration.
This article assumes that you are familiar with the basic operations of the NetBeans IDE. If you are new to NetBeans, you can find a comprehensive introduction on its basic usage in the December 2003/January 2004 VSJ article "Unleashing NetBeans".
Let's begin. Start the NetBeans IDE, and mount the c:\vsjservice directory in the FileSystem explorer. This can be done by right click on the FileSystem node, select Mount, select Local Directory, and then browse to select the c:\vsjservice directory.
Immediately, you will see that NetBeans recognises this as a web module (from the directory structure of the application, as well as the existence of the web.xml file) and mounts it accordingly. The resulting FileSystem explorer after the mount is illustrated in Figure 2.
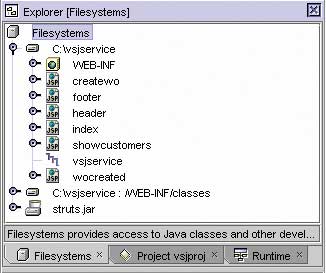
Figure 2: The project files
Since the web application coding depends on the Java classes under WEB-INF/classes, as well as any JAR files in the WEB-INF/lib directory, they need to be mounted on separate mount points in NetBeans. The NetBeans IDE recognises this dependency for a web module, and automatically creates the extra mounts for us:
- c:\vsjservice : /WEB-INF/classes
- struts.jar
Creating a Web Module from Scratch
In our example, the web application already exists and NetBeans automatically recognises it as a web module. If you're creating a web module from scratch, you can proceed in one of two ways:- Create the directory structure of a web module, together with a skeletal WEB-INF/web.xml file before mounting the directory in NetBeans.
- Tell NetBeans explicitly that your mounted directory is a web module and let NetBeans create the directory hierarchy and skeletal web.xml for you.
To tell NetBeans that a newly mounted directory is a web module, right click on the mounted directory in the Filesystems Explorer and select: New->All Templates… In the new wizard, expand the JSP & Servlets node and select Web Module, then click the Next button.
The new wizard then prompts for the target directory, make sure it is your newly mounted directory and click the Finish button. The Filesystem explorer will immediately reflect the additional mount point for the web module. If you use your operating system to view the directory, you will see that NetBeans has created the WEB-INF directory, the WEB-INF/classes directory, the WEB-INF/lib directory, and a default web.xml deployment descriptor for your web module. (See "Working with a Web Module Group".)
Associating a context path with the web application
After you've created a web module, either from scratch or by mounting an existing web application, you need to associate the root of the module with a context path before deployment. For example, we want the following URL to lead to our VSJ Service Center application:
http://localhost:8081/vsjservice/This means that we need to set our root context path to "/vsjservice". Note that the default internal Tomcat server is by default listening at port 8081 for requests. This port is typically free on most Win32 machines, even when another external Tomcat server is running at its own default port of 8080.
To set the root context path, first highlight the WEB-INF node in the vsjservice Web Module. Look for the property tab (typically below the Filesystems explorer on the default layout), and type in "/vsjservice" for the Context Root property. Figure 3 illustrates the entry of this Context Root property.
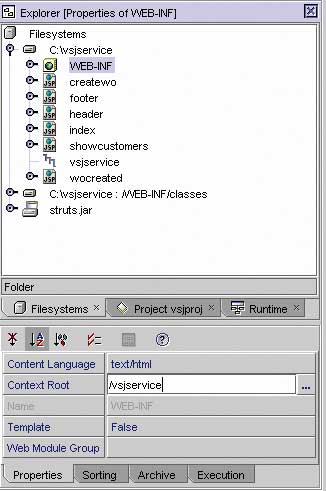
Figure 3: Context Root property
Adding JSP and Servlets to a Web Module
Our vsjservice application already includes all the required JSPs, Java code, and servlets. To work with any of the source files, use the Filesystem explorer to select the name of the class you want to work with, then double click on the element that you want to modify (for example, a single method of a Java class).You can enjoy all the basic Java development features of NetBeans while working with the source files (syntax highlighting, auto-completion, auto code format, etc). Any JSP files that you edit will also be syntax highlighted by NetBeans, helping you to catch syntax errors during code entry.
To add a new JSP page, right click on the directory where you want it added (try this with the WEB-INF node), select New -> All Templates… . In the new wizard, expand JSPs & Servlets and select JSP. The wizard then prompts for the name of the JSP. For our case, enter in "dummy", and click Finish. This will create a new JSP called dummy.jsp under the WEB-INF directory. It will also open the skeletal dummy.jsp in the editor pane for you to enter your own JSP code.
To add a new Servlet, do the same as detailed above, except select Servlet instead of JSP in the new wizard. In our case, expand the com node under WEB-INF/classes directory. Keep expanding until you are at the com->vsj->struct directory. Highlight the struct directory and create a new servlet called "Dummy" there. After prompting for the name of the servlet, you will be greeted with a dialog as in Figure 4.
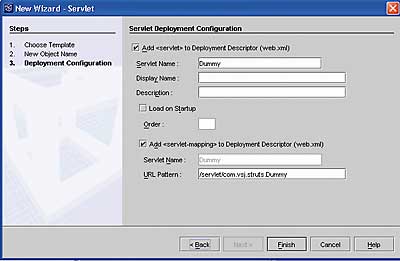
Figure 4: The New Wizard used to add a new Servlet
The information from the top half of this dialog is used in creating a <servlet> definition in the web.xml file, the bottom half in creating a <servlet-mapping> element in the web.xml file. You can use this wizard to generate what you need, or hand edit the web.xml file yourself to do the same thing. Finally, click the Finish button.
At this point, a skeletal Java source file for the servlet is created and opened for editing. You can then modify it to add your own application logic.
Editing the deployment descriptor
It is possible to edit the deployment descriptor at any time. Just expand the WEB-INF directory, and double click on the web node. This will create a new editing window with the web.xml file in it.NetBeans knows about the structure of XML files and will syntax highlight all XML files during editing (including web.xml). While modifying the web.xml file in NetBeans, you can also use the Check XML and Validate XML features. Just right click anywhere within the web.xml edit window, and select the option. Check XML will ensure that the document is well formed, or it will point out any detected problem. Validate XML will actually validate the XML content against the document's DTD or schema, catching any non-conforming elements in the descriptor and providing useful hints in correcting the problem. These features come in very handy when working with XML documents that have a DTD.
Handling JSP tag libraries
NetBeans knows about JSP tags and JSP tag libraries, and can provide a view into these objects. For JSP tag libraries, such as those provided by Struts, NetBeans can be used to explore all the tags within a library. For each tag, NetBeans can access all its attributes and scripting variables. Figure 5 shows a drill-down on one of the Struts JSP tag libraries, called struts-html.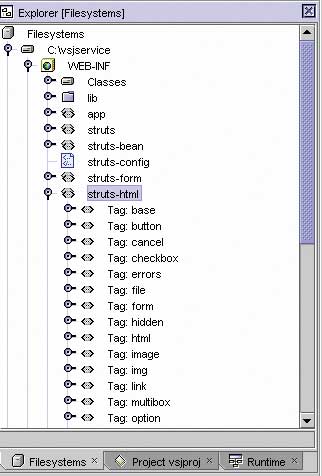
Figure 5: Struts tags display
In Figure 5, note the icon used for a JSP tag library and individual JSP tag. NetBeans typically use object specific icon for objects that it recognises.
NetBeans also provides support for creating JSP tags, and assembling JSP tag libraries but these topics are beyond the scope of this article. Please see NetBeans' documentation if you need to perform these tasks.
To compile the entire web application, you can highlight the WEB-INF node, right click and select Compile All. This will compile any recently updated Java source files and servlets. During development, you can also compile individual JSP to ensure that they are syntactically valid.
Rapid development cycle with Tomcat
The NetBeans internal Tomcat server can be seen in the Runtime Explorer, shown in Figure 6.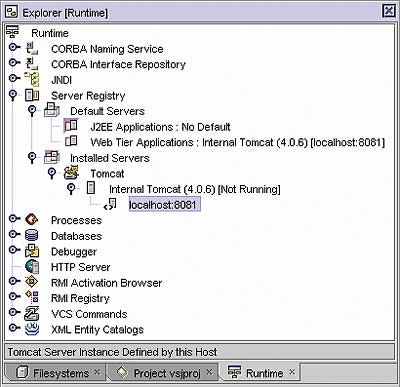
Figure 6: The internal server
When you expand the Server Registry node, you can see the default server for the Web Tier Applications is the internal Tomcat server. It is a Tomcat 4.0.6 instance (for NetBeans 3.5), and runs at port 8081. Note that the same server appears under the Installed Servers node. At this node, you can also see all the web modules that are deployed (nothing yet in our case). To remove an installed application, simply right click on it and select Delete.
The internal Tomcat server is typically activated only when you deploy a web module. This is why the Runtime Explorer indicates that it is [Not Running] at this time.
To deploy the web module, all we need to do is to highlight the WEB-INF node, right click and select Deploy. You should see a progress dialog similar to Figure 7.
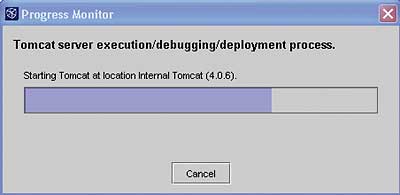
Figure 7: Waiting for deployment
At this point the web application is being deployed to the internal Tomcat server.
The VSJ Service Center application comes with a Microsoft Access database called vsjservice.mdb. You will need to configure it as an ODBC system datasource named VSJSERV. This will enable the application to access the data via the JDK's JdbcOdbc bridge. Once deployment completes, you can either start your own browser and test the application via the URL:
http://localhost:8081/vsjservice/…or once again highlight the WEB-INF node, right click, and select Execute. This will automatically start up the configured browser at the application's URL.
At this point, you can test out the web application and correct any problem that may be observed. Once bugs are fixed, you can simply deploy and execute again to test the revised web application. The ability to quickly complete a deploy-test-revise cycle takes the pain and tedium out of the development of web application.
If you now select the Runtime Explorer tab, you should see:
- The vsjservice web application being deployed at the /vsjservice context, on the internal Tomcat server.
- The processes node indicating that the internal Tomcat server is up and running.
Debugging with the HTTP monitor
From the main menu, select View->HTTP Monitor. This will start up the HTTP monitor debugging tool. The HTTP monitor is inserted between your browser and the Tomcat server, as shown in Figure 8.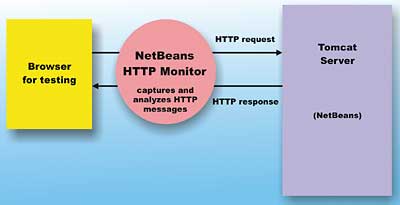
Figure 8: The HTTP monitor
This means that the HTTP Monitor can intercept and capture every single HTTP request and response message that passes between the browser and the Tomcat server. In addition, the HTTP monitor understands the structure of an HTTP request, a response, and that of servlet request/response. By capturing HTTP messages and analysing them, one can gain a valuable view into the operation of the web application not otherwise possible.
As an example, we can now add a workorder using the vsjservice application. After adding the workorder, check the HTTP monitor again. In the Current records folder, select the latest record (should be a POST operation). This is the request that was used to create the workorder. Click on the Session tab and you can see the session ID that is currently used; click on the Request tab and you can see the details of the POST request, including the parameters containing the work order information (see Figure 9).
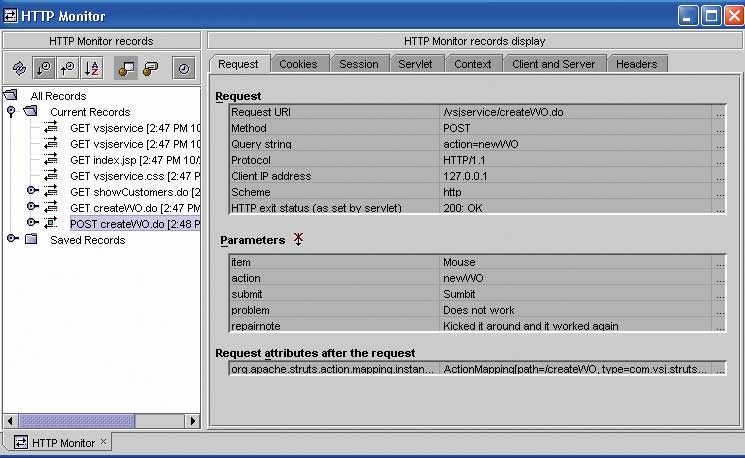
Figure 9: The HTTP monitor in action [Click to enlarge]
Browsing and editing RDBMS data and schemas
Most web applications are created to retrieve, modify, or collect data. And most of the time these data reside in an external relational database management system (RDBMS). JDBC can be used to access data of almost any commercial RDBMS. The web application developer typically has a wide variety of options in accessing JDBC data.NetBeans supports the viewing and manipulation of RDBMS data via JDBC. It is possible to view tables or query, add, modify or delete records all without leaving the NetBeans IDE and without writing a single line of code.
Using a JDBC connection and the JDBC-ODBC bridge driver, we will now set NetBeans up for viewing the data in the vsjservice.mdb file. First, go to the Runtime Explorer pane, and expand Databases node, and then expand the Drivers node. Highlight the JDBC-ODBC Bridge driver, right click, and select Connect using… . Fill in the dialog's Database URL entry with "jdbc:odbc:vsjserv", and then click the OK button.
Looking back at the Runtime Explorer, under the Databases node, you should now see the connection to the access database as illustrated in Figure 10.
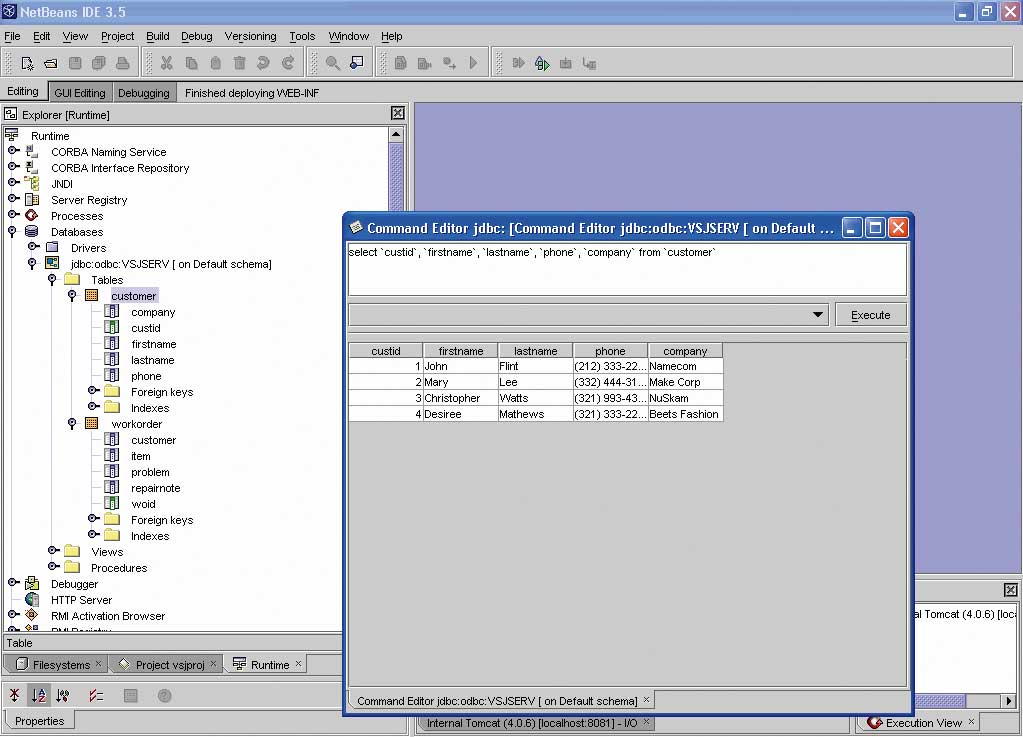
Figure 10: The database connection [Click to enlarge]
By right-clicking on the tables and column displayed, you can edit and modify the JDBC connected database.
Optional Strut Console module
Up to this point, all our discussions have centred around web application development features that are delivered standard with the NetBeans distribution. Since NetBeans is extensible and it is an open source project, there exists an active community of developers creating optional modules to support additional functionality. There are many different optional modules available for different development activities. One very useful addition for the struts developer is the Struts Console.The struts console adds the ability to recognise a strut 1.0 or 1.1 configuration file to NetBeans. To install this optional module, first unarchive the struts console distribution into a temporary directory. From the NetBeans main menu, select Tools -> Options. In the Options editor, select IDE Configuration -> System -> Modules. Right click with Modules highlighted, and select Add -> Module… . Browse to the struts-console.jar from the distribution and add it.
That's it, now if you go back to the vsjservice web module, and double click on the strut-config file, you will see that NetBeans knows about its structure and provides a customised editor for its content. Figure 11 illustrates the optional struts console module at work.
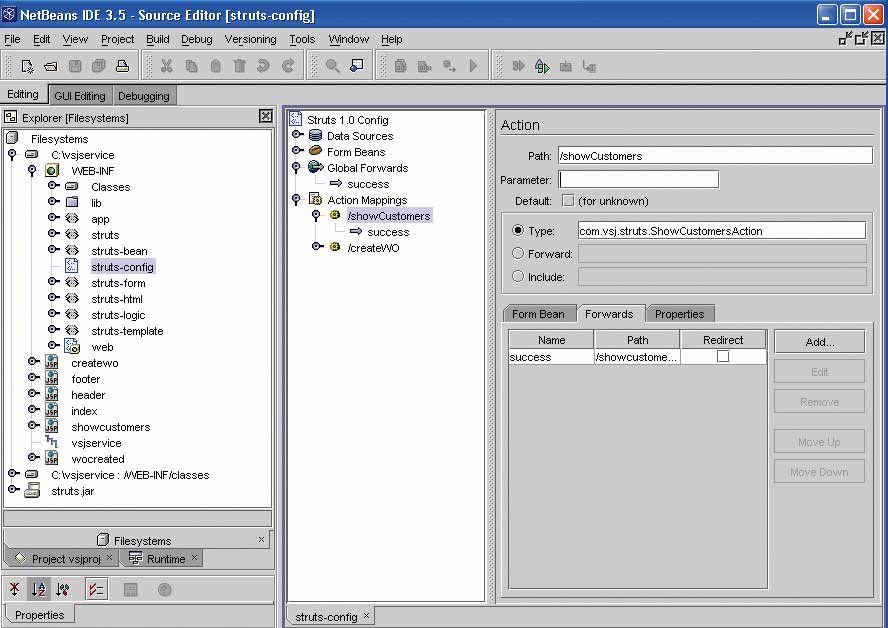
Figure 11: The Struts console module [Click to enlarge]
NetBeans' extensibility and open source nature will ensure the availability of many more useful optional modules from third parties in the future.
Conclusions
NetBeans's support for web application development makes creating web application as easy, and sometimes even easier, than creating standalone client applications.Deployment and unit testing are facilitated by the built-in Tomcat server. NetBean's web module and web module group concepts assist in the assembly and deployment of larger size web application. Automatic context creation, XML checking and validation tools ensure our configuration files are correct. The handy HTTP Monitor tool gives us an x-ray view into the requests and responses that are flying over the wire – and deciphers them to make our debugging life simpler.
If you're into web application or web services development and are still using command line editors or build tools, it may be a good time to give NetBeans a serious second look.
Sing Li is a consultant, system architect, open source software contributor, and freelance writer specialising in Java technology, embedded and distributed systems design. He has authored or co-authored several books on the topic, including Professional Apache Tomcat (Wrox), Professional JSP 2 (Apress), Early Adopter JXTA (Wrox), and Professional Jini (Wrox).
Working with a Web Module GroupA web module is a deployable unit associated with a context path. In some circumstances, you may need to deploy multiple web modules at once (for convenience, or due to interdependencies of web modules). You can use NetBeans' Web Module Group feature to accomplish this. Web Module Group alllows you to group multiple web modules for deployment. See NetBeans' documentation on how to create Web Module Group. |
Comments