Data flow through multiple tiers
The Google Web Toolkit gives Java developers an easy route to create interactive AJAX web applications. Using a specialized compiler to translate Java user interface code into JavaScript code, GWT allows developers to use the Java programming language for all parts of the application – from the user interface, through the business logic, down to the data access code. Figure 1 shows the typical architecture of a GWT based system.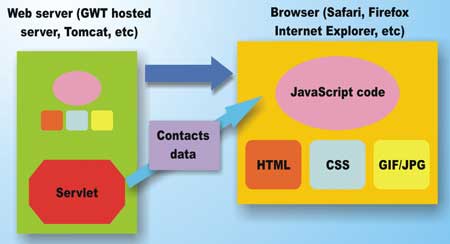
Figure 1: A GWT based client server system
The system depicted in Figure 1 is described fully in the November 2007 VSJ article, Simple RPC with GWT. It is a web application that displays a list of contacts. If you click on one of the contacts, more details pops up as a fly-in details panel. The topology here is a simple client server configuration. The client is a mobile device running a browser that is JavaScript enabled; the server is a Tomcat server. The GWT code, compiled into JavaScript, handles the user interface and uses GWT-RPC to make asynchronous call to a servlet running in the Tomcat server. The contact information is hard coded within the servlet, and transferred to the calling JavaScript client over the network. Finally, the user interface code displays the contact information as a graphical list on the mobile device. While this illustrates how GWT-RPC can be used to fetch data asynchronously over the Internet, it is not indicative of typical deployment. Figure 2 shows an extension of the architecture into a more realistic multiple tier one.
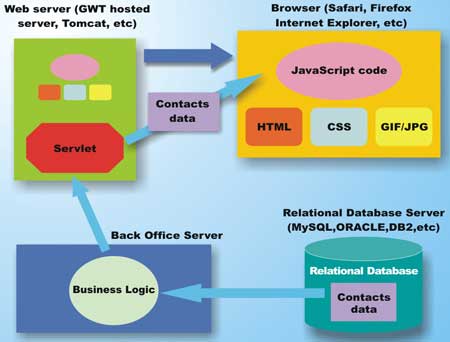
Figure 2: A typical multi-tiered server system
A More realistic deployment
The system depicted in Figure 2 has the following interesting properties:- a back-office server running a business logic component
- data is stored in a relational database in the back office
- the servlet in this case is just a front-end proxy that manages the mobile user interfaces (potentially multiple users) and retrieves data from the business logic tier
- for a larger system, you can increase the capacity of the system by independently adjusting the number of front-end servers, and/or the number of back office servers
- there is no direct access to the data source possible from the mobile client, it can only access the subset of data presented by the business logic component
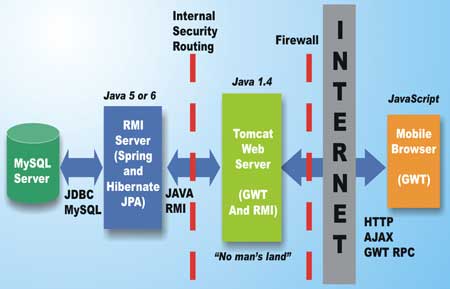
Figure 3: A typical corporate deployment of multi-tiered server system
Users have mobile devices running a browser supporting JavaScript and AJAX. These browsers talk to the Tomcat server over the Internet, using the HTTP protocol. The code that is executed on the browser is loaded over the Internet as part of a web page. The code is JavaScript code, compiled from Java source code using GWT. This code presents the user interface, and also fetches data asynchronously over the Internet, via the Tomcat server. Data fetch is performed through the network using the GWT RPC mechanism.
On the Tomcat server, the server portion of the GWT RPC mechanism executes. This code runs as a standard Java EE Servlet on the Tomcat server. This code is at JDK 1.4 level because GWT currently only supports JDK 1.4 level. When an HTTP request arrives for contact information, the servlet makes calls to the business logic server in the back office for the actual contact list. This is done via standard RMI. Java 5’s RMI backwards compatibility enables the JDK 1.4 servlet to communicate over the network with the business logic server (running on Java 5). Of course, it is also possible to use other remoting technologies to communicate between the web tier and the business logic tier – such as Web Services or CORBA. However, the use of RMI keeps the details of interfacing straightforward and keeps us focused on the integration activities.
The business logic server itself is hosted in a Java 5 (or Java 6) virtual machine. It acts as an RMI-based server that accepts network requests from the servlet. The components running on this server communicate directly with a Relational Database Management System (RDBMS). Here, the RDBMS is a MySQL server in the back office data tier. In a production scenario, the business logic may request data from multiple data sources and may also process or manipulate the data before sending it as a response to the servlet. One can easily visualize a Java 2 Enterprise Edition (J2EE) server here hosting Enterprise Java Bean components (EJBs). Instead, to keep things componentized, lightweight, and maintainable, the Spring 2 framework is used (see the November 2006 VSJ article, Wiring your way to a maintainable future, for more information on the Spring 2 framework. More specifically, this code uses Spring 2’s lightweight container, its support for RMI remoting, and persistence support through Java Persistence API (JPA). The business logic component accesses the MySQL server via JDBC. However, the JDBC code is generated by Object to Relational Mapping (ORM) using the Hibernate JPA component. The Spring 2 container can support any JPA component implementation, our decision to use the Hibernate implementation is an arbitrary one. In production, you may need to use Oracle, BEA, IBM, or another vendor’s JPA depending on the server that your back office data resides on. All of the code in this tier is written in Java, and takes advantage of the support for annotation and generics found in Java 5 and beyond.
Now that you understand the architecture of the system that we are going to build, it is time to download all the required software.
Downloading the components
It is assumed that you have GWT 1.4 (or later) installed and running. If not, you need to download GWT.There is no need to download Tomcat separately, as we will be using the embedded Tomcat that is included with the GWT distribution.
In addition, this article uses the Eclipse IDE to build and run the applications. The Europa edition of Eclipse (actually 3.3) is used for this article. Download the latest version of Eclipse, selecting the distribution for Java EE developer.
The Spring 2 Framework is used at the business logic layer. Download the latest revision of Spring 2 (make sure you download the distribution with all dependencies, it can save you time hunting for dependencies; Spring 2.0.7 is used in testing the code here).
The Hibernate JPA provider (consisting of Hibernate Annotation and Hibernate EntityManger) is included as a dependency of the Spring 2 download, and you do not have to download them separately. For more information on these components, see the Hibernate site.
The JavaAssist library is a dependency of the Hibernate provider, you can download the latest version (version 3.6 is used to test code in this article).
The relational database used here is MySQL. If you do not already have MySQL installed, download it.
The version used in this article is 5.0.27 of the Community Server. You will also need the JDBC driver, MySQL Connector/J. Version 5.1 of this driver is used in this article.
Of course, it is assumed that you have Java 6 installed and running. I used JDK 1.6 udpate 2; but any later version should work just fine.
Loading the projects into Eclipse
The source code distribution for this article includes two Eclipse projects:- GWTFlyer – the GWT GUI and the front-end servlet
- ContactServer – the backend data fetching servlet
Next, you need add a list of dependent JARs to the Build Path of the projects. Right click on the project name, then select Build Path –> Configure Build Path.
Click the Libraries tab, and then the button Add External JARs… to add the required JARs.
The dependent JARs that you need for the GWTFlyer project is tabulated in Table 1.
| Table 1: GWTFlyer dependent JARs | |
| JAR library | Origin of library |
| gwt-dev-windows.jar | GWT distribution |
| gwt-user.jar | GWT distribution |
The ContactServer project depends on Spring 2, Hibernate, and the MySQL driver. The dependent JARs, all from the Spring 2 distribution unless otherwise indicated, that you need to add for the ContactServer project are shown in Table 2.
| Table 2: ContactServer dependent JARs | |
| JAR library | Origin of library |
| spring.jar, spring-mock.jar | dist |
| commons-collections.jar commons-logging.jar |
lib\jakarta-commons |
| cglib-nodep-2.1_3.jar | lib\cglib |
| antlr-2.7.6.jar | lib\antlr |
| jta.jar | lib\j2ee |
| log4j.jar | lib\log4j |
| junit.jar | lib\junit |
| hibernate3.jar hibernate-entitymanager.jar hibernate-commons-annotations.jar hibernate-entitymanager.jar jboss-archive-browsing.jar |
lib\hibernate |
| persistence.jar | lib\jpa |
| jaxen-1.1-beta-7.jar, dom4j-1.6.1.jar | lib\dom4j |
| javaassist.jar | JavaAssist distribution |
| mysql-connector-java-5.1.5-bin.jar | MySQL Connector-J distribution |
The projects include three Eclipse launch configurations to ease the execution and testing of the code. These launch configurations are described in Table 3.
| Table 3: Launch configurations | |
| Configuration | Description |
| GWTFlyer | Located in the GWTFlyer.launch file. Runs the GWTShell class and the embedded Tomcat server. This is the standard GWT host mode of operation, starts the GWT application is a hosted browser. This configuration starts both the browser and the servlet. |
| RunService | Located in the RunService.launch file. This runs the class named ContactAccessService, which is a standalone RMI server. The hibernate.hbm2ddl.auto system property is set to validate in this configuration to prevent the ORM mapper from deleting the table being mapped. |
| SeedData | Located in the SeedData.launch file. Starts the RunThisToSeedData class. This class creates the MySQL tables and seeds it with three rows of contact data. This code is kept simple through the use of JPA and Hibernate generated DDL. The hibernate.hbm2ddl.auto system property is set to create in order to create the required relational database tables. |
To start any of these configurations, select from menu Run –>Open Run Dialog… Then look for the configurations on the left panel.
Invoking RMI from the GWT RPC Servlet
In the GWTFlyer project, the GWT RPC servlet class is named ContactManagerImpl. This class accepts asynchronous HTTP requests from the GWT code running on the mobile browser, and sends RMI requests to the business logic server for Contacts information. The code for ContactManagerImpl is shown here.public class ContactManagerImpl
extends RemoteServiceServlet implements
ContactManager {
public ContactManagerImpl() {
}
public Contact[] getContacts() {
Contact[] retval = null;
XContact[] contList = null;
try {
boolean needToReset = false;
if (System.getSecurityManager()
== null) {
System.setSecurityManager(
new CustomSecurityManager());
needToReset = true;
}
RemoteContactAccess remote =
(RemoteContactAccess)
Naming.lookup(
"rmi://localhost:1199/ContactService");
contList = remote.getContacts();
} catch (Exception ex) {
ex.printStackTrace();
}
if (contList != null) {
int contSize = contList.length;
retval = new Contact[contSize];
for (int i = 0;
i < contList.length; i++) {
XContact cnt = contList[i];
retval[i] = new Contact(
cnt.getFirstName(),
cnt.getLastName(),
cnt.getPhoneNumber(),
cnt.getAddress1(),
cnt.getAddress2(),
cnt.getPhotoFile());
}
}
return retval;
}
}
A custom RMI security manager
In this code, the getContacts() method is called by the GWT RPC machinery when an async call arrives from the browser. Note that a CustomSecurityManager is installed before making the RMI call. This is a standard requirement for RMI clients – a SecurityManager must be installed. Normally, one would install a stringent instance of RMISecurityManger, and then explicitly tweak each individual access permission. If you just install an RMISecurityManager, however, the GWT RPC support runtime will throw security exceptions when introspecting for class information. To keep things simple for this article, a highly permissive CustomSecurityManager is created. You can find the code for this security manager in CustomSecurityManager.java. The purpose is to enable RMI client functionality without disabling the GWT RPC runtime support.Using a data-exchange class for RMI
Another point to note in the ContactManagerImpl code is the use of a data-exchange class called XContact. Instead of using the Contact class in the client code, or the Contact class from the business logic server, a new data-exchange class is created containing essentially the same fields. This is done on purpose to decouple the requirements of GWT on the client’s version of the Contact class, from the Java 5 annotation requirements of JPA and Hibernate on the server version of Contact. The only tradeoff is the need to explicitly transfer data to and from XContact instances. This approach also enables the client and the server’s Contact class to evolve independently unencumbered by each other’s inheritance hierarchies. This benefit is evident when you see that the remote RMI method has no type dependency on client nor server code.The RMI interface
The remotely invoked method is part of the uk.co.vsj.gwtjpa.service.RemoteContactAccess interface. This interface, along with the data-exchange XContact class, is defined and accessible from both projects. The following code is from RemoteContactAccess:import java.rmi.Remote;
import java.rmi.RemoteException;
import uk.co.vsj.gwtjpa.xchange.XContact;
public interface RemoteContactAccess
extends Remote {
XContact [] getContacts()
throws RemoteException;
}
To obtain a remote instance of RemoteContactAccess, the lookup is performed against the RMI registry. The URL used for lookup is “rmi://localhost:1199/ContactService”.
A RemoteContactAccess instance must be previously bound, in the RMI registry, to the name ContactService (this is done by the server code, you will see this shortly). If your business logic server is on another machine (or port), you need to modify this URL to reflect it.
The remote getContacts() method is called by ContactManagerImpl synchronously to fetch contact information from the RMI server. The implementation of getContacts() on the RMI server must fetch the data from the relational database and return them.
Fetching contacts using the remote method
In the ContactServer project, the implementation of the getContacts() method can be located in the uk.co.vsj.gwtjpa.service.ContactAccessService class and is shown here:public class ContactAccessService
implements RemoteContactAccess {
private ContactRepository repo;
public void setRepo(ContactRepository
repo) {
this.repo = repo;
}
public XContact[] getContacts()
throws RemoteException {
List <Contact> contList =
	repo.retrieveAllContacts();
return
convertToXContacts(contList);
}
...
Counter to expectation, note how simple the code of getContacts() is. First, the convertToXContacts() method is a simple data-exchange method that copies the list of Contact to an array of XContact and returns them. This avoids two compatibility issues between JDK 1.4 and Java 5 classes:
- the use of generics in contList – List <Contact>
- the use of annotations in Contact
List <Contact> contList = repo.retrieveAllContacts();You can track the retieveAllContacts() method to the uk.co.vsj.gwtjpa.repos.ContactJpaRepository class. In this class, the method is implemented as:
public List<Contact>
	retrieveAllContacts() {
	Query q = em.createNamedQuery(
		"allContacts");
	return q.getResultList();
}
You may question where repo, the instance of ContactJpaRepository comes from. Actually, it is nowhere to be found in the code. This is because the instance is created by the Spring 2 container and injected into the ContactAccessService bean. You will see this Spring “wiring” a little later when the Spring configuration file is examined.
JPA annotations to persistence-enable a contact
A JPA named query is used in the retieveAllContacts() method to obtain all contacts in the database. Of course, in a production scenario, you’ll need to limit the number of contacts that are returned.To see the actual named query, take a look at the uk.co.vsj.gwtjpa.pojos.Contact class itself. It is partially reproduced in the following listing, showing the named query and the JPA entity annotations:
package uk.co.vsj.gwtjpa.pojos;
import javax.persistence.Column;
import javax.persistence.Entity;
import javax.persistence.GeneratedValue;
import javax.persistence.Id;
import javax.persistence.NamedQueries;
import javax.persistence.NamedQuery;
@Entity
@NamedQueries( {
@NamedQuery(name = "getByLastname",
	query="select a from Contact a where
	a.lastName = ?1"),
@NamedQuery(name = "allContacts",
	query = "select a from Contact a")
})
public class Contact {
	@Id
	@Column(insertable=false,
		updatable = false)
	@GeneratedValue
	private int id;
	private String firstName;
	private String lastName;
	private String phoneNumber;
	private String address1;
	private String address2;
	private String photoFile;
	public Contact(String firstName, String
		lastName, String phoneNumber,
		String address1, String address2,
		String photoFile) {
		super();
		this.firstName = firstName;
		this.lastName = lastName;
		this.phoneNumber = phoneNumber;
		this.address1 = address1;
		this.address2 = address2;
		this.photoFile = photoFile;
	}
	public String getFirstName() {
		return firstName;
	}
...
}
The red annotations in the preceding code show the actual object query that is performed. This query is written in Java Persistence Query Langauge (JPQL). For more information on how to use JPQL, check out the persistence document of the JSR-220 Enterprise Java Bean 3.0 specifications.
The green annotations in the preceding code tell the JPA provider how to persist a Contact POJO. In fact, when the above JPA annotation is translated into MySQL data definition language (DDL) statements, the following relational database schema will be created:
CREATE TABLE vsjdb.contact (
	id int(11) NOT NULL auto_increment,
	address1 varchar(255) default NULL,
	address2 varchar(255) default NULL,
	firstName varchar(255) default NULL,
	lastName varchar(255) default NULL,
	phoneNumber varchar(255) default NULL,
	photoFile varchar(255) default NULL,
	PRIMARY KEY (id)
) ENGINE=InnoDB DEFAULT CHARSET=latin1;
Of course, you would want to tune the length of the fields generated in a production environment, and can do that with additional JPA annotations. See the JSR-220 persistence specification or the VSJ Spring/JPA article (November 2006) for more details of the options.
Wiring the beans together with Spring 2
I mentioned earlier that an instance of uk.co.vsj.gwtjpa.repos.ContactJpaRepository is injected into the ContactAccessService by the Spring 2 container. Now let’s take a look at the configuration file. You can find the file named context.xml in the META-INF directory of the ContactServer project. The following is the listing of context.xml:<?xml version="1.0" encoding="UTF-8"?> <beans xmlns="http://www. springframework.org/schema/beans" xmlns:xsi="http://www.w3.org/ 2001/XMLSchema-instance" xmlns:aop="http://www. springframework.org/schema/aop" xmlns:p="http://www. springframework.org/schema/p" xmlns:tx="http://www. springframework.org/schema/tx" xsi:schemaLocation="http://www. springframework.org/schema/beans http://www.springframework.org/ schema/beans/spring-beans-2.0.xsd http://www.springframework.org/ schema/tx http://www.springframework.org/ schema/tx/spring-tx-2.0.xsd http://www.springframework.org/ schema/aop http://www.springframework.org/ schema/aop/spring-aop-2.0.xsd" > <tx:annotation-driven /> <bean class="org.springframework. dao.annotation. PersistenceExceptionTranslationPostProcessor" /> <bean class="org.springframework.orm. jpa.support. PersistenceAnnotationBeanPostProcessor" /> <bean id="entityManagerFactory" class="org.springframework.orm.jpa. LocalContainerEntityManagerFactoryBean"> <property name="dataSource" ref="dataSource" /> <property name="jpaVendorAdapter"> <bean class="org.springframework.orm.jpa. vendor.HibernateJpaVendorAdapter"> <property name="database" value="MYSQL" /> </bean> </property> </bean> <bean id="dataSource" class="org. springframework.jdbc.datasource. DriverManagerDataSource"> <property name="driverClassName" value="com.mysql.jdbc.Driver" /> <property name="url" value="jdbc:mysql://localhost/vsjdb" /> <property name="username" value="dbuser" /> <property name="password" value="pass" /> </bean> <bean id="transactionManager" class="org.springframework.orm. jpa.JpaTransactionManager"> <property name="entityManagerFactory" ref="entityManagerFactory" /> <property name="dataSource" ref="dataSource" /> </bean> <bean id="contactRepo" class="uk.co.vsj.gwtjpa.repos. ContactJpaRepository" /> <bean id="contactAccessService" class="uk.co.vsj.gwtjpa.service. ContactAccessService"> <property name="repo" ref="contactRepo"/> </bean> <bean id="dataSeeder" class="uk.co.vsj.gwtjpa.service. RunThisToSeedData"> <property name="repo" ref="contactRepo"/> </bean> <bean class="org.springframework. remoting.rmi.RmiServiceExporter"> <property name="serviceName" value="ContactService"/> <property name="service" ref="contactAccessService"/> <property name="serviceInterface" value="uk.co.vsj.gwtjpa.service. RemoteContactAccess"/> <property name="registryPort" value="1199"/> </bean> </beans>In the preceding Spring 2 context configuration file, the green code shows how the Hibernate JPA entity manager is configured to use a MySQL data source. In this case, it is assumed that the table is created in a database named vsjdb, and the user dbuser with password pass has full access to the database.
The red code shows how an instance of the ContactJpaRepository bean is created (named contactRepo). Then an instance of ContactAccessService is created (named contactAccessService), and its repo property is wired with contactRepo. This tells the Spring 2 container to use setter injection (calling the setRepo() method) to wire the contactRepo bean into the ContactAccessService.
The blue code creates an instance of the Spring 2 RMI remoting RMIServiceExporter bean. This creates binds the contactAccessService bean to the RMI registry as “ContactService”. The registry is configured to run on port 1199. With this configuration, the business logic server is fully configured, and the service can be accessed at the URL “rmi://localhost:1199/ContactService”.
The main() method of the ContactAccessService class loads the Spring 2 configuration file via the ClassPathXmlApplicationContext class in the Spring API, and explicitly obtains an instance of the contactAccessService.
Testing the system
To test the system, you need to do the following:- Make sure the MySQL server is installed and running, the vsjdb database must be available and accessible by the user named dbuser
- In Eclipse, seed data by running the SeedData configuration (select menu Run->Open Run Dialog…, then select SeedData on the left and click the Run button)
- In Eclipse, start the business logic server by running the RunService configuration
- Finally run the GWTFlyer configuration in Eclipse
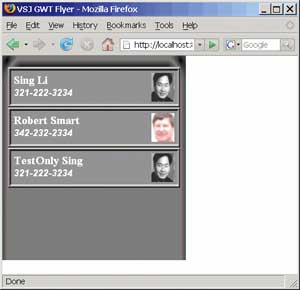
Figure 4: GWT user interface running in the Firefox browser
Conclusions
GWT together with GWT-RPC is great for creating interactive web-based user interfaces and data retrieval mechanisms over the Internet. This architecture can be extended to access business logic and data stored in back office servers. In this article, the GWT-RPC server is extended to access a business logic server via RMI remoting. The business logic server itself accesses backend MySQL relational database data with the help of the Spring framework and a JPA $provider from Hibernate. Using these widely available open source technologies, quickly creating modular and flexible multi-tiered data systems need no longer be a dream.Sing Li has been writing software, and writing about software, for twenty plus years. His specialties include scalable distributed computing systems and peer-to-peer technologies. He now spends a lot of time working with open source Java technologies. Sing’s most recent publications include Professional Geronimo and Professional Apache Tomcat from Wrox Press.
Comments