We all just love documentation and do it extremely well. If you agree with this statement don’t bother reading on. But, if like the majority of programmers, you just see documentation as something that gets in they way of creating code then you need to know that C# integrates documentation and coding in a way that makes it about as easy as it possibly can be.
The XML documentation facility is built into all Visual Studio versions, including Express, because it is actually provided by the compiler at the next level down. You could say that it’s core C#, yet many programmers simply don’t know it exists and when they do find out about it they either dismiss is as trivial or fail to build some customising infrastructure that makes it truly useful.
Let’s begin by looking at the basic facilities and then move on to the interesting topic of using the generated XML documentation to create something more human friendly.
Triple slash comment
The key to embedding XML within a program is to make use of the triple slash comment. Whenever the compiler encounters the sequence “///” it assumes that the line contains valid XML. Yes it really is this simple. If you start a new project, depending on the type of project, you might see some /// comments that have automatically been inserted by the template. If you have been wondering why triple slash comments – now you know. If you type /// within the code of any project just before a method definition then the IDE will automatically generate a <summary> tag for you:
/// <summary>
///
/// </summary>
public void MyMethod()
{
}
Simply from the look of this, it is clear that you have just added a pair of XML tags and whatever you type between them will be converted into the tag’s value. For example:
/// <summary>
/// MyMethod is designed to
/// demonstrate XML documentation
/// </summary>
public void MyMethod()
{
}
It is a little-known fact but as well as the triple slash comment method you can also make use of a block comment similar to /* /. In this case you write /* to start the block and /** to end it. However block comments are not automatically generated in C# so to enter the above as a block comment you would have to manually enter:
/**
* <summary>
* MyMethod is designed to
* demonstrate XML documentation
* </summary>
**/
Block comments are sometimes useful but the triple slash comments are much more common.
So far so good, but how do we get the triple slash comments converted into the promised XML? All you have to do is open the project properties, click on the Build tab and then select the box “XML documentation file” and provide a suitable file name (see Figure 1). There is a corresponding command line parameter for the command line compiler and this is easy to look up in the documentation.
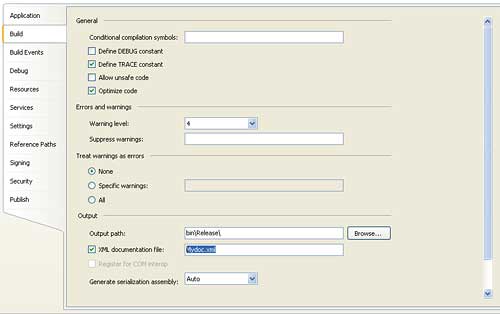
Figure 1: Selecting the XML document option is easy but often overlooked
If you now build or debug the program the triple slash comments are used to generate the XML file specified. You can find this either in the debug or release directory within the Bin directory. If you try this out you might be surprised to see are so many tags that you didn’t specify, see Figure 2.
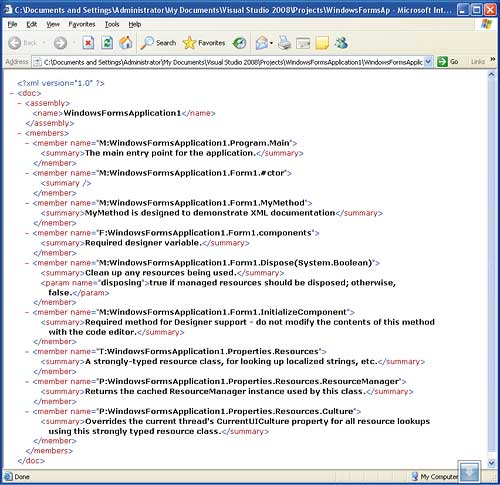
Figure 2: The raw XML documentation
As already mentioned any template that you use to start a project generally already has lots of default XML documentation – including sections of generated code that you probably never give a moment’s thought to. If you look carefully at the file however you should be able to find the documentation that you added:
<member name="M:WindowsFormsApplication1.
    Form1.MyMethod">
    <summary>
    	MyMethod is designed to
    		demonstrate XML documentation
    </summary>
</member>
You can see immediately the structure of the XML goes a little further than you might have expected. As well as the <summary> tags that were in the triple slash comments there is also a pair of <member> tags with a name attribute giving the fully qualified name of the method that the <summary> tags are associated with.
The idea that every comment is associated with a particular code construct – a method in our example – is also key to understanding how it all works. You can only add a comment to one of: class, struct, enum, method, property, field indexer, delegate or event. Any triple slash comments not associated with one of these constructs is simply ignored by the XML generator. If you start a triple slash comment that is in the wrong place, i.e. not associated with a correct code construct, then the IDE will not auto-generate a pair of <summary> tags for you. If you are in the correct place than not only will the IDE generate a pair of tags but it also generates the name of the code construct and indicates its type with a leading letter followed by a colon. This name is used at the value of the name attribute in the <member> tag. Hence:
<member name="M:WindowsFormsApplication1.
    Form1.MyMethod">
…and the “M:” means Method. Other single letter type indicators include:
- N: = Namespace
- T: = Type i.e. class, interface, struct, enum or delegate
- F: = Field
- P: Property
- E: Event
- I: error unresolved construct
In addition to these indicators methods are also documented with additional information. For any method that has parameters a <param> tag listing the parameter names as attribute values is added. For example:
/// <summary>
/// MyMethod is designed to
/// demonstrate XML documentation
/// </summary>
/// <param name="param1">A simple integer</param>
/// <param name="param2">A more sophisticated string</param>

public void MyMethod(int param1,string param2)
{
}
…and this generates:
<member name="M:WindowsFormsApplication1.
    Form1.MyMethod(
    	System.Int32,System.String)">
    <summary>
    	MyMethod is designed to
    	demonstrate XML documentation
    </summary>
    <param name="param1">
    	A simple integer</param>
    <param name="param2">A more
    	sophisticated string</param>
</member>
Notice that in addition to the <param> tags the parameter types have been added to the name attribute. Similarly for any non-void return type the IDE generates a <return> tag so that you can comment on the purpose of the returned value. Notice that the type of the return value isn’t automatically encoded. The only exception to this if for an implicit conversion operator when the return type is coded as part of the name following “~”.
At this point it is important to understand that the IDE is inserting tags as it thinks fit but you can do the same job manually if you want to. As long as you insert valid XML the compiler will add it to the XML file it generates. You can even invent your own tags to do special tasks. However the compiler actually checks the correctness of some of the tags that are generated automatically and their content is used in Intellisense prompting. For example, with the documentation given for MyMethod listed above you will see the content of the <summary> tag part way through typing MyMethod( and the parameter tag value after typing the opening bracket. This makes this approach to documenting class libraries immediately rewarding – even to the programmer creating the documentation!
There are some other tags that are only entered manually that are worth knowing about. In particular if you want to make an extended remark about a code construct then use the <remarks> tag. Use the <see> and <seealso> tags to refer to other constructs that are relevant to the current constructs. Perhaps the most elaborate of the standard tags is the <example> tag which can be used, as its name suggests, to provide an example of the use of the construct complete with code. To include code you either need to use the <c> tag for code snippets or <code> for multi-line code examples. For example:
/// <remarks>
/// This method is very clever and I'm
/// very proud of it so pay special
/// attention when you read it.
/// </remarks>
/// <example>
/// To call this method:
/// <code>
/// MyMethod(1,"String");
/// </code>
/// </example>
…which generates:
<remarks>
    This method is very clever and I'm
    very proud of it so pay special
    attention when you read it.
</remarks>
<example>
    To call this method:
    <code>MyMethod(1,"String");</code>
</example>
It is important to realise that there is no implied semantics here. The text in between the <code> tags is just text. The value of all of this really only comes about when the XML is put through some sort of processor which treats the values associated with each tag appropriately, e.g. formatting and colour coding anything between <code> tags. For example, the <list> tag can be used to include a list of items formatted as bullet, numeric or as a table according to the type attribute specified. However if you try:
/// <list type="bullet">
/// <term>
/// bug number 1
/// </term>
/// <term>
/// bug number 2
/// </term>
…then when this is converted to XML you don’t see any bullet points just the usual tags:
<list type="bullet">
    <term>bug number 1</term>
    <term>bug number 2</term>
</list>
So what is the point of using type=”bullet” or indeed any of the recommended tags? The XML generated by the compiler is intended to be further processed by a documentation engine of some kind and if you use these standard tags then there is a reasonable chance that the engine will format things as you expect. If you use non-standard tags then processing the XML is your problem – more of which later.
One final comment on tags and meaning: a commonly used attribute cref is a little confusing. The documentation says that some tags can use cref to create a link to other members but what does this mean? For example the <see> and <seealso> tags have a cref to specify what additional documentation the user should consult. The attribute works by simply specifying the name of a member as generated by the IDE. You do this by simply giving an unambiguous name of the member and the compiler transforms this to the fully qualified name complete with single letter type identifier. For example:
/// <see cref="MyMethod"/>
…is translated to:
<see cref="M:WindowsFormsApplication1.
    Form1.MyMethod(
    	System.Int32,System.String)" />
Obviously it is better to give a more specific name within the cref to avoid any later changes altering the documentation for example:
/// <see cref="Form1.MyMethod"/>
If the compiler cannot find the member specified then it will generate an error which means you can’t refer to members that don’t yet exist. Once again the XML that is generated has no predefined semantics but you can expect documentation processing tools to convert it to something like a hyperlink to other areas of the documentation. It is also worth knowing that the compiler will allow you to use curly brackets in place of angle brackets in generic types so as to avoid confusion with XML tags. For example:
/// <see cref="List{T}"/>
…is converted to:
System.Collections.Generic.List<T>
Hiding the comments
One of the problems with adding XML comments to source code is that they can obscure the code itself. The simplest solution to this problem is to use outlining to collapse the XML comments using the outliner and only expand when needed. However this doesn’t help with the problem of allowing two users to work on the same code – one modifying the code and one documenting. The solution to this problem is to use the <include> tag which instructs the compiler to read the contents of an external file as XML to be used as comments. Of course you now need some way to associate the XML in the file with the various members in the code. This is achieved by specifying which XML tags are to be extracted from the file at the point that the <include> tag is used. That is the position of the <include> tag specifies where in the code the XML comments are to be inserted and hence which member they apply to. To specify which chunk of XML in the file is to be applied to the member we have to use an XPATH specification selecting that XML. So for example, if we have an XML file called XMLFile1.xml that contains the XML needed to comment MyMethod you might use and <include> of the form:
/// <include file='XMLFile1.xml'
/// path='/*'/>
public void MyMethod(
    int param1,string param2)
{
}
Obviously the file attribute specifies the XML file. Less obviously the path attribute is an XPATH statement that locates the XML in the file to be used. In this case the XPATH simply resolves to everything inside the root tags. In this case if the XML file contained the following:
<?xml version="1.0" encoding="utf-8" ?>
<MyDocs>
    <summary>
    	MyMethod is designed to
    	demonstrate XMLx documentation
    </summary>
</MyDocs>
The XPATH specification retrieves everything from the root of the XML tree and hence inserts the <summary> tags. The compiler then generates:
<member name="M:WindowsFormsApplication1.
    Form1.MyMethod(
    	System.Int32,System.String)">
    <summary>
    	MyMethod is designed to
    	demonstrate XML documentation
    </summary>
</member>
Clearly you can’t use this approach if you are going to want to include the XML to document multiple members within a single file. In this case the solution is to add additional XML tags to allow XPATH expressions to be written to select which XML subtree is to be used for each <include> tag. For example, if the XML file contains
<?xml version="1.0" encoding="utf-8" ?>
<MyDocs>
    <Member1>
    	<summary>
    		MyMethod is designed to
    		demonstrate XML documentation
    	</summary>
    </Member1>
    <Member2>
    	Another member's documentation
    </Member2>
</MyDocs>
…then we can pick out the XML comments for MyMethod using:
/// <include file='XMLFile1.xml'
/// path='/MyDocs/Member1/*'/>
public void MyMethod(
    int param1,string param2)
{
}
To include the XML comments for other methods you would write another <include> tag at the appropriate place and change the path to pick out (say) /MyDocs/Member2/* and so on. Using a brand new tag each time you need to document a new member doesn’t sit well with the overall philosophy of XML syntax and semantics but it works perfectly well. A better method is to introduce a single tag for members and a name attribute to identify which member the tag applies to, for example:
<?xml version="1.0" encoding="utf-8" ?>
<MyDocs>
    <Member name="MyMethod" >
    <summary>
    	MyMethod is designed to
    	demonstrate XML documentation
    </summary>
    </Member>
    <Member name="AnotherMethod">
    	Another member's documentation
    </Member>
</MyDocs>
Notice that now the member that the <Member> tag refers to is specified by the name attribute. Now the appropriate XML block can be picked out using a slightly more complicated XPATH specification:
/// <include file='XMLFile1.xml'
    path='/MyDocs/Member[
    	@name="MyMethod"]/*'/>
This works in exactly the same way and generates exactly the same XML comments as before. You can use any identification method you like as long as you can write an XPATH statement to pick out the bit of the XML contained in the file that you need – however the use of a name attribute is a fairly standard way of organising things.
It is arguable that using <include> breaks the connection between the XML comments and the code. It is true that you are more likely to keep the documentation up-to-date if the comments are part of the code you are modifying rather than something you have to go in search of. The conclusion has to be that you should only resort to <include> if there is a clear reason to do so.
Processing the XML
Now you can see how easy it is to add XML comments to code the next question is what to do with it. At this point the temptation is overwhelming to start a new project and create a processing engine. This is a very bad idea as it will only divert you from your real goal and soak up much more time than you could ever imagine. Even so it is very easy to create an XSL transformation from XML to HTML. The advantage of this is that it is easy and completely under your control. However you do need to heed the earlier warning as converting an XSL transformation into an entire web help system is much more complex than simply applying some formatting.
The idea of XSL is that it can be used to create an HTML page by mixing HTML tags with information extracted from the XML file. The extraction is, of course, specified by the use of XPATH statements. To see this in action generate an XML file from some XML comments and add to the start the line:
<?xml-stylesheet type="text/xsl"
    href="XLS1.xsl"?>
This instructs any XSL capable XML processor to load the XSL file called XLS1.xsl and use it to transform the XML in the XML file. Now all we need is a suitable XSL file. For simplicity let’s use the XML file documenting MyMethod and build an XSL file to display the details of the method. We need an XSL file that starts off in the standard way:
   <xsl:stylesheet xmlns:xsl=
    	"http://www.w3.org/TR/WD-xsl">
    	<xsl:template match="/">
Next we enter some basic HTML tags to get the page started:
   <html>
    	<body>
    		<h1>XSL formatted XML help</h1>
    		<hr/>
The first piece of information derived from the XML comments file is the assembly name which is done using an XSL XPATH selector:
   	<h2>
    		Assembly name:
    		<xsl:value-of select=
    			"doc/assembly/name"/>
    	</h2>
The XPATH simply specifies the value of the <name> tag nested within <doc> and <assembly> i.e. the name of the assembly. Slightly more complicated is retrieving the summary text corresponding to MyMethod:
   <h3>
    	Method: <xsl:value-of select=
    		'doc/members/member[@name=
    		"M:WindowsFormsApplication1.
    		Form1.MyMethod(
    		System.Int32,System.String)"]'/>
    </h3>
In this case the XPATH statement is complicated because of the need to quote the entire name of the member – but that’s all. Finally we bring the web page to a close:
   	</body>
    </html>
    </xsl:template>
</xsl:stylesheet>
If you now load the original XML file into a browser that supports XSL, i.e. any modern browser, it will be transformed by the XSL file assuming they are both stored in the same directory. The result can be seen in Figure 3.
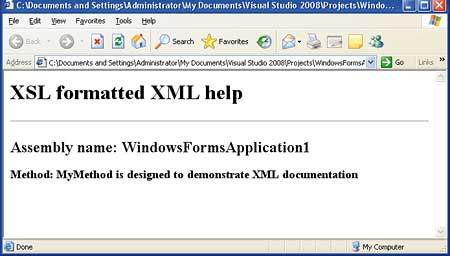
Figure 3: The transformed XML file
Of course in a real application you wouldn’t be quoting the name of each member in the way described above unless it was a very special member that needed individual attention. In most cases members would be processed using an XLS for loop something like:
<table border="2">
    <tbody>
    	<tr>
    	<td>
    		<b>Member</b>
    	</td>
    	<td>
    		<b>Summary</b>
    	</td>
    	</tr>
    	<xsl:for-each select="doc/members/member">
    	<tr>
    			<td>
    				<xsl:value-of select="@name"/>
    			</td>
    			<td>
    				<xsl:value-of select="summary/text()"/>
    			</td>
    		</tr>
    	</xsl:for-each>
    </tbody>
</table>
In this case additional HTML has been supplied to build a table of members and names but the same sort of general technique can be used to construct other presentations. The overall result of the XSL transformation can be seen in Figure 4.
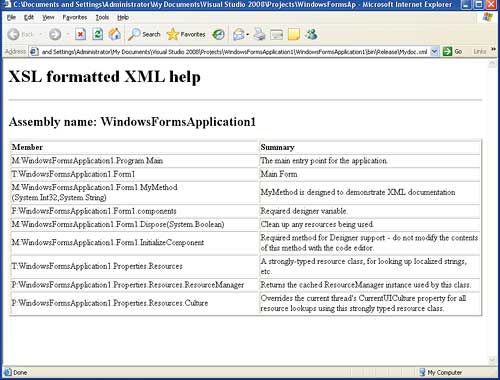
Figure 4: An XSL transformation to a table
Documentation tools
At this point I would like to be able to say that there was an excellent tool to convert your XML comments into full formatted help files. Many would say that there is and it is called, or rather codenamed, “Sandcastle”. We covered Sandcastle when it was young in VSJ. You can download an installer and the source code.
The project is still going strong but currently it is making slow progress towards integration with Visual Studio and for a documentation tool its own state of documentation is, or should be, embarrassing. The actual tool itself is a command line application which takes an unforgivably long time to learn and use. There are third party GUI interfaces designed to make Sandcastle easier to use, notably Sandcastle Help File builder which is also free to download from the CodePlex site. This works reasonably well but it’s another download and another install and for something that is supposed to be used in a professional environment it all lacks polish. Microsoft really needs either to take this software seriously or create something better to build into VS 2010.
It is worth saying that Sandcastle goes well beyond simply using the XML comments to build HTML documents. It also uses reflection to get additional information from the .NET assemblies and it can produce end user documentation by compiling files in Microsoft Assistance Markup Language (MAML), which is another XML based help file authoring language.
If you want to try out Sandcastle you need to download and install and the latest version and a copy of Sandcastle Help File Builder. These both install automatically but you will need to make sure that you have the .NET Framework 3.5 SP1 installed. Another major dependency is the HTML Help 2.x compiler which is part of the Visual Studio SDK which can be downloaded from the Microsoft web site. There are other useful utilities that can make using Sandcastle easier but these are described in the Sandcastle Help File Builder help file and you can try them out once you have everything working. Assuming you have added XML comments to your project and enabled XML help file generation you should be set to try it all out at this point.
Start by opening the Sandcastle Help File Builder and create a new project using any suitable name, e.g. MyHelp. Next use the Project Explorer to add the assembly of the application you are documenting; right-click on Document Sources and add either the .exe, .dll or the project file. From here you can just accept the default settings and build the help file. This takes longer than you might imagine even for a trivial test example because reflection is used to create documentation that includes all of the methods and properties of any framework classes that you might have used. In short, the default result is often more that you expect or want. However, if you look carefully you will find the XML comments that you have added to your custom methods and properties, see Figure 5.
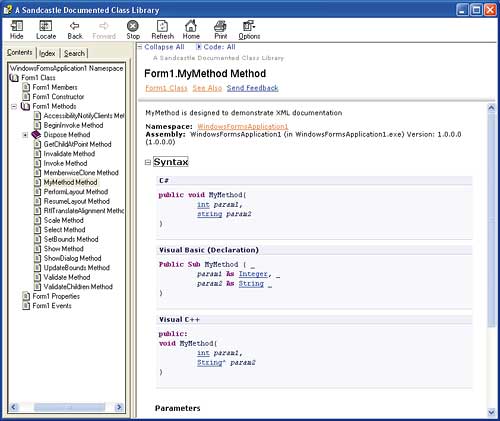
Figure 5: MyMethod documented in the standard style
What you will also discover is the generated documentation has an unexpected depth given how little effort you have put into creating it. Perhaps this is enough to forgive Sandcastle its shortcomings, but you could also conclude that it gives a tantalising view of what could be if only the documentation tool was itself well documented and had a good user interface.
Comments