Sadly, this is not always the case.
So in this article you’ll see how you can “shape” data to make it work better with WPF (with the underlying concepts applicable to shaping any model for use with any UI technology).
And I’ve decided to break with tradition. Most data binding examples tend to deal with customers or bank accounts; well, not this one. Instead, you’ll see this shaping in the context of a game: “Make Fifteen”.
A quick introduction to “Make Fifteen”
I was introduced to the game of “Make Fifteen” many years ago, and from time to time I revisit it and implement it in the technology of the day, as it forms an excellent introduction into the world of models, views and controllers.So what is “Make Fifteen”? Figure 1 shows a screenshot of the game in action.
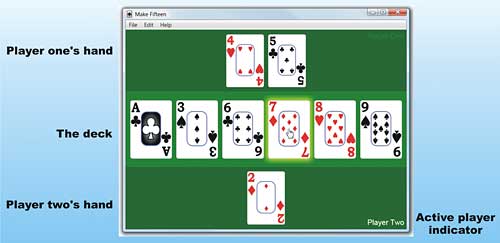
Figure 1: Make Fifteen in action
As you can see, the game is actually a very simple, two-player card game. It starts with nine cards, sequentially numbered one to nine, placed in the central deck. The players each take it in turns to remove one of the cards from the deck and add it to their hand. All cards are kept face up for both players to see.
To win the game, a player must have any three (not four, not two) cards in their hand whose combined values add up to fifteen. You can see that Player One has a winning hand in Figure 2.
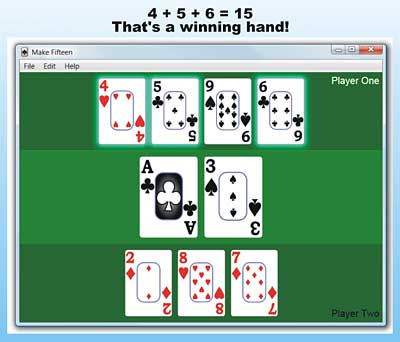
Figure 2: Player one wins!
Of course, it is possible for all nine cards to be taken from the deck with no player being able to make fifteen out of any three of their cards: in that case, the game is drawn.
Now with the rules out of the way, what does “Make Fifteen” have to do with shaping data in WPF? Let’s take a look and see.
Models, views and controllers too!
Now many of you will be familiar with the classic separation of concerns afforded by the Model-View-Controller (MVC) pattern, as shown in Figure 3.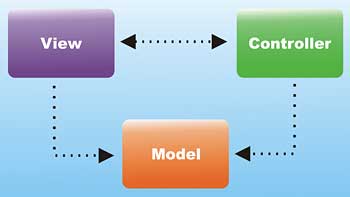
Figure 3: Classic Model-View-Controller
In a (very brief) nutshell, MVC allows you to separate the presentation of data (the view) from the actual data (the model) itself. This facilitates better testing, as you can test the model in isolation using non-graphical testing tools such as unit testing frameworks, use mock objects for the data and so on. It also enables you to reuse the model with different presentation technologies, show multiple views of the same data, or even replace the model with a new one without impacting the onscreen representation.
There is often some confusion about the role of the controller (or even the need for it), and I have no intention of rehashing the arguments here, but in essence the controller is used to drive the model. In many cases, the view simply captures user input and passes it to the controller in order for the controller to update the model.
However, perhaps the most important aspect of Figure 3 is the dependency lines. View and Controller both depend on Model (and can depend on each other and even be one and the same object). The critical point, though, is that the Model depends on neither the View nor the Controller; and it is this which enables us to test the model independently of its UI and to redeploy it to various platforms as we see fit.
I won’t dwell on the many merits of the separation offered by MVC: suffice to say that if you’re not separating your UI from your model, then in the long term you’ll probably regret not doing it from the beginning.
MVC and WPF
WPF and .NET, like all modern UI and OO technologies, fully embrace MVC. Figure 4 shows some of the most important facilitating mechanisms for implementing MVC in your applications.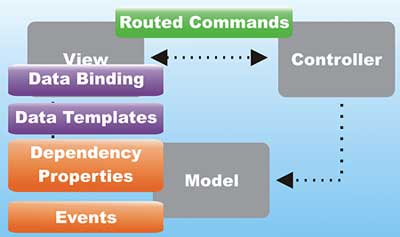
Figure 4: Core mechanisms for achieving MVC in WPF
The real problem comes, though, when your model code isn’t written to support any of these technologies. Figure 5 shows the class diagram for the original “Make Fifteen” model.
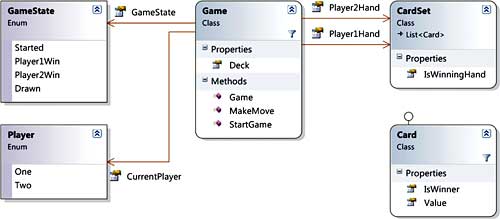
Figure 5: The original “Make Fifteen” model
At its core is the Game class, which has methods to start a game and make a move. The class also maintains three lists of cards: one for the deck and one for each of the players’ hands. The Card class simply tracks the Value of the card and whether the Card is one of the three that would constitute a winning hand. The Game object also tracks the state of the game, and knows which player is about to move, and whether the game is in progress or has been won or drawn.
Unfortunately, this Game class is not binding-friendly. It doesn’t raise events when the properties are changed, and the CardSet class is really nothing more than a wrapper around List<T>, and List<T> doesn’t use events to notify anyone when changes occur on the list. So does this mean that it’s time to junk the original model?
Well, for something as simple as the “Make Fifteen” game that might be the best option, but it would be a shame to junk the existing game logic. And in bigger applications, you can’t simply throw away millions of lines of well-tested code. This means that you’ll often find yourself having to “shape” the model to fit with the new technology. And that’s exactly what we’re going to look at now.
Shaping models
So what do you do when the model isn’t optimally configured to support features such as WPF’s data binding? One of the most common techniques is to create another object to sit between the View and the Model.What do we call it (at least in the WPF world)? A “ViewModel”. Figure 6 gives you the overall idea.
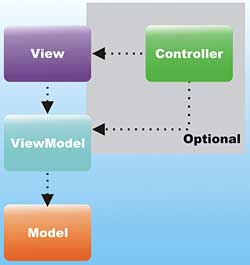
Figure 6: Model – View – ViewModel
The key thing to remember about a ViewModel is that it will typically be optimised for a specific View implementation and/or UI technology. Therefore, in the case of a ViewModel for WPF it should understand all of the advantages and limitations of WPF data binding, such as not modifying collections from a secondary thread.
So let’s use a ViewModel to shape the original Game class so that it works well with WPF.
The ViewModel for Make Fifteen
Figure 7 shows you the class diagram for the ViewModel implementation for the “Make Fifteen” game, which I’ve called GameViewModel.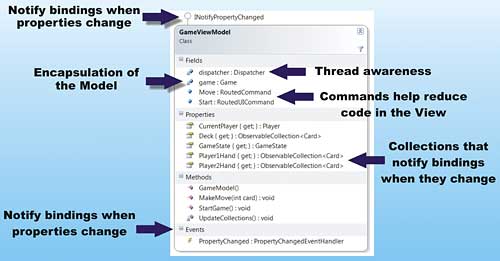
Figure 7: Key features of the “Make Fifteen” ViewModel
In essence, GameViewModel is simply an adapter around the standard Game class from Figure 5, encapsulating it and exposing properties and events that work well with WPF data binding.
Let’s now take a look at the core features of the GameViewModel, and examine why they’re needed.
Implementing INotifyPropertyChanged
WPF fully supports binding to standard CLR properties, but it is unable to detect changes to those properties unless one of two conditions is met, namely:The type exposes an event named propertynameChanged, where propertyname would be set to the name of the property. The type implements INotifyPropertyChanged with its single PropertyChanged event.
Option 2 is the preferred choice in WPF, as you only need one event handler (and thus delegate object) to track all of the property changed notifications.
From the View’s perspective, it needs to understand when the CurrentPlayer changes so that it can update the active player indicator. It also definitely needs to track the changes to the GameState property so that it can display a friendly “game over” message, highlight the winning cards and disable the deck.
Listing 1 shows how INotifyPropertyChanged has been implemented for GameViewModel. What you will notice is that none of the internal logic from the original Game class is surfaced into the GameViewModel. In fact, the implementation is extremely simplistic. To begin with, GameViewModel exposes two read-only properties, GameState and CurrentPlayer, which are direct wrappers around the existing Game properties of the same names.
The only situations where the GameState and CurrentPlayer properties can be changed is as a result of a call to either the StartGame() or MakeMove() methods. Therefore, both of these methods call a private helper method, UpdateViews(), at the end of their execution. UpdateViews() in turn uses the OnPropertyChanged() method to raise the PropertyChanged event for both GameState and CurrentPlayer.
So how does this impact on the View?
Listing 2 contains an extract of the XAML for the View relating to the display of the active player indicator, which is nothing more than the player’s name shown in white.
The key thing to take away from Listing 2 is that the appearance of the two TextBlocks is now controlled exclusively through data-bound triggers. There is no procedural code involved whatsoever. The selection of the Foreground brush is controlled using data triggers applied via the control’s Style.
Triggers, and data triggers in particular, are an invaluable aid to designers that want to create interesting UI without having to deal with code; and especially as they can be configured using Microsoft Expression Blend, which is a very significant benefit.
For more complex situations, this sort of logic can be moved into binding converters and data template selectors. Whilst these latter options require a developer to write some code (either an implementation of IValueConverter or DataTemplateSelector, they can be used to keep UI code out of the model and up near the View).
ObservableCollection<>
The second item of interest in the GameViewModel is the use of ObservableCollection<> for the Deck, Player1Hand and Player2Hand properties. Remember that in the original Game class, the standard List<> collection was used and sadly List<> doesn’t implement the INotifyCollectionChanged interface. This means that any Binding objects that use those lists won’t spot any changes.Wrapping a collection with an ObservableCollection<> can be a touch on the tedious side, as you can see from the code in Listing 3. The GameViewModel simply exposes three ObservableCollection<> properties, and ensures that they’re up to date with the state of the actual Game object in much the same way that the earlier properties were kept in sync: the UpdateViews() method calls an UpdateCollections() method to make sure that the relevant ObservableCollection<> properties get updated to reflect the state of the Game’s Deck, Player1Hand and Player2Hand lists.
Before you write in and complain, the code is not optimised for performance as you can see from the UpdateCollection() method. I chose to simply clear the exposed ObservableCollection<> and then add all the items back in. This could result in unnecessary levels of change in the UI as a result of all of the change notification events, and it would certainly be inefficient with very large collections of data. Applying a smarter algorithm is, as they say, left as an exercise for the reader.
An alternative to ObservableCollection
There is an alternative to using ObservableCollection: exposing an ICollectionView.In WPF, controls don’t actually bind directly to the collection. They actually bind to a view over the data, which in turn enables filtering, grouping and sorting. It is perfectly acceptable for a ViewModel to expose an ICollectionView rather than any other form of collection.
Listing 4 shows an example of using this approach to expose the Deck from the GameViewModel. Note how the CollectionView object is wrapped around the underlying Game object’s Deck property in the GameViewModel’s constructor. This CollectionView object is then exposed by the GameViewModel as a property.
The key thing to note is that we have to manually call the Refresh() method on the CollectionView object so that any bound controls update their appearance.
One side effect of exposing an ICollectionView is that you can add features such as sorting, filtering and grouping directly to your ViewModel if you use an appropriate implementation type that supports these features, such as ListCollectionView. You can, of course, apply these in the XAML or code of the View if you prefer.
Thread awareness
It’s perfectly plausible (although not likely in the “Make Fifteen” game) that data in the low-level Model might be modified by any thread. This is not a problem when data binding to single properties, such as CurrentPlayer and GameState, as the WPF Binding object will take care of the thread transitions. But it is a problem with collections: any attempt to change the source of a CollectionView on the wrong thread will result in an exception.So which object should deal with this to prevent the problem from occurring?
Some might argue that it’s the View’s responsibility, as it’s the object that’s performing the binding. Unfortunately, the View has (or at least should have) no idea about how the low-level Model is implemented. Similarly, the Model should have no idea about which UI technology it’s currently working with, which means that if it wants to utilise multiple threads then that should be fine. As for the Controller, well it’s not even in the picture, because this is all about how the View gets updated data from the Model using data binding. Which means that thread awareness can only be the responsibility of one object: the ViewModel.
If you examine the GameViewModel class shown in Figure 7 you’ll notice a strange-looking field called dispatcher (of type Dispatcher). WPF associates a Dispatcher with a UI thread, and it can be used to check and then marshal calls from background threads onto that UI thread. Dispatcher therefore provides a relatively easy way to add thread awareness to your ViewModel.
Listing 5 shows the Dispatcher in action. The important thing to note is that the GameViewModel caches the Dispatcher for the thread that is used to create the object in its constructor. Thereafter, any call into the GameViewModel that might affect the state of the game, such as starting it or making a move, is checked to ensure that it is made on the same thread.
Should the call come in on the “wrong” thread, the Dispatcher’s BeginInvoke() method is used to queue the request up so that it is re-issued on the correct thread.
This might seem like overkill, and it certainly is for the current implementation of “Make Fifteen”. One thing to be aware of, though, is that when you start creating complex ViewModels that deal with, say, asynchronous creation of data, it’s not going to be as simple as this implementation, but you will find that pushing the thread affinity code down into your ViewModel object will make it much easier to design a clean UI.
Routed commands
By now you might be wondering about the two RoutedCommand fields, Start and Move, which you can see in Figure 7 (and Listing 6).The point of routed commands (well technically, types that implement ICommand) is that you can isolate a UI element from the action (command) that will be performed when the user interacts with the element. So how is this separation achieved? Figure 8 shows the important relationships.
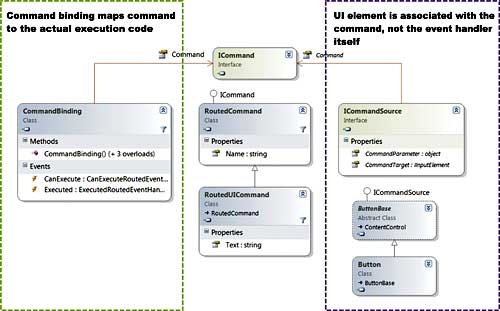
Figure 8: Separating UI elements from actions
As you can see, a UI element will be associated with a specific command via its Command property. As you would expect, only certain types of element, and specifically those that implement ICommandSource, support commands. For example, Button clicks will cause the command to execute.
Of course, for a command to execute it has to know what piece of code to call. The routed nature of commands – they bubble up through the WPF element tree – allows you to centralise the mapping of events at a central location if you so desire. This is the purpose of a CommandBinding, which will be inserted into the CommandBindings collection of the element that you want to handle the command.
The routed command mechanism also supports the notion of querying whether a command can currently be executed. You might have noticed the CanExecute event on the CommandBinding class, which can be handled to prevent the command from executing. What’s exceedingly neat about this approach is that WPF will automatically disable UI elements that are associated with a command that can’t currently be executed, removing the need for copious amounts of tedious UI code. To my mind, this feature itself is worth the effort of using routed commands.
Let’s dig inside the Make Fifteen game to see where and how these commands are used. To begin with, we’ll head into the View, which is implemented as a WPF User Control. Listing 7 shows you the core parts of interest in the View as it relates to the commands:
As you can see, the View consists of three ListBox objects, one for each hand and one for the deck. The key thing to note here is that we want to associate clicking a Card in the deck with the action of making a move in the game. Thus the DataTemplate that is used for the deck ListBox consists of a Button whose Command property is set to the GameViewModel.Move command.
All that is then left for us to do is to map the Command using a CommandBinding, which is shown in Listing 8.
This is by no means that only way of binding commands to their execution methods, and it is certainly possible to remove the code from the control’s code behind into a separate class. Listing 8 just happens to reflect a very common pattern of usage in .NET UI development, where the Controller code is in fact placed in the View. Achieving a more complete separation is certainly possible, just sadly not in the space for this article!
ViewModel and DataContext
One of the interesting parts of Listing 8 is the sudden appearance of a DataContext property. A core part of WPF’s data binding mechanism is its ability to walk up the element tree to find the data that an element is being bound against by examining each node’s DataContext property.It’s thus very convenient, and traditional, to set the View’s DataContext property to the ViewModel object. A quick examination of the Window code for the “Make Fifteen” game, as seen in Listing 9, shows us this in action. This listing also shows the flexibility of the routed command architecture, with the MenuItem being able to easily connect to the GameViewModel’s Start command. Again, if you don’t like the idea of what is in effect controller code from leaking out into a Window, you could encapsulate the command handling into a separate class.
Conclusion
Our applications are normally better (i.e. more testable and more maintainable) if we can separate the view from the underlying data, and to achieve this we have been using the Model-View-Controller pattern (or one of its close cousins) for many years. Newer technologies, such as WPF, ASP.NET and Windows Forms, have been specifically designed to facilitate this separation of concerns. And features such as WPF’s data templates, data binding and ObservableCollection<> all go a long way to making this even easier.But there’s a catch.
A Model should not only have no knowledge of its View (and Controller), it should also have little or no knowledge of the UI technology with which it’s being used. And very often, when you find yourself using existing Models within a WPF application, you will find that they don’t quite offer the features that you really need to make the binding mechanism work well.
So it’s at this point that ViewModel comes in. And a good ViewModel in WPF will implement some or all of the following:
- Implementing INotifyPropertyChanged to support binding to standard CLR properties
- Exposing collections that support INotifyCollectionChanged
- Make the ViewModel have thread affinity, and handle cross-threaded calls appropriately
- Use of the DataContext property to connect the View to its ViewModel
- Separating UI elements from their actions using routed commands
- Use DataTemplate, data triggers and template selectors, where appropriate, to control the visual appearance of data
The idea of ViewModel is not particularly new, and as you find in the world of patterns, it has very similar analogues that have different names (the terms “view controller” and “model controller” immediately spring to mind).
Whether you’re trying to adapt an existing Model to WPF, or whether you’re starting a project from scratch, consider isolating your View from your Model. The advantages from a testing and mocking standpoint alone are worth the price of admission.
Dave Wheeler is a freelance consultant, who specialises in the various UI technologies within Microsoft .NET. He also writes and delivers courses for DevelopMentor, and speaks at various industry conferences including DevWeek.
Listing 1: INotifyPropertyChanged and the GameViewModel
public class GameViewModel :
	INotifyPropertyChanged
{
	private Game game;
	public GameViewModel()
	{
		game = new Game();
		StartGame();
	}
	public void StartGame()
	{
		game.StartGame();
		UpdateView();
	}
	public void MakeMove(int card)
	{
		game.MakeMove(card);
		UpdateView();
	}
	private void UpdateViews()
	{
		OnPropertyChanged(“GameState”);
		OnPropertyChanged(
			“CurrentPlayer”);
	}
	public GameState GameState
	{
		get
		{ return game.GameState; }
	}
	public Player CurrentPlayer
	{
		get
		{ return game.CurrentPlayer; }
	}
	public event
		PropertyChangedEventHandler
		PropertyChanged;
	protected virtual void
		OnPropertyChanged(
		string propName)
	{
		if (PropertyChanged != null)
		{
			PropertyChanged(this,
			new PropertyChangedEventArgs(
				propName));
		}
	}
	// rest of class elided for clarity
	...
}
Listing 2: Supporting the active player indicator
<Grid.Resources>
	<Style TargetType=”{x:Type TextBlock}” x:Key=”playerIndicator”>
		<Setter Property=”Foreground” Value=”Green” />
		<!-- Other common property setters elided -->
		...
	</Style>
	<Style TargetType=”{x:Type TextBlock}” x:Key=”playerOneIndicator”
		BasedOn=”{StaticResource playerIndicator}” >
		<Style.Triggers>
			<MultiDataTrigger>
				<MultiDataTrigger.Conditions>
					<Condition Binding=”{Binding Path=CurrentPlayer}”
						Value=”{x:Static model:Player.One}” />
					<Condition Binding=”{Binding Path=GameState}”
						Value=”{x:Static model:GameState.Started}” />
				</MultiDataTrigger.Conditions>
				<Setter Property=”Foreground” Value=”White” />
			</MultiDataTrigger>
			<DataTrigger Binding=”{Binding Path=GameState}”
				Value=”{x:Static model:GameState.Player1Win}”>
				<Setter Property=”Foreground” Value=”White” />
			</DataTrigger>
		</Style.Triggers>
	</Style>
	<Style x:Key=”playerTwoIndicator” ... >
		<!-- Very similar to playerOneIndicator -->
	</Style>
</Grid.Resources>
...
<TextBlock ... Text=”Player One” Style=”{StaticResource playerOneIndicator}” />
<TextBlock ... Text=”Player Two” Style=”{StaticResource playerTwoIndicator}” />
Listing 3: Implementing observable collections
public class GameViewModel :
	INotifyPropertyChanged
{
	public GameViewModel()
	{
		game = new Game();
		deck = new
			ObservableCollection<Card>();
		p1Hand = new
			ObservableCollection<Card>();
		p2Hand = new
			ObservableCollection<Card>();
		StartGame();
	}
	ObservableCollection<Card> deck;
	ObservableCollection<Card> p1Hand;
	ObservableCollection<Card> p2Hand;
	public ObservableCollection<Card>
		Deck
	{
		get
		{ return deck; }
	}
	// Properties for Player1Hand and
	// Player2Hand not shown
	...
	private void UpdateViews()
	{
		UpdateCollections();
		OnPropertyChanged(“GameState”);
		OnPropertyChanged(
			“CurrentPlayer”);
	}
	private void UpdateCollections()
	{
		UpdateCollection(deck,
			game.Deck);
		UpdateCollection(p2Hand,
			game.Player2Hand);
		UpdateCollection(p1Hand,
			game.Player1Hand);
	}
	private void UpdateCollection(
		ObservableCollection<Card>
			target, IList<Card> source)
	{
		target.Clear();
		foreach (Card c in source)
		{
			target.Add(c);
		}
	}
	// rest of class elided for clarity
	...
}
Listing 4: Exposing an ICollectionView as a property
public class GameViewModel :
	INotifyPropertyChanged
{
	public GameViewModel()
	{
		game = new Game();
		deck =
CollectionViewSource.GetDefaultView(
			game.Deck );
		...
	}
	ICollectionView deck;
	public ICollectionView Deck
	{
		get { return deck; }
	}
	private void UpdateViews()
	{
		UpdateCollections();
		...
	}
	private void UpdateCollections()
	{
		Deck.Refresh();
		...
	}
	// Rest of class elided for clarity
	...
}
Listing 5: Using the Dispatcher within the GameViewModel
public class GameViewModel :
	INotifyPropertyChanged
{
	private Game game;
	private Dispatcher dispatcher;
	public GameViewModel()
	{
		dispatcher =
			Dispatcher.CurrentDispatcher;
		// other ctor code elided for
		// clarity
		...
	}
	private delegate void
		StartGameInvoker();
	private delegate void
		MakeMoveInvoker(int card);
	public void StartGame()
	{
		if (!dispatcher.CheckAccess())
		{
			dispatcher.BeginInvoke(
				DispatcherPriority.Normal,
				new StartGameInvoker(
				StartGame));
		} else {
			game.StartGame();
			UpdateViews();
		}
	}
	public void MakeMove(int card)
	{
		if (!dispatcher.CheckAccess())
		{
			dispatcher.BeginInvoke(
				DispatcherPriority.Normal,
				new MakeMoveInvoker(
				MakeMove), card);
		} else {
			game.MakeMove(card);
			UpdateViews();
		}
	}
	// rest of class elided for clarity
	...
}
Listing 6: The routed commands for the GameViewModel
public class GameViewModel :
	INotifyPropertyChanged
{
	public static RoutedUICommand
		Start = new RoutedUICommand(
		“Start Game”, “Start”,
		typeof(GameViewModel));
	public static RoutedCommand Move =
		new RoutedCommand(“Move”,
		typeof(GameViewModel));
	// rest of class elided for clarity
	...
}
Listing 7: The View
<!-- The core of the View -->
<Grid>
	<Grid.Resources>
	<Style x:Key=”deckList”
	TargetType=”{x:Type ListBox}”>
	<Setter Property=”ItemTemplate”>
	<Setter.Value>
	<DataTemplate DataType=”{...}”>
		<Button
			Command=”{x:Static viewModel:
			GameViewModel.Move}”
			CommandParameter=
			“{Binding Path=Value}”>
		<cards:PlayingCard
			CardValue=”{Binding
			Path=Value,...}” ... />
		</Button>
	</DataTemplate>
	</Setter.Value>
	</Setter>
	<!-- other setter properties
		elided for clarity -->
	...
	</Style>
	</Grid.Resources>
	<ListBox x:Name=”lstPlayer1”
		ItemsSource=”{Binding
		Path=Player1Hand}”
	Style=”{StaticResource handList}” />
	<ListBox Grid.Row=”1”
		x:Name=”lstDeck”
		ItemsSource=”{Binding Path=Deck}”
		Style=”{StaticResource deckList}”
		SelectionMode=”Single” />
	<ListBox Grid.Row=”2”
		x:Name=”lstPlayer2”
		ItemsSource=”{Binding
		Path=Player2Hand}”
	Style=”{StaticResource handList}” />
</Grid>
Listing 8: Mapping Commands using CommandBindings
<UserControl ... >
	<UserControl.CommandBindings>
		<CommandBinding
			Command=”{x:Static
			viewModel:GameViewModel.Move}”
			Executed=”Move_Executed” />
	</UserControl.CommandBindings>
	<Grid>
		<!-- Rest of the View -->
		...
	</Grid>
</UserControl>
// In the CardView.xaml.cs code
// behind
public partial class CardView :
	UserControl
{
	public CardView()
	{
		InitializeComponent();
	}
	private void Move_Executed(object
	sender, ExecutedRoutedEventArgs e)
	{
		GameViewModel g = (GameViewModel)
			DataContext;
		g.MakeMove( (int) e.Parameter );
	}
}
Listing 9: Setting the DataContext for the View
public partial class MainWindow :
	Window
{
	public MainWindow()
	{
		InitializeComponent();
		cardView.DataContext =
			new GameViewModel();
	}
	private void Start_Executed(object
	sender, ExecutedRoutedEventArgs e)
	{
		GameViewModel g = (GameViewModel)
			cardView.DataContext;
		g.StartGame();
	}
}
<!-- Excerpts of the XAML
for MainWindow
Note: XML namespaces not shown -->
<Window ... >
	<Window.CommandBindings>
		<CommandBinding
			Command=
“viewModel:GameViewModel.Start”
			Executed=”Start_Executed” />
	</Window.CommandBindings>
	<DockPanel LastChildFill=”True”>
		<Menu
			DockPanel.Dock=”Top”
	FocusManager.IsFocusScope=”False”>
			<MenuItem Header=”_File”>
				<MenuItem Header=
					“_Start Game”
					InputGestureText=”F5”
					Command=
	“viewModel:GameViewModel.Start” />
			<!-- Other menu items not
			shown -->
		</Menu>
		<view:CardView x:Name=”cardView”
			/>
	</DockPanel>
</Window>
Comments