While I had previously used JScript as if it was just a different dialect of VBScript, I quickly discovered that set free from this constraint it was a very different and initially very strange language. It is a functional language similar to Lisp or (dare I suggest) Forth. It is object oriented – but with a big difference. Here I’m going to use JScript 5.5 rather than JScript .NET because it is still the most broadly available client-side scripting language. (It is also worth mentioning that JScript .NET is compatible with 5.5, but it has a mode of operation that is more traditionally class-based.)
Prototype objects
The key to understanding how JScript differs from other object oriented languages you may have encountered is to realise that it is “prototype” based. It doesn’t use a class definition which is then instantiated to create objects. Instead, it creates new objects by creating copies of existing objects. You can expand objects by adding properties and methods, and even implement a sort of inheritance in this way. Just keep in mind that in JScript everything is an instantiated object, and there are no classes.So how do we create an object? There are a number of ways, but the simplest and most useful is to just define a function that you can think of as the object’s constructor – although this isn’t quite correct. Objects are collections of name value pairs. For example:
function MyObject() { }
…or the equivalent:
MyObject=function(){}
…creates a new object called MyObject with a function value. Once the object has been created you can add properties and methods to it using statements like:
MyObject.MyProperty=2;
MyObject.MyMethod=function() {
	alert(“method called”);
}
…which add MyProperty and MyMethod to the object. These are public and used as in:
alert(MyObject.MyProperty);
MyObject.MyMethod();
Objects can be expanded by additional methods and properties at any time. When you call an object method the this statement refers to the current object. This can be used to gain access to object properties and methods from the called method. For example:
MyObject.MyMethod=function() {
	alert(“method called”);
		alert(this.MyProperty);
		this.MyProperty=5;
}
…accesses and changes MyProperty in the object. Notice that any variables or functions defined within members are private to those members.
Creating new objects
So far what we have is very similar to the idea of a static class or object, where just one instance of the object exists without explicit instantiation. If you want to create new instances of an object then you have to do a little more than create methods and properties. The new operator, when applied to a function, will create a new object with no methods or properties, and then call the function with the this statement set to the new object. What this means is that if you include instructions within the function that create properties and methods prefixed by this, then the new object will be initialised to have exactly these methods and properties. Notice that the new object will not be able to access any of the properties or methods belonging to the original object. For example, following:MyObj2=new MyObject();MyObj2 has inherited none of the methods and properties of MyObject. To provide an inherited method and property the MyObject function would have to be redefined as:
function MyObject() {
	this.MyInheritedProperty=10;
	this.MyInheritedMethod=function()
	{
	alert(“MyInhertedMethod called”);
	}
}
Now the object created with new inherits the method and property which can be used as in:
MyObj2.MyInheritedMethod();
alert(MyObj2.MyInheritedProperty);
This is the sense in which the object function acts like a constructor for the new object. However, there is another way that objects can inherit methods and properties. JScript uses the rule that if a method or property cannot be found, it looks at the constructor object’s prototype property to see it can find it. In this sense the only methods/properties of the original object that are inherited without the use of the constructor are those defined as part of the prototype property. For example, if you change the definition of MyMethod to:
MyObject.prototype.MyMethod=function(){
	alert(“method called”);
	alert(this.MyProperty);
}
…this is defined outside of the constructor, and you will find that MyObj2 inherits it but that this.MyProperty is undefined. The reason for this is that this is set to MyObj2 and this doesn’t have a MyProperty. What is more with the new definition MyObject no longer has a MyMethod(). It now has a MyObject.prototype.MyMethod()which can be called using its full name. If you want to call MyMethod without the need to use prototype you can define it as:
MyObject.MyMethod = MyObject.prototype.MyMethod;Now MyObject has a MyMethod and a prototype.MyMethod member. Of course you can do the job the other way round if you want to. All you have to do is make sure that you don’t use brackets after the function name. If you do then the function is called rather than pointers being assigned. Providing inheritable functions using the prototype property needs a little care because when they are called the this statement doesn’t reference the base object, and this can cause the method to fail if it tries to use base object members.
So we now have a mechanism for creating static object methods and properties as in:
MyObject.MyProperty=2;We can create public inheritable properties and methods in the “constructor”:
function MyObject() { this.MyInheritedProperty=10; }
We can also create inheritable properties and methods using the prototype property of the base object:
MyObject.prototype.MyProperty=3;In both cases the this statement references the current instance and not the base object. If you want to refer to the base object’s properties and methods then you must write them explicitly, as in:
MyObject.prototype.MyMethod=function() {
	alert(“method called”);
	alert(MyObject.MyProperty);
}
For inherited methods declared within the constructor there are even private shared properties and methods. A private member can be declared in the constructor by simply not using the this statement. These private members cannot be accessed from instances of the object but they can be accessed from within the inherited methods, e.g.:
function MyObject() {
	var MyPrivateProperty=5;
	this.MyInheritedMethod=function() {
		alert(“MyInhertedMethod called”);
		alert(MyPrivateProperty);
}}
When MyInheritedMethod is called on an instance of MyObject it does correctly access MyPrivateProperty. There is one word of caution needed here. These private shared properties are static in the sense that all instances of the object share the same set of private variables.
JScript components
Using the object oriented properties of JScript in combination with the DOM – Document Object Model – it is fairly easy to implement code components. As an example, let’s build a new HTML component that allows the user to pan across a large image. This serves both as a demonstration of JScript’s objects and how it can work together with the DOM to create client-side components that are fast enough to respond in real time. Building components is one of the approaches used in AJAX to organise client-side code. Let’s see how it works.First we need to start a constructor for the new component. Let’s call it clipper and pass the constructor some parameters indicating its location, size and the graphic file to display:
function clipper(top,left,width,height,file) {
	clipper.controlList.push(this);
	this.index=clipper.controlList.length;
	this.top=top;
	this.left=left;
	this.width=width;
	this.height=height;
	this.cx=left+width/2;
	this.cy=top+height/2;
We need to store the parameters as public properties. The cx and cy property give the location of the centre of the control on the page. This is going to be used to provide a simple user interface for panning the image. If the user clicks on the image then it will be panned in the direction and amount given by the distance from the centre of the component. This isn’t a good user interface but it is easy to implement and serves as an adequate demonstration of how to handle events in general. One subtle point – unless you add the code to do so, changing the location and size properties won’t change the location and size of the component. This is left as a task for the interested reader. Notice also the use of the static object property contolList. This is an array that will be declared later that keeps track of the instances as they are created. The reason for storing this in the array will also become clear later. The index property gives an identifying integer to the instance of the component.
The next job is to create the first “visible” HTML element of the component. This is a simple Div set up to clip the image, which is positioned behind it by statements later in the constructor. To create the div element we use the createElement method:
this.frame=document.
	createElement(“div”);
Notice that this creates the element but doesn’t add it to the document. Frame is a public property that provides access to this element throughout the life of the component. In many ways the accessibility of this property is undesirable, but there isn’t anything that can be done to make it a private instance variable. Once we have created the element we can customise it:
this.frame.id=”frame”+this.index;
this.frame.style.position=”absolute”;
this.frame.style.top=this.top;
this.frame.style.left=this.left;
this.frame.style.width=this.width;
this.frame.style.height = this.height;
this.frame.style.zIndex=201;
this.frame.style.overflow=”hidden”;
After these instructions we have an element with a style that specifies absolute positioning that will clip anything positioned behind it, i.e. with a zIndex less than 201. Notice that the id includes the index number of the component so that if the user creates multiple instances it remains unique.
Next we need to set an event handler for the frame to detect when the user clicks on it. This is best implemented as a public static method for reasons that will become clear:
this.frame.onclick=clipper.onclick;Now we can add the new element:
document.body.appendChild(this.frame);The only other element that the component generates is an img tag, which is created in the same way:
this.image=
	document.createElement(“img”);
this.image.id=”image”+this.index;
this.image.src=file;
this.image.style.position=”absolute”;
this.image.style.top=0;
this.image.style.left=0;
this.image.style.zIndex=200;
this.frame.appendChild(this.image);
}
This is all straightforward, but notice that the element is added to the page as a child node of the frame. In HTML terms this just places the img tag inside the div tags. As this is the case it is positioned relative to the frame. If you are going to load a file that is local rather than via an HTTP server then make sure that the browser security is set low enough to allow this.
This completes the constructor function. All that is left is to implement the static object properties. These follow the constructor in the JScript file and they are executed immediately as the page is loaded. This means that the new static properties exist before the constructor is called. All we need in this case is the array that is used to store the this reference for each component as it is created:
clipper.controlList=new Array();The event handler is also best implemented as a static object method. The reason for this is that when the user clicks on an HTML element and an event handler is called, the this statement doesn’t give the current instance of the object. The reason for this is fairly obvious. After all, how could the system keep track of which object each HTML element belongs to? In short you have to implement a system that works out which object is involved from which HTML element is the source of the event. This, of course, is the same task for all instances of the component, so it is best implemented as a static object member that all instanced have access to. This first gets the event object and from this gets the source of the event:
clipper.onclick=function() {
	var e=window.event;
	var s=e.srcElement;
A custom function then uses the contents of the controlList and the source of the event to work out which instance the event belongs to:
	var c=clipper.GetControl(s);
	if(c==null)return;
On return from the function the variable c is either a this reference to the instance or null. Assuming that we now have the reference to the instance we can use this to update its public properties to move the picture in the click’s direction. First we compute the offset from the click to the centre of the image, which is then added to its current position:
	var x=-e.clientX+c.cx;
	var y=-e.clientY+c.cy;
	c.image.style.top =
		parseInt(c.image.style.top)+ y;
	c.image.style.left =
	  parseInt(c.image.style.left) + x;
}
Notice that we do need to use the parseInt method because the img element returns its value as a string complete with units.
All that is left is the GetControl static public method:
clipper.GetControl=function(s) {
	var c=clipper.controlList;
	for(var i=0;i<c.length;i++) {
		if (c[i].image==s) return c[i];
	}
	return null;
}
This is fairly simple, but notice that it assumes that the img element will be the source of the event – which is true in this case. In a more complicated component you might well have to check all of the elements that have been created by the component. In this case it might be a good idea to keep an array of their references.
Now everything is complete we can create as many instances of the component on a page as we need. For example, if you place button on the page and define its click event handler to be:
function Button1_onclick() {
	clip1=new clipper(10,10,200,200,”http://url.jpg”);
	clip2=new clipper(300,10,200,200”http://url.jpg”););
}
…when the page is displayed the user will see two views into the same picture and can pan the view point by clicking (see Figure 1). Of course this is a very simple example and far from a usable component but it only requires elaboration.
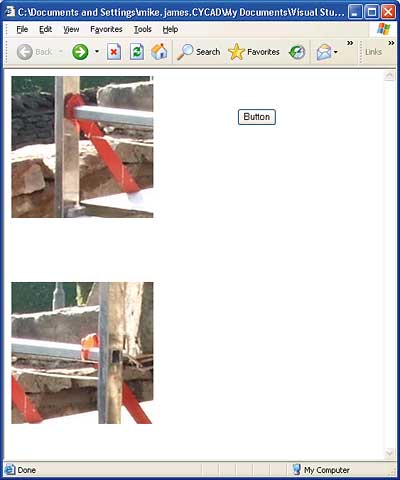
Figure 1: Two clipped images complete with user pan control
Once you have seen how JScript and DOM fit together to create components it’s not difficult to see that this is a good way of organising client-side JScript. If you add the ability to communicate with the server for more data and to send intermediate results then you essentially have an AJAX component.
There are only two serious design issues in using this approach. The most obvious is the need to implement a custom event handling system. In fact this isn’t a huge problem, and it can even be improved with just a little additional work. A better scheme is to simply use the static object as a “switching centre” that identifies which instance the event belongs to. Once it has identified the instance, it simply calls a corresponding instance method to handle the event instead of implementing the event handler itself. In our case this would mean adding to the constructor a single property:
this.OnClick=null;In the static object the event handler now changes to:
clipper.onclick=function() {
	var e=window.event;
	var s=e.srcElement;
	var c=clipper.GetControl(s);
	if(c==null)return;
	c.OnClick();
}
Of course nothing now happens unless either the user defines an event handler or you provide a default event handler. The point is that this design allows each instance to deal with its own events rather than having a single central event handler.
A second problem is the lack of private instance variables and the lack of any property procedures. For example, in this case the user might well try to move the component using:
Clip1.top=50;Of course this has no effect on the HTML elements created by the component. You might think that the solution would be to let the user have direct access to the element properties. For example,
Clip1.frame.style.top=50:…does move the location of the component. However, in a component with multiple top-level elements the user would have to remember to change the properties of all the elements. A better, but not ideal, solution is to provide a method that changes all of the properties needed for a move, e.g.
Clip1.MoveTo(50,40);JScript is an interesting language and its object oriented facilities can seem a little strange at first. You can use it to create client-side components that interact with the user. To create an AJAX component, all that is needed is to add the ability to interact, asynchronously with the server to get new data – but that’s another story.
Ian Elliot is a developer with I/O Workshops Ltd, a consultancy which solves real world problems for clients with widely varying requirements.
Comments