The OSGi Alliance is an industry standard group formed to address this problem. It turned out that the SOA folks are not the only ones who need such a solution. Services over the public phone network, cable based service operators, mobile devices networks, embedded device manufacturers, and component software vendors can all benefit from it. The OSGi membership currently includes IBM, Sun Microsystems, ORACLE, BEA, Redhat, Motorola, Nokia, Ericsson, SAP AG, IONA, Sprint and many others. Prior to wide industry acceptance, OSGi had a previous life as the Open Services Gateway initiative – a software library specifically designed for devices with embedded Java engines.
This article introduces you to the basic concepts behind the software framework specified by the OSGi Alliance. You will learn about the three widely available open source implementations of the OSGi framework. You will also have a hands-on opportunity to work with the Apache Group’s implementation – Apache Felix. The code example shows how you may use OSGi to deploy your own inter-dependent services.
Multiple Services Running within a Single VM
If you need to run multiple Java based services on a system, there are at least two ways you can do it. The first is to run a separate Java VM for each service; in this case, each running service in a Java VM is an independent operating system process. Most operating system provides persistent registry service for storing attributes, service lifecycle and dependencies management – these services are typically:- operating system specific
- work only if every one of your services runs as an independent process on the operating system
For example, a Java EE 5 server itself runs a Java VM in a system process, and all the web applications and EJBs run within the same physical Java VM on threads that are created and managed by the server VM. Another example might be an Integrated Development Environment such as Eclipse. In this case, the IDE may manage and run an ever-expanding set of plug-ins for different purposes.
Until the arrival of OSGi, however, there had not been any widely adopted standard APIs or frameworks for managing and deploying dependent or independent services within a single Java VM. Contrasting the OSGi approach with an operating system approach, you can readily see some of the advantages:
- complete operating system independence – the same OSGi compatible services can be managed in the same way across platforms supporting Java
- no need to have one OS-level process per service with potentially higher system efficiency
- you can write your own program to manage all the services, using only Java coding
Service provider interaction model
The OSGi framework maintains a Service Registry. Service providers can register with the framework and service consumers can then look up the service from the registry. In the case where a service A makes use of another service B, service A is actually both a service provider and a service consumer (of service B). This sort of dependency occurs frequently in the real-world, and the framework’s service registry is designed with this interaction in mind.Another common scenario is the availability of multiple service providers for the same service interface. For example, the directory service in a Java EE server may be implemented by several providers – each providing the same directory lookup interface. In this case, each provider registers itself as a provider of the same interface; but in the service description, each service also registers one or more properties. The directory consumer can then either:
- query the framework’s service registry for all the services that implement the lookup interface, and then examine each returned service’s property value to determine the one to use
- query the framework’s service registry for a particular implementation by providing a specific property value that identify the implementation
A bundle-centric view
Deployable services exist in the OSGi world as bundles. Bundles are archives of Java artifacts. You will hear a lot about bundles when perusing the OSGi literature. Physically, a bundle is a JAR file containing an OSGi-specific manifest. Just like web application WAR files in Java EE, an OSGi bundle should contain the code to a service (or feature) and all the related resources.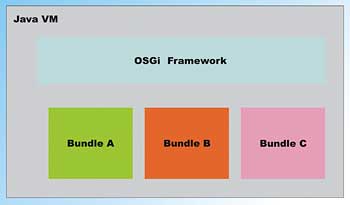
Figure 1: An OSGi bundle
Figure 1 reveals the anatomy of an OSGi bundle, showing that the JAR file contains the Java classes and resources that implement the service. It also has an OSGi specific bundle activator class (also called service activator). The OSGi framework can always find this class by examining the manifest file in the bundle and looking for the manifest header named Bundle-Activator. Like other JAR manifest files, the OSGi bundle manifest is a Java properties file with key-value pairs separated by “:”. For example, the following is the bundle manifest for an OSGi service that you will work with later. In this case, the bundle activator class is called uk.co.vsj.osgi.service1.ServiceActivator:
Bundle-Name: Service One
Bundle-Description: Example OSGI Service
Bundle-Vendor: VSJ UK
Bundle-Version: 1.0.0
Bundle-Activator: uk.co.vsj.osgi.
						service1.ServiceActivator
Import-Package: org.osgi.framework
In addition to the service activator class, the manifest also contains other header information, such as the packages that it needs to run (Import-Package), the packages that it may export for other bundles to use (Export-Package), and the execution environment that it requires (Bundle-RequiredExecutionEnvironment). Consult the OSGi specification for a complete list. The section of the OSGi specification that describes bundles is called the Module Layer – referring to the way that bundles modularizes features and functionality in a system.
How bundles become services
From inspection of the manifest, the OSGi framework can locate the service activator class within a bundle. Once the service activator is obtained, the framework can then call the start() and stop() methods in this class to start and stop the service. In fact, the OSGi specification describes a Life Cycle layer that includes a well-defined set of activities that you can perform on bundles. These activities are described in Table 1.| Table 1: Bundle Activities and State Transitions | |
| Activity | Description |
| Install | The bundle is located, persisted to managed storage, and is ready to be loaded into the OSGi framework from its image on disk. The bundle ends up in the INSTALLED state. |
| Resolve | An attempt is made to resolve the explicitly specified dependencies of the bundle. The bundle goes into the RESOLVED state if all dependencies can be resolved; otherwise it stays in the INSTALLED state. |
| Start | Explicitly specified dependencies of the bundle are verified by the OSGi framework before it loads the bundle. The bundle activator’s start() method has been called. The bundle transitions into the STARTING state, and then the ACTIVE state when the bundle activator’s start() method returns. Once in the ACTIVE state, an instance of the service has been activated. The service instance is sometimes called the Logical Bundle. |
| Stop | The bundle activator’s stop() method has been called, and the bundle transitions into the STOPPING state on its way back to the RESOLVED state upon completion. |
| Update | Used to upgrade existing bundles to newer version. The persistent copy of the bundle is updated. |
| Uninstall | The bundle is unloaded from the OSGi framework. The bundle is also removed from the managed storage of the framework. Once uninstalled, the OSGi framework no longer manages any instances of the bundle. |
As described in this table, you can change the bundle’s state according to a well-defined state transition diagram, shown in Figure 2, where the STARTING state is a transitional state when the bundle activator’s start() method has been called, but has not yet returned.
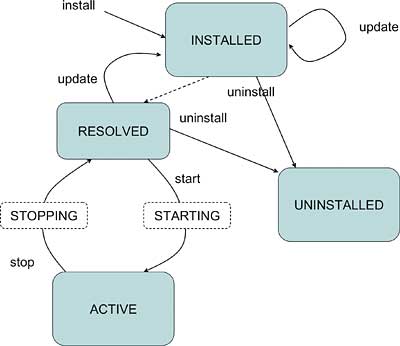
Figure 2: State diagram
The STOPPING state is a transitional state when the bundle activator’s stop() method has been called by the framework, but has not yet return. A bundle is RESOLVED only if its explicitly specified dependencies (in the manifest) are satisfied, and it is ready to be started. In the RESOLVED state, any exported packages from the bundle are available for use by other bundles that import the package.
You now know enough about the module layer, the service layer, and the life cycle layer of the OSGi model to actually start experimentation with an OSGi framework. One nice thing about using OSGi is that it is not an all-or-nothing affair, you can use as much (or as little) of the model as you need.
Hands on OSGi – finding open source implementations
The OSGi framework is one of those technologies that appear to be extremely intricate and complex until you actually try them out. Getting some hands-on time with an actual OSGi implementation will quickly convince you that everything is quite straightforward and intuitive.With wide industry support, and a history dating back to 1999, there’s no shortage of OSGi implementations. There are perhaps upwards of 50+ independent implementations of OSGi. However, not all of them are open source and/or publicly accessible. Three of the most popular and accessible open source implementations are:
- Apache Felix, from the Apache Group
- Knopflerfish, from Makeware (formerly Gatespace Telematics), released under open source BSD license
- Equinox from Eclipse open source community
This article focuses on the latest download of Apache Felix. All the code in this article has been tested against version 1.0.3, the latest available at the time of writing.
Installation of Felix boils down to unarchiving the downloaded compressed JAR file into an installation directory of your choice. To try the example, you will also need a version of the JDK installed and running. The code is tested with SUN JDK 1.5.0_11-b03.
Compilation and bundle building is scripted using Apache Ant in this article. You need to have Ant 1.6.5 or later installed.
Apache Felix
Apache Felix supports two general modes of operation. In Standalone mode you launch Apache Felix OSGi framework directly from the command line, which actually causes the framework to install and start a default bundle that operates the Felix command shell service and text-based user interface. This command shell enables you to interact with the available bundles by entering commands interactively. This is the mode that you will use throughout the example.The second mode of operation is to embed the Apache Felix framework within your own application programmatically. In this case, you can manage the dynamic configuration and life cycle of the available OSGi bundles all within the host application. Apache Felix becomes a sort of plug-in manager library working with OSGi bundles in this scenario. Consult the Apache Felix documentation if you need to learn more about how to embed the OSGi framework within your own host application.
Under your Felix installation directory, you should find bin\felix.jar.
You can run the Felix in the standalone interactive mode using the command:
java –jar bin\felix.jarThis starts the default launcher which actually starts all the bundles located in the bundle subdirectory just below the Felix installation directory. In this case, the shell service is installed and started:
Welcome to Felix.
=================

Enter profile name: testprofile
-> ps

START LEVEL 1
ID State Level Name
[ 0] [Active ] [ 0] System Bundle (1.0.3)
[ 1] [Active ] [ 1] Apache Felix Shell
	Service (1.0.0)
[ 2] [Active ] [ 1] Apache Felix Shell
	TUI (1.0.0)
[ 3] [Active ] [ 1] Apache Felix Bundle
	Repository (1.0.2)

-> shutdown
Bold face font indicates commands that you type. The ps command lists all of the installed bundle. You can type help to get a list of available command. Note the Felix initially prompts you for a profile. A profile is used by Felix to maintain persistent state between sessions. In other words, Felix remembers the bundles that are installed or started in a particular profile between runs. Felix stores the persisted bundle (profile) information under the Documents and Settings\<your user name>\.felix directory.
Creating OSGi Service Bundles
This example involves three services, each residing in its own OSGi bundle. These services are named service1, service2, and service3; and they are stored in service1.jar, service2.jar, and service3.jar respectively.Each of these services listens to a different TCP port for incoming client requests. In addition, service3 is dependent on a package exported by service2.
Table 2 describes each of these services, and their interdependency.
| Table 2: Services in the Example | |||
| Service | TCP Port for Requests | Package exported | Dependencies |
| Service1 | 9000 | None | None |
| Service1 | 9000 | None | None |
| Service2 | 9010 | uk.co.vsj.osgi.service2 | None |
| Service1 | 9000 | None | None |
| Service3 | 9020 | None | requires the package uk.co.vsj.osgi.service2 |
The code for each of the service is similar. They can be found under the src directory of the code download. The only difference is the servicePort that each service listens to. The code for uk.co.vsj.osgi.service1.ServiceOne is shown in the following listing:
public class ServiceOne implements Runnable {
	public static int servicePort = 9000;
	public boolean stopnow = false;
	public ServiceOne() {
	}
	public synchronized void
		startService() {
		stopnow = false;
		new Thread(this).start();
	}
	public synchronized void
		stopServiceAsync() {
		// assume stop service successful
		stopnow = true;
	}
	public static void main(String[]
		args) {
	}
	public ServerSocket serverSocket =
		null;
	public Socket clientSocket = null;
	public void run() {
		try
		{
			serverSocket = new
				ServerSocket(servicePort);
			while (!stopnow) {
				clientSocket =
					serverSocket.accept();
				PrintWriter toClient =
					new PrintWriter(
clientSocket.getOutputStream(), true);
				toClient.println(“OK”);
			}
		}
		catch(IOException ex)
		{
			ex.printStackTrace();
		} finally {
			try {
				if (clientSocket != null) {
					clientSocket.close();
					clientSocket = null;
				}
				if (serverSocket != null) {
				serverSocket.close();
				serverSocket = null;
				}
			} catch (Exception ex) {
				ex.printStackTrace();
			}
		}
	}
}
The bundle activator
The OSGi framework uses a bundle activator class to start and stop the service. Each of the service bundles has its own ServiceActivator class for this purpose. The code for uk.co.vsj.osgi.service1.ServiceActivator is shown in the following listing:package uk.co.vsj.osgi.service1;
import java.util.Hashtable;
import org.osgi.framework.BundleActivator;
import org.osgi.framework.BundleContext;
import org.osgi.framework.ServiceReference;
public class ServiceActivator
implements BundleActivator
{
private BundleContext m_context =
null;
public void start(
BundleContext context)
{
m_context = context;
Hashtable<String, String> dict =
new Hashtable<String, String>();
dict.put(“uk.co.vsj.service.name”,
“ServiceOne”);
ServiceOne service = new
ServiceOne();
service.startService();
m_context.registerService(
ServiceOne.class.getName(),
service, dict);
}
public void stop(BundleContext
context) throws Exception
{
ServiceReference[] refs =
context.getServiceReferences(
ServiceOne.class.getName(),
“(uk.co.vsj.service.name=ServiceOne)”);
if (refs != null) {
((ServiceOne)
context.getService(refs[0])).
stopServiceAsync();
}
}
}
Note that the start() method delegates to the service’s own startService() method, while the stop() method delegates to the stopServiceAsync() method.
In the start() method, Felix’s OSGi service registry is used to store a reference to the newly created service. Here, you can see the service registration with an associated property named uk.co.vsj.service.name (containing the value ServiceOne). Other dependent services can use Felix’s OSGi service registry to locate this particular service instance. In fact, the stop() method uses this technique in order to lookup the service instance.
The OSGi Bundle Manifest
A manifest file, located in the META-INF directory, provides bundle information to the OSGi framework. The file is named manifest.mf. The manifest.mf file for service1 was shown earlier in this article. The manifest.mf for service2 is:Bundle-Name: Service Two Bundle-Description: Example OSGI Service Bundle-Vendor: VSJ UK Bundle-Version: 1.0.0 Bundle-Activator: uk.co.vsj.osgi.service2.ServiceActivator Export-Package: uk.co.vsj.osgi.service2 Import-Package: org.osgi.frameworkIn service2’s manifest, the Export-Package header is used to specify the package exported by the bundle (uk.co.vsj.osgi.service2). In the manifest.mf for service3, the Import-Package header is used to specify its dependency on uk.co.vsj.osgi.service2 :
Bundle-Name: Service Three
Bundle-Description: Example OSGI Service
Bundle-Vendor: VSJ UK
Bundle-Version: 1.0.0
Bundle-Activator:
 uk.co.vsj.osgi.service3.ServiceActivator
Import-Package: org.osgi.framework,
	uk.co.vsj.osgi.service2
The OSGi bundle manifest
The source code includes an Ant build.xml script with pre-defined target to create the bundles. First, you need to edit the file to set your own Felix install directory:<project name=”vsjosgi” default=”bundle”>
<description>
description
</description>
<property name=”felixpath”
location=”c:/javabin/felix103”/>
<path id=”osgi.jar.path”
location=”${felixpath}/bin/felix.jar” />
...
To compile the code, use the command:
ant compileTo create the OSGi bundles, use the command:
ant bundleThe bundles are placed in the bundles subdirectory by the script.
Determining if services are running
In order to observe the status of the services as they are being manipulated in the Felix shell, we need a way to detect if a service is running – without relying on Felix itself.A ServiceMonitor GUI class is created for this purpose. This monitor displays three buttons on its GUI, corresponding to service1, service2, and service3. If the corresponding service is running, the button is shown in green. Any service that is not running will have its button shown in red. Figure 3 shows the ServiceMonitor in action, with the button for service 1 shown in green while those for service 2 and service 3 are shown in red. This means that service 1 is running while and service 2 and service 3 have stopped.
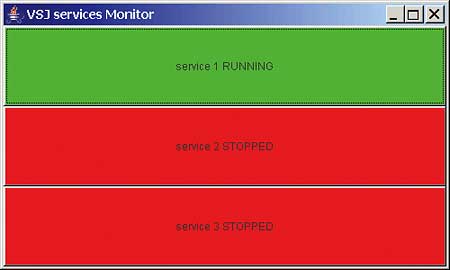
Figure 3. The independent ServiceMonitor
The ServiceMonitor is written without using any OSGi code. This allows us to observe the status of the services independently of the OSGi framework. The code simply tries to connect to the services one at a time, and successful connection results in a green button while failed attempts result in a red button.
The class is uk.co.vsj.ServiceMonitor, the code is shown in the following listing:
public class ServiceMonitor extends
		JFrame implements Runnable {
	public ServiceMonitor() {
		super(“VSJ services Monitor”);
	}
	public static ServiceMonitor mon =
		null;
	public static ServiceStatus services[]
		= new ServiceStatus[3];
	public static ServerStatusButton []
		buttons = null;
	public static void main(String[] args) {
		services[0] = new ServiceStatus(
			“service 1”,”localhost”,9000);
		services[1] = new ServiceStatus(
			“service 2”,”localhost”,9010);
		services[2] = new ServiceStatus(
			“service 3”,”localhost”,9020);
		mon = new ServiceMonitor();
		mon.setDefaultCloseOperation(
			JFrame.EXIT_ON_CLOSE);
		Box box = Box.createVerticalBox();
		buttons = new
	ServerStatusButton[services.length];
		for (int i = 0;
			i < services.length ; i++){
			buttons[i] = new
				ServerStatusButton(services[i]
				.getDisplayName());
			box.add(buttons[i]);
		}
		mon.add(box, BorderLayout.CENTER);
		mon.setSize(500, 300);
		mon.setVisible(true);
		new Thread(mon).start();
	}
	public void run() {
		Socket socket = null;
		while(true) {
			try {
				Thread.sleep(3000);
			} catch (InterruptedException e) {
				e.printStackTrace();
		}
		for (int curservice = 0;
			curservice < services.length;
				curservice++) {
			try {
				socket = new
					Socket(services[curservice].
					getServiceHost(),
					services[curservice].
					getServicePort());
				socket.setSoTimeout(1000);
		// try connecting for 1 second
				BufferedReader serverIn =
					new BufferedReader(new
					InputStreamReader(
					socket.getInputStream()));
				String resp =
					serverIn.readLine();
				if (resp.equals(“OK”)) {
					services[curservice].
						setStatus(true);
					final int curIndex =
						curservice;
					SwingUtilities.invokeLater(
						new Runnable() {
						public void run() {
							buttons[curIndex].
								setBackground(
								Color.GREEN);
							buttons[curIndex].
								setLabel(
								services[curIndex].
								getDisplayName()
								+ “ RUNNING”);
						}
					});
					}
			} catch (Exception ex) {
				services[curservice].
					setStatus(false);
				final int curIndex = curservice;
				SwingUtilities.invokeLater(new
					Runnable() {
						public void run() {
							buttons[curIndex].
						setBackground(Color.RED);
							buttons[curIndex].
							setLabel(services[
							curIndex].
							getDisplayName()+
							“ STOPPED”);
					}
				});
			} finally {
				try {
					if (socket != null) {
						socket.close();
						socket = null;
					}
				} catch (Exception ex) {
					ex.printStackTrace();
				}
			}
		}
		}
	}
}
There is an Ant script target to compile all code, create the bundles, and run this ServiceMonitor – use the command:
ant runmonitor
Trying out the example
First, start Felix. Next, set the bundles working directory (from source code download) with the cd command inside the Felix shell:-> cd file:..\vsjogsi\bundles\Make sure you set the path to where your own OSGi bundles are located, and include the trailing “\”. Now, start another console window and run the service monitor. All of the service buttons should be red at this time – no service is running.
Install the first service in the Felix shell:
-> install service1.jar
Bundle ID: 4
The bundle id is a short form for referring to the bundle in Felix (and your bundle id may be different than the ones shown here). Try a ps command, notice that ServiceOne is now Installed, but not yet Resolved.
-> ps
START LEVEL 1
ID State Level Name
[ 0] [Active ] [ 0] System Bundle (1.0.3)
[ 1] [Active ] [ 1] Apache Felix Shell
	Service (1.0.0)
[ 2] [Active ] [ 1] Apache Felix Shell
	TUI (1.0.0)
[ 3] [Active ] [ 1] Apache Felix Bundle
	Repository (1.0.2)
[ 4] [Installed ] [ 1] Service One
	(1.0.0)
Now, resolve the bundle:
-> resolve 4
-> ps
You should now see bundle 4 in the Resolved state, all dependencies satisfied. You can activate the service by:
-> start 4
-> ps
Felix now shows ServiceOne in the Active state. In addition, take a look at the ServiceMonitor that you have started, the service 1 button is now green! The OSGi framework has started ServiceOne.
Now, install and start ServiceThree:
-> install service3.jar
Bundle ID: 5
-> resolve 5
-> start 5
org.osgi.framework.BundleException:
	Unresolved package in bundle 5:
	package; (&(package=
	uk.co.vsj.osgi.service2)(version
	>=0.0.0))
-> ps
Note how Felix has prevented service3 from starting because of its dependency on the package exported by service2. Note that bundle 5 is in the Installed state, but not the Resolved state. The ServiceMonitor button for service3 remains red. Next, try:
-> install service2.jar
Bundle ID: 6
-> ps
Both bundle 5 and bundle 6 are now in the Installed state. Try:
-> resolve 5
-> ps
Note how both bundle 5 and bundle 6 are in the Resolved state. Felix has resolved service3’s dependency by moving service2 (bundle 6) into the Resolved state.
Finally, start both service2 and service 3:
-> start 5 6
-> ps
All services are now in the Active state, and you should see three green buttons in the ServiceMonitor.
Conclusions
The OSGi framework provides a standards-based platform and APIs for managing and deploying modularized services in a networked environment. Apache Felix is an open source, liberally licensed implementation of the OSGi framework that you can put to use within your own systems today.Sing Li has been writing software, and writing about software for twenty plus years. His specialities include scalable distributed computing systems and peer-to-peer technologies. He now spends a lot of time working with open source Java technologies.
Comments