Then a few years ago I started using ASP.NET, and the first thing that struck me was its lack of support for MVC. In the last few months Microsoft has released a new library for ASP.NET, the MVC library. This is currently in its second beta (at the time of writing) and is still in flux; however the general concepts are in place. In this article we will examine the library, how to use it, and the advantages of using the MVC pattern. To me, it feels like I’ve come home!
How to Build Web Applications
Web applications are complicated things. When you write a desktop application, everything is in front of you; you don’t need to worry about latency, or round trips, or whether the user’s state still exists. Web applications are built across multiple tiers, there’s the client and the server, and maybe a data tier as well. In the case of the web you have to think about all the things that are largely irrelevant in a desktop application. Many developers were used to building desktop applications, and in particular were used to the model defined on the desktop. An application consists of a set of windows, those windows fire events, and some code in the application handles the events, processes the data and produces output. Because of this, when Microsoft created ASP.NET the attempt was made to mimic the development mechanisms you would use if you were building a desktop application.From the outside an ASP.NET application looks like a Windows Forms application. For example, there are controls and events. Even though the user interacts with the browser on the client (e.g. by clicking on a button), ASP.NET captures that interaction and then fires events in the server code. An ASP.NET application persists the state of a page between requests. When the user sends a request to the server, ASP.NET rebuilds the page on the server, re-populates it with controls and re- populates those controls with their correct data. Any events triggered by the user are then fired in the server code. The page and other controls also generate events which can be handled in code.
This model has certain advantages. If you are used to the desktop metaphor of controls and events then the model is relatively easy to pick up; if you are building data rich, intranet applications with little navigation and only a few pages the model can work very well, as there are many rich controls that developers can use, such as the GridView control.
However, this model also has issues. There are major problems with testing. Model View Controller makes it much easier to unit test parts of the application in a way that is almost impossible in a traditional ASP.NET program. Another issue is state management; state in the ASP.NET model is tied to a page, managing navigation between pages can be tricky. Another important aspect is that of design. In an ASP.NET application, responsibilities tend to get intermingled. The page will manage the user interface; the data that is passed between the business logic and the page; and all the other state interactions within the application, such as storing and retrieving things in Session or Profile state.
What is Model View Controller?
Model View Controller (MVC from now on) was first thought of at Xerox PARC in the late 1970s. The primary aim of MVC was to divide an application into layers, where each layer has its own distinct set of responsibilities. The two easiest parts of MVC to understand are the Model and the View.The Model is the business rules, or data layer. This is where your application’s business logic lives. From the model you access data in a database, apply validation to it, and pass it back to the application to be displayed in some way. The model is not just a set of data access methods however; the model should provide a set of business logic used by the application. The model is also re-usable, that is, the code for the model could be used in different applications, be they ASP, ASP.NET, Windows Forms or something else entirely.
The View is the logic used to present the data to the user. The view could present the data as HTML, XML, using Windows Forms controls or as WPF. It is purely there to perform presentation, so there is no business logic in the view. The view will contain some logic, but this will be all to do with how the data should be displayed.
So, given that there is a Model and a View, how do you get data from one to the other? The answer lies in the Controller. The Controller is responsible for communication between the Model and the View. Because of this the Controller is also tied to specific technologies. The Controller has to know how the view works, and it also has to understand how to talk to the model.
In the original form of MVC, the model signalled changes in data by firing events that the view would listen for, and indeed, this is how MVC works today in desktop systems. However in the web where views are transient (the page only exists for the lifetime of the request), the controller is responsible for getting data from the model into the view and vice versa (see Figure 1).
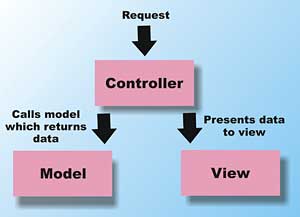
Figure 1: The MVC additions for ASP.NET provide support for using this pattern
MVC gives you a distinct separation of concerns; the view is responsible for the UI; the model is responsible for the business logic; and the controller is responsible for communication between these layers.
For example, the controller may extract data from URLs, query strings or sessions, before calling into the appropriate part of the model, and then deciding which view to render; the controller may render a different page depending on the current state of the application, or may render a different view entirely, for example RSS or HTML depending on the exact request parameters.
In traditional ASP.NET the Controller and the View are intertwined in the page class, hence the intermingling of responsibilities mentioned earlier. This means the navigation and controller logic are closely tied to the presentation logic, making the controller logic almost impossible to test.
If you want to use the code from this article or try ASP.NET MVC for yourself you can download the ASP.NET extensions .
Controllers
In a traditional ASP.NET application URLs are targeted at a page, for example default.aspx or showdata.aspx. In an MVC application URLs are targeted at application logic, typically in the form of classes. These classes are the controllers and decide how to process the incoming request.For example a request may come to:
http://localhost/application/User/Edit/1In this case we have a web application (called application), with a controller called User. This controller wants to perform the Edit action on the user identified by the value 1. No pages were harmed while making this request, although a page will be used to format the output. The request is instead targeted at a specific thing the user wants to do, in this case Edit User 1.
To see this working we will build a simple blog application. The application will store blog entries, display them, let the user add new entries and edit and delete existing entries.
In the browser the application will appear as shown in Figure 2. As you can see, this is very simple, although it will let us explore the various aspects of ASP.NET MVC.
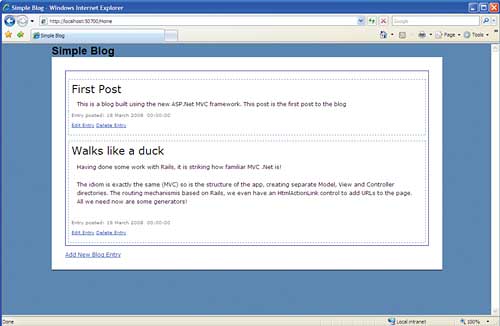
Figure 2: An example blog application
Displaying Blog Entries
As a first cut of the application, it has two database tables, one for blog entries and one for comments. The blog entry table contains the title, text and created date for the blog, along with an Id column that is the primary key for the entry.In the application we will also use LINQ to SQL to simplify the data access. I’m not going to cover LINQ here; there are enough books and articles on how to get started.
The first thing to do is to fire up Visual Studio 2008 and, assuming you have the MVC extensions installed, create a new MVC project. Select File..New..Project and you will see the ASP.NET MVC Web Application project listed. When prompted also create the test project.
When you have created a project, look at the project outline, as shown in Figure 3. You’ll notice that this is like no other ASP.NET project you’ve created.
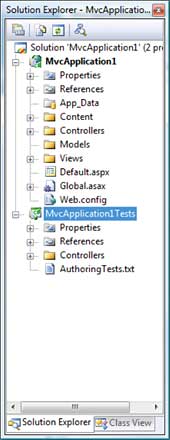
Figure 3: The project outline
You will see that the application is structured into different directories; you should recognise App_Data, Properties and References. The others are specific to this application type; there are directories called: Controllers, Models, Views and Content. Expanding Controllers, Views and Content will show the default files placed there by the project, while the Models directory is empty. The Controllers, Models and Views folders are self-explanatory, this is where the code for these parts of the application live. The Content directory contains content shared across the entire site, in this case a common stylesheet. If we run the application we will see a default page appearing that gives an introduction to ASP.NET MVC. Clicking on the Home tab at the top of the page takes us to the http://localhost/Home URL, while clicking on the About tab takes us to the http://localhost/Home/About URL. This shows the common forms of URLs used in MVC applications. Notice that there are no extensions used here, so what is going on? How does this request reach its destination?
Routing
MVC applications route request to the specified location based on a set of rules. These rules are defined in the application by creating a set of routes. These routes are specified in the global.asax file, this is the same GlobalApplication class that classic ASP.NET applications use. Opening this file shows a method called RegisterRoutes that is called from Application_Start. This method creates two routes:routes.Add(new Route(
"{controller}/{action}/{id}",
new MvcRouteHandler())
{
Defaults = new RouteValueDictionary(
new { action = "Index", id = "" }),
});
routes.Add(new Route("Default.aspx",
new MvcRouteHandler())
{
Defaults = new RouteValueDictionary(
new { controller = "Home",
action = "Index", id = "" }),
});
These Routes are initialized partly with a constructor and partly using the new initializer syntax in C# 3.0. The first route says: for anything that matches {controller}/{action}/{id} (where the {} are placeholders) map the {controller} section to an MVC Controller class and {action} to a public method on the class, pass {id} as a parameter to that method, and the default part says that if {action} and {id} are missing, use “Index” and “” respectively for these values. The second Route says that if anybody requests Default.aspx route them to /Home/Index, as given by the default values. Routes are checked in the order they are specified in the RouteTable. Looking at our URLs (http://localhost/Home and http://localhost/Home/About), these map to: Controller=Home; Action=Index; Id=”” in the first case and Controller=Home; Action=About; Id=”” in the second.
Once the route has been mapped MVC looks for a matching controller. It does this by looking for a class called {xxx}Controller which implements the IController interface. So for a controller called Home it looks for a class called called HomeController that implements IController. In the default application there is a class in the Controllers directory called HomeController that derives from Controller. Controller implements the IController interface so this satisfies the criteria. Note that the class does not have to be in the Controllers folder but it’s obviously convenient to place the code there.
Opening the controller class we see that it has two methods: Index and About. These satisfy the second part of the routing from above, these are the actions. In this case the actions do no work, i.e. they do not touch the model, but they do render the appropriate view. They do this by executing the RenderView method, passing the name of the view.
For View rendering, location does matter. If we were to change the value passed to one of the calls to RenderView to a non-existent view we would see the error shown in Figure 4.
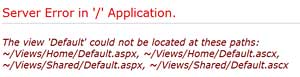
Figure 4: A RenderView error
The RenderView is looking for the view in the /Views/Home folder and in the /Views/Shared folder (note that these folders are not browesable, i.e. if you pointed a browser at http://localhost/Views/Home/Index.aspx you would get a 404 error).
When the application calls RenderView(“Index”) the page Index.aspx is found in /Views/Home and this page is rendered. This is a fairly standard aspx page. It has code behind, runat=”server” controls and a master page. Notice that the master page for the view is in the Shared folder, and is called site.master.
Doing Work
Now that some of the basics are in place, we can add some functionality. For this example the master page and stylesheet have been changed to make things simpler; I’m not going to detail those changes here but they are provided on the VSJ website. We can now start building our model. For this we will use LINQ; add the model code by right-clicking on the models directory in Visual Studio and selecting Add..New Item; from there you select “LINQ to SQL Classes” (it’s easier to find this in the Data section of the dialog box) and add a Blog.dbml file. Open up server explorer and add the database tables wanted in the model, initially these will be the BlogEntries and Comments tables, see Figure 5.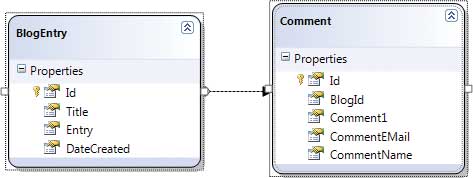
Figure 5: Database table for BlogEntry and Comment
There are also some stored procedures defined in the database, these are added to the model and then the behaviour of the model is configured to use these stored procedures.
Remember that the model will be called from the controller. It’s not a good idea to leak details of the model’s underlying implementation into the rest of the application, especially as the model, as it stands, is generated code. It’s good to have another layer on top of the generated code to hide away the mode details. Luckily LINQ to SQL provides a way to do this easily. The primary class generated by LINQ to SQL is the DataContext, ours is called BlogDataContext, and this is a partial class. That means we can create another part of this partial and put our data access code there. This code should be generic enough to be used by any controller, and also hide away the details of the underlying model implementation.
Our class looks like this:
public partial class BlogDataContext
{
	public List<BlogEntry>
		GetBlogEntries()
	{
		return
			BlogEntries.OrderByDescending(
			e => e.DateCreated)
			.ToList<BlogEntry>();
	}

	public bool AddBlogEntry(string title,
		string entryText){}
	public bool DeleteBlogEntryById(
		int id){}
	public BlogEntry EditBlogEntry(
		int id) {}
	public void UpdateBlogEntry(int id,
		string title, string entryText){}
}
There are methods here to add, delete, edit and update a blog entry as well as one to get the entries. Only the code for the GetBlogEntries is shown. As you can see in this case it’s a fairly simple wrapper over the LINQ code that gets the entries ordered by descending date. Some of the other methods are a little more complicated. Once the model is in place the controller can be written to call the model. Controllers typically do at least two things, call the model and pass the data on to the view. We want the default URL to display the blog entries in date order, so we need to edit the HomeController’s Index method.
We change the Index method to look like this:
BlogDataContext ctx =
	new BlogDataContext();
var entries = ctx.GetBlogEntries();
This gets the blog entries from the model, and we now want to pass them onto the view.
Views
The job of the view is to take the data from the model and render it back to the user. By default views are aspx pages which use the standard code behind model. However the view engine is replaceable and several different view engines already exists for ASP.NET MVC. Feel free to choose the one you are most comfortable with.Views derive from ViewPage which itself derives from the standard ASP.NET Page class. In the page you can use server side controls. This follows the same layout model as standard aspx pages, the controls must be inside a <form runat=”server” tag, for them to work. Be aware that these controls will carry viewstate and, as we are using a server side form, postbacks will happen. Events will get routed through the controller and then fire in the page (at least in the current release). This goes against the MVC model, HTTP requests should be handled only by the controller, do not mix the postback and the MVC model. The view should not be involved with processing the HTTP request in its guise as an event, the view is purely about presentation, only the controller should care about the HTTP request. Here Be Dragons!
We will use server side controls but only for databinding, to present data, we will not process any events in the page.
Passing Data
Views and controllers share a property called ‘ViewData’. You populate the ViewData in the controller and the data is then available in the View. We can set the ViewData up inside the controller in various ways. The first way is to treat the ViewData as a dictionary and add your data to it:ViewData["blogEntries"] = ctx.GetBlogEntries();Then in the view you can retrieve the data from the ViewData in the code behind:
var entries = ViewData["blogEntries"];You can also create your own ViewData type:
class BlogEntryViewData
{
	public List<BlogEntry> BlogEntries {
		get; set; }
}

BlogEntryViewData viewData =
	new BlogEntryViewData { BlogEntries =
		ctx.GetBlogEntries() };
When you do this, you pass the ViewData instance as the second parameter to RenderView.
RenderView("Index", viewData);
And again it’s available in the View, in this case the code is the same as above, but here the key is the property name from the class:
var entries = ViewData["BlogEntries"];The third option is one we will use here. The view has another base class it can derive from, ViewPage<T>. In this case, T, is the type of data that will be available in the ViewData member. If our view derives from ViewPage<T>, then ViewData is defined as a variable of type T. This gives type safe access to the ViewData.
In our case we want to pass a List<BlogEntry> to the view from the controller. To use a typesafe version of the ViewData we derive out view from ViewPage<List<BlogEntry>>, like this:
public partial class Index :
	ViewPage<List<BlogEntry>>
The ViewData variable will now be of type List<BlogEntry>. In this case, as the data us a list we can use databinding to display the data. In the page we can use the new ListView control shipped with 3.5.
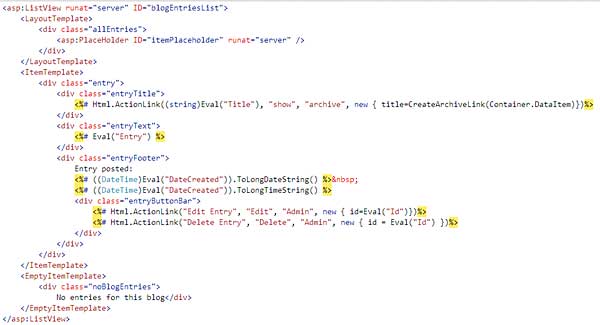
Figure 6: Page in ListView
The page will look as shown in Figure 6, and the code behind like this:
protected void Page_Load()
{
	blogEntriesList.DataSource = ViewData;
	blogEntriesList.DataBind();
}
In this case we are setting the DataSource of the ListView to be a List<BlogEntry> and then binding it. Notice that as the control is data bound we can use <%# Eval(…) %> to get the data from the current row that we are processing. This is all very like standard aspx.
The interesting thing in the code are these lines:
<%# Html.ActionLink("Edit Entry",
	"Edit", "Admin",
	new { id=Eval("Id")})%>
<%# Html.ActionLink("Delete Entry",
	"Delete", "Admin",
	new { id = Eval("Id") })%>
The HTML object is a helper added by the MVC framework, it has a set of helper methods that can be used inside a page to produce HTML output. One of the most important of these is ActionLink. This method will produce an anchor tag that maps to a route. In this case we are adding two links to the page, one to edit the entry and one to delete it (note the complete lack of authentication here; anybody can do this). The first parameter to the ActionLink method is the text that will appear on the page, the rest of the parameters specify how to make up the link, they are the action, the controller, and an object specifying any other data the link needs. This code produces links which look like http://localhost/Admin/Edit/1 and http://localhost/Admin/Delete/1 respectively, where ‘1’ is the id of this item, Admin is the controller and Edit is the action. These links follow the structure defined in the Routes table. Clicking on these sends a request to the appropriate controller to perform this work.
Conclusion
In this brief introduction to ASP.NET MVC we’ve seen how to create a new MVC application; how the application separates the concerns of a web developer into the business layer, the view logic and a controller tying these together. We’ve looked at how we can pass data between the layers by using the ViewData and how we can format that data in the View by using standard ASP.NET controls, and also using the new Html helper class.This is only the start of what MVC can do. In the future we will look at testing, security, managing data across sessions, routing requests and replacing the view engine.
Kevin Jones has been involved in software development and design for more years than he cares to remember, originally as a mainframe programmer in the days when “client-server computing” wasn’t called “client-server computing”. He has been involved in training and consultancy since 1990, and is the co-author of Servlets and JavaServer Pages: The J2EE Technology Web Tier. He is also a regular speaker at Bearpark’s DevWeek and Software Architect conferences.
Comments