The most common giveaway a user experiences when an enterprise application has been moved to the cloud is the sudden appearance of a username/password dialogue box. Developers and IT teams have been hamstrung because of the problems of extending their Active Directory Infrastructure in to the cloud along with its attendant applications.This is where the combined capabilities of Windows Azure’s App Fabric Access Control Service v2 (App Fab ACS v2) and Windows Server’s Active Directory Federation Services 2.0 (ADFS 2.0) can solve the problem relatively simply.
On-premise applications have factored out their authentication to Active Directory for many years with support for Integrated Windows Authentication: Sharepoint, Exchange, SQL Server, File/Print and so on. The notion is that you hit ctrl-alt-del to log on to the network and prove you are who you say you are. Under the covers, security tokens are transported between your computer and the Active Directory servers. Let’s say a few minutes later you connect to an Exchange server; a Kerberos dialogue which moves specialised security tokens around - Kerberos tickets - is fired up between your logged-in workstation, the Exchange server and an Active Directory server.
In federation technologies we can do pretty much the same thing. Instead of building our own authentication or using features which were really built in to Visual Studio for consumer type applications, we can factor out the authentication and allow an on-premise Active Directory to do that work for us - and it’s not all that difficult.
The Kerberos protocol was designed from the outset to work in a contained corporate network. Federation technologies dispense with such complexities and use web protocols to move security tokens around (typically Security Assertion Markup Language, or SAML, tokens) in a vaguely similar way. Of course the advantage is that they can traverse the Internet and most importantly get in to and out of most corporate perimeter security without raised voices from the security team; HTTP and HTTPS are the only requirements.
Federation Primer
Before we get in to the guts of Visual Studio and ADFS 2.0, let’s just have a quick lesson in federation. A key component is the Security Token Service (STS): a service that issues security tokens, usually in response to some form of authentication exchange (maybe username and password) or in response to itself receiving a security token. There are 2 broad types of STS – Identity Providers (IPs) and Federation Providers (FPs).
In this example there are 4 players:
- The Identity Provider, fulfilled by ADFS. It issues SAML tokens which are related to the logged-on user.
- The Federation Provider, fulfilled by App Fab ACS. It receives SAML tokens from ADFS 2.0 and in turn issues its own SAML tokens.
- The Relying Party (RP), fulfilled by the web application. It is protected by Windows Identity Foundation (WIF) and consumes tokens issued by App Fab ACS.
- The user’s workstation. This and the logged-on user are at the centre of all this because web-browser redirects enable it to link all these services together by visiting each one of them in turn according to the rules of the protocol.
Figures 1 and 2 explain the journey.
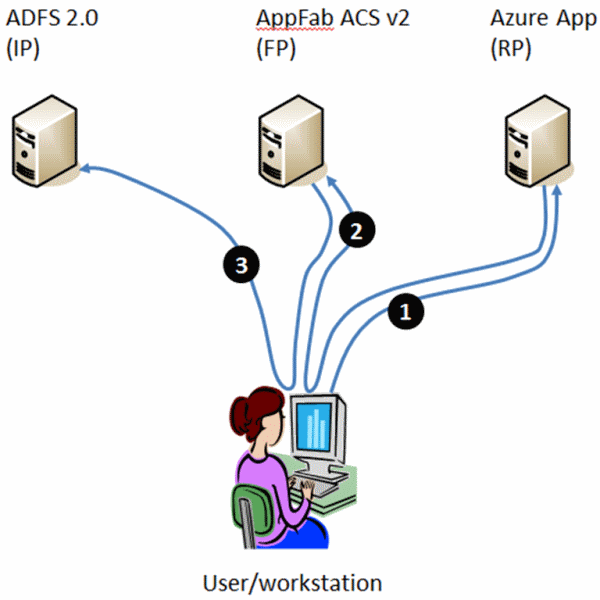
Figure 1 : Browser Redirects
- The user visits the relying party application. WIF notices the user is attempting to access a URL that is protected and that the user is not authenticated. It redirects the user’s browser to …
- …App Fab ACS which also notices the user isn’t authenticated. A process of finding where the user should go to authenticate runs – in this case it’s simple because only one place is configured, so it redirects the user to…
- …ADFS 2.0. This is an internal website, protected by Windows Integrated Authentication. ADFS 2.0 gets the context of the user and uses that to retrieve information about them from AD. In this case let’s say it grabs the User-Principal-Name (UPN – a name of the form [email protected]).
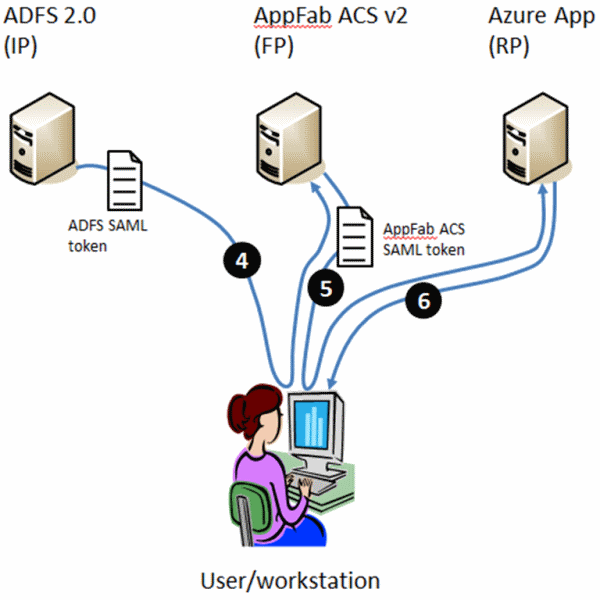
Figure 2: HTTP POST Redirects containing a SAML Token
- It populates a SAML token with this data, calling it the “name”, digitally signs the token and redirects the user’s browser back to App Fab ACS with the SAML token as POST data. App Fab ACS validates the signature on the SAML token and is happy that the user must have therefore successfully authenticated. It creates its own SAML token and copies the “name” claim in to it before finally digitally signing the token.
- It then redirects the user’s browser back to the relying party with the new SAML token as POST data. WIF in the relying party application inspects the token and reasons the user must have successfully authenticated.
- It allows the user to access the URL and returns the requested page. It also creates an authentication cookie which is forwarded to the user’s web browser so the user doesn’t have to suffer this process for every request to a resource within the base URL.
You can see there are 2 “trust” relationships here:
- Between the relying party application and App Fab ACS
- Between App Fab ACS and ADFS 2.0.
If you really want to get to grips with federation, check out the federation primer. You may also find it useful to understand encryption, certificates and digital signatures.
Tutorial
In this example, we’ll look at the tasks involved in building a cloud application that uses federated Active Directory authentication.
Pre-Requisites
Before starting on this tutorial, you’ll need to install the following items onto your development machine.
- Windows Identity Foundation runtime from here.
- Windows Identity Foundation SDK from here.
- Windows Azure SDK and Windows Azure Tools for Visual Studio from here.
build a Windows Server 2008 R2 or Windows Server 2008 SP2 machine and add it onto your on-premise domain infrastructure. You may want to consider making it the domain controller for a test domain rather than attaching it to a ‘live’ domain. Onto this server, you’ll also need to install
- Internet Information Services (IIS) 7 or 7.5
- .NET Framework 3.5 SP1
- SQL Server 2005 (Express, Standard, Enterprise), or SQL Server 2008 (Express, Standard, Enterprise)
ADFS 2.0 Server can then be downloaded from here and installed onto the machine. Be careful to install from and read the instructions on the download page and not to simply add the Active Directory Federation Services role from Server Manager in Windows Server. That would give you ADFS version 1.0. The configuration will create an ADFS web site, which will need to be protected by SSL which means using a certificate to protect the site.
Once ADFS is installed and the federation metadata document saved, you can follow this tutorial. The video below shows all the screens described in the text so you can watch it through first if you prefer.
Click-by-click: Using on-premise Active Directory to authenticate to a Windows Azure App from Steve Plank on Vimeo.
Create the Application in Visual Studio
- Right-click Visual Studio on the Start Menu and select Run as administrator. The Windows Azure compute and storage emulators require this.
- Create a new project: In the Main Page in Visual Studio, click
New Project.
- The New Project dialogue fires up:
- Select Visual C#|Cloud, give the project a name then click
OK. Ensure the name has no spaces. The resulting Windows Azure package
will inherit the project name, but Windows Azure doesn’t permit spaces
in package names.
- The New Windows Azure Application dialogue appears.
- Select ASP.Net Web Site from the left hand pane, click the “>”
button. In the right hand pane click the edit logo (a pencil) and rename the
Web Role to “WebSite”, then click OK.
- The project is created and Solution Explorer is populated with the project’s components.
- In Solution Explorer navigate to WebSite|References,
right-click and select Add Reference.
- The Add Reference dialogue appears.
- Select the .Net tab and select Microsoft.IdentityModel from the main pane then click OK.
- In Solution Explorer navigate to WebSite|References|Microsoft.IdentityModel. In the properties sheet, set Copy Local to True. This is because the Microsoft.IdentityModel assembly is not included as part of the “golden image” that Microsoft provisions in the Windows Azure data-centers. A more elegant way to deal with this is to create a Windows Azure Startup Task and install the WIF runtime as part of the task.
Create the Relying Party Trust
A Relying Party Trust needs to be created between your application and App Fab ACS. This will involve the exchange of XML federation metadata documents that contain information such as certificate details and the URLs of endpoints as shown in the figure 3 below:
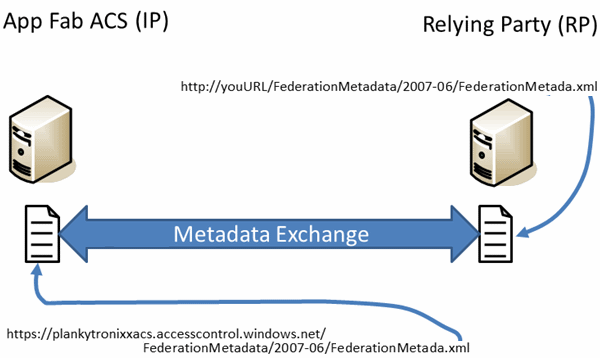
Figure 3: Relying Party Trust – exchanging Federation Metadata.
First, you need to create an App Fab ACS namespace.
- If you don’t have an existing Windows Azure subscription, sign-up for a free trial subscription here.
- Once your subscription is activated, go to the Windows Azure portal at http://windows.azure.com and log in using the Live ID you used to register for the free trial.
- In the left hand pane, select Service Bus, Access Control and Caching.
- In the main pane, select your subscription and then on the ribbon click New Namespace.
- Give the namespace a name. In this example we’ll use my namespace, for which the URL is https://plankytronixxacs.accesscontrol.windows.net.
- In the main pane, select your namespace and then click Access Control on the ribbon as shown in figure 4 below:
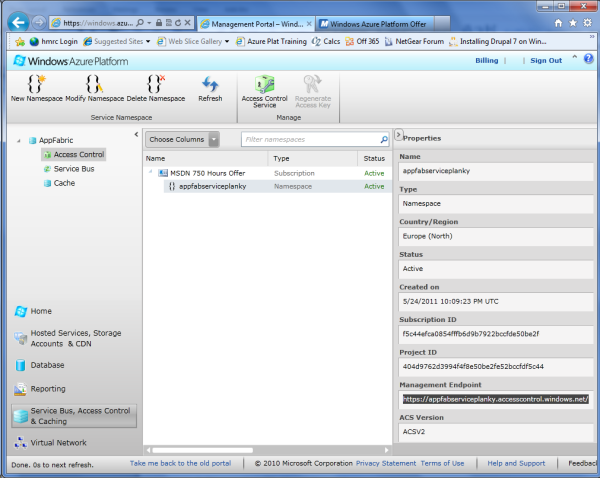
Figure 4: The App Fab ACS namespace.
- Depending on the browser you are using you might get a new tab or a new instance of the browser. The focus doesn’t always jump to the active window – so be aware of that.
- On the ACS Management home page, in the left pane, click Application Integration.
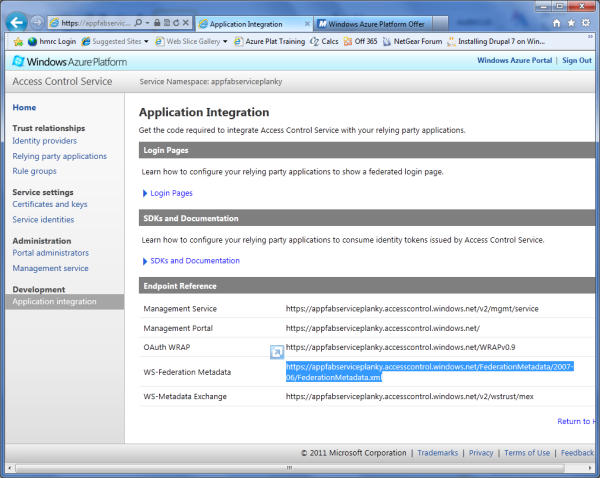
- A list of endpoints appears as shown in figure 5 above.
- Select the URL for the WS-Federation endpoint and copy it to the paste buffer.
This will be used in Visual Studio for the federation metadata exchange. In
my example, the URL is:
https://plankytronixxacs.accesscontrol.windows.net/FederationMetadata/2007-06/FederationMetada.xml
The next job is to configure the Visual Studio side of the federation metadata exchange.
- In Visual Studio| Solution Explorer, navigate to the WebSite project. Right-click and select Add STS reference from the context menu – as shown in figure 6 below:
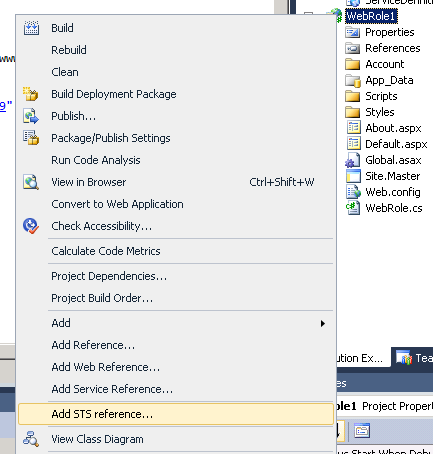
Figure 6: FedUtil
- The Federation Utility wizard appears.
- The location of web.config should already be populated. The final URL of
the application, once hosted in Windows Azure should be entered in to the
Application URI text box. If at this stage, you wish to run the application
in the Windows Azure compute emulator, you can just enter
http://127.0.0.1:81 which is the default address
and port the emulator runs on. But let’s assume you want to test in a
fully deployed fashion. It’d be a good idea at this stage to check that
the domain name you intend to use is available. Windows Azure will automatically
deploy to http://<your-chosen-name>.cloudapp.net . In this example I’ll
assume the rather unimaginative http://adfstoacs.cloudapp.net
. Once entered, click Next.
- A warning that the application is not hosted over an https connection
appears. Click Yes.
- The Security Token Service page appears.
- A warning that the application is not hosted over an https connection
appears. Click Yes.
- Select Use an existing STS, then paste the URL you copied from step
8 above in to the text box and click Test location. Refer to the Federation
Metadata exchange diagram depicted in figure x to understand what is happening.
- A web browser appears with the Federation Metadata document displayed in XML. This validates that you can retrieve the federation metadata document from your newly created ACS namespace.
- Click Next.
- The Security token encryption page appears.
- Select No encryption and click Next.
- The Offered claims page appears.
- Leave the default claims (Name Identifier and Identity Provider) as they
are and click Next.
- The Summary page appears.
- You could schedule a regular job for WIF to go to ACS’s federation metadata URL and retrieve the latest document from ACS every night at midnight. This is particularly useful for when the ACS certificate expires and a new one is added. For this tutorial, don’t worry about it. Leave the check-box clear and click Finish then click OK to the Confirmation messagebox.
- In Solution Explorer notice there is now a folder structure for the federation metadata documents: FederationMetada/2007-06/FederationMetadata.xml. Fedutil has created this document and also made some changes to web.config to configure WIF. For example the URL of the App Fab ACS service’s federation metadata document has been added (along with many other things – to see them all, reference the click-by-click video at the top of the tutorial).
- ASP.Net tries to protect itself and examines POST data to see if it looks
reasonable. A SAML token is not something it would normally encounter and it
will reject the POST. There is a class (available in the
Windows Azure Platform Training Kit, in the
\WAPTK\Labs\WindowsAzureAndPassiveFederation\Source\Assets folder) that can
be used to validate the POST data is a genuine SAML token.
- Open web.config and find the </system.web> section delimiter.
Immediately above it, enter the following httpRuntime element:
    </roleManager>
    <machineKey decryption="AES" decryptionKey="…" validation="SHA1" validationKey="…" />
    <httpRuntime requestValidationType="SampleRequestValidator"/>
  </system.web>
<system.webServer>
- Open web.config and find the </system.web> section delimiter.
Immediately above it, enter the following httpRuntime element:
- In Solution Explorer, navigate to the WebSite node, right-click
and select Add|Existing Item and navigate to wherever you have
saved the class, then select it and click OK.
- The SampleRequestValidator class is added to the project in Solution Explorer.
The next task is to configure a relying party application in App Fab ACS.
- Go to the management page for your App Fab ACS namespace (you can access it via the Service Bus, Access Control & Caching button on the Windows Azure management portal homepage).
- In the left hand pane, click Relying party applications then in the
main pane, click Add Relying Party Application.
- The Add Relying Party Application page appears.
- Enter a name for the application (in my case it will be adfstoacs
then click the Import WS-Federation Metadata radio button. Click the
File radio button, then click Browse and navigate to the federation
metadata document in your Visual Studio Project – the folder/file name within
the web site is FederationMatadata\2007-06\FederationMetadata.xml - and click
Open.
- The Add Relying Party page re-appears.
- Leave all the other fields in their default state and click the Save
button.
- The Relying Party Applications page appears with the configured application listed.
- Click the hyperlink that represents your relying party application (mine
is adfstoacs).
- The Edit Relying Party page appears.
- Note the Realm and Return URL fields are now populated. Note
also there is a Default Rule Group which will be configured later. Click
Cancel.
- The Relying Party Applications page appears.
- Aside from specifying the Identity Provider to use, which we’ll configure later, the Relying Party Trust is now configured.
Creating the Federation Trust
The next task is to set up the federation trust between the on-premise ADFS 2.0 Server and your App Fab ACS service.
This will involve exchanging the metadata documents from the 2 services and providing descriptive names and so on as shown in figure 7 below:
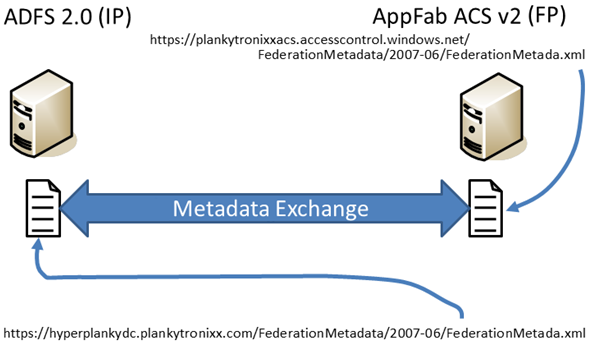
Figure 7: Federation Trust – exchanging federation metadata.
With the federation trust configured, it means App Fab ACS knows about your ADFS Server. And your ADFS Server knows about App Fab ACS.
- Open the ADFS Management Console and navigate to Relying Party Trusts
right-click it and select Add Relying Party Trust.
- The Add Relying Party Trust Wizard appears. It’s important to remember here that App Fab ACS’s relationship to ADFS is that of a Relying Party; that App Fab ACS is the consumer of tokens and ADFS is the issuer of tokens.
- Click Start.
- The Select Data Source screen appears.
- You can see there is an option to import data about the relying party
published online or on a local network. This refers to the federation metadata
endpoint for App Fab ACS. This can be retrieved from App Fab ACS as detailed
in step 8 of the Creating a Relying Party Trust section. Past the URL in to
the text box and click Next.
- The Specify Display Name screen appears. Notice the display name is auto-filled. It’s the DNS domain-name of the App Fab ACS Service, as retrieved from the FederationMetadata.xml document.
- Click Next.
- The Choose Issuance Authorization Rules screen appears.
- Leave Permit all user to access this relying party checked and click
Next.
- The Ready to Add Trust screen appears.
- Click Next.
- The Finish page appears.
- Leave the Open the Edit Claim Rules dialog for this relying party when
the wizard closes check box checked then click Close.
- The Edit Claim Rules for <acs-namespace> dialog appears. In my case this screen’s title is Edit Claim Rules for plankytronixxacs.accesscontrol.windows.net.
- Ensure the Issuance Transform Rules tab is selected, then click
Add Rule.
- The Add Transform Claim Rule Wizard appears.
- Ensure Send LDAP Attributes as Claims is selected in the Claim
rule template drop-down, then click Next.
- The Configure Rule screen appears.
- In the Claim rule name text box, type “Default Rule for App
Fab ACS”. In the Attribute store dropdown, select Active Directory
then set the LDAP Attribute to User-Principal-Name and Outgoing Claim Type to
Name. Then click Finish.
In Active Directory, the User-Principal-Name or UPN, is a contraction of the username and the UPN-suffix. For example [email protected] or [email protected] . You can therefore see that Active Directory will create a SAML Token containing a claim of type Name with the value of (for example) [email protected].- The Edit Claim Rules for <acs-namespace> dialog re-appears.
- Click OK.
- A new entry appears under the Relying Party Trusts list in the main pane of the ADFS 2.0 management console.
The ADFS part of the federation trust is now set up. It now remains to set up the App Fab ACS part of the trust. ADFS exposes a number of endpoints, but the most important one - during the configuration steps - is the federation metadata endpoint shown highlighted in figure 8 below:
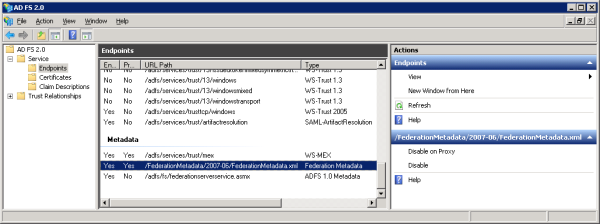
Figure 8: The Federation Metadata document URL within the ADFS Management UI.
This XML document will eventually be exchanged for a similar document on the App Fab ACS service. It is unlikely your ADFS Service’s endpoints will be directly exposed to the public Internet. This means it’s a good idea to save the document to a file which you can later upload to App Fab ACS. Follow the configuration instructions:
- First; save the ADFS FederationMetadata document to your hard drive. In
a web browser go to https://<your ADFS server domain name>/FederationMetadata/2007-06/FederationMetadata.xml.
- The page opens in the Web browser. Use File|Save and save the file to a convenient location on your hard drive – as shown in figure 9 below.
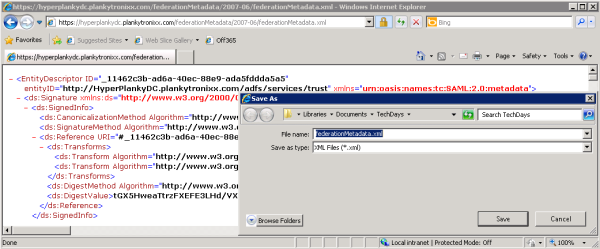
Figure 9: Saving the ADFS FederationMetadata.xml document.
- Open the App Fab ACS Management page (you can access this through http://windows.azure.com – as above).
- Click Identity Providers in the left hand pane.
- The Identity Providers page loads and shows Windows Live ID configured by default.
- Click Add.
- The Add Identity Provider page loads.
- Ensure WS-Federation identity provider (e.g. Microsoft ADFS 2.0)
is selected then click Next.
- The Add WS-Federation Identity Provider page loads.
- Type the domain name of the AD domain in to the Display name text box then ensure File is selected for WS-Federation metadata. Click Browse and navigate to the location you saved the ADFS FederationMetadata.xml document to then select it and click Open.
- Enter “Please login” in to the login link text textbox. Because in this scenario we’ll only ever use one identity provider – the text will never be shown, however an error occurs if you don’t complete the text box.
- Ensure your relying party is selected in the Relying party applications
check-box then click Save.
- The Identity Providers page appears showing your ADFS domain and Windows Live ID.
- Click the hyperlink that represents your ADFS domain.
- The Edit WS-Federation Identity Provider page appears.
- Check that you have a read-only value in the Realm text box of the form https:<your ADFS domain>/adfs/services/trust then click Cancel.
The federation trust configuration is now complete.
Create App Fab ACS Rule Groups and configure the RP/IP relationship
The final job is to set up rules in App Fab ACS which take the SAML token issued by ADFS 2.0 and then extract the name claim and copy it to a new SAML Token which will be issued by App Fab ACS. The Windows Azure application will trust this token because, remember, a relying party trust was created between the application and App Fab ACS. The UI for creating rules runs along these lines:
If IdentityProvider == <Identity Provider’s Name>
And If Input ClaimType == <Claim Type>
And If Input Claim Value == <Claim Value>
Then
Output Claim Type = <New Claim Type>
And
Output Claim Value = <New Claim Value>
The UI is flexible enough to do things such as “copy claim value” or “copy claim type” from input claims to output claims.
The very first job is to specify that the relying party will use the newly configured identity provider.
-
In the left hand pane of the App Fab ACS Management page, click Relying Parties.
-
The Edit Relying Parties page appears.
-
-
Scroll down to Identity Providers and select <your-identity-provider> then clear the Windows Live ID check box and click Save.
-
The Relying Parties page re-appears.
-
-
In the left hand pane, click Rule Groups
-
The Rule Groups page appears.
-
-
Click Default Rule Group for <Your Relying Party>.
-
a. The Edit Rule Group page appears.
-
-
Scroll to the area below the Save button and click Add. The Add Claim Rule page appears.
-
Set the following values and click Save.
|
Item |
Radio Button |
Value |
|
Claim Issuer |
Identity Provider |
<Your Identity Provider> |
|
Input Claim Type |
Select type |
|
|
Input Claim Value/p> |
Any |
|
|
Output Claim Type |
Select Type |
|
|
Output Claim Value |
Pass through input claims value |
Everything is now setup from ADFS and App Fab ACS. The next thing to do is deploy the application to Windows Azure.
Deploy the Windows Azure Application
- In Visual Studio’s Solution Explorer, select the Windows Azure project
node (a blue globe), right click and select Publish.
- The Deploy Windows Azure project window appears.
- Select Create Service Package Only then click OK.
- After a short delay, the folder with the .cspkg and the .cscfg files appears. In the address bar, copy the folder location in to the paste buffer then close the folder.
- Visual Studio re-appears.
- Open the Windows Azure management portal (http://windows.azure.com)
and log in using your Windows Live ID.
- The Portal page appears.
- In the left hand pane of the portal, click Hosted Services, Storage Accounts and CDN.
- In the upper left pane, select Hosted Services.
- In the main pane, select your subscription.
- On the ribbon at the top, click New Hosted Service.
- The default subscription should appear:
- Enter a name for your service such as “My App”
- Enter the URL prefix specified in step 5 of the “Create the Relying Party Trust” section above. This needs to be unique across all Windows Azure deployments.
- Choose a region close to you.
- In Deployment Options select Deploy to production environment. Leave the Start after successful deployment check box enabled.
- In Deployment name give a name.
- In Package Location click Browse Locally… and paste the location from step 2.a.i in the previous section (above) in to the File name text box and click Open:
- In the main pane, select <Your Project Name>.cspkg and click Open.
- On the Create new Hosted Service dialog, under Configuration File, click Browse Locally… and paste the location from step 2.a above in to the File name text box and click Open:
- In the main pane, select ServiceConfiguration.cscfg and click Open.
- On the Create a new Hosted Service dialog, click OK.
- You may receive a warning informing you that the deployment only contains one instance and no SLA can be given with one instance.
- In the main pane of the portal, note the stages the service goes through as it builds. The deployment takes some time but check back after approximately 10 minutes.
- Note the status of the various nodes in the portal noting that when the Deployment node goes in to the Ready state your application is deployed and live on the Internet. This takes between 7 and 12 minutes. Note also that with the deployment node selected, the DNS name appears as a hyperlink in the right hand pane.
Testing the application
At this stage everything is deployed so you should be able to use AD to log in to the application.
For seamless log in integration:
- Go to IIS Manager on the ADFS Server and in the left hand pane, drill down to <Server Name>|Sites|Default Web Site|adfs.
- In the main pane set Anonymous authentication to Disabled
and Windows Authentication to Enabled, as shown in figure 10 below:
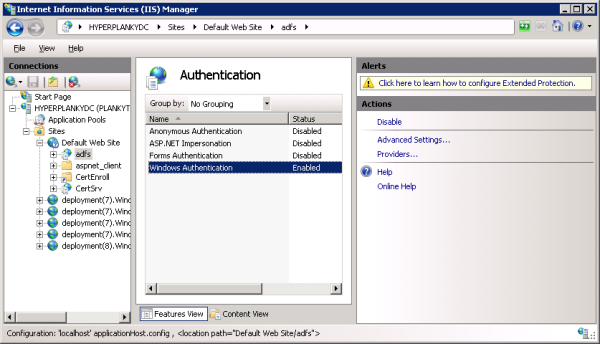
Figure 10: Setting up Windows Authentication on the adfs web site. - Open Internet Explorer on a domain-joined computer and go to ToolsI|Options
then select the Security tab.
- The Security zones screen appears.
- Select the Local Intranet Zone and then click Sites.
- The Local Intranet dialog appears.
- Click the Advanced button.
- A further Local Intranet dialog opens.
- If the https URL of your ADFS Server is already present in the Websites
list box, ignore the next few steps. Otherwise, add the https URL of your ADFS
Server to the Add this website to the zone text box (for example my server
would be https://hyperplankydc.plankytronixx.com)
then click Add and finally click Close. Figure 11 below, illustrates
this:
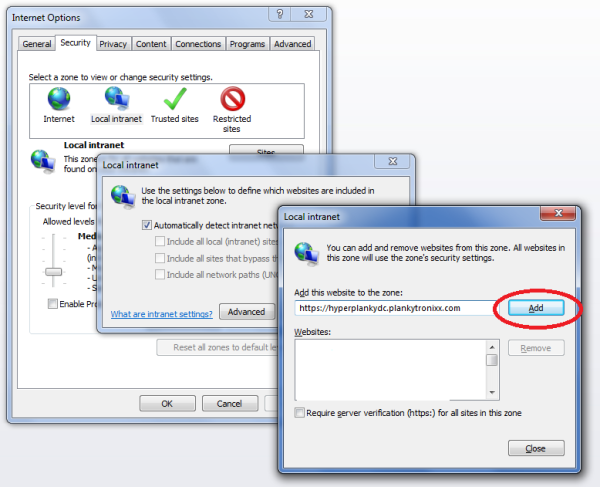
Figure 11: Configuring IE’s Local Intranet Zone sites.~
- The Local Intranet dialog re-appears. Click OK.
- The Internet Options screen re-appears. Click OK.
- In the Windows Azure management portal, click the DNS name hyperlink
of your deployment (in the right hand pane of the deployment node).
- Your application starts up in the web browser. At this stage try to
notice the http redirects by keeping a careful eye on the browser’s
address bar. A couple of seconds later you will have an application that
displays something like figure 12 below:

Figure 12: The final application running with integrated AD authentication.Note that in the top right-hand corner, WIF has integrated in to the login control and displayed the UPN that was passed as a “name” claim type in to the application. Unless you are logged in to Active Directory, you cannot access this base URL or any deeper URL within this site.
- Your application starts up in the web browser. At this stage try to
notice the http redirects by keeping a careful eye on the browser’s
address bar. A couple of seconds later you will have an application that
displays something like figure 12 below:
You may want to allow for a Windows username and password prompt from the ADFS Server. This is useful when you may want to log on to Active Directory (using Ctrl-Alt-Del) as one user, but authenticate to the Windows Azure application as another user. In that situation it’s just a case of removing the ADFS Server’s URL from the list of sites in IE’s Local Intranet zone.
Summary
In this tutorial, you have used Visual Studio with its attendant Windows Azure and Windows Identity Foundation SDKs to build a Windows Azure application. The application has been configured to trust SAML security tokens issued by an instance of App Fab ACS that you created. This involved the creation of a relying party trust between the application and App Fab ACS. TO do this you had to exchange federation metadata documents between the Windows Azure application and App Fab ACS.
You also created a federation trust between ADFS and App Fab ACS. This also involved the exchange of federation metadata documents between the two services. You configured ACS to copy the “name” claim out of the input SAML token and populate the “name” claim in the output SAML token. You also set App Fab ACS to allow authentication from ADFS for the Windows Azure relying party application.
Finally, to achieve integrated single-sign-on with Active Directory, you made sure IE’s Local Intranet security zone included the ADFS Server’s URL (including “https”) and you also set Windows Authentication up in IIS.
A typical user’s experience, now that an application has been moved to the Windows Azure cloud is no different than when it was an on-premise enterprise application. The user arrives in the morning and logs on to Active Directory. Let’s say 10 minutes later they need to use the application – they simply click the relevant icon on their desktop and all that WS-Federation magic happens behind the scenes. As far as the user is concerned they just logged in to the application and it knows who they are just like it always did. They need never be told a fundamental change in the way applications are deployed is going on. As far as they are concerned it’s business as usual. And that’s exactly how it should be with the cloud.
You can watch a click-by-click, line-by-line video of the entire process here as well as at the top of this page..
Comments