Force-Directed Graph Layout in WebSharper
In this tutorial I demonstrate how to build an interactive force-directed graph visualization running in the browser. Instead of coding directly in JavaScript and HTML5, I take advantage of F#, WebSharper, and Raphael. This technology combo makes it pleasantly simple to navigate the available API. It also reduces mistakes by checking types and units of measure, making the job both easy and fun. Dive in to learn how to make the most out of F# and WebSharper for portable interactive vector graphics in the browser.
Setting Up
To follow the code in the tutorial you will need Microsoft Visual Studio ™ and the latest WebSharper. You will also need WebSharper bindings for Raphael, available in the downloads section.
The complete source code is available in the force-graph repository. You are also welcome to try it out live.
Drawing with Raphael
To quickly get started doing vector graphics, create a new WebSharper project in Visual Studio, choose the "WebSharper 2.4 HTML Application (Sitelets)" template: this template generates the simplest standalone static (HTML, JS, CSS) web apps.
Adding a reference to IntelliFactory.WebSharper.Raphael.dll makes the Raphael library available for use in F#. Let us write a simple test program:
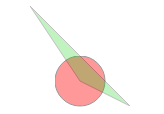
module RaphaelTest = open IntelliFactory.WebSharper open IntelliFactory.WebSharper.Raphael open IntelliFactory.WebSharper.Html[<JavaScript>] let DrawFigures () = Div [] |>! OnAfterRender (fun canvas -> let r = Raphael(canvas.Dom, 640., 480.) let circle = r.Circle(100., 100., 25.) .Fill("#ff0000") .Opacity(0.4) let triangle = let path = Path() .Absolute .MoveTo(100., 100.) .LineTo(150., 125.) .LineTo(50., 25.) .ClosePath() r.Path(path) .Fill("#00cc00") .Opacity(0.25) circle.Click(fun () -> circle.Opacity(1. - circle.Opacity()) |> ignore) |> ignore triangle.Click(fun () -> triangle.Opacity(1. - triangle.Opacity()) |> ignore) |> ignore ())
Copy this code to your project and run it from a control, for
example by setting the body of MyControl type
present in the template to the output of
the DrawFigures like this:
override this.Body = RaphaelTest.DrawFigures() :> _
Build the project and you will now be able to see the control running on Page 2 and responding to clicks.
Raphael provides a fluent drawing API implemented with the browser SVG support. This approach to visualization is especially suited for vector graphics with a small (under 10000) number of objects, and is compatible with the browser notion of mouse events. The HTML5 Canvas element provides the alternative pixel-based graphics system, but it is out of the scope of this tutorial.
WebSharper bindings to Raphael expose its API in a typed manner, and also add some helper functionality such as the path builder. Try exploring the code in your IDE, relying on code completion and type hints. Building simple graphics and animations can be a lot of fun.
Modeling the Physics
Let us now move on to the force-directed graph layout problem. A basic algorithm for force-directed graph layout builds on two laws of physics: Hooke's law and Coulomb's law. Graph nodes are imagined as points with identical electric charges repulsing each other according to Coulomb's law. Edges become springs that generate a force when compressed or stretched from their optimal length, with Hooke's law describing the force.
The important thing about the laws is that the electric charge repulsion force quadratically decreases with distance, and the spring force is proportional to the displacement from the optimal spring length. The multipliers in the equations are not important and can be picked to produce the desired smoothness.
It would be nice to code the vector form of the laws directly in
F#. However, JavaScript execution environment does not support
structs. The direct encoding that would model positions and
speeds as two-element objects would be allocating
O(N2) objects on the heap on every cycle. This is
not a very good idea for performance reasons. You can, however,
easily model multi-dimensional arrays. I therefore use a simple
State object encapsulating such an array to
represent the state of our physics system, encoding positions
and speeds of N nodes in two dimensions.
One nice feature of F# that is available and relevant to our simulation is units of measure. In F#, you can declare SI units and type-check your float equations for physics compatibility. For example, we can define meters, seconds and Newtons:
[<Measure>] type m
[<Measure>] type s
[<Measure>] type N = m / s ^ 2
Without further ado, here is the physics model (Physics.fs),
with some arbitrary coefficients that seem to work well. The
function describes the update of the state over a time
delta dT:
[<JavaScript>]
let Update (g: Graph) (dT: float<s>) (s: State) : State =
 // Euclidian distance between two points.
 let distance (p1x: float<m>) (p1y: float<m>)
              (p2x: float<m>) (p2y: float<m>) : float<m> =
     let dx = p2x - p1x
     let dy = p2y - p1y
     sqrt (dx * dx + dy * dy)
 let kAttr = 0.05<N/m> // Hooke attraction factor
 let kRep = 0.0005<N*m^2> // Coulomb repulsion factor
 let dOpt = 0.1<m> // Optimal distance (spring length at rest)
 let dMin = 0.01<m> // Minimal distance between nodes
 let damping = 0.9 // Friction factor
 let sN = s.Copy()
 for i in 0 .. s.Count - 1 do
     // Cumulative force vector acting on the i-th node.
     let mutable fx = 0.<N>
     let mutable fy = 0.<N>
     // Position of i-th node
     let xi = s.Px i
     let yi = s.Py i
     for j in 0 .. s.Count - 1 do
         // Position of j-th node
         let xj = s.Px j
         let yj = s.Py j
         // Distance between (i, j) nodes.
         let dist = max dMin (distance xi yi xj yj)
         // Normalized direction vector |dir| = 1.
         let xDir = (xj - xi) / dist
         let yDir = (yj - yi) / dist
         // Hooke attraction
         if g.IsConnected(i, j) then
             let delta = dist - dOpt
             fx <- fx + kAttr * delta * xDir
             fy <- fy + kAttr * delta * yDir
         // Coulomb repulsion
         if i <> j then
             fx <- fx - kRep * xDir / (dist * dist)
             fy <- fy - kRep * yDir / (dist * dist)
     let vx = s.Vx(i)
     let vy = s.Vy(i)
     sN.Set(i,
         xi + vx * dT,
         yi + vy * dT,
         damping * (vx + fx * dT),
         damping * (vy + fy * dT))
 sN
Grabbing Some Data
Looking for a manageably small graph, I found Les Miserables data, the coappearance network of characters in the novel Les Miserables (appearing in D. E. Knuth, The Stanford GraphBase: A Platform for Combinatorial Computing, Addison-Wesley, Reading, MA (1993)). I then adapted it for use in the browser by a simple F# script.
Connecting the Dots
To visualize the graph, I draw nodes as circles and edges as lines. On every update, then apply Raphael transforms to move the circles and lines to their new positions. Using transforms has proven to be more efficient than redrawing from scratch (code from Graphs.fs):
[<JavaScript>] let updateNode (circle: Raphael.Element) (x: float) (y: float) = circle.Cx(x).Cy(y).ToFront() |> ignore[<JavaScript>] let updateEdge (line: Raphael.Element) (x1: float) (y1: float) (x2: float) (y2: float) = let dx = x2 - x1 let dy = y2 - y1 let angle = Math.Atan2(dy, dx) / Math.PI * 180. let dist = sqrt (dx * dx + dy * dy) let transform = Raphael.Transform().Absolute .Scale(dist, dist, 0., 0.) .Translate(x1, y1) .Rotate(angle, x1, y1) line.ClearTransform().Transform(transform) |> ignore
The remaining parts of the code are fairly straightforward. I
hook up the dataset to the application via JSON. Initial
velocities are set to zero, and node positions are assigned
randomly - the rest is done by the physics model. Updates are
done in an async loop. The initialization and
update code looks like this (also from Graphs.fs):
 let redraw (lastTime, lastState: Physics.State) =
     let cT = currentTime ()
     let dT = cT - lastTime
     let st = Physics.Update g dT lastState
     for i in 0 .. nodes.Length - 1 do
         let node = nodes.[i]
         for j in 0 .. node.edges.Length - 1 do
             let edge = node.edges.[j]
             edge.redraw st
         node.redraw st
     (cT, st)
 let rec loop (cT, st) : Async<unit> =
     async {
         do! Async.Sleep 1
         return! loop (redraw (cT, st))
     }
 let initialState =
     let s = Physics.State(nodes.Length)
     let r () =
         2.<m> * random () - 1.<m>
     for i in 0 .. nodes.Length - 1 do
         s.Set(i, r (), r (), 0.<m/s>, 0.<m/s>)
     s
 Async.Start (loop (currentTime (), initialState))
You are welcome to explore and experiment with the complete code.
Summary
In this tutorial you have learned how to do interactive vector graphics in the browser. Using Raphael via WebSharper and F# simplified the job by letting you code faster with code completion, make fewer mistakes with type checking, and focus on the problem at hand. You have seen both the basics of doing interactive graphics and a slightly more involved example of doing force-directed graph layout.

Comments