The effective use of object to relational mapping technology requires in-depth understanding and experience in object design principles, relational database design, and the application’s problem domain.
This article examines the fundamentals common to most object to relational data mapping frameworks/toolkits. It introduces the technology, examines the problems that it solves, and describes the basic concepts and techniques involved.
You will learn how to use the SQLAlchemy O-R mapper and toolkit through a set of hands-on examples. The programming language used is Python. This article assumes that you are familiar with Python coding and basic relational database concepts – specifically working with MySQL. However most of the ideas and techniques are general.
The need for an OR mapper
Modern programming languages are almost all object-oriented. While most object-oriented languages offer developer benefits such as componentization of code, ease of maintenance, possibility of reuse, and so on; finding a robust and scalable way of storing object-oriented data has always been difficult. Meanwhile, the popularity of relational databases has reached an all-time high – leading to the availability of a wide choice of alternative products. This gives developers an obvious choice – create your object model, code your business logic using the model, and then convert to and from a table-based relational model whenever you need to store or retrieve data.Being largely procedural, database access and manipulation code does not sit “naturally” in an object-oriented language. As such, data access code mingled within OO code is difficult to understand, test, and maintain. Even when heavily wrapped in object oriented libraries, database access code still cannot hide its procedural heritage in production projects.
An OR mapping framework (OR mapper – see Figure 1) aims to solve this problem.
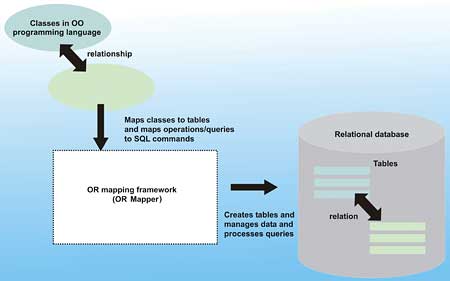
Figure 1: Features of an OR Mapping Framework
It does the hard work of “writing” (actually generating) the database access code – enabling you to focus on the object model, business logic, and testing of your application. Basically, you define your classes, tell the mapper how to map them to database tables, and the mapper takes care of the rest.
The command generation work of a mapper is typically transparent to the developer and has minimal code footprint, leaving almost all code in the purely OO realm. You no longer need to pollute your code with calls to connect to a database, execute statements, or manage resultsets.
Starting with object classes defined in the programming language of your choice, the mapper defines the relational database tables for you, creates them, and then facilitates the storage and retrieval of instances of the classes to and from the database tables.
Typically, one table is one class. And each of the fields in a table is accessible as a property of that class.
The SQLAlchemy OR framework
When you are coding in the Python programming language, one leading OR mapping framework is the open source SQLAlchemy OR mapper and database toolkit. Figure 2 shows the operation of SQLAlchemy.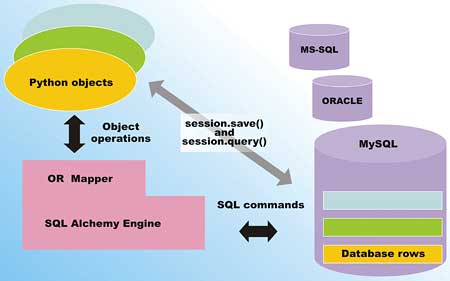
Figure 2: The operation of SQLAlchemy
Through SQLAlchemy, you can define mappings between Python classes and relational database tables. These mappings can maintain the natural relationship between the classes/tables – such as a one-to-many relationship between customer and their orders. Once the mapping is defined, you can use methods provided by SQLAlchemy to persist object instances to rows of the relational database. You can also use SQLAlchemy’s powerful query capabilities to retrieve object instances from the relational tables. You will get a chance to perform all of these operations in the upcoming example, but first you must download and install SQLAlchemy.
Installing the latest SQLAlchemy
The following discussion assumes you already have Python 2.5.2 or later installed and running on your system. To set up the latest release version you need the latest version of setuptools installed first. I installed SQLAlchemy 0.4.6 using setuptools 0.6c8.Select the Windows EXE based installer if you are on XP or Vista. After setuptools installation, add the <python installation directory>/scripts directory to your PATH environment variable and then just use the command:
easy_install SQLAlchemyThis example comprises of a set of Python modules, tabulated and described in Table 1.
| Table 1: Python Modules | |
| Module | Description |
| model1.py | The object model containing Python Customer and Order class, and simple unit test. |
| loaddata.py | Code that creates a set of Customer objects and associated Order objects, and then generate a report on them. |
| table1.py | Definition of the relational database tables, enabling SQLAlchemy to create them and map classes to them. |
| mapping1.py | OR Mapping code to map between classes in the model and the relational database tables. Also creates the actual tables on the server as a test, and then drop them. |
| loadDB.py | Code that creates a small set of Customers and associated Orders, maps them, and then saves them to the relational database via a session. Also reports on the dataset using SQLAlchemy’s query capabilities. |
| genData.py | Code that generates a large data set of Customers and associated Orders, maps them, and then saves them to the relational database. The same reporting code in loadDB.py is used to report on this production-sized data set. |
Creating the object model
Let’s start with some plain old Python objects. The two Python classes examined here represents a hypothetical order tracking system – maintaining information on orders that customers have placed.Customer is Python class that store a customer’s first and last name, as well as phone number. It also includes a method that return a customer’s full name, for report purposes. The definition of the Customer class is in model1.py, and shown in the following excerpt:
class Customer(object):
	def __init__(self, firstname, lastname,
		phone):
		self.firstname = firstname
		self.lastname = lastname
		self.phone = phone
	def __repr__(self):
		return "<Customer instance
			with data(%s,%s,%s)>" %(
			self.firstname,
			self.lastname, self.phone)
	def fullname(self):
		return "%s %s" % (self.firstname,
		self.lastname)
The Order class maintains information about orders placed. It stores a reference to the customer that placed the order, the total value of the order, and the order number, and includes a convenient method to determine the amount of tax already included in the total. The following excerpt from model1.py shows the Order class:
TAXRATE = 0.06
class Order(object):
	def __init__(self, ordernumber, cust,
		total):
		self.ordernumber = ordernumber
		self.cust = cust
		self.total = total
	def __repr__(self):
		return "<Order instance with
			data(%s,%s,%s)>" ]
			%(self.ordernumber,
		self.cust.fullname(),self.total)
	def taxamount(self):
		return (self.total / (1 + TAXRATE))
		* TAXRATE
A customer may have placed one or more orders, so the relationship between instances of these classes maps to a relation between tables.
Plain objects enable easy testing
One great thing about starting with plain object definition (instead of database tables) is that the code plus any business logic can be easily tested. There is no need to set up any network or servers.In this case, the model1.py module has a main() method that unit tests these classes by creating several instances and calling their methods:
def main(argv=None):
	newcust1 = Customer("Sam", "Jackson",
		"343-223-2121")
	print newcust1
	print newcust1.fullname()
	newcust2 = Customer("Jane", "Dimitri",
		"343-242-2222")
	print newcust2
	neworder1 = Order("0001", newcust1,
		333.03)
	print neworder1
	print neworder1.taxamount()
	return 0
The code creates two customers and one order and tests the fullname() as well as the taxamount() methods. Run the model1.py module to unit test these classes:
C:\>python model1.py
<Customer instance with
	data(Sam,Jackson,343-223-2121)>
Sam Jackson
<Customer instance with
	data(Jane,Dimitri,343-242-2222)>
<Order instance with data(0001,Sam
	Jackson,333.03)>
18.850754717
Generating reports
Now the basic classes have been unit tested, you can put them to work with a more substantial capacity. The loaddata1.py module creates 5 customers and creates 8 orders and then prints a report of the total purchases made by each customer.Here, the loadCustomers() function creates and load the 5 customers into a list named custs:
custs = []
def loadCustomers(addproc):
	newcust1 = Customer("Sam", "Jackson",
		"343-223-2121")
	addproc(custs, newcust1)
	newcust2 = Customer("Jane", "Dimitri",
		"343-242-2222")
	addproc(custs, newcust2)
	newcust3 = Customer("Joe", "Wang",
		"212-233-1282")
	addproc(custs, newcust3)
	newcust4 = Customer("Melissa", "Camp",
		"647-328-4891")
	addproc(custs, newcust4)
	newcust5 = Customer("John", "Roland",
		"406-494-3499")
	addproc(custs, newcust5)
	return custs
Loading of the list is performed through the helper addproc() function:
def addObjectToList(Collection , Item):
	Collection.append(Item)
Orders are created and loaded into an orders list via the loadOrder() function and the list of newly created customers is passed into the loadOrder() as an argument – since orders need to be associated with customers:
orders = []
def loadOrders(addproc, custlist):
	addproc(orders,
		Order("0001", custlist[0], 333.03))
	addproc(orders,
		Order("0002", custlist[1], 17.98))
	addproc(orders,
		Order("0003", custlist[2], 949.13))
	addproc(orders,
		Order("0004", custlist[3],
			4343.88))
	addproc(orders,
		Order("0005", custlist[4], 187.00))
	addproc(orders,
		Order("0006", custlist[0], 3.43))
	addproc(orders,
		Order("0007", custlist[0],
			1000.12))
	addproc(orders,
		Order("0006", custlist[1], 543.87))
The main() method of this loaddata1.py module tests the data creation and calls the report() function:
def main(argv=None):
	clist = loadCustomers(addObjectToList)
	loadOrders(addObjectToList, clist)
	report()
return 0
The report() function iterates through the list of customers and the list of orders to print out all the orders belonging to a customer and the purchase grand total:
def report():
	print "There are %s customers and %s
		orders" %
		(len(custs), len(orders))
	for cust in custs:
		print "----------------"
		print "Customer : ",
			cust.fullname()
		summary =
			getSummaryForCustomer(cust)
		print "Number of orders : ",
			summary["count"]
		print "Total purchase : ",
			summary["total"]
A helper function called getSummaryForCustomer() is used in reporting. getSummaryForCustomer() function finds all the orders associated with a customer and adds up the purchase total:
def getSummaryForCustomer(cust):
	count = 0
	total = 0
	for order in orders:
		if (order.cust == cust):
		count = count + 1
		total = total + order.total
	return {'count': count, 'total':total}
Run the loaddata1.py module to load the data and print out the report:
C:\> python loaddata1.py
There are 5 customers and 8 orders
-----------------
Customer : Sam Jackson
Number of orders : 3
Total purchase : 1336.58
-----------------
Customer : Jane Dimitri
Number of orders : 2
Total purchase : 561.85
-----------------
Customer : Joe Wang
Number of orders : 1
Total purchase : 949.13
-----------------
Customer : Melissa Camp
Number of orders : 1
Total purchase : 4343.88
-----------------
Customer : John Roland
Number of orders : 1
Total purchase : 187.0
So far so good. This system easily handles 8 orders and 5 customers using completely in-memory instances of Python classes. Once you scale to hundreds of customers and thousands of orders, however, integrating a relational database is often inevitable.
Thankfully, OR mappers such as the mapper in SQLAlchemy make this the ‘natural’ step forward.
Migrating to a Relational Database
Before using SQLAlchemy’s Object to Relational mapping capabilities, the relational database table structure can be specified declaratively as a Table instance. In the table.py module, the defineTables() function define the relational mappings for our Customer and Order classes:def defineTables(metadata):
custtable = Table('customers',
metadata,
Column('id', Integer,
primary_key=True),
Column('firstname', String(80)),
Column('lastname', String(80)),
Column('phone', String(15))
)
orderstable = Table('orders',
metadata,
Column('id', Integer,
primary_key=True),
Column('ordernumber', Integer),
Column('custid', Integer,
ForeignKey("customers.id"),
nullable=False),
Column('total',Float)
)
return {'customers': custtable,
'orders': orderstable}
Note how the datatype of each database field is specified. For example, the firstname field is defined to be of String type with length of 80 characters. This is a generic description of a table, and not tied to any specific brand of relational database. Most OR mappers supports a variety of database “dialects”. What this means is that the mapper can work with relational databases from different vendors. For example, SQLAlchemy’s OR mapper can work with ORACLE, MySQL, MS-SQL, Sybase, Informix, and SQLite amongst others.
The custid field in the orders table refers to a customer and is a foreign key – the primary key in the customers table. This definition ensures that foreign key constraints are honoured when the code is used with relational databases that support them. The MySQL server, with the InnoDB provider, that is used in this article supports foreign key constraints.
The main() method of the table1.py module defines the relational tables and prints out the structure maintained by SQLAlchemy:
def main(argv=None):
	mdata = MetaData()
	print defineTables(mdata)
	return 0
You can test the table definitions by running the table1.py module:
c:\ >python table1.py
	{'customers': Table('customers',
		MetaData(None),
		Column('id', Integer(),
			table=<customers>,
				primary_key=True,
			nullable=False),
		Column('firstname',
			String(length=80,
			convert_unicode=False,
			assert_unicode=None),
			table=<customers>),
		Column('lastname',
			String(length=80,
			convert_unicode=False,
			assert_unicode=None),
			table=<customers>),
		Column('phone', String(length=15,
			convert_unicode=False,
			assert_unicode=None),
			table=<customers>), schema=None),
			'orders': Table('orders',
			MetaData(None),
		Column('id', Integer(),
			table=<orders>,
			primary_key=True, nullable=False),
		Column('ordernumber', Integer(),
			table=<orders>),
		Column('custid',
	Integer(),ForeignKey('customers.id'),
			table=<orders>, nullable=False),
		Column('total', Float(precision=10,
			asdecimal=False), table=<orders>),
			schema=None)}
OR Mapping
An OR mapper is a utility module that provides assistance in mapping classes defined in the host programming language (in this case Python) to tables in relational databases. Typically, the structure of a class in the programming language maps to a table in the database; and each actual object instance of a class maps to a row (or a record) in the table. This is often referred to as the Active Record pattern (see Martin Fowler’s Patterns of Enterprise Application Architecture, ISBN-0321127420, for a discussion of this application pattern).The mapping1.py module contains code that:
- defines the object side of the mapping (our Python Customer and Order classes)
- defines the relational side of the mapping (our customers and orders table)
- creates an OR mapper to map between the object instances and relational database records
- associates the OR mapping with a MySQL database instance
- creates the actual relational tables in the MySQL database instance
Take a look at the createTablesAndMapObjects() function where most of the logic resides:
import sys
from sqlalchemy import
	create_engine,MetaData,Table
from table1 import defineTables
from model1 import Customer, Order
from sqlalchemy.orm import mapper,
	clear_mappers,relation
def createTablesAndMapObjects():
	engine = create_engine(
		'mysql://vsjuser:vsjpass@localhost/
		vsjdb', echo=True)
	metadata = MetaData()
	tab = defineTables(metadata)
	# safe to call the line below multiple
	# times
	metadata.create_all(engine)
	print tab['customers']
	# map each class to the corresponding
	# table
	clear_mappers()
	mapper(Customer, tab['customers'],
		properties= {
	'orders': relation(Order,
		backref='cust')})
	mapper(Order, tab['orders'])
	return {"metadata":metadata,
		"engine":engine }
In the createTableAndMapObjects() function, an instance of the SQLAlchemy engine is created using the create_engine() function. You need to specify the relational database dialect and the URL to reach your server when creating the engine instance. In this case, a MySQL server on the localhost is used, and the database is named vsjdb. You can change the username (vsjuser) and password (vsjpass) if they are different. The echo=True argument tells the engine to print out the generated SQL statements that are sent to the MySQL server. After testing, you may want to set echo to False to minimize the output during execution.
We examined the defineTables() function from the table1.py module earlier. Here, we are using it to declare the structure of the customers and orders table. The metadata.create_all(engine) statement connects to the MySQL server and creates the tables if they do not already exist.
The clear_mappers() method clears any other mapper that may still be active at this point. Two instances of mapper are created to map the Python classes to the relational tables:
mapper(Customer, tab['customers'],
	properties= {
	'orders': relation(Order,
		backref='cust')})
	mapper(Order, tab['orders'])
Instances of the Customer class are mapped to the customers relational table. An additional property is created on the Customer class during this mapping called orders (note this is not in the original object). In addition, you indicate that this is a relation with the Order object – to be mapped next. Essentially, you are saying that a single customer can have multiple orders – a one-to-many relationship. You also tell the mapper, via the backref=’cust’ argument, that the cust field in the mapped orders table is used to determine which customer an order record belongs to.
Instances of the Order Python class are mapped to the orders relational table with the second mapper.
The main() method of the mapper1.py module tests the creation of tables in MySQL and then the mappings:
def main(argv=None):
	mlist = createTablesAndMapObjects()
	mlist["metadata"].drop_all(
		bind=mlist["engine"])
return 0
The main() method also deletes all the created MySQL tables after it executes. This allows you to run the module multiple times without having to manually delete or clear the created tables.
Run the mapping1.py module and notice the generated SQL statements to create (and then delete) the relational table within the output:
CREATE TABLE customers (
	id INTEGER NOT NULL AUTO_INCREMENT,
	firstname VARCHAR(80),
	lastname VARCHAR(80),
	phone VARCHAR(15),
	PRIMARY KEY (id)
)
CREATE TABLE orders (
	id INTEGER NOT NULL AUTO_INCREMENT,
	ordernumber INTEGER,
	custid INTEGER NOT NULL,
	total FLOAT(10),
	PRIMARY KEY (id),
	FOREIGN KEY(custid) REFERENCES
		customers (id)
)
DROP TABLE customers
DROP TABLE orders
The SQLAlchemy engine ensures that the correct “dialect” of SQL, in this case MySQL, is generated. If you switch database, say to ORACLE, your tested Python business logic code continues to work and all you have to change is the URL passed into the constructor of the engine. For MySQL, the engine selects the InnoDB provider in order to support transactions and foreign key constraints.
Working with session and mapped objects
The loadDB.py module works with mapped objects and introduces a session. It:- creates the Python classes
- creates relational tables
- maps the Python objects to the tables
- creates a session
- creates instances of the mapped objects and save them via the session (hence filling the database with data)
- prints the report via the session (accessing data from the database)
Corresponding to connections to a database, an OR mapping engine maintains sessions. Each session maintains an engine state associated with a connection to the relational database. A mapped object is associated with a session once it is saved using the session. In OR mapping speak, an object is attached to a session. In essence, the mapping engine has saved the underlying data of the mapped object to the mapped relational database table using the connection associated with the session.
The main() method contains the core logic. The following listing has session handling code highlighted in red:
def main(argv=None):
	mlist = createTablesAndMapObjects()
	Session =
		sessionmaker(bind=mlist["engine"],
		autoflush=True, transactional=True)
	globvars["session"] = Session()
	clist = loadCustomers(addObjectToDB)
	globvars["session"].commit()
	loadOrders(addObjectToDB, clist)
	globvars["session"].commit()
	reportDB(globvars["session"])
	globvars["session"].clear()
	globvars["session"].close()
	return 0
In the last section, you saw how the createTablesAndMapObjects() function creates and maps the Python objects and the relational tables. Here, the class factory for a session, sessionmaker, is configured and bound to the engine. Configuring the session with transactional=True enables transactional handling.
Note the use of globvars[“session”].commit() to commit the record additions transactionally. The corresponding SQL statement will be generated and sent to the server to commit the transaction.
The loadCustomer() and loadOrders() functions are exactly as the same as used earlier to create in-memory list of customers and orders. However, the helper function passed as an argument this time is slightly different – it is called addObjectToDB() and it saves the Python object into the relational database via the session:
def addObjectToDB(Collection, Item):
	Collection.append(Item)
	globvars["session"].save(Item)
Database queries via a session
Unlike the report() function in loaddata1.py, the reportDB() function here uses the session and the mapped Python objects to access the database. Not only does this enable the code to work with a very large set of data (hundreds or thousands of records), but it actually simplifies the reporting logic. The reportDB() function is shown in the following listing:def reportDB(session): print "There are %s customers and %s orders" % (session.query(Customer).count(), session.query(Order).count()) for cust in session.query(Customer): print "---------------" print "Customer : ", cust.fullname() count = 0 total = 0 for order in cust.orders: count = count + 1 total = total + order.total print "Number of orders : ", count print "Total purchase : ", totalThe session.query() method enables you to issue a variety of sophisticated queries against mapped objects using an SQL Expression Language. SQLAlchemy will generate and manage the corresponding (and sometimes database-specific) SQL commands to process the query. In this report, session.query(Customer).count() is used to determine the number of rows in the customer table and for cust in session.query(Customer) is used to iterate through the records in the customers table one at a time. In addition, the cust.orders property is used in an iteration to walk through the orders associated with a given customer. This one-to-many relationship was established earlier in the OR mapping via the mapper in the mapping1.py module; and the underlying SQL commands required to handle this relationship are now generated and managed automatically by SQLAlchemy.
When you run the loadDB.py module, you will see the expected report output and the SQL commands to create the tables; but in addition, you should also see a SQL INSERT statement that adds the customers and orders record and also the SQL SELECT statements generated to query the database for report. The following are some of the generated SQL INSERT and SELECT statements from a run of loadDB.py module:
BEGIN
INSERT INTO customers (firstname,
	lastname, phone)
	VALUES (%s, %s, %s)
	['Sam', 'Jackson', '343-223-2121']
...repeat for more customers

COMMIT
BEGIN
INSERT INTO orders (ordernumber, custid,
	total) VALUES (%s, %s, %s)
['0001', 1L, 333.02999999999997]
...repeat for more orders

COMMIT
BEGIN
SELECT count(1) AS count_1 FROM customers
SELECT count(1) AS count_1 FROM orders
SELECT customers.id AS customers_id,
	customers.firstname AS
		customers_firstname,
	customers.lastname AS
		customers_lastname,
	customers.phone AS customers_phone
FROM customers ORDER BY customers.id
SELECT orders.id AS orders_id,
	orders.ordernumber AS
		orders_ordernumber,
	orders.custid AS orders_custid,
	orders.total AS orders_total
FROM orders
WHERE %s = orders.custid ORDER BY
	orders.id
SELECT orders.id AS orders_id,
	orders.ordernumber AS
		orders_ordernumber,
	orders.custid AS orders_custid,
	orders.total AS orders_total
FROM orders
WHERE %s = orders.custid ORDER BY
	orders.id
...
With an OR mapper such as SQLAlchemy, you can comfortably write the database-independent Python code against the mapped object, and the framework takes care of generating and managing SQL queries for you.
Reporting on a large dataset
A database with 5 customer and 8 orders can be readily maintained by a system using simple in-memory data structures. When the same system is required to handle hundreds of customers and thousands of orders, the situation is quite different.The gendata.py module generates a set of database table with 500 customers and up to 10 orders for each customer. The firstname and lastname of the customers are generated randomly, and the amount of each order is generated randomly. The genData() function performs this data generation. Note the use of session.save() when persisting a Customer instance, along with the associated Orders, to the relational database. The following listing shows the genData() method:
def genData(session):
	letters = "ABCDEFGHIJKLMNOPQRSTUVWXYZ"
	numbers = ""
	cust = None
	# generate 500 customers with up to 10
	# orders each
	for i in range(500):
		print "--------"
		first = letters[i % 26] +
			str(randint(0,5000)) +
			letters[randint(0,1000) %
				26].lower()
		lastnm = letters[ (i+1) % 26] +
			str(randint(0,3000)) +
			letters[randint(0,1000)%
				26].lower()
		phone = str(400 + randint(0,599)) +
			"-" + str(300 + randint(0,699)) +
			"-" + str(1000 + randint(0,8999))
		print "%s %s %s %s" % (str(i),
			first, lastnm, phone)
		cust = Customer(first,lastnm,phone)
		numorders = randint(1, 10)
		ordno = 20 # starting order number
		for j in range(numorders):
			ordno = ordno + 1
			tot = Decimal(str(0.99)) +
				Decimal(randint(0,100000)/
				Decimal(100))
			print " - %s %s %s " % (j,
				ordno, tot )
			cust.orders.append(Order(
				ordno, cust, tot ))
		session.save(cust)
Once the data is saved into the database, the same reportDB() function from loadDB.py is used to report on the customer and associated orders. The main() method is responsible for creating tables, creating Python objects, mapping, generating the data, saving them to database, and then finally reporting on them:
def main(argv=None):
	mlist = createTablesAndMapObjects()
	Session= sessionmaker(
		bind=mlist["engine"],
		autoflush=True, transactional=True)
	sess = Session()
	genData(sess)
	sess.commit()
	reportDB(sess)
	sess.clear()
	sess.close()
	return 0
When you run the genData.py module, a large report will be quickly printed for the 500 customers. The very same code that is tested to handle 8 orders is now reporting for a database of thousand of orders. Using an OR technology such as SQLAlchemy, you can write and test your code using a small in-memory dataset and then deploy the same tested code against a large database.
Conclusions
Object to relational mapping technology has matured and is now ready for real work. Using an OR mapping framework enables you to quickly code and test your application’s data model and business logic, working with a small dataset, all using your favourite programming language such as Python. The tested code can then be deployed against a large dataset in production, against your choice of framework-supported relational database products. In the case of SQLAlchemy, the resulting application can be deployed against popular databases such as MySQL, Oracle, Sybase and Microsoft SQL Server.Sing Li has been writing software, and writing about software for twenty plus years. His specialities include scalable distributed computing systems and peer-to-peer technologies. He now spends a lot of time working with open source Java technologies.
Guess the mappingSome OR mappers, especially those used with strongly typed languages such as Java or C#, can “guess” how fields should be mapped by examining the declared data type of the class’s members. Granted, these automated mappings are seldom useful in production scenarios due to the lack of control over the outcome; nevertheless, they are used frequently in demonstrations and marketing pitches to emphasise the ease of use and non-intrusive nature of the OR mapper. |
Comments