- The tests have to be repeatable, which means that they can be re-run whenever necessary and so allow for regression testing.
- The tests have to be runable by somebody other than the test author. This allows for sharing of code and tests, and it also means that if the developer leaves the project then the tests are still there to be used and are meaningful.
- The test results have to be concise, but errors must be very visible. There is little point in running tests if the errors are hidden in the output of successful tests.
One other thing to keep in mind is that exponents of TDD do exactly what TDD says, i.e. use the tests to drive the development. This means writing the tests first, then writing the code. Initially this is hard to do because all developers want to get on and write code, but psychologically it makes sense. There is a tendency when writing code first to then test what you have written, whereas if you write the test first you should write tests to test the ideas that you are trying to convey.
This article is about NUnit, and about using NUnit to write unit tests for .NET.
So what is a Unit?
There are several forms of testing, for example acceptance testing, system testing and integration testing. Often, different testing is done by different teams with different skills and different needs. As programmers, we’re likely to be most interested in Unit testing, which is the testing of individual, stand-alone units of code.Using NUnit
NUnit is a framework for unit testing .NET applications. It is an open source tool, and at the time of writing version 2.2 is available from www.nunit.org. To see NUnit in action we will write a class and a set of tests for that class. To run the tests for your code you will need to download this version of NUnit and then install it. NUnit will be installed in the GAC making it available to all .NET processes.Setting up Visual Studio
The easiest way to write test code if you are using Visual Studio is to use two separate projects, one that contains the code under test (i.e. your normal code), and one that contains the testing code. Typically each of these projects will be built into its own assembly, and so long as both assemblies are available to the NUnit framework, this is not a problem, as NUnit will be able to load them. However, Visual Studio does put a roadblock in the way of this. If the code under test is to be built into a .EXE assembly rather than a .DLL, then Visual Studio will not let you reference this assembly from another project, something you have to do if you want your test assembly to compile. To get around this you can build a copy of the code to be tested into the same assembly as the testing code. This assembly can then be loaded by NUnit and all the tests run.To do this under Visual Studio you create a solution with two projects, the first project is your code and the second project is your testing code. In the test project you then need to add references to the code from the ‘real’ project. To do this you right click on the test project, select Add then ‘Add Existing Item’. Now browse to the directory the real code is in, then select the files to add, then in the button on the dialog make sure you select “Link File” (see Figure_1 for an example).
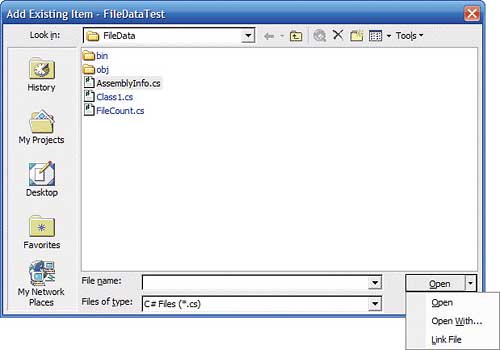
Figure 1
Once you link to the files you can then build your testing assembly.
The class to test
To show how NUnit works we need a class to test. I wanted something that was fairly easy to understand but would also allow me to point out the features of NUnit. The class we will write will be a utility class that will count the number of characters, words and paragraphs in a file (very useful if you are an author and get paid by the word!).Our class will look something like this
public class FileCount
{
	private int _words;
	private int _characters;
	private int _paragraphs;
	public int Characters
	{
		get{ return _characters; }
	}
	public int Words
	{
		get{ return _words; }
	}
	public int Paragraphs
	{
		get{ return _paragraphs; }
	}
	public FileCount(string fileName)
	{
		// read file into buffer
		// count chars, words and paras
	}
	private void CountChars(byte[] data)
	{
	}
	private void CountWords(byte[] data)
	{
	}
	private void CountParagraphs(byte[] data)
	{
	}
}
In this class the constructor is passed a filename. It has to open the file and determine the number of characters, words and paragraphs in the file. Following in the footsteps of the agile programmers we will write the tests before we write the code.
Let’s start by writing a test and then running it in NUnit, to show how this all hangs together.
Writing and testing code
Our testing class looks like this:using System;
using NUnit.Framework;
using kevinj;
namespace FileDataTest
{
[TestFixture]
public class TestFileCount
{
FileCount fc;
[SetUp]
public void SetUp()
{
fc = new FileCount(“”);
}
[Test]
public void TestCountChars()
{
fc.countChars();
}
}
}
A couple of points to note here:
The kevinj namespace is the namespace containing the code under test, while the NUnit.Framework namespace references the NUnit code.
This test currently contains two methods: Setup() and TestCountChars(). Traditionally (i.e. in JUnit, the Java equivalent of NUnit, which is the grand-daddy of all unit testing tools) these names matter, however in NUnit it is the attributes that tell the story.
The [TestFixture] attribute marks this class as containing tests.
The [Test] attribute marks this as a test case, i.e. code that will be run by NUnit to execute one or more tests; you can mark as many methods as you need with this attribute.
The [setUp] attribute on the other hand can only be applied to one method. This method is run before the start of each test and is used to initialise the test environment. There is also a corresponding [tearDown] method that is run at the end of each test case.
This means that if I had two tests called foo and bar, the order of execution would be:
Setup(), Foo(), Teardown(), Setup(),
	Bar(), TearDown().
The first test we write will test the CountChars method of the FileCount class – as this method hasn’t been written yet, the test should fail.
The test code looks like this:
[Test]
public void TestCountCharsNoNewLines()
{
	// 1234567890123456789012345678901
	string stringData =
	“There are 31 chars in this line”;
	byte[] byteData =
Encoding.ASCII.GetBytes(stringData);
	fc.CountChars(byteData);
	Assert.AreEqual(
	byteData.Length, fc.Characters);
}
In the test we create the data used for the test, put it into a byte array and call the method we would like to test. When the method returns we check to see if the test has succeeded or failed, we do this by calling a method of the Assert class.
Assert is a class that provides many static methods to check the result of tests that you run. There are three kinds of methods on Assert, comparisons, conditionals and utility methods. The comparison methods have two forms:
Assert.AreEqual( type expected,
		type actual );
…and:
Assert.AreEqual( type expected,
	type actual, string description );
…where type is a .Net type, for example:
Assert.AreEqual( int expected,
	int actual );
Although there are some variations on this, for example the AreEqual methods for float also take a parameter that is the tolerance in the comparison.
There are also AreSame methods that check for reference equality, and since NUnit 2.2 you can also compare arrays for equality.
The conditional tests are IsTrue, IsFalse, IsNull and IsNotNull and finally the utility methods are Fail and Ignore.
Running the tests
If you try and compile this code, it will fail. This is because the CountChars() method in the FileCount class is private. There is an ongoing debate as to whether ‘private’ methods should be tested, and by private here I mean anything that is not public. My personal view is that you should test anything that needs testing. If your class contains only a single method in its public interface and many non-public methods, simply testing that public method becomes extremely difficult. Tests should be as simple as possible and as easy to understand as possible. However I do not recommend making everything non-private just to get testing code to compile. For now we will take a short cut by marking the method as internal allowing access to the method from other code in the same assembly (another reason for putting all the code into one assembly), later I will present another solution to this problem.So, if you mark the method as internal and recompile, everything should now build and you can run the tests. NUnit comes with two test ‘runners’ – the GUI runner and the console runner. To run the NUnit console runner, run a command prompt and execute the following command:
c:>”c:\Program Files\NUnit
	2.2\bin\nunit-console.exe”
This will show the help for the command. To run the console test runner change to the directory containing the assembly and run:
“c:\Program Files\NUnit 2.2\bin\
	nunit-console.exe” FileDataTest.dll
This will produce output something like:
.F
Tests run: 1, Failures: 1,
	Not run: 0, Time: 0.0400576 seconds

Failures:
1) FileDataTest.TestFileCount.
		TestCountCharsNoNewLines :
		expected:<0>
		 but was:<31>
	at FileDataTest.TestFileCount.
		TestCountCharsNoNewLines() in
		c:\filedatatest\testfilecount.cs:
		line 30
The ‘F’ indicates a test failure.
The console runner is very quick and efficient, however NUnit has another runner that you might want to use, the GUI runner. This is a Windows Forms application that we will use for the rest of the article.
To run the test fixture using the GUI runner you first need to start it. It should be available from the Start menu under the NUnit 2.2 program group (at the time of writing). Once started, select File..Open File then browse to the DLL containing your test cases, load the DLL and hit the run button.
Figure_2 shows what the results look like.
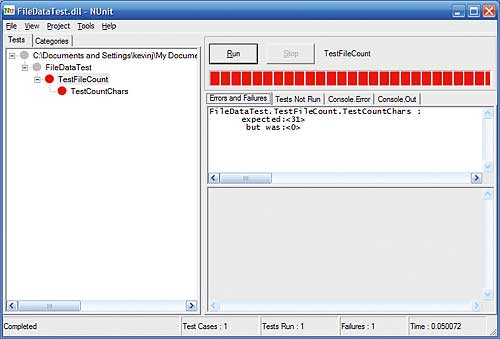
Figure 2
We have a red bar! Red is bad! The idea is to make the bar go green. Green is good! It means all the tests have passed. To get to this state of Nirvana we have to go back and write an implementation of the method under test. A naïve implementation would look like this:
internal void CountChars(byte[] data)
{
	_characters += data.Length;
}
Re-compile, re-run the test and the bar goes green, remember, this is good!
However this implementation is far too simple, it counts carriage returns and line-feeds as characters, most tools do not do this, so we have to define what we mean by a character. To do this we can use the .NET Char.IsControl(char c) method. Using this changes our implementation to:
internal void CountChars(byte[] data)
{
	foreach (byte b in data)
	{
		if (Char.IsControl((char)b) == false)
			_characters++;
	}
}
Not as efficient, but it does turn the bar green, so we move on for now. We can now write tests for the other methods, testing and refining as we go along.
Testing exceptions
One of the important points of unit testing is that you must test edge cases. For example, what happens when you pass a null buffer to the CountChars method? Let’s try it:public void
TestCountCharsWithNullBuffer()
{
byte[] byteData = null;
fc.CountChars(byteData);
Assert.AreEqual(0, fc.Characters);
}
If you run the tests now the tests fail with an exception:
FileDataTest.TestFileCount.TestCountCharsWithNullBuffer :
	System.NullReferenceException :
	Object reference not set to an
	instance of an object.
This is probably not what is wanted. In this case we have two choices (at least). Within the method we can check for the null case and set the word count to 0, or we can throw an application level exception. For pedagogical reasons we will throw the exception.
The code now looks like this:
internal void CountChars(byte[] data)
{
	if (data == null) throw new ArgumentNullException(
		“Data element cannot be null”);
	foreach (byte b in data)
	{
		if (Char.IsControl((char)b) == false)
			_characters++;
	}
}
Running the test again still produces an exception:
FileDataTest.TestFileCount.TestCountCharsWithNullBuffer :
	System.ArgumentNullException :
	Data element cannot be null
However, this is now expected, and we must amend the test case to succeed if this exception is thrown. The way we do this in NUnit is to add another attribute to the test case, this is the ExpectedException attribute. The test case now looks like this:
[Test]
[ExpectedException (typeof (ArgumentNullException))]
public void TestCountCharsWithNullBuffer()
{
	byte[] byteData = null;
	fc.CountChars(byteData);
}
Notice that the ExpectedException attribute takes a type as its parameter, this is the type of the exception that we expect to be thrown. If the exception is thrown the test will succeed and if the exception is not thrown then the test will fail, this is exactly what we want.
There are some other attributes we should mention, starting with the Ignore attribute. You add this to any test cases that should not be run. It takes a message as a parameter which is the reason for not running the test case, something like this:
[Ignore (“Code not yet written”)]
public void testSomeTest()
{
	 ...
}
You can use this to include tests that you know need to be written but you have not got around to yet, this will act as a reminder that the test has to be written and run at some point (in the NUnit GUI these tests show up in yellow).
There is also the Explicit attribute. A test case with this attribute will not be run automatically, instead you have to explicitly choose the test case in the runner.
Testing private methodsI now want to address one of the issues we skipped over above, how to test private methods. Originally I said to mark the method as internal, however this breaks one of the cardinal rules of object-oriented programming. We should keep our scopes as narrow as possible, marking a method as internal when it should be private smells wrong. However if you mark the CountChars method private the code simply fails to compile. To overcome this limitation we have to use another feature of .NET, reflection.
Reflection allows us to reach into any .NET class and examine the information about the class, including the data members, properties and methods the class has available. Reflection also allows us to set the values of the properties and data members, and to execute methods, including private methods (assuming we have the correct security permissions).
Let’s take the simplest test first TestCountCharsNoNewLines(), this changes to the following:
[Test]
public void TestCountCharsNoNewLines()
{
	// 1234567890123456789012345678901
	string stringData =
	“There are 31 chars in this line”;
	byte[] byteData =
Encoding.ASCII.GetBytes(stringData);
	Type t = typeof(FileCount);
	MethodInfo mi =
		t.GetMethod(“CountChars”,
		BindingFlags.NonPublic |
		BindingFlags.Instance);
	mi.Invoke(fc,
		new object[]{byteData});
	Assert.AreEqual(stringData.Length,
		fc.Characters);
}
In this code we replace the call to fc.CountChars() with a set of Reflection APIs. To call the CountChars method using reflection we have to do several things:
- We have to know the type of object we want to call the method on
- We have to have an instance of that type
- We have to have a reference to the method to call
- We have to pass any data to the method
Once we have this reference we can then call the method. This is done through the Invoke method of MemberInfo; this takes two arguments, the instance on which to call the method and the parameters to that method. Remember that the instance (fc in the above code) is created in the Setup method. The parameters (in this case the byte array) have to be passed as an array of objects. The CLR then manages the calling of the method with the correct stack in place. Phew!
We can now convert the other two test cases, which look like this:
[Test]
public void
	TestCountCharsWithNewLines()
{
	// 1234567890123456789012345678901
	string stringData = “There are 31
		chars in this line\r\n”;
	byte[] byteData =
Encoding.ASCII.GetBytes(stringData);
	Type t = typeof(FileCount);
	MethodInfo mi =
		t.GetMethod(“CountChars”,
		BindingFlags.NonPublic |
		BindingFlags.Instance);
	mi.Invoke(fc, new
		object[]{byteData});
	Assert.AreEqual(stringData.Length
		- 2, fc.Characters);
}

[Test]
[ExpectedException (typeof
	(ArgumentNullException))]
public void
	TestCountCharsWithNullBuffer()
{
	byte[] byteData = null;
	Type t = typeof(FileCount);
	MethodInfo mi =
		t.GetMethod(“CountChars”,
		BindingFlags.NonPublic |
		BindingFlags.Instance);
	mi.Invoke(fc, new
		object[]{byteData});
}
Recompile and run the code. The bar goes red – oops!
The failing test is TestCountCharsWithNullBuffer and the error is:
FileDataTest.TestFileCount.
	TestCountCharsWithNullBuffer :
	Expected: ArgumentNullException but
	was TargetInvocationException
What happens is that the exception is being thrown by the test case, but the Invoke method is wrapping the application exception in a TargetInvocationException, which is not what we want. We need to unwrap the exception, which is easy to do. Amend the code to look like the following:
[Test]
[ExpectedException (typeof
	(ArgumentNullException))]
public void
	TestCountCharsWithNullBuffer()
{
	byte[] byteData = null;
	Type t = typeof(FileCount);
	MethodInfo mi =
		t.GetMethod(“CountChars”,
		BindingFlags.NonPublic |
		BindingFlags.Instance);
	try
	{
		mi.Invoke(fc, new
			object[]{byteData});
	}
	catch(TargetInvocationException
	tie)
	{
		throw tie.InnerException;
	}
}
We wrap the call to invoke in a try..catch block and re-throw the TargetInvocationExceptions InnerException.
Re-run the code and the bar turns green, Nirvana again.
Conclusion
Unit testing allows you to have confidence in your code. It allows you to change code and check that those changes do not break anything. Adding unit tests to .NET projects is fairly painless with the advent of NUnit, which is an easy-to-use, comprehensive testing framework.Kevin Jones is an instructor and course author who teaches both Java and .NET courses for DevelopMentor. He is a frequent speaker at industry events, and is the co-author of Servlets and JavaServer Pages: The J2EE Technology Web Tier, published by Addison-Wesley.
Comments