A complex software project is likely to have complicated deployment requirements. A given developer’s box will probably be inappropriate to stage a build of the whole product. The project team may have many developers, not all of whom may work on all parts, so an individual developer’s machine is unlikely to have the required deployment configuration. In fact, security restrictions may even block one developer from even seeing another’s code. Additionally, a developer’s box may not be particularly stable, and its resources will perhaps be competed for by other applications.
A common solution is to set up a separate product build environment on a dedicated machine where the entire product can be built, executed and tested with contributions from the whole project team. Often such a product build will occur upon some trigger, such as a continuous integration build that takes place after a source code check-in, or a scheduled nightly build. Some common steps in such a build are to get all product sources from version control, compile the code, analyze the code, run build verification tests, run unit tests and, finally and importantly, communicate the results of the build to those members of the project team that need to act on them.
Team Build
Microsoft’s Visual Studio Team System (VSTS) is a platform that helps software development teams to deliver complex software solutions more successfully. Not only does it provide client-side software development lifecycle tools aimed at enforcing best practices for the different roles played by team members – project managers, architects, developers and testers – but it also provides a server-side integration platform that improves communication and collaboration between team members throughout the entire development process.One of the components of the Team Foundation Server (the server-side integration platform) is called Team Build, and it deals with setting up and executing product builds. Its goals are twofold. First, that creating and executing full product builds should be as integrated and straightforward as for the local builds that you are familiar with in Visual Studio. Second, that the health and quality of the product build should be measurable and its results published centrally. To that end, it is well integrated with other VSTS features – such as source code version control, work item tracking, code analysis, testing and reporting – and product builds can be easily created and executed within Visual Studio via Team Explorer.
The Build Type
The build configuration information that is needed to perform a particular product build is held in a set of XML files called a Build Type. These XML build files are used by MSBuild to execute the product build on a dedicated build machine. A Build Type is associated with a particular Team project and is created by a Team Explorer wizard shown in Figure 1.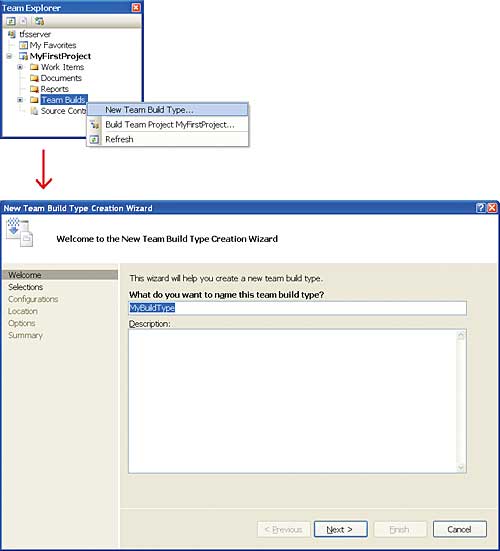
Figure 1: The Team Explorer wizard
It uses five pages to capture the information about the build. The first page (Welcome) allows you to supply a name for the Build Type, which must be unique within the Team project. The next page (Selections) allows you to choose which Visual Studio solutions are to be built as part of this Build Type. The wizard will only display solutions ‘belonging to’ the Team project associated with the Build Type. The next page (Configurations) allows you to define which configurations to build for the selected solutions. This covers aspects such as whether to build solutions for debug or release or what target platform to build solutions for. The next page (Location) allows you to specify the locations where the build will occur, and where the results of the build will be published. The build location is a directory on the build machine while the publication location is a UNC share on some server. The penultimate page (Options) allows you to select whether or not to invoke static code analysis or run tests. If you elect to perform code analysis you’ll be able to specify the details of which rules are used etc. If you choose to run tests then you’ll get to select which relevant test lists to execute. Figure 2 confirms that the resulting Build Type is associated with a single Team project.
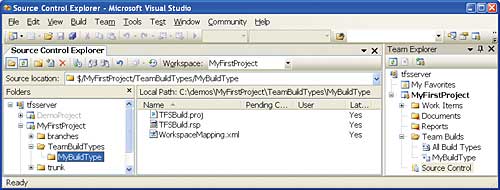
Figure 2: Confirming the Build Type
Under the Team project’s TeamBuildTypes folder in the version control repository is a folder representing the newly created Build Type that contains the generated XML files.
TFSBuild.proj is an MSBuild project file and contains the instructions for the build process. An example is shown below of a Build Type where it was decided not to run static code analysis or execute any tests.
<Project DefaultTargets=”DesktopBuild”
xmlns=”http://schemas.microsoft.com/
		developer/msbuild/2003”>
	<Import Project=
		”$(MSBuildExtensionsPath)\
Microsoft\VisualStudio\v8.0\TeamBuild\
Microsoft.TeamFoundation.Build.targets
		” />
	<ProjectExtensions>
		<BuildMachine>BuildServer
			</BuildMachine>
	</ProjectExtensions>
	<PropertyGroup>
		<TeamProject>Test</TeamProject>
		<BuildDirectoryPath>
			c:\builds
		</BuildDirectoryPath>
		<DropLocation>
			\\BuildServer\drops
		</DropLocation>
		<RunTest>false</RunTest>
		<RunCodeAnalysis>
			Default
		</RunCodeAnalysis>
	</PropertyGroup>
...
	<ItemGroup>
		<SolutionToBuild Include=
	“$(SolutionRoot)\test\test.sln” />
	</ItemGroup>
	<ItemGroup>
		<ConfigurationToBuild
			Include=”Release|Any CPU”>
<FlavorToBuild>Release</FlavorToBuild>
		<PlatformToBuild>Any CPU
			</PlatformToBuild>
		</ConfigurationToBuild>
	</ItemGroup>
	<ItemGroup>
		<MetaDataFile Include=” “>
		<TestList> </TestList>
		</MetaDataFile>
	</ItemGroup>
</Project>
Notice that a .targets file is imported that contains Team Build’s default build process.
TFSBuild.rsp is an MSBuild response file which allows particular command-line options to be set for when MSBuild executes on the build machine. WorkspaceMapping.xml defines the version control workspace mappings that will be in force on the build machine when the source files for the build are checked out of the version control repository. As mentioned above, each Build Type is associated with a single Team project. However, workspaces can span multiple Team projects. For this reason, the Build Type wizard filters workspaces to a subset of workspace mappings for the current Team project only and only solutions from this subset are presented to the user on the wizard’s Selections page. WorkspaceMapping.xml contains this subset and is used to create workspace mappings on the build machine.
Security considerations
On most platforms, if you don’t get the security right then nothing works. Team Foundation Server – and Team Build in particular – is no exception. TFS has its own security groups and membership of a TFS group allows or denies certain TFS permissions. Groups can be made up of Windows users and groups and/or other TFS groups. There are server-level groups which are not specific to a project, and project-level groups which are. Some groups are built-in and others can be added later.Selecting the MyFirstProject Team project in the Team Explorer and right-clicking reveals a context menu, from which can be selected the
Team Project Settings->Group Membership menu item. This reveals the dialog shown in Figure 3.
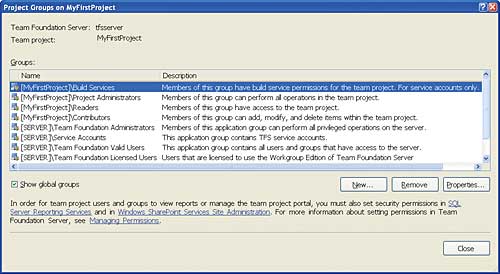
Figure 3: Project groups
This shows the four built-in server-level groups (whose names are prefixed with [Server]) and four built-in project-level groups that were created when the Team project was created (whose names are prefixed with the Team project name MyFirstProject). Additionally, selecting the Team Project Settings->Security context menu item shows the dialog illustrated in Figure 4.
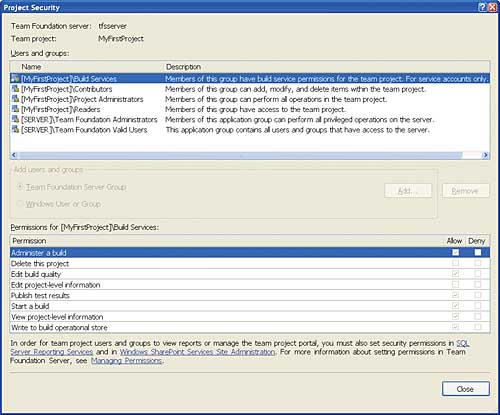
Figure 4: Security settings
This shows which permissions are set for the members of each TFS group. The build-related permissions can be seen in Figure 4. If these aren’t set correctly then nothing will work. For example, the user that creates a build type via Team Explorer requires the ‘Administer a build’ permission plus the permission to check-in to the Team project’s TeamBuildTypes version control folder.
A Team project’s TeamBuildTypes version control folder is created when the first Build Type is created within the Team project. At this time the access control list on this folder is set to grant checkout/checkin permissions to groups with the ‘Administer a build’ permission set (or not explicitly denied). All Build Types created under the TeamBuildTypes folder then inherit this ACL, which can subsequently be overridden or customized by a TFS administrator. Note that giving or revoking the ‘Administer a build’ permission retrospectively does not automatically change any ACLs on the TeamBuildTypes folder or any of its Build Types.
To execute a build requires permission too. The user that starts a build via Team Explorer requires the ‘Start a build’ permission. Additionally, the build service account must be a member of the Team project’s Build Services group or, at least, have the same build-related permissions set. The build service account is the one that the Team Build service runs as on the build server machine – the service that actually executes the build. This account was prompted for during the Team Build install on the build server machine, and will probably be the same account under which the TFS AppPool runs on the Team Foundation server (the TFS AppPool process hosts the TFS Web services, amongst them the Team Build Web service). The build service account must also have full access to the directory location where the build will occur and the UNC share where the results of the build will be published. Furthermore, you should check this account has full access to the .NET framework’s Temporary ASP.NET Files directory if ASP.NET Web sites are being built.
Note that Team Build is not installed by default as part of the TFS install, but has its own separate install.
Executing the build
To execute a build simply select the Build Type in Team Explorer and right-click to obtain its context menu. From there the build can be started. A dialog will appear that provides a chance to override the build server and the build location on the build server. Immediately, a build report will appear that tracks the progress of the build. The sequence of events that occurs upon a build is roughly as follows.- Team Explorer communicates with the Team Foundation Server’s Team Build Web service to initiate the build.
- It, in turn, communicates with the Team Build service to prompt it to start the build.
- The Team Build Service checks the Build Type’s XML files out onto the build server in the specified build directory under a subdirectory hierarchy determined by the Team project and Build Type names.
- From that point, it executes MSBuild on TFSBuild.proj, specifying the target named EndToEndIteration.
- This runs through a number of tasks including:
- generate a unique build name
- prepare the build location and drop location
- check out the required sources from the version control repository (using the workspace mappings defined in WorkspaceMapping.xml)
- compile and analyze the code
- execute any tests
- calculate code churn and code coverage
- publish the build results to the drop location
Viewing the build report
A build report for a successful completed build is shown in Figure 5.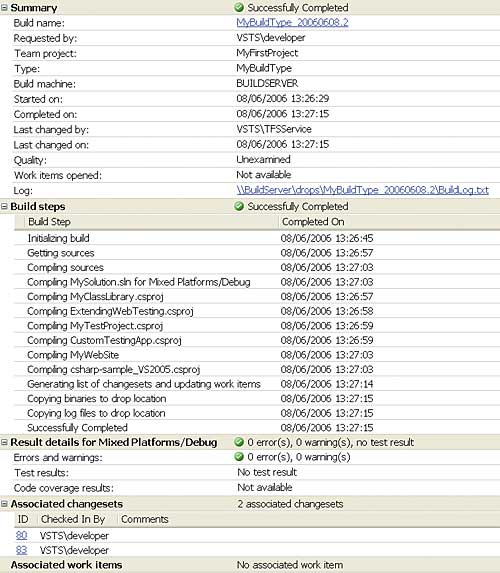
Figure 5: The report
To view a build report requires the ‘View project-level information’ permission. Each build invocation is uniquely named. In this case, the default naming scheme is used, which combines the Build Type name with the date and an incrementing counter. Clicking on the build name link will take you to the build location on the build machine. Selecting the Log link will take you to the build log created at the UNC drop location. To access these links, a user requires read access to the build directory and drop location UNC share. Notice each of the build steps from checking out the sources through to publishing the build results in the UNC drop location. Note also, how each build is associated with any version control changesets (check-ins) that have been created between the last build and this one. It is also possible to see the work items that might have been associated with those changesets. In this case there were none. These last two features provide a really useful way of tracking what went on between one build and the next and provides some level of traceability and accountability.
Figure 6 shows a failed build.
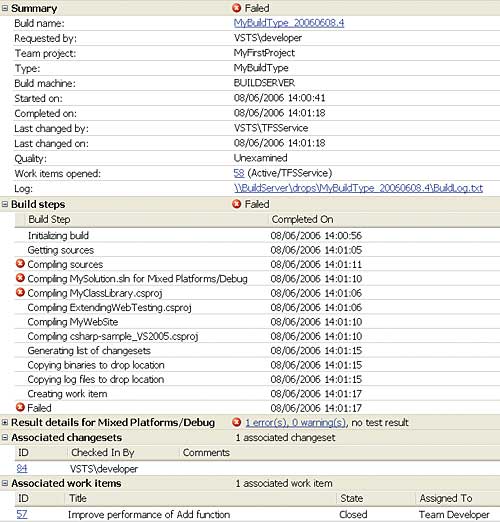
Figure 6: A failed build
Notice that because the build failed, a work item was automatically created by the build process. These types of work items could be monitored by the person responsible for the build health and used to trigger a sequence of actions to fix any problems. In this case, there was only one changeset between the last build and this one, and it was associated with a work item itself, so the problem should be fairly easy to track down and fix.
Build notification events
Team Foundation Server generates certain events when particular actions occur. For instance an event is fired when files are checked in to the version control repository or when a work item status changes. TFS also fires events related to Team Build. One such event is the BuildCompletion event that fires at the end of every build. The easiest way to subscribe to this event is via the Team Explorer. Right-clicking on the Team project in Team Explorer reveals a context menu that contains a Project Alerts menu item. Selecting this shows the dialog illustrated in Figure 7. This allows build details to be sent to the specified email recipient.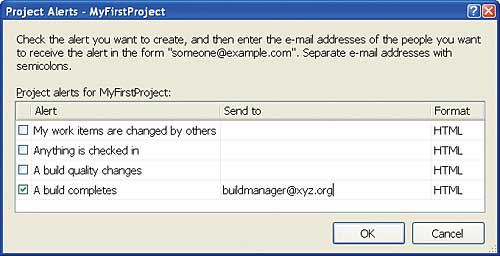
Figure 7: Emailing the build details
It turns out that there are more events generated by TFS than you can subscribe to in this way. For those events that aren’t represented in the dialog shown in Figure 7 there is another way of handling events using a TFS command-line tool called BisSubscribe.exe. This allows you to have events generate an email as described above, but also to call a Web service, which can be handy if you want to respond to the event programmatically. An example of how to respond to a check-in event by writing a Web service that kicks off a build is discussed below and in the blog.
Editing the Build Type
The build process is entirely defined within the MSBuild project file TFSBuild.proj and can be completely customized by editing this file. This means that characteristics of the build that were set when the Build Type was created by the wizard can be changed retrospectively. For instance, when our Build Type was created, the decision was taken not to perform static code analysis and not to run tests. To change this, simply check-out TFSBuild.proj, edit it to enable static code analysis and testing, and then check it back in. The following fragment shows the changes needed to TFSBuild.proj to achieve this.<Project DefaultTargets=”DesktopBuild” xmlns=”http://schemas.microsoft.com/ developer/msbuild/2003”> ... <PropertyGroup> ... <RunTest>true</RunTest> <RunCodeAnalysis>Always </RunCodeAnalysis> </PropertyGroup> ... <ItemGroup> <MetaDataFile Include= ”$(SolutionRoot)\test\test.vsmdi”> <TestList>UnitTests; WebTests</TestList> </MetaDataFile> </ItemGroup> </Project>A re-build yields a slightly different build report. The differences are confined to what’s shown in Figure 8.
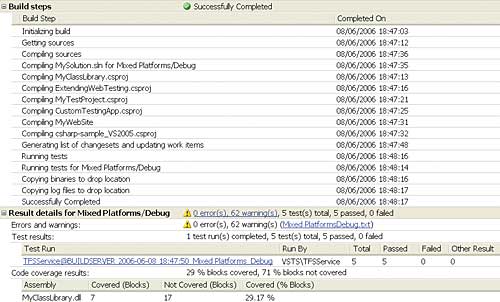
Figure 8: A changed build
Now there are a number of code analysis warnings and some test and code coverage results, all of which can be further inspected.
As mentioned earlier, the Team Build service executes MSBuild on TFSBuild.proj, specifying the target EndToEndIteration. This target, and the targets it is dependent on, are defined in the file Microsoft.TeamFoundation.Build.targets which is imported by TFSBuild.proj and essentially defines the build process. It is possible to go in and edit this file to customize the build process, although this is not recommended. Rather, some of these targets in the Microsoft.TeamFoundation.Build.targets file are empty, and are designed to be overridden to provide necessary customization during different stages of the build process. Some examples are PreBuild, PostBuild, BeforeGet, AfterGet, BeforeCompile, AfterCompile, BeforeTest, AfterTest, BeforeDropBuild and AfterDropBuild. Another such empty target is BuildNumberOverrideTarget, which is designed as the place to override the default build number generation scheme. Consider the custom task below to calculate a build number based on your own scheme.
public class
	MyBuildNumberGeneratorTask : Task {
	public override bool Execute() {
		m_buildNumber =
			MyNumberGeneratonScheme();
		return true;
	}
	private string m_buildNumber;
		[Output]
	public string BuildNumber {
		get { return m_buildNumber; }
	}
	private string
		MyNumberGenerationScheme() {
		// Some scheme goes here
	}
}
To use this custom task you must edit TFSBuild.proj so it knows about the task and calls it at the right time, i.e. inside the BuildNumberOverrideTarget target, as shown in the snippet below.
<Project DefaultTargets=”DesktopBuild”
xmlns=”http://schemas.microsoft.com/
		developer/msbuild/2003”>
	<Import Project=
		”$(MSBuildExtensionsPath)
\Microsoft\VisualStudio\v8.0\TeamBuild
\Microsoft.TeamFoundation.Build.
targets” />
...
	<UsingTask AssemblyFile=
		”mytasks.dll”/>
TaskName=”MyBuildNumberGeneratorTask”
	<Target Name =
		“BuildNumberOverrideTarget” >
		<MyBuildNumberGeneratorTask>
	<Output TaskParameter=”BuildNumber”
			PropertyName=”BuildNumber”/>
		</MyBuildNumberGeneratorTask>
	</Target>
</Project>
You need to ensure that the custom task assembly was checked in to the same folder as TFSBuild.proj. For more detailed information on MSBuild and how to customize it, see my previous article Customizing your build process with MSBuild (VSJ July/August 2006).
Another aspect of the build that might be changed is the workspace mappings held in WorkspaceMapping.xml. For instance, Team Build has no clue which mapping is for which Visual Studio solution, which means that all sources belonging to each mapping are checked-out to the build machine regardless. Now, only the solutions selected in Build Type are actually built but, nevertheless, you may wish to prevent certain sources from being checked out onto the build server machine. In the following example, WorkspaceMapping.xml has been changed so that everything under the MyFirstProject repository folder is checked out except the contents of the hidden folder.
<SerializedWorkspace ...>
	<Mappings>
		<InternalMapping
		ServerItem=”$/MyFirstProject”
			Type=”Map”
			LocalItem=”...” />
		<InternalMapping
			ServerItem=
		”$/MyFirstProject/test/hidden”
			Type=”Cloak” />
	</Mappings>
</SerializedWorkspace>
Scheduled builds and continuous integration builds
One question that is often asked about Team Build is, “Can I perform nightly builds?” The answer is yes. Team Build doesn’t have a built-in scheduler, but it does have a command-line tool called TFSBuild.exe that can be used to execute a specific Build Type. In this case the Windows Task Scheduler can be used to start a build at a pre-determined time by using a command such as the one below.TfsBuild start mytfsserver MyFirstProject MyBuildTypeAnother question that arises is, “Can I do continuous integration builds?” Again, the answer is yes. It is possible to handle TFS version control check-in events (similar to the TFS build events discussed earlier) with a Web service, and then use the Team Build API to start a build. In fact, one of the project team responsible for developing Team Build has published a nice packaged example of how to do this.
Conclusion
Because it is important to perform full product builds often during the development lifecycle, Microsoft has released Team Build as part of Team Foundation Server. Its aim is to make it as easy as possible to create a product build, as well as making the build details readily available to the people who need them so that the health of the project can be ascertained. It does a pretty good job on both counts.Simon Horrell is an author and instructor at DevelopMentor, where he develops and delivers .NET courses. He can be reached at [email protected].
Comments