A lack of complete code testability means that ASP.NET Web Forms is becoming less popular in enterprise-level web applications. Ravi looks at using the Model-View-Presenter pattern to enable complete test coverage in Web Forms.
Need of MVP pattern in ASP.NET Web Forms
ASP.NET Web Forms provides a great platform to build websites. It abstracts the complexity of writing HTML tags by providing the easy to use ASP.NET controls. A web form is easily made interactive by accessing the data access and the business logic tiers from the code behind file. However, on an enterprise level, with an evolving set of requirements and a large set of interchangeable developers, Web Forms as provided by Visual Studio is not that good a model to build upon.
- You cannot test all the code-behind a Web Form because it depends on concrete methods and properties defined in the Page class (the base class for all web forms) which is sealed.
- As a result of this, you cannot ensure the creation of new components in the web application does not have any knock-on effects over the existing code base.
- The Web Forms model does prescribe any structure or conventions for developers. New developers may take longer to pick up the ‘house style’ and be productive than if any such prescription did exist. (Depends on the house style - Ed)
Based on the analysis above, we can say that the code of an enterprise application should meet the following requirements at the heart of which is the requirement to test fully the code in a Web application:
- Functional components have to be clearly identified and they should have least dependency among each other
- Adding a new component should not tire the developer. This component should not cause cascading effects
- Repetition in the code should be as less as possible
- Each functional component should be testable independently
In this article, you’ll see how using the Model-View-Presenter model within a Web Forms project enables all of these requirements.
MVP vs MVC. What’s The Difference?
One of the most widely used techniques to structure Web Forms applications for unit testing is the Model-View-Presenter (MVP) pattern.
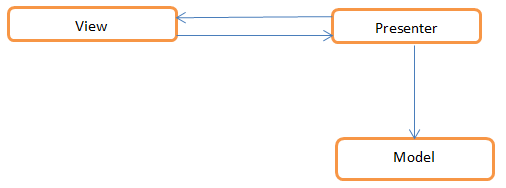
In the MVP pattern:
- The view represents the user interface. It contains only the user interaction logic.
- The model interacts with the data source for the page (a file, database, web service etc).
- The presenter mediates between the view and model. The business logic and data operations of the views are co-ordinated by the presenters.
Compare this with another widely used pattern: Model-View-Controller, or MVC.
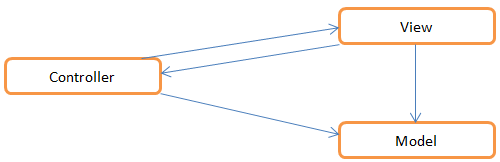
Unlike MVP, the view in MVC is aware of the model. The controller takes the responsibility of connecting the model with the view and navigation among the views. Every view is bound with a model. Properties of the model are bound to the controls of the view using declarative binding.
Both MVP and MVC patterns are designed to achieve the same goal, separating the concerns. The difference is their approach to achieve the goal. Read here on MSDN to learn more about these patterns.
The Sample Application
To demonstrate how to incorporate the MVP pattern into a Web Forms project and then how to build it using a test-driven approach, we’ll be creating a simple two page application based on the Northwind database. You’ll need to be using either Visual Studio 2010 or Visual Studio 2012 installed to follow along with the text.
ShipperOperations
The ShipperOperations page consists of a GridView, a panel and a button:
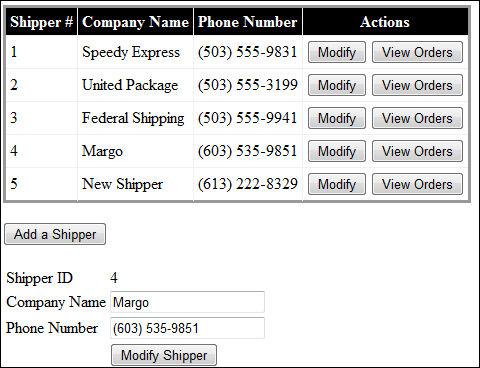
Each row in the GridView displays the details for a shipping company in the database along with two action buttons, Modify and View Orders:
- When Modify is clicked, a small form appears in the panel below the GridView allowing you to edit the details for that company.
- When View Orders is clicked, the browser will navigate to the ShipperOrders page to display the orders for that company.
Under the GridView, clicking the Add a Shipper button will show a blank form in the panel beneath it. This form will take details for a new company and save them to the database when Add Shipper is clicked.
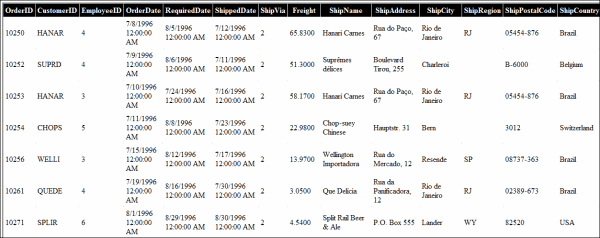
ShipperOrders
The ShipperOrders page displays the details of orders handled by a shipper. It has just a GridView on the page
Building the Application
So then, with plenty to do let’s start by creating a new Web Application project and adding a little structure.
- In Visual Studio, on the File menu, click New, and then Project.
- In the New Project dialog, select Visual C#, then Web, and then ASP.NET Empty Web application.
- Give it the name MVPDemo, and click OK.
- In the Solution Explorer window, add three new folders to the application and name them Model, View and Presenter.
Creating The Model
As noted earlier, the model is used to interact with the application’s data source - the Northwind database. This is a SQL Server database, so there are plenty of quick ways to generate a strongly-typed model we can use in our application. For this demonstration, we’ll use the Entity Framework as it is built into Visual Studio.
- In Solution Explorer, right click the Model folder, and on the context menu, click Add and then New Item.
- In the Add New Item dialog, click Visual C#, then Data, and then ADO.NET Entity Data Model template.
- Give it the name Northwind.edmx and click Add.
- In the Entity Data Model Wizard dialog, select Generate From Database and then click Next.
- Click New Connection to create a connection to your copy of the Northwind database and then click Next.
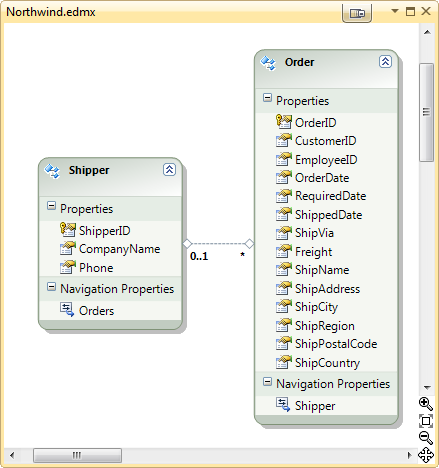
- In the Choose Your Database Objects dialog, expand the Tables list, and select the Shippers (dbo) and Orders (dbo) tables.
- Click Finish.
When Visual Studio has finished you’ll see the Entity Framework designer displaying the two tables in the model.
Ed’s Note: This article was written using Visual Studio 2010. If you’re using Visual Studio 2012, you’ll need to tweak the generated NorthwindEntities class to follow the rest of the article successfully.
- In Solution Explorer, click Northwind.edmx, and then Northwind.Context.tt to expand the tree. Double-click Northwind.Context.cs to show the code.
- Add using System.Data.Objects; to the set of using statements.
- Change the declaration of Orders and Shippers to be of type ObjectSet
and ObjectSet<Shipper> respectively.
You’ll need to alter this file again if you regenerate the Entity Data Model.
Using the Repository Pattern
To add a central data access class that will use our generated model classes, we’ll use the Repositry pattern. This is a great pattern to use here because it separates out the data access logic from the business logic, making both easier to test.
The repository mediates between the data source layer and the business layers of the application. It queries the data source for the data, maps the data from the data source to a business entity, and persists changes in the business entity to the data source. A repository separates the business logic from the interactions with the underlying data source or Web service. The separation between the data and business tiers has three benefits:
- It centralizes the data logic or Web service access logic.
- It provides a substitution point for the unit tests.
- It provides a flexible architecture that can be adapted as the overall design of the application evolves.
To implement the repository pattern, you need to:
- Create a repository class for each entity you wish to use in the model. For example, ShippersRepository.
- Create a substitution point for the test by having each repository class implement an interface detailing the database operations for that entity. For example, IShipperRepository.
- Have the Presenter class refer to an instance of a class implementing the interface rather than a concrete class. In this way, you can swap out your concrete class for a mock repository class during testing.
Let’s start with the interface for accessing the Shippers table.
- In Solution Explorer, right click the Model folder, and on the context menu, click Add and then New Item.
- In the Add New Item dialog, click Visual C#, then Code, and then Interface.
- Give it the name IShipperRepository.cs and click Add.
- Add the following code and then save the file.
public interface IShipperRepository
{
  List<Shipper> Shippers { get; }
  bool IsSuccessful { get; set; }
  void AddNewShipper(Shipper shipper);
  void ModifyShipper(Shipper shipper);
  IEnumerable<Order> GetShipperOrders(int shipperId);
  Shipper GetShipper(int shipperId);
}
The Concrete Class : ShippersRepository
With the interface coded, we can write both a concrete and a mock implementation of the IShipperRepository interface. The concrete class, ShippersRepository, will perform actual database operations, while the mock class, MockShipperRepository, will return fake results for testing classes and methods that need data access without actually accessing it.
First, the concrete implementation, ShipperRepository.
- In Solution Explorer, right click the Model folder, and on the context menu, click Add and then Class.
- In the Add New Item dialog, give it the name ShipperRepository.cs and click Add.
- Add the following code and then save the file.
public class ShippersRepository : IShipperRepository
{
  NorthwindEntities nwEntities;

  public List<Shipper> Shippers
  {
    get
    {
        return nwEntities.Shippers.ToList();
    }
  }

  public bool IsSuccessful { get; set; }

  public ShippersRepository()
  {
    nwEntities = new NorthwindEntities();
  }

  public void AddNewShipper(Shipper shipper)
  {
    try
    {
        nwEntities.Shippers.AddObject(shipper);
        nwEntities.SaveChanges();
        IsSuccessful = true;
    }
    catch (Exception)
    {
        IsSuccessful = false;
    }
  }

  public void ModifyShipper(Shipper shipper)
  {
    try
    {
        Shipper originalShipper = nwEntities.Shippers
           .Where(s => s.ShipperID == shipper.ShipperID).Select(s => s).FirstOrDefault();
        nwEntities.Shippers.ApplyCurrentValues(shipper);
        nwEntities.SaveChanges();
        IsSuccessful = true;
    }
    catch (Exception)
    {
        IsSuccessful = false;
    }
  }

  public IEnumerable<Order> GetShipperOrders(int shipperId)
  {
    return nwEntities.Shippers.Where(s => s.ShipperID == shipperId).Select(s => s.Orders).FirstOrDefault();
  }

  public Shipper GetShipper(int shipperId)
  {
    return nwEntities.Shippers.Where(s => s.ShipperID == shipperId).Select(s => s).First();
  }
}
The Mock Class : MockShipperRepository
Our next task is to create a unit test project and create the mock implementation of the IShippersRepository interface within that. By doing separating out mock and test code into its own project, when you want to ship an application, you simply omit the test project from the build and there’s no more testing code in your application.
- In Visual Studio, on the File menu, click Add, and then New Project.
- In the Add New Project dialog, select Visual C#, then Test, and then Test Project.
- Give it the name MVPDemoTest, and click Add.
- In the Solution Explorer window, add a new folder to the project called Mocks.
You’ll need to add a reference to the MVPDemo project, so you can access the code you want to test.
- In Solution Explorer, right click MVPDemoTest\\References.
- Click Add Reference.
- In the Add Reference dialog box, select the Projects tab, and then the MVPDemo entry.
- Select the .NET tab, select the System.Data.Entity entry.
- Click OK.
FInally, we can write our mock repository class, MockShipperRepository. This will build an in-memory collection of Shipper objects for use in testing.
- In Solution Explorer, right click the MVPDemoTest\\Mocks folder, and on the context menu, click Add and then Class.
- In the Add New Item dialog, give it the name MockShipperRepository.cs and click Add.
- Replace the generated code with the code below and then save the file.
using System.Collections.Generic;
using System.Linq;
using MVPDemo.Model;

namespace MVPDemoTest
{
  public class MockShipperRepository : IShipperRepository
  {
    private List<Shipper> _shippers;

    public bool IsSuccessful { get; set; }

    public List<Shipper> Shippers
    {
      get
      {
        return _shippers;
      }
    }

    public MockShipperRepository()
    {
      _shippers = LoadTestShippers();
    }

    List<Shipper> LoadTestShippers()
    {
      List<Shipper> testShippers = new List<Shipper>()
         {
             new Shipper{ShipperID=1,CompanyName="AB",Phone="251870"},
             new Shipper{ShipperID=2,CompanyName="CD",Phone="87621"},
             new Shipper{ShipperID=3,CompanyName="EF",Phone="36912"},
             new Shipper{ShipperID=4,CompanyName="GH",Phone="639217"},
             new Shipper{ShipperID=5,CompanyName="IJ",Phone="8723370"}
         };

      return testShippers;
    }

    public void AddNewShipper(Shipper shipper)
    {
      _shippers.Add(shipper);
      IsSuccessful = true;
    }

    public void ModifyShipper(Shipper shipper)
    {
      _shippers[shipper.ShipperID - 1] = shipper;
      IsSuccessful = true;
    }

    public IEnumerable<Order> GetShipperOrders(int shipperId)
    {
      var result = _shippers.Where(s => s.ShipperID == shipperId).Select(s => s);
      return result.FirstOrDefault().Orders.AsEnumerable();
    }

    public Shipper GetShipper(int shipperId)
    {
      return _shippers.Where(s => s.ShipperID == shipperId).FirstOrDefault();
    }
  }
}
As you can see, the main difference between concrete and mock classes is that the mock class doesn’t touch the database.
Looking for Views
With the model classes complete, we can turn our attention to the two views we described earlier - ShipperOperations and ShipperOrders - and their corresponding presenter classes. Each presenter is responsible for a single view and will keep a reference to that view as it is processed. Rather than the presenter holding a concrete instance of a view however, we’ll take the same approach as we did with the model and create an interface for Views called IView. The presenter class can then reference the interface rather than its concrete implementation which makes testing easier.
- In Solution Explorer, right click the MVPDemo\\View folder, and on the context menu, click Add and then New Item.
- In the Add New Item dialog, click Visual C#, then Code, and then Interface.
- Give it the name IView.cs and click Add.
- Add the following code and then save the file.
namespace MVPDemo.View
{
  public interface IView
  {
  }
}
As this is only a small application, there is no logic common across pages and so IView is left blank. It will be quite useful for larger applications.
IShipperOperations
Now to consider the actions to be taken on the ShipperOperations page. Again we’ll define these operations using an interface so we can create a MockShipperOperations view for use in testing its presenter class.
- Load all Shippers from the database for binding into the GridView
- Add a new Shipper to the database
- Update an existing Shipper in the database
- Get details for a single Shipper based on its ID.
The presenter interface represents each of these actions as an event.
- In Solution Explorer, right click the MVPDemo\\View folder, and on the context menu, click Add and then New Item.
- In the Add New Item dialog, click Visual C#, then Code, and then Interface.
- Give it the name IShipperOperations.cs and click Add.
- Add the following code and then save the file.
using System;
using System.Collections.Generic;
using MVPDemo.Model;
using MVPDemo.Helper;

namespace MVPDemo.View
{

  public interface IShipperOperations : IView
  {
    IEnumerable<Shipper> Shippers { get; set; }

    event EventHandler LoadShippers;
    event EventHandler<AddShipperEventArgs> AddShipper;
    event EventHandler<GetShipperEventArgs> GetShipper;
    event EventHandler<ModifyShipperEventArgs> ModifyShipper;
    event EventHandler<ShipperNavigationEventArgs> NavigateToOrders;
  }
}
We’ll come to the Helper classes momentarily.
IShipperOrders
Let’s define the interface for the ShipperOrders view as well. If you recall, this page simply retrieve a list of orders for binding into a GridView, so there is only one action to model.
- In Solution Explorer, right click the MVPDemo\\View folder, and on the context menu, click Add and then New Item.
- In the Add New Item dialog, click Visual C#, then Code, and then Interface.
- Give it the name IShipperOrders.cs and click Add.
- Add the following code and then save the file.
using System;
using System.Collections.Generic;
using MVPDemo.Model;

namespace MVPDemo.View
{
  public interface IShipperOrders : IView
  {
    IEnumerable<Order> Orders { get; set; }

    string this[string key] { get; }

    event EventHandler<EventArgs> LoadOrders;
  }
}
The collection Orders will be used to bind the list of orders to the GridView. The event handler LoadOrders will interact with the presenter to get the details of orders handled by the shipper. We will pass the shipperId to the ShipperOrders page using QueryString. To make the QueryString available to the presenter through the interface, we created the indexer.
Helper Classes
Each EventHandler with the exception of LoadOrders use a class derived from EventArgs to pass information to their event or to obtain some value after the event is executed. For example, AddShipperEventArgs contains a Shipper object holding the details of the new shipper to add to the database, GetShipperEventArgs has the ShipperId of the object to retrieve from the database, and so on.
We’ll define these classes and several others in a Helper directory as they assist but are not directly part of either the Presenter or Model.
- In Solution Explorer, right click the MVPDemo folder, and on the context menu, click Add and then New Folder.
- Change the new folder’s name to Helper.
- Right click the Helper folder, and on the context menu, click Add and then Class.
- In the Add New Item dialog, give it the name EventArgs.cs and click Add.
- Add the following code for all four EventArgs classes and then save the file.
using System;
using MVPDemo.Model;

namespace MVPDemo.Helper
{
  public class AddShipperEventArgs : EventArgs
  {
    private Shipper newShipper;
    public Shipper NewShipper
    {
      get { return newShipper; }
      set { newShipper = value; }
    }

    public AddShipperEventArgs(Shipper shipper)
    {
      newShipper = shipper;
    }
  }

  public class GetShipperEventArgs : EventArgs
  {
    private int shipperId;
    public int ShipperId
    {
      get { return shipperId; }
      set { shipperId = value; }
    }

    public Shipper ShipperDetails { get; set; }

    public GetShipperEventArgs(int shipperId)
    {
      this.shipperId = shipperId;
    }
  }

  public class ModifyShipperEventArgs : EventArgs
  {
    private Shipper modifiedShipper;

    public Shipper ModifiedShipper
    {
      get { return modifiedShipper; }
      set { modifiedShipper = value; }
    }

    public ModifyShipperEventArgs(Shipper modifiedShipper)
    {
      this.modifiedShipper = modifiedShipper;
    }
  }

  public class ShipperNavigationEventArgs : EventArgs
  {
    private int shipperId;
    public int ShipperId
    {
      get { return shipperId; }
      set { shipperId = value; }
    }

    public ShipperNavigationEventArgs(int shipperId)
    {
      this.shipperId = shipperId;
    }
  }
}
A Navigator Class For Redirection
If you recall the ShipperOperations page, each row of its GridView contains a View Orders button. When clicked, the ShipperId associated with that row is added as a QueryString parameter to the URL for the ShipperOrders page and the browser is redirected.
The presenter class should handle this process. However, if we do implement it this way, we’ll be making the presenter dependent on the sealed System.Web.HttpContext class. This makes the presenter hard to test. We have to implement this logic in a way that makes the presenter less dependent on the HttpContext object.
There are several ways to do this, but in this case, we’ll create a Navigator class which uses the HttpContext object for the redirection instead. We’ll base it on an interface INavigator which the Presenter class will then require an instance of. We can then create a MockNavigator class to pass to the Presenter when testing.
Let’s being by creating INavigator. It contains two methods. The first method navigates from one page to another page without passing any parameters. The second method navigates to a page by passing some values on the query string.
- In Solution Explorer, right click the Helper folder, and on the context menu, click Add and then New Item.
- In the Add New Item dialog, click Visual C#, then Code, and then Interface.
- Give it the name INavigator.cs and click Add.
- Add the following code and then save the file.
using System.Collections.Generic;

namespace MVPDemo.Helper
{
  public interface INavigator
  {
    void NavigateTo(string pageName);
    void NavigateTo(string pageName, Dictionary<string, string> queryStringParams);
  }
}
Now to implement the concrete Navigator class derived from INavigator that the ShipperOperations presenter class will use. Note that we don’t have direct access to the Request and Response objects here as Navigator doesn’t inherit the System.Web.UI.Page class. Instead, we must use the static HttpContext.Current property, which holds all the objects currently used by the ASP.NET application.
- In Solution Explorer, right click the Helper folder, and on the context menu, click Add and then Class.
- Give it the name Navigator.cs and click Add.
- Add the following code and then save the file.
using System.Collections.Generic;
using System.Linq;
using System.Text;
using System.Web;

namespace MVPDemo.Helper
{
  public class Navigator : INavigator
  {
    public void NavigateTo(string pageName)
    {
      HttpContext.Current.Response.Redirect(pageName);
    }

    public void NavigateTo(string pageName, Dictionary>string, string< queryStringParams)
    {
      StringBuilder urlToNavigate = new StringBuilder(pageName);

      urlToNavigate.Append('?');

      for (int index = 0; index < queryStringParams.Count; index++)
      {
        var entry = queryStringParams.ElementAt(index);
        urlToNavigate.Append(entry.Key + "=" + entry.Value + "&");
      }
      urlToNavigate.Remove(urlToNavigate.Length - 1, 1);
      HttpContext.Current.Response.Redirect(urlToNavigate.ToString());
    }
  }
}
For the unit test project, we need to define a mock implementation of INavigator. This class won’t redirect the browser anywhere but it does make the URL to navigate to and the query string parameters being sent to it available as public properties for inspection in tests.
- In Solution Explorer, right click the MVPDemoTest\\Mocks folder, and on the context menu, click Add and then Class.
- Give it the name MockNavigator.cs and click Add.
- Add the following code and then save the file.
using System.Collections.Generic;
using MVPDemo.Helper;

namespace MVPDemoTest
{
  public class MockNavigator : INavigator
  {
    public string UrlToNavigate { get; set; }
    public Dictionary<string, string> QueryStringParams { get; set; }

    public void NavigateTo(string pageName)
    {
      UrlToNavigate = pageName;
    }

    public void NavigateTo(string pageName, Dictionary<string, string> queryStringParams)
    {
      UrlToNavigate = pageName;
      QueryStringParams = queryStringParams;
    }
  }
}
Creating Presenters and Views Using Test Driven Development
Now that we have our helper classes and data access repository classes ready, we can start writing a presenter class using a test-driven approach. We’ll start with the presenter class for the ShipperOperations page.
The Mock ShipperOperations Presenter Class
The purpose of a Presenter class is to mediate between model and view, so we’ll need to pass it mocked versions of both model and view (and navigator too). We’ve already created MockShipperRepository but we’ll need to create a mock instance of the IShipperOperations, the interface representing the view for the ShipperOperations page.
Our first test will be to make sure the presenter fills data into the Shippers collection when the page loads, so we’ll also include an implementation of PageLoad in the mock class.
- In Solution Explorer, right click the MVPDemoTest\\Mocks folder, and on the context menu, click Add and then Class.
- Give it the name MockShipperOperations.cs and click Add.
- Add the following code and then save the file.
using System;
using System.Collections.Generic;
using MVPDemo.Helper;
using MVPDemo.Model;
using MVPDemo.View;

namespace MVPDemoTest
{
  public class MockShipperOperations : IShipperOperations
  {
    public IEnumerable<Shipper> Shippers { get; set; }
    public Shipper ShipperDetails { get; set; }

    public event EventHandler LoadShippers;
    public event EventHandler<AddShipperEventArgs> AddShipper;
    public event EventHandler<GetShipperEventArgs> GetShipper;
    public event EventHandler<ModifyShipperEventArgs> ModifyShipper;
    public event EventHandler<ShipperNavigationEventArgs> NavigateToOrders;

    public void PageLoad()
    {
      if (this.LoadShippers != null)
      {
        LoadShippers(this, new EventArgs());
      }
    }
  }
}
On to the test class itself. We’ll start by defining the LoadObjects method to create the required mock objects and pass them to the ShipperOperationsPresenter constructor. LoadObjects is decorated with [TestInitialize], so it will run before each test executes.
- In Solution Explorer, rename the MVPDemoTest\\unitTest1.cs file to ShipperOperationsPresentersTest.cs
- Open the file, add the following code and save it.
using System.Linq;
using Microsoft.VisualStudio.TestTools.UnitTesting;
using MVPDemo.Model;
using MVPDemo.Presenter;

namespace MVPDemoTest
{
  [TestClass]
  public class ShipperOperationsPresentersTest
  {
    MockShipperOperations view;
    ShipperOperationsPresenter presenter;
    MockNavigator navigator;

    [TestInitialize]
    public void LoadObjects()
    {
      IShipperRepository repository = new MockShipperRepository();
      navigator = new MockNavigator();
      view = new MockShipperOperations();

      presenter = new ShipperOperationsPresenter(repository, navigator);
      presenter.View = view;
    }
  }
}
Once the PageLoad method has executed, we expect the Shippers collection to be filled with data. Let’s write our first unit test against the ShipperOperationsPresenter class to make sure of it. Add the following code directly beneath LoadObjects.
[TestMethod]
public void PageLoadTest()
{
  view.PageLoad();
  Assert.IsNotNull(view.Shippers);
  Assert.AreEqual(5, view.Shippers.Count());
}
PageLoadTest verifies that the collection Shippers is instantiated. As we added five shippers in the MockShipperRepository, we are checking whether the collection holds five entries in it. If any of the two checks fail, the test method will fail.
The ShipperOperationsPresenter Class
We can now turn our attention to writing the ShipperOperationsPresenter class that will pass our first test and handle the LoadShippers event. We’ll define the OnLoadingShippers method to fetch a list of Shippers from the model and assign it to the view’s Shippers property.
- In Solution Explorer, right click the MVPDemo\\Presenter folder, and on the context menu, click Add and then Class.
- Give it the name ShipperOperationsPresenter.cs and click Add.
- Add the following code and then save the file.
using MVPDemo.Helper;
using MVPDemo.Model;
using MVPDemo.View;
using System;

namespace MVPDemo.Presenter
{
  public class ShipperOperationsPresenter
  {
    IShipperOperations view;
    IShipperRepository operations;
    INavigator navigator;
    public event EventHandler<ShipperNavigationEventArgs> NavigateToOrders;

    //Flag to indicate whether the data operation was successful
    public bool IsSuccessful
    {
      get
      {
        return operations.IsSuccessful;
      }
    }

    //To hold the corresponding View
    public IShipperOperations View
    {
      get
      {
        return view;
      }
      set
      {
        view = value;
        AttachEventsToView();
      }
    }

    //Constructor
    public ShipperOperationsPresenter(IShipperRepository operations, INavigator navigator)
    {
      this.operations = operations;
      this.navigator = navigator;
    }

    //Attaching event handlers to the view
    private void AttachEventsToView()
    {
      view.LoadShippers += OnLoadingShippers;
      //view.AddShipper += OnAddingShipper;
      //view.GetShipper += OnGettingShipper;
      //view.ModifyShipper += OnModifyingShipper;
      //view.NavigateToOrders += OnNavigationToOrders;
    }

    //Loading the shippers to display on the page
    void OnLoadingShippers(object sender, EventArgs e)
    {
      view.Shippers = operations.Shippers;
    }
  }
}
At this point, we can compile and run a test for the first time. If we run the PageLoadTest() method now, it will be pass. Congratulations! Now that most of the boilerplate code to enable testing is written, we can progress a lot faster writing tests and operational code that passes them.
Adding A Shipper
Now to write a test for adding a shipper and the code that passes it. First the test. We know from the PageLoadTest method that there are five Shipper objects loaded for the MockShipperOperations view by the presenter initially. Adding another Shipper should increase that count to six, so we can add the following test to ShipperOperationsPresentersTest.cs:
[TestMethod]
    public void TestAddShipper()
    {
      view.PageLoad();
      view.AddAShipper();
      Assert.AreEqual(6, view.Shippers.Count());
      Assert.IsNotNull(view.Shippers.Select(s => s.ShipperID == 6).ToList());
    }
We haven’t created the AddAShipper method in MockShipperOperations yet, so that’s the next thing to do:
public void AddAShipper()
    {
      if (AddShipper != null)
      {
        Shipper shipper = new Shipper { ShipperID = 6, CompanyName = "IJ", Phone = "8723370" };
        //You may add logic to create a collection of Orders and add it to the shipper created above

        AddShipper(this, new AddShipperEventArgs(shipper));
      }
    }
The mock view now raises the AddShipper event for our presenter class to handle. The actual adding to the database will be handled by your model \ repository class which we’ve mocked of course, so all the presenter class needs to do is call the AddNewShipper method of the MockShipperRepository class, and uncomment the relevant event handler hook-up line in AttachEventsToView.
private void AttachEventsToView()
    {
      view.LoadShippers += OnLoadingShippers;
      view.AddShipper += OnAddingShipper;
      …
    }

  void OnAddingShipper(object sender, AddShipperEventArgs e)
    {
      operations.AddNewShipper(e.NewShipper);
    }
If you run the tests again, you’ll see they pass. The test methods and the methods for modifying a shipper and getting the details of a shipper can be defined in similar manner. You can find them in the download for this article.
Remember: The Presenter acts as the enabler for the View. All we’re testing currently is that it can call a method that would access the Model. Hence the Model class is a mock repository as well. Testing the actual repository method is done separately and so is testing the view.
Testing Navigation
Let’s test and define the logic of navigation to the ShipperOrders page. When an order is selected and the button clicked on the view, the presenter class should call the navigator’s NavigateTo method with the URL of the ShipperOrders page and some QueryString parameters. We can use the MockNavigator class to test that the Presenter makes the call with the expected values. Add the following test to ShipperOperationsPresentersTest.cs:
[TestMethod]
    public void TestNavigationToOrders()
    {
      view.PageLoad();
      view.NavigateToOrdersView(2);
      Assert.AreEqual(true, navigator.UrlToNavigate.Contains("ShipperOrders.aspx"));
      Assert.IsNotNull(navigator.QueryStringParams);
    }
We haven’t created the NavigateToOrdersView method in MockShipperOperations.cs yet, so that’s the next thing to do:
public void NavigateToOrdersView(int shipperId)
    {
      if (NavigateToOrders != null)
      {
        NavigateToOrders(this, new ShipperNavigationEventArgs(shipperId));
      }
    }
To pass the test, we’ll need to handle the NavigateToOrders event in the Presenter and pass the expected values to the MockNavigator class. In ShipperOperationsPresenter.cs, uncomment the the relevant event handler hook-up line in AttachEventsToView and add the following code:
//Attaching event handlers to the view
    private void AttachEventsToView()
    {
      view.LoadShippers += OnLoadingShippers;
      view.AddShipper += OnAddingShipper;
      view.GetShipper += OnGettingShipper;
      view.ModifyShipper += OnModifyingShipper;
      view.NavigateToOrders += OnNavigationToOrders;
    }

    void OnNavigationToOrders(object sender, ShipperNavigationEventArgs e)
    {
      LoadOrdersOfShipper(e.ShipperId);
    }

  //Navigating to ShipperOrders.aspx page with the value of Shipper ID passed as QueryString parameter
public void LoadOrdersOfShipper(int shipperId)
{
  Dictionary<string, string> queryStringValues = new Dictionary<string, string>();
  queryStringValues.Add("ID", shipperId.ToString());
  navigator.NavigateTo("ShipperOrders.aspx", queryStringValues);
}
Compile and run the tests, and you’ll see they pass.
Making the Page Operational
Once you’ve written sufficient tests for your presenter, and repository classes, you’ll need to create the actual page \ view and pass through the tested classes in reflection of the MockShipperOperations view class. Most of the logic of the page is defined in the presenter, so the code behind for the page will contain just the user interaction logic: the click handlers for the buttons raising the events for the presenter to handle.
public partial class ShipperOperations : System.Web.UI.Page, IShipperOperations
    {
        ShipperPresenter presenter;
        public IEnumerable<Shipper> Shippers { get; set; }

        public event EventHandler LoadShippers;
        public event EventHandler<AddShipperEventArgs> AddShipper;
        public event EventHandler<GetShipperEventArgs> GetShipper;
        public event EventHandler<ModifyShipperEventArgs> ModifyShipper;
        public event EventHandler<ShipperNavigationEventArgs> NavigateToOrders;

        public ShipperOperations()
        {
            IShipperRepository repository = new ShipperRepository();
            INavigator navigator = new Navigator();
            presenter = new ShipperPresenter(repository,navigator);
            presenter.View = this;
        }

        protected void Page_Load(object sender, EventArgs e)
        {
            if (!IsPostBack)
            {
                BindShippers();
            }
        }

        protected void btnAddShipper_Click(object sender, EventArgs e) {
        }

        protected void btnModifyShipper_Click(object sender, EventArgs e)
        {
        }

        protected void btnViewOrders_Click(object sender, EventArgs e)
        {
        }

        protected void btnAddNewShipper_Click(object sender, EventArgs e)
        {
        }

        void BindShippers()
        {
            LoadShippers(this, new EventArgs());
            gvShipper.DataSource = this.Shippers;
            gvShipper.DataBind();
        }
    }
You can find the full code for the page in the download along with the full test and implementation code for the Orders page which is created in a similar way as described above in the download for the article.
Conclusion
Design patterns are a bit tricky to learn and implement. But, they make the application better in many ways. MVP is one such pattern. As shown in this demonstration, implementing the MVP pattern requires additional time and effort for its initial development, but it quickly makes testing for developers much easier once the initial boilerplate has been written.

Comments