The world in which we live evolves at a vast speed. Today, many applications on the Internet expose an API which can be consumed by everyone using a web browser or a mobile application on their smartphone or tablet. How would you build your API if you want these apps to be a full-fledged front-end to your service without compromising security? In this article, I’ll dive into that. We’ll be using OAuth2 and the Windows Azure Access Control Service to secure our API yet provide access to all those apps out there.
Why would I need an API?
A couple of years ago, having a web-based application was enough. Users would navigate to it using their computer’s browser, do their dance and log out again. Nowadays, a web-based application isn’t enough anymore. People have smartphones, tablets and maybe even a refrigerator with Internet access on which applications can run. Applications or “apps”. We’re moving from the web towards apps.
If you want to expose your data and services to external third-parties, you may want to think about building an API. Having an API gives you a giant advantage on the Internet nowadays. Having an API will allow your web application to reach more users. App developers will jump onto your API and build their app around it. Other websites or apps will integrate with your services by consuming your API. The only thing you have to do is expose an API and get people to know it. Apps will come. Integration will come.
A great example of an API is Twitter. They have a massive data store containing tweets and data related to that. They have user profiles. And a web site. And an API. Are you using www.twitter.com to post tweets? I am using the website, maybe once a year. All other tweets come either from my Windows Phone 7’s Twitter application or through www.hootsuite.com, a third-party Twitter client which provides added value in the form of statistics and scheduling. Both the app on my phone as well as the third-party service are using the Twitter API. By exposing an API, Twitter has created a rich ecosystem which drives adoption of their service, reaches more users and adds to their real value: data which they can analyze and sell.
API characteristics
An API is simply a software-to-software interface, defined by whoever is exposing the API to public or private users. It’s a programming contract between system components, defining how these components interact with each other. It defines constraints, both technical as well as legal. Twitter for example defines a usage constraint: if you are using their API without paying you will be limited to a certain number or requests.
Modern web API’s are built around the HTTP protocol. This makes it easy to expose your API: the web has the infrastructure ready to access your API. As a matter of fact, any web site has been using this infrastructure for over a decade to expose its services in your browser. Your browser is simply an API client built on top of HTTP. Here’s an example HTTP request to www.google.com (issued using the excellent Fiddler2 web debugger, hence the User-Agent value you’re seeing):
GET http://www.google.com/ HTTP/1.1
User-Agent: Fiddler
Accept: text/html, */*
Host: www.google.com
Google responds to this request with the HTML contents you all know and use. There are two very interesting concepts in this request: the HTTP verb (in this case: GET) and the Accept header (in this case text/html, /). Both define what the client wants from the server: GET tells the server to simply send data as a response, text/html, / tells the server that the response should preferably be in the HTML format, but optionally any other format will work for the client too.
We can inform the server of what we intend it to do using one of the standard HTTP verbs: * GET – return a resource, like HTML, images or an employee record * HEAD – check if the resource exists but don’t return it * POST –update an existing resource * PUT – create a new resource * MERGE – merge values with an existing resource, like adding a property to an employee recordDELETE – delete data resource There are more verbs if you like, but these are the most widely used.
Let’s have a look at Google’s response as well:
HTTP/1.1 200 OK
Connection: Keep-Alive
Content-Type: text/html; charset=ISO-8859-1

<!doctype html><html itemscope="itemscope" itemtype="http://schema.org/WebPage"><head><meta itemprop="image" content="/images/google_favicon_128.png"><title>Google</title>

<!-- more HTML and JavaScript -->

</html>
Interesting here is the first line: Google responds with a 200 status code. 200 means that everything is okay: the resource has been found at the location specified by the client and it will be returned as part of the HTTP response. In this case, the resource is the HTML and JavaScript markup that makes up the Google homepage.
There’s a large number possible status codes you can use. Here are some you will most commonly encounter:
- 200 OK – Everything is OK, your expected resource is in the response.
- 201 Created – The resource has been created successfully
- 401 Unauthorized – You either have to log in and/or you are not allowed to access the resource.
- 404 Not Found – The resource could not be found.
- 500 Internal Server Error – The server failed processing your request.
- 503 Service Unavailable – The service is unavailable at this time
There’s a theme in these status codes. 1XX are informational. 2XX codes mean “successful”. 3XX tell you to go elsewhere, like our 302 example above. 4XX means the request the client sent cannot be completed because the resource wasn’t found, authentication is required or something else.5XX means the server has had a problem, like a configuration issue or a database connection failure resulting in the feared error 500 – Internal Server Error you see on some websites.
Building an API in ASP.NET
Along withASP.NET MVC 4, Microsoft also ships a framework for building Web API’s based on HTTP and REST in .NET. The ASP.NET Web API framework looks similar to ASP.NET MVC in that it has controllers, routes, filters and all other great features to build your API (explained on the ASP.NET website if you need a refresh). In this article, I’m not going to dive deep into the internals of ASP.NET Web API but I do want to give you a feel on how you can build an API with it.
Here are four basic conventions for ASP.NET Web API:
- Requests have an HTTP verb defined. This maps to the API controller’s action method.
- Requests have an Accept header. This is handled by ASP.NET Web API’s MediaTypeFormatter and will transform the request to your controller from JSON, XML or whatever format you want to add as a MediaTypeFormatter.
- Responses have an HTTP status code.
- Responses are formatted by ASP.NET Web API’s MediaTypeFormatter into JSON, XML or whatever format you want to add as a MediaTypeFormatter.
Here’s a sample API controller:
public class EmployeeController
    : ApiController
{
    public Employee Get(int id)
    {
        return new Employee { Name = "Maarten" };
    }

    public void Post(Employee employee)
    {
        if (employee == null)
        {
            throw new HttpResponseException(
                new HttpResponseMessage(
                    HttpStatusCode.BadRequest)
                    {
                        ReasonPhrase = "employee should be specified"
                    });
        }

        // ... store it in the database ...
    }
}
Our API now has one controller, EmployeeController, which accepts both the HTTP GET and POST methods. Get() simply returns an employee resource, which is formatted as JSON or XML based on the Accept header the client provided. Here’s a sample request/response:
Request:
GET http://localhost:3476/api/Sample HTTP/1.1
User-Agent: Fiddler
Accept: application/json
Host: localhost:3476


Response:
HTTP/1.1 200 OK
Content-Type: application/json; charset=utf-8
Date: Wed, 18 Jul 2012 08:53:56 GMT
Content-Length: 29

{ "name": "Maarten" }
The Post() method (triggered by the HTTP POST verb) creates a new employee in our database. If no employee is posted, we respond with an HTTP status code 400 Bad Request to inform the client that he really has to specify the employee parameter. Easy? Thought so.
Getting to know OAuth2
If you decide that your API isn’t public or specific actions can only be done for a certain user (let that third party web site get me my tweets, Twitter!), you’ll be facing authentication and authorization problems. With ASP.NET Web API, this is simple: add an [Authorize] attribute on top of a controller or action method and you’re done, right? Well, sort of…
When using the out-of-the-box authentication/authorization mechanisms of ASP.NET Web API, you are relying on basic or Windows authentication. Both require the user to log in. While perfectly viable and a good way of securing your API, a good alternative may be to use delegation.
In many cases, typically with public API’s, your API user will not really be your user, but an application acting on behalf of that user. That means that the application should know the user’s credentials. In an ideal world, you would only give your username and password to the service you’re using rather than just trusting the third-party application or website with it. You’ll be delegating access to these third parties. If you look at Facebook for example, many apps and websites redirect you to Facebook to do the login there instead of through the app itself.
Before I dive into OAuth2, I want you to remember one sentence from the previous paragraph: “your API user isn’t really your user, but an application acting on behalf of a user”. This sentence summarizes what OAuth2 tries to solve: provide support for the scenario where a user can grant an application access to resources owned or accessible by that user.
From http://hueniverse.com/2010/05/introducing-oauth-2-0/ :
Many luxury cars come with a valet key. It is a special key you give the parking attendant and unlike your regular key, will only allow the car to be driven a short distance while blocking access to the trunk and the onboard cell phone. Regardless of the restrictions the valet key imposes, the idea is very clever. You give someone limited access to your car with a special key, while using another key to unlock everything else.
(…)
OAuth provides a method for users to grant third-party access to their resources without sharing their passwords. It also provides a way to grant limited access (in scope, duration, etc.).
For example, a web user (resource owner) can grant a printing service (client) access to her private photos stored at a photo sharing service (server), without sharing her username and password with the printing service. Instead, she authenticates directly with the photo sharing service which issues the printing service delegation-specific credentials.
In OAuth2, we can define the following actors: * Client – The application wanting to act on behalf of the user * User – The user who wishes to grant the Client to act on his behalf * Authorization server – A trusted system in which the User can grant a Client privileges to access one or more resources with a specific scope during a specific timeframe. These claims will be described in an access token which is signed by this trusted system. * Resource server – The system (or web API) the Client wishes to access
OAuth2 supports many authentication flows, often depending on the client type (e.g. is it running inside a browser or on a mobile device). The flow I’ll be using throughout the rest of the article is one which allows other websites to consume your data and services and roughly looks like the following:
When a Client wants to use the Resource server, it has to request the Authorization server for an Access token. The Client presents its client_id and its intentions (or scope) For example: “I want to be able to access your timeline”. The Authorization server asks the user to login and to allow or disallow the Client and the requested scope. When approved, the Authorization server sends the client a key or code which the Client can then exchange, together with the client_secret, to request an access_token and a refresh_token.
The access_token received can be used to access the Resource server or API. It contains a set of claims (you can access user X’s timeline between 9AM and 10AM on the 1st of January). The token is signed using a signature which is known and trusted by the Resource server. The Resource server can use these claims to gather the correct information and allow/disallow the requested grants for a specific resource.
An access_token can expire. Whenever the Resource server receives an expired access_token from your client, it should not accept the claims presented in the accesstoken and potentially deny access to a resource. Luckily there’s also the refresh_token: this token can be used to refresh the accesstoken without requiring user action.
Windows Azure Access Control Service
One of the interesting components in the Windows Azure platform is the Access Control Service (ACS). ACS allows you to outsource your authentication and authorization woes and have Microsoft handle those. At www.myget.org, an application me and a colleague have been working on, you’ll find that you can log in through a variety of identity providers (Windows Live ID, Google, Facebook, ADFS, …). We don’t have to do anything for that: ACS solves this and presents us with a set of claims about the user, such as his Google e-mail address. If we want to add another identity provider, we simply configure it in ACS and without modifying our code, you can login through that new identity provider.
Next to that, ACS provides a little known feature: OAuth2 delegation support. The idea with that is that your application’s only job is to ask the user if a specific application can act on his or her behalf and store that decision in ACS. From then on, the client application will always have to go to ACS to fetch an access token and a refresh token which can be presented to your API. Here’s a sample flow for an application hosted at www.brewbuddy.net:
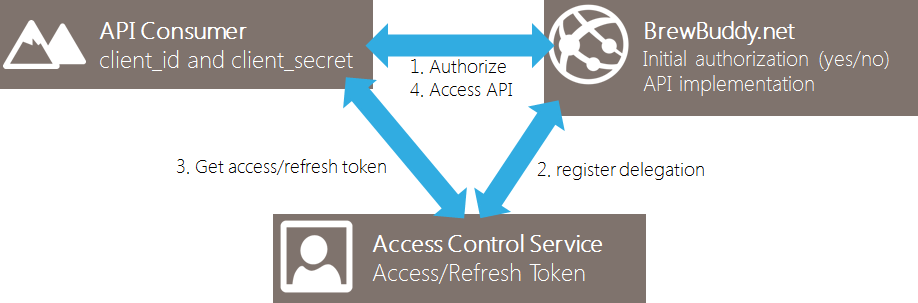
This approach comes in very handy! Every client application will only have to ask our Authorization server once for user consent, after which ACS will take care of handing out access tokens, expiring tokens, renewing tokens and so on. ACS handles the entire authentication and authorization load for us, even with 1 billion apps and users consuming my API. And all of that for just 19 US$ per million actions on ACS (see pricing calculator).
Consuming an API protected using OAuth2
Let’s step out of the dry theory. For a demo, I’ve been working on an application which is online at www.brewbuddy.net. It’s a website in which people who share my hobby, brewing beer, can keep track of their recipes and brews as well as share recipes with others. From a business point of view, BrewBuddy would like to be able to expose a user’s list of recipes through an API. That way, third party websites or apps can use these recipes to enhance their own service.
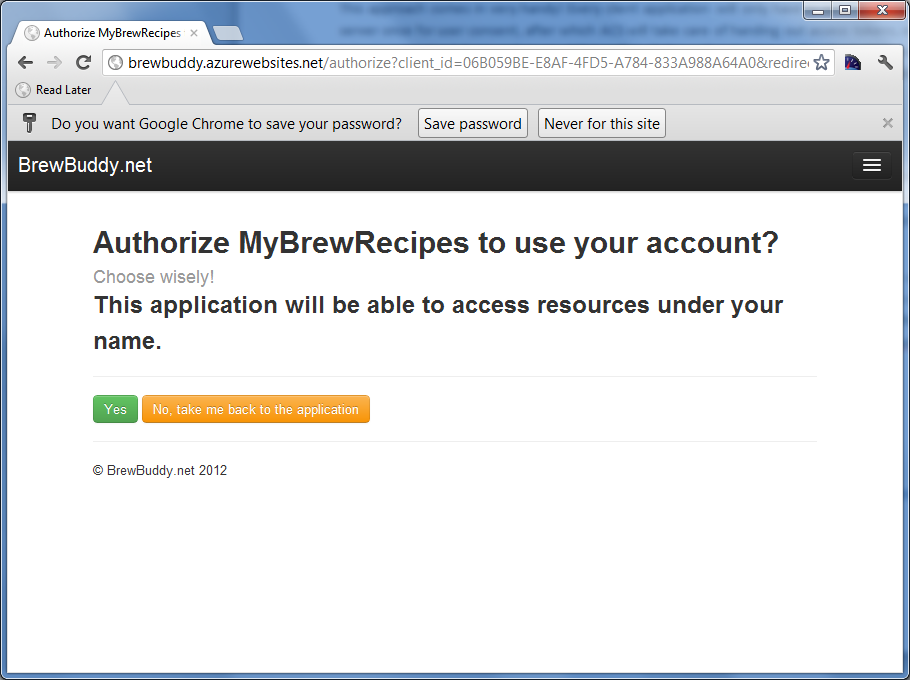
An ecosystem of apps and websites integrating with BrewBuddy may come alive. A simple website called MyBrewRecipes wants to integrate with BrewBuddy and fetch the recipes for a user. It’s a pretty simple website today, but they want to be able to enrich their own experience with recipes coming from BrewBuddy. A user of MyBrewRecipes can choose to download his list of recipes from BrewBuddy and use them in MyBrewRecipes. After navigating to MyBrewRecipes and clicking a link saying “import recipes from BrewBuddy”, the user is redirected to www.brewbuddy.net and asked to log in. After logging in, the user has to give consent and allow or disallow MyBrewRecipes to fetch data from BrewBuddy on the user’s behalf:
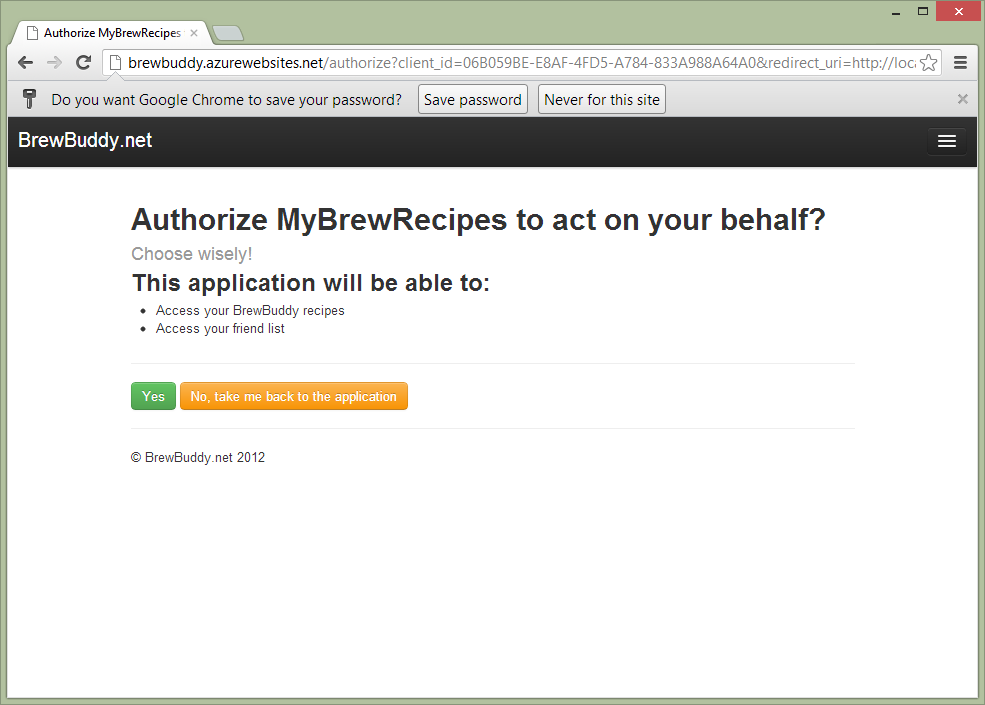
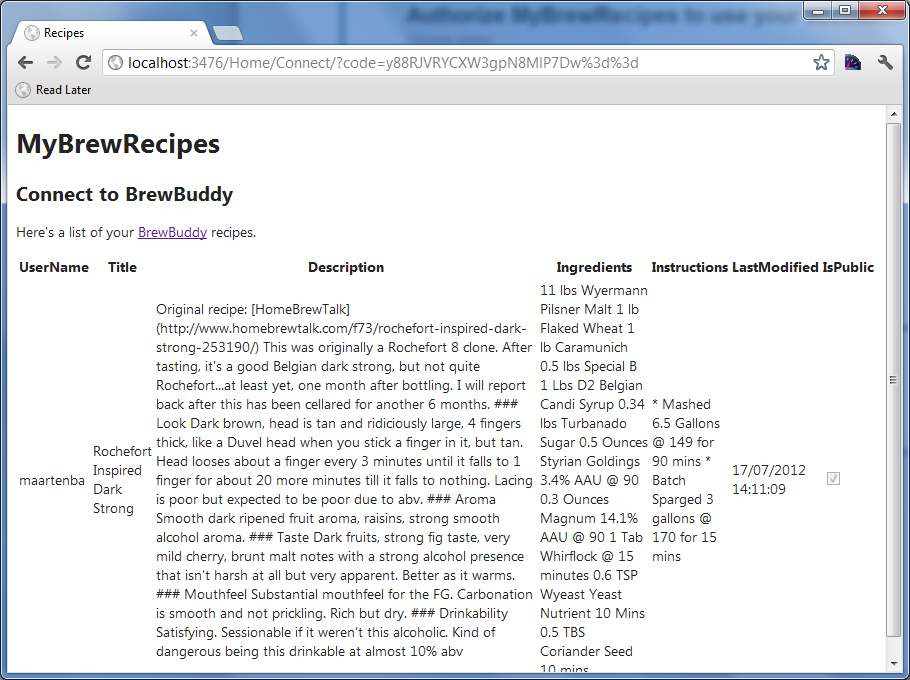
After granting access, I’m redirected back to MyBrewRecipes and a simple list of all my recipes stored in BrewBuddy is fetched from the BrewBuddy API:
A lot of things happened behind the scenes though. Here’s the flow that took place:
- The User visited MyBrewRecipes and clicked a link there to fetch recipes from BrewBuddy
- MyBrewRecipes redirected the user to BrewBuddy’s Authorization server
- BrewBuddy’s Authorization server asked for user consent (yes/no) and when clicking yes, BrewBuddy created a delegation for that user in Windows Azure ACS. BrewBuddy redirects the user back to MyBrewRecipes with an authorization code in a parameter.
- MyBrewRecipes requested an access token and a refresh token with Windows Azure ACS using authorization code received from BrewBuddy.
- MyBrewRecipes accessed the BrewBuddy API, passing the access token.In this case, the access token contains several claims: MyBrewRecipes can access maarten’s(user) recipes (scope) for the next 15 minutes (expiration)
- BrewBuddy’s API validated the token (a simple hash check) and when valid, returned the recipes for the user who is using MyBrewRecipes.
If after this MyBrewRecipes wants to use the API again on behalf of our User, that site would simply fetch a new access token from Windows Azure ACS without having to bother the BrewBuddy website again. Of course, for that to work, MyBrewRecipes should store the refresh token on their side. If they don’t, their only way to consume BrewBuddy’s recipes is by going through the entire flow again.
Sounds complicated? It isn’t. It’s a fairly simple flow to use. You could build all of this yourself, or delegate the heavy lifting on the server side to Windows Azure ACS. On the client side, a number of frameworks for a variety of programming languages (.NET, PHP, Ruby, Java, Node, …) exist which make this flow easy to use on the client side. Your API consumers.
Building an API protected using OAuth2 (and Windows Azure ACS)
On the server side of the API, your application, building the API would be as easy as creating ApiController derivates using the ASP.NET Web API framework. I’ve been working on a GitHub project called WindowsAzure.Acs.Oauth2 (also available on NuGet) which makes setting up your API to use Windows Azure ACS for OAuth2 delegation very easy.
Let’s start with the API. In BrewBuddy, the API serving a user’s recipes looks like this:
[Authorize]
public class RecipesController
    : ApiController
{
    protected IUserService UserService { get; private set; }
    protected IRecipeService RecipeService { get; private set; }

    public RecipesController(IUserService userService, IRecipeService recipeService)
    {
        UserService = userService;
        RecipeService = recipeService;
    }

    public IQueryable<RecipeViewModel> Get()
    {
        var recipes = RecipeService.GetRecipes(User.Identity.Name);
        var model = AutoMapper.Mapper.Map(recipes, new List<RecipeViewModel>());

        return model.AsQueryable();
    }
}
Fairly simple: we return a list of recipes for a given user’s username. This username is provided by the accesstoken BrewBuddy’s authorization server issued to our client and which that client is sending along with its API calls into BrewBuddy. By installing the WindowsAzure.Acs.Oauth2 assembly into our project, the OAuth2 complexity is handled for you and all the parsing and validating of the accesstoken is taken care of.
After installing the NuGet package into your project, some dependencies will be installed into your ASP.NET Web API project as well as some new source files:
App_Start/AppStart_OAuth2API.cs- Makes sure that the OAuth2 accesstoken is transformed into a ClaimsIdentity for use in your API. This ensures that in your API, calling User.Identity.Name returns the user on whose behalf the client application is calling your API. Next to that, other claims such as e-mail, scope or whatever your authorization server stored in the accesstoken are available as claims in this identity. On a side note, it currently only handles Simple Web Tokens (SWT) as the type of access token supported. Make sure you configure the ACS relying party to make use of SWT when using WindowsAzure.Acs.Oauth2.Controllers/AuthorizeController.cs– An authorization server implementation which is configured by the settings in Web.config (explained later on). You can override certain methods here, for example if you want to show additional application information on the consent page.Views/Shared/_AuthorizationServer.cshtml- A default consent page. This can be customized at will. For example, the page BrewBuddy showed on which the user had to allow or deny access was served by the AuthorizeController and this view.
Next to these files, 6 appSettings entries are added to your Web.config. I would recommend encrypting these in your configuration files to ensure security. These settings are everything required to get OAuth2 up and running:
<?xml version="1.0" encoding="utf-8" ?>
<configuration>
  <appSettings>
    <add key="WindowsAzure.OAuth.SwtSigningKey"
         value="[your 256-bit symmetric key configured in the ACS]" />
    <add key="WindowsAzure.OAuth.RelyingPartyName"
         value="[your relying party name configured in the ACS]" />
    <add key="WindowsAzure.OAuth.RelyingPartyRealm"
         value="[your relying party realm configured in the ACS]" />
    <add key="WindowsAzure.OAuth.ServiceNamespace"
         value="[your ACS service namespace]" />
    <add key="WindowsAzure.OAuth.ServiceNamespaceManagementUserName"
         value="ManagementClient" />
    <add key="WindowsAzure.OAuth.ServiceNamespaceManagementUserKey"
         value="[your ACS service management key]" />
  </appSettings>
</configuration>
These settings should be configured based on your Windows Azure Access Control settings. Instructions can be found on the GitHub page for WindowsAzure.Acs.Oauth2.
Conclusion
Next to your own website, apps are becoming more and more popular as an alternative manner to consume your data and services. Third-party web sites may also be interested in enriching their experience with the data and services you have to offer. Why not use that as a lever to reach more users? By exposing an API, you’re giving third party app developers the opportunity to interface with your services and at the same time, they are the advocate of them. Embrace them, give them a good API.
Of course, that API should be protected. OAuth2 is becoming the de-facto standard for that but requires some server-side coding on your part. If you just want to focus on the API and delegate the heavy lifting and scaling of the OAuth2 protocol, you may as well delegate it to the Windows Azure Access Control Service. WindowsAzure.Acs.Oauth2, an unofficial open source project leveraging the OAuth2 delegation features in ACS, will help you with that.

Comments