Ed’s Note: This is an extract from the book HTML5 for .NET Developers By Jim Jackson II and Ian Gilman. For Source Code, Sample Chapters, the Author Forum and other resources, go to http://www.manning.com/jackson/

Using history you can manipulate the URL of the page without needing to perform a complete refresh. Additionally, because you have MVC views, controllers, and routes controlling the system on the server, your application is completely compatible with any browser, even if JavaScript is disabled or the history API is not available.
In this article, you will learn to tame browser history through effective use of JavaScript and a good understanding of the URL formatting.
Building in support for the History API
The first step to taming browser history is to attach some JavaScript to the ubiquitous jQuery ready handler. This gives you the entry point to the rest of the code where you wire up the history events. Remember, you do not usually want your library to execute until the page is completely loaded. The jQuery team has gone to great effort to figure out when a page is completely loaded and rendered in any browser. That is the reason the ready event is the first coded entry point of almost all HTML5 applications. To begin:
- Open the _Layout.cshtml file in the Shared folder and remove the jQuery and Modernizr script tags.
- Replace them with the latest libraries located on the Microsoft CDN.
For our purposes, the script tags at the top of _Layout.cshtml read as follows:
<script
   src="http://ajax.aspnetcdn.com/ajax/jQuery/jquery-1.7.1.js"
   type="text/javascript"></script>
<script
   src="http://ajax.aspnetcdn.com/ajax/modernizr/
   modernizr-2.0.6-development-only.js" type="text/javascript"></script>
The Modernizr script is set to the development-only version. Check out the Modernizr web site at modernizr.org to build a custom script that includes only the features you need.
Next up:
- Add a new JavaScript file to your application in the Scripts folder and call it main.js.
- Then, add the reference below to the file just before the closing body element in the _Layout.cshtml page. We will use the MVC Url helper function to make sure the path is correct when the application is deployed.
<script src="@Url.Content("~/Scripts/main.js")" type="text/javascript"></script>
- Finally, open the main.js file and add the ready handler in listing 1.
Listing 1: The intellisense helpers and jQuery ready event wire up
$(document).ready(function () {
   if (!Modernizr.history)
      return;
});
If Modernizr does not detect HTML5 History API support in the current browser, do nothing. The fallback of a complete page refresh will still work with any browser and the user will never know that he or she is missing the feature.
What is important about this particular ready function is that we will short circuit it and do nothing if the history API is not detected by Modernizr. So a user without this feature in their browser can still click on any menu item and have a full view of the additional content; it will just force a complete refresh of the page without the smooth transitions that we will be building shortly. We are trying to gracefully degrade the experience by trying to give the user the best possible experience and back off when specific capabilities are not detected.
Tying into the browser history event
Now we need to tie into the history event of the browser. Every browser that supports the history API will have the onpopstate event available for wiring up. There are two ways to wire this up in a jQuery world: with the base JavaScript event and with the jQuery bind function.
onpopstate = function (event) { function body };
$(window).bind("popstate", function (event) { functin body });
The onpopstate event fires whenever the user presses the forward or backward buttons and also, in some browsers, when a page is loaded. The event argument is a standard DOM event with the addition of a state property object. This object contains whatever value was pushed into that particular element in the browser’s history stack. The state value can also be null if nothing was assigned to it for the element in question. So in your ready handler, add the following code to the end. This function will execute whenever the onpopstate event fires in the browser window.
$(window).bind("popstate", function (event) {
   updateState(history.state);
});
We will get to the updateState function next, but right now you need a clear understanding of what this little bit of code does. Whenever the browser’s onpopstate event is fired, the state value of the history object for the browser window will be set (by the browser, not by your code) to the value of the data in that item of the history stack. Additionally, the title of the browser window and the document.location will already be updated when the event fires. Finally, no calls will have been made by the browser to get the resource defined by the new document.location value. Even if there is no caching on the client, no server calls will be made. Figure 1 should give you a better understanding.
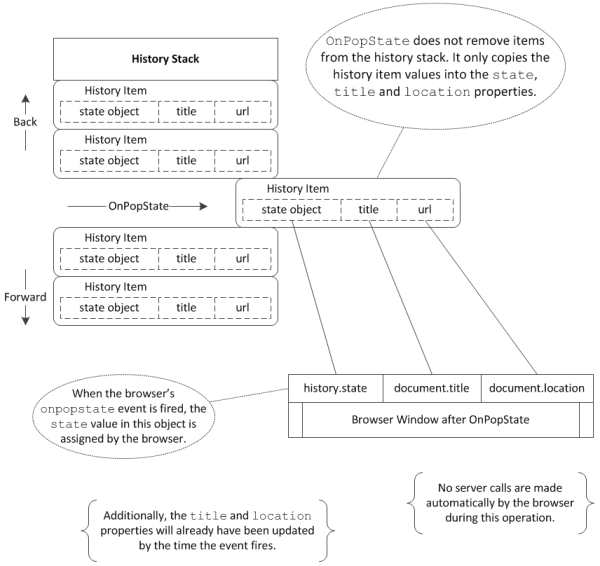
Figure 1 Understanding OnPopState in the History API.
Manipulating the history stack directly
At this point, you’re familiar with the primary event that fires with the history object, and you know that the state property object assigned to the history object (and to the onpopstate event) will be available to you for the duration of the current page. But there are still two more logical elements to explore. The first is that the links on the menu page are actual anchor tags that will force the browser to do a complete round-trip to the server to get the entire page, defeating the purpose of the history API. The second missing piece of logic is the fact that, while you are obtaining values from the history.state property, you are not actually assigning that value anywhere because you have not implemented your updateState function.
The history object uses two built-in functions to directly manipulate the history stack: pushState and replaceState. pushState adds a new item to the history stack for the current browser session. Values that are pushed to history will not be available in any other browser or session and cannot be enumerated other than to count them using the history.length property. On the other hand, replaceState takes the current history entry and replaces the data, title, and URL values without adding or removing anything from the rest of the history stack. The pushState and replaceState functions have the same signature, with syntax as illustrated in figure 2.
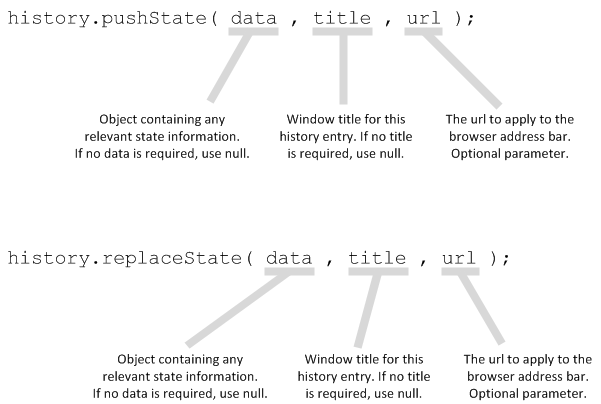
Figure 2 pushState and replaceState function syntax in the history object
Back at our application, since you won’t need to modify the current page in history after it has completed the load cycle, let’s use the pushState function exclusively. In your ready function, add the code in listing 2.
Listing 2 Using jQuery to override the default behavior of anchors
$(".menu-item").click(function (event) {      #A
   event.preventDefault();                    #B
   event.stopPropagation();                   #C
   var $target = $(this);                     #D
   var url = $target.find("a").attr("href");  #E
   var state = stateFromPath(url);            #F
   history.pushState(state, "", url);         #G
   updateState(state);                        #H
});

#A This jQuery selector finds all menu elements
#B preventDefault overrides the normal click behavior
#C stopPropagation keeps the event from bubbling beyond this event
#D 'this' inside the click handler will refer to the clicked element
#E Gets the url parameter from the target object's anchor element
#F Calls the stateFromPath function with the url to build a custom state object
#G Pushes the new state object into history
#H Updates the user interface based on the new state
While there seems to be a lot going on in this click handler, the fact of the matter is that you’re just overriding default page behavior and adding your own methods in its place. The history API is acting like a local storage LIFO (last-in-first-out) queue that stores the url and data you want without much fuss. The mechanisms you build around that operation are far more complex than the actual API itself!
At this point, two methods still need to be built out: The stateFromPath function and the updateState function. stateFromPath just parses the current URL to build a state object with the meal and dish properties that everything else uses. The updateState function uses the state object to set styles and asynchronously load content to the page. First, let’s build up the stateFromPath function since it will give you the opportunity to look more deeply at the page URL and some of its important properties. Afterwards, we’ll tackle the updateState function.
Working with the page URL in JavaScript
The location property of the window object in JavaScript is much more than just the URL that appears in the browser’s address bar. It is, in fact, a breakout of the major components of the current URL along with a reload() method that forces the page to re-request everything from the server for the current page. The various properties are all subsets of the entire URL presented as strings that can be parsed and divided as required, as illustrated in figure 3.
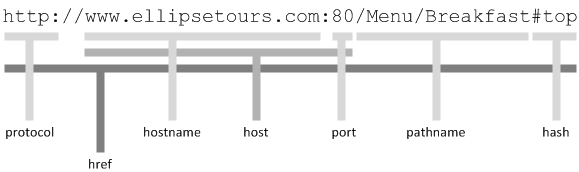
Figure 3 The window.location object properties
By this point, it should be very clear what we are trying to accomplish. In order to build an object that contains the meal and the dish, you take a typical URL used in the application, such as
http://www.mysite.com/Menu/Breakfast/Pancakes
And divide the pathname into its component parts. The last element in the array is the dish; the element just before it is the meal. Add the function in listing 3 to your main.js file.
Listing 3 Dividing the location.pathname to build a JavaScript object
function stateFromPath(path) {
   var base = "/Menu/";
   var parts = path.replace(base, "").split("/");      #A
   return {              #B
      meal: (parts.length >= 1 ? parts[0] : ""),    #B
      dish: (parts.length >= 2 ? parts[1] : "")     #B
   };
}

#A Removes the /Menu/ part of the path parameter and split the remaining string into an array.
#B The last part of the array should be the dish while the previous part is the meal element.
This code is by no means ready for prime time. In a production scenario, you would want to test the entire URL to make sure that it is valid according to business rules and that the properties being assigned are in the right order. You should also consider parsing out any querystring values and special characters and perhaps escaping the outbound text to avoid URL-encoded text.
WARNING: Assigning values using the history.replaceState method will change the current URL of the browser without forcing a server-side hit but history cannot edit protocol, hostname or the host properties of the URL.
Applying History’s lessons to update the page
You’re almost home! You’ve tested for the existence of history and intercepted the onpopstate event and all menu item click events to call the updateState function. You also worked out a simple mechanism to parse the URL into an object. Now, it’s time to build the updateState function and see how it does its work. This function goes into your main.js file and makes extensive use of jQuery selectors and Ajax asynchronous server calls to get the preview data. Start with the code below to build the function and check to see that the state parameter has been assigned.
function updateState(state) {
   if (!state)
      state = stateFromPath(location.pathname);  #A
}

#A If the state value was not passed in, get it from the stateFromPath function.
The previous snippet ensures that you will always have a state value regardless of whether there is a value in history when the onpopstate event fires.
Next, enhance the updateState function to make the edits to the user interface that would be there by default if the MVC View had been called directly with the current URL. Do this by adding and removing CSS classes from elements on the page, appending the code in listing 4 to the updateState function.
Listing 4 Modifying presentation with jQuery based on the state object
var $selectedMenu =
   $(".menu[data-meal='" + state.meal + "']");          #A
$(".menu").not($selectedMenu).removeClass("active");    #B
$selectedMenu.addClass("active");                       #C

var $selectedItem =                                     #D
   $(".menu-item[data-dish='" + state.dish + "']");
$(".menu-item").not($selectedItem).removeClass("selected");
$selectedItem.addClass("selected");

#A Gets the data attribute for the selected meal item.
#B Removes the active class from every other meal item.
#C Adds the active class to the selected meal item.
#D Performs the same actions against the dish items.
Adding the menu item preview
The final part of the updateState function is the menu item preview, using the jQuery Ajax \$.get() function and provided in listing 5. Note that the URL corresponds to the route you defined for the Preview view. The value of data in the callback function should be an HTML island that you can just append to the preview container element with no changes.
Listing 5 Using Ajax to load an HTML island from the preview partial MVC View
var $dishContainer = $(".preview-dish");        #A
var $oldDish = $dishContainer.find("section");  #A

if (!state.dish) {                              #B
   $oldDish.fadeOut(function () {               #B
      $oldDish.remove();                        #C
   });
   return;                                      #D
}

var url = "/Preview/Index/" + state.dish;       #E

$.get(url, function (data) {                    #F

   var $newDish = $(data);

   $newDish.find("img").load(function () {      #G

      $newDish.fadeIn(function () {             #H
         $newDish.css("z-index", 0);
      });

      $oldDish.fadeOut(function () {            #I
         $oldDish.remove();
      });
   });

   $newDish                                     #J
     .css("z-index", 1)                         #J
     .hide()                                    #J
     .appendTo($dishContainer);                 #J
});

#A Gets a reference to the preview section and find the currently selected dish.
#B If there is no selected dish, we are at the top level so fade the section out.
#C After fadeout, removes the section from the DOM.
#D If there no dish is selected, there is nothing to fill so exit.
#E If a dish is selected, compile a new url.
#F Gets the data via jQuery get.
#G Loads the image from the returned data so that everything appears at once.
#H When the image is loaded, fade it into view.
#I Fadeout the old image as the new one fades in and remove it when fade is complete.
#J None of the animations will fire until the new wrapped set is attached to the DOM. That is the final step.
At first, some of the code in listing 5 may seem backward but take a moment to remember the order of operations in jQuery and to consider that certain CSS styles will not take effect until an element is actually attached to the DOM. The layout of this code ensures that as one image faces away, the next fades in. A small amount of careful coding here gives a smooth, subtle and professional transition to the image previews and, in keeping with your goals, forces a server request for a much smaller data set than is required for a complete page refresh.
The HTML5 History API also implements the onhashchange event that fires when hash changes take place but this is not universally supported so you should test thoroughly before implementing a solution that relies heavily on this event.
Hash Values and QueryStrings
We have discussed parsing the normal parts of the URL here and, in many cases that is all you will need to use the History API in HTML5. But there will be times when additional data is required both on the client side and on the server. Here are some brief points to remember about querystring values that come after the resource name and hash values that come at the end of the URL and are prefixed by a hash (#) symbol:
- Querystring values have no native JavaScript API to parse them into their component name/value pairs nor is there a native method in the jQuery library. You can parse these values using regular expressions against the location.href value but you need to take care and unescape the values before you attempt to present them in your user interface.
- Querystring values are available both on the client and the server.
- Hash values must be escaped and can contain any value or set of values but do not by design have a specification for name/value pairs in the manner of the querystring.
- Hash values are only available on the client. They cannot be detected or manipulated on the server other than to be set.
Hash values are popular for deep linking content in a way that allows an HTML5 application to see what is requested and take action asynchronously to load additional data. This keeps the user interface responsive even if large amounts of data must be downloaded.
Summary
You also learned how to implement the HTML5 History API to take a loaded page and transform it using asynchronous methods and jQuery animations. These methods could be just as easily used for a photo album web site, a news reader or a wizard-style questionnaire. Any interaction that represents a progression of steps is a good candidate for History integration. Using it will reduce the number and size of requests to the server as well as provide for a richer and more responsive experience for users. The History API may not be the most talked-about API in the HTML5 arsenal but it deserves attention in any HTML application based on the large benefits in such a small package of features.

Comments