Developers often need control over the process by which their code is built. For instance they may want to perform builds that are reliant on some condition being met, or to specify certain build task dependencies or particular ordering of build tasks, or to author customised build tasks for special cases. Before Visual Studio 2005, the Visual Studio build engine was essentially a black box with no possibility of fundamentally altering how the build process worked. If such control was required, the solution was to build a makefile to be executed by the command-line nmake utility, an alternative build engine shipped with Visual Studio. Although nmake was bundled with Visual Studio, it was not well-integrated with Visual Studio.
Microsoft has now released a new build engine called MSBuild that ships with the .NET 2.0 framework. MSBuild has much in common with nmake. It can be used to run command-line builds as well as user-initiated builds from within the IDE (Visual Studio 2005 in this case), and it allows the build process to be fully customised. But MSBuild has some significant advantages over nmake. First, because MSBuild ships with the .NET framework it is not necessary to have Visual Studio installed in order to use it. Second, the declaration of what is to be built, and how and when, is contained within XML project files, so it is arguably more approachable. The MSBuild engine and its project file format are loosely based on Ant, the build engine of choice in the Java world. Finally, Visual Studio 2005 uses the MSBuild project file format for its project files, so MSBuild is much better integrated with the IDE.
The project file
MSBuild needs a project file to operate on. An MSBuild project file contains a top-level element called Project, from the schemas.microsoft.com/developer/msbuild/2003 namespace that groups the rest of the build definitions. The schema for the project file is found in Microsoft.Build.xsd in the framework directory. The four main build definitions are tasks, items, targets and properties.
A task is a tool that performs a specific function within the build process. For example, the built-in Csc task runs the C# compiler. An item is an artefact of the build process that is operated on, or produced by, some task. For instance, a .cs source file to be compiled by the Csc task. The build process is divided into multiple targets. Each target groups together an ordered list of tasks into a build step and binds those tasks to specific items. For instance, a Compile target might use the built-in MakeDir task to create an output directory followed by the Csc task to compile and link a particular set of .cs files into an assembly in the output directory. A property is a way of parameterising a task. For instance, you may want to parameterise the compiler flags used by the Csc task under different conditions, say for a release or debug build. A simple project file is shown below.
<! – myapp.proj —>
<Project
xmlns=”http://schemas.microsoft.com/
    developer/msbuild/2003”>
    <ItemGroup>
    	<FilesToCompile
    		Include=”app.cs”/>
    	<FilesToCompile
    		Include=”util.cs”/>
    </ItemGroup>
    <PropertyGroup>
    <OutputDir>bin\debug</OutputDir>
    	<OutputAssembly>
    		$(OutputDir)\myapp.exe
    	</OutputAssembly>
    	<Optimize>false</Optimize>
    </PropertyGroup>
    <Target Name=”Compile”>
    	<MakeDir
    		Directories=”$(OutputDir)”/>
    	<Csc
    		Sources=”@(FilesToCompile)”
    OutputAssembly=”$(OutputAssembly)”
    		Optimize=”$(Optimize)”
    		TargetType=”exe” />
    </Target>
</Project>
Executing the project file
To execute MSBuild, run msbuild.exe located in the .NET framework directory. If there is a single project file in the current directory then msbuild.exe will use it automatically. If not, a project file name must be supplied as shown below.
msbuild myapp.proj
The output from executing this project file is shown in Figure 1.
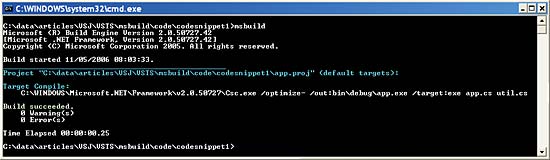
Figure 1
Notice that even though the command didn’t specify a target to run, the Compile target ran anyway. This is because if msbuild.exe does not know which target to run, it runs the first one it finds in the file. In cases where there are multiple targets and you want to specify which one to run, either specify the target on the command line or define a default target.
Here is how to specify a target on the command-line:
msbuild /t:Compile
Here is how to specify a default target:
<Project
    xmlns=”http://schemas.microsoft.com
    /developer/msbuild/2003”
    DefaultTargets=”Compile”>
In either case, a semi-colon separated list of targets can be specified to run multiple targets.
Items
As you can see, items are grouped into an ItemGroup collection. In this case, the @(FilesToCompile) specified by the Csc task refers to all item elements under any ItemGroup element that have the name FilesToCompile. It is possible to be quite specific about which items you want, as shown in the example below. Note the use of wildcards.
<ItemGroup>
<!— How to recursively specify files —>
    <FilesToCompile
    	Include=”\sub\**\*.cs” />
    <!— How to exclude certain files —>
    <FilesToCompile Include=”*util.cs”
    	Exclude=”hiddenutil.cs”/>
    <!— How to list specific files —>
    <FilesToCompile
    	Include=”app.cs;foo.cs”/>
</ItemGroup>
Properties
Similarly, properties are grouped into a PropertyGroup collection. In this case, the $(OutputDir) specified by the MakeDir task refers to an element under a PropertyGroup element that has the name OutputDir. MSBuild defines some reserved properties and they are listed in the table below:
Table 1: Reserved properties |
|
| MSBuildProjectDirectory | Folder in which the project is stored |
| MSBuildProjectFile | Filename of the project file |
| MSBuildProjectExtension | File extension of the project file |
| MSBuildProjectFullPath | Full pathname of the project file |
| MSBuildProjectName | Name of the project file without extension |
| MSBuildProjectDefaultTargets | List of targets specified in project’s DefaultTargets attribute |
| MSBuildBinPath | Folder in which msbuild.exe is stored |
Using one of these properties we could deduce the name of the output assembly from the name of the project file as shown here.
<PropertyGroup>
    <OutputDir>bin\debug</OutputDir>
    <OutputAssembly>
    	$(OutputDir)
    	\ $(MSBuildProjectName).exe
    </OutputAssembly>
    <Optimize>false</Optimize>
</PropertyGroup>
Most constructs in a project file can be made conditionally part of the build using the Condition attribute. For example, this is often used to control the way items and properties are evaluated in order to influence build details. In the example below, the properties affecting the compilation details depend on the setting for the Config property.
<PropertyGroup>
    <Config Condition=”’$(Config)’ == ‘’
    		Or ‘$(Config)’ != ‘Debug’
    		Or ‘$(Config)’ != ‘Release’”>
    	Debug
    </Config>
</PropertyGroup>
<PropertyGroup Condition=”’$(Config)’
    	== ‘Debug’”>
    <OutputDir>bin\debug</OutputDir>
    <Optimize>false</Optimize>
</PropertyGroup>
<PropertyGroup Condition=”’$(Config)’
    	== ‘Release’”>
    <OutputDir>bin\release</OutputDir>
    <Optimize>true</Optimize>
</PropertyGroup>
<PropertyGroup>
    <OutputAssembly>
    	$(OutputDir)\$(
    		MSBuildProjectName).exe
    </OutputAssembly>
</PropertyGroup>
The Config property could be set on the command-line as shown below.
msbuild /p:Config=Release
Properties also map to environment variables with the same name, so it would be possible to define the value of the Config property that way too. Notice how the Config property itself can be conditionally set using the Condition attribute in case it has not been set correctly. Properties that have no Condition attribute are evaluated regardless. Be careful, as properties are evaluated in the order in which they are encountered in a project file. In the example above, note the placement of the OutputAssembly property – it cannot be set until after the OutputDir property (on which it relies) has been set above it. Another example problem is that a property defined later in a project file will mask a property with the same name defined earlier in a project file.
Common Tasks
Numerous common tasks are included with MSBuild out of the box. A task is just a class that implements a particular interface (ITask) with task attributes corresponding to public properties on the task class. The file that maps these built-in tasks to the assemblies they are contained in is Microsoft.Common.Tasks in the .NET framework directory. An excerpt from this file is shown below.
<Project xmlns=
    ”http://schemas.microsoft.com/
    developer/msbuild/2003”>
    ...
    <UsingTask TaskName=”Csc”
AssemblyName=”Microsoft.Build.Tasks,
    	Version=2.0.0.0,
    	Culture=neutral,
    PublicKeyToken=b03f5f7f11d50a3a”/>
    ...
    <UsingTask TaskName=”MakeDir”
AssemblyName=”Microsoft.Build.Tasks,
    	Version=2.0.0.0,
    	Culture=neutral,
    PublicKeyToken=b03f5f7f11d50a3a”/>
    ...
</Project>
It is possible for you to write and use your own custom tasks, as we will see later.
Communication between targets
A task consumes input from some item or collection of items. We have seen that those items can be declaratively specified inside the ItemGroup element. It turns out that items can also be dynamically generated. This means that one task can generate output in the form of a dynamically generated item or item collection to be consumed as input by another task. We will see exactly how a task can generate items later but, for now, all you need to know is that the task needs a property of the right type, e.g. ITaskItem[], that is marked with the [Output] attribute. For instance, the built-in GenerateResources task – that compiles resource source files into binary resources – has such a property called OutputResources which represents the compiled binary resource files. To assign a name to this dynamically generated item collection so it can be referred to elsewhere in the project file, the Output element must be used as shown below. It binds the GenerateResources task’s output property named OutputResources to the item collection named CompiledResources which is later used as an input parameter to the Csc task as its Resources property.
<ItemGroup>
    <ResourceFiles Include=”app.resx”/>
    <ResourceFiles
    	Include=”app.fr.resx”/>
</ItemGroup>
...
<Target Name = “Build”>
    <GenerateResource Sources =
    	“@(ResourceFiles)”>
    <Output TaskParameter =
    	“OutputResources”
    ItemName = “CompiledResources”/>
    </GenerateResource>
    <MakeDir Directories =
    	“$(OutputDir)” />
    <Csc Sources=”@(FilesToCompile)”
    	Optimize=”$(Optimize)”
    	TargetType=”exe”
    Resources = “@(CompiledResources)”
OutputAssembly=”$(OutputAssembly)” />
</Target>
Target dependencies
Rather than cramming all tasks into a single target, it’s normally better to split the build process up into multiple, related targets that each make sense in their own right but can also be combined. This way you can choose to execute specific targets and be more precise about what actually gets built. Dependency relationships can be established between different targets so it is possible to specify that one build step cannot proceed until after another has taken place. For example, you may have separate targets as shown below.
<Target Name = “Prepare”>
    <MakeDir Directories =
    	“$(OutputDir)” />
</Target>
<Target Name = “GenResources”>
    <GenerateResource Sources =
    	“@(ResourceFiles)”>
    	<Output TaskParameter =
    		“OutputResources”
    		ItemName =
    			“CompiledResources”/>
    </GenerateResource>
</Target>
<Target Name = “Build”
    DependsOnTargets=
    ”Prepare;GenResources”>
    <Csc Sources=”@(FilesToCompile)”
    		Optimize=”$(Optimize)”
    		TargetType=”exe”
    Resources = “@(CompiledResources)”
OutputAssembly=”$(OutputAssembly)” />
</Target>
It may be that you want to execute the GenResources target as shown in Figure 2.
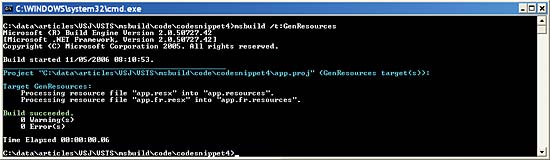
Figure 2
However, if you want to execute the Build target then its DependsOnTargets attribute will ensure that the dependent Prepare and GenResources tasks run first as shown in Figure 3.
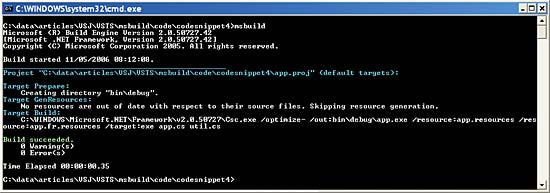
Figure 3
If one or more targets need to execute before any other target, the Project’s InitialTargets attribute can be used as shown below.
<Project InitialTargets=”Prepare”
    DefaultTargets=”Build”
xmlns=”http://schemas.microsoft.com/
    developer/msbuild/2003”>
Incremental builds
If you look closely at Figure 3, you will see that the GenerateResource task was smart enough to figure out that nothing needed doing, as the compiled binary resources are older than the resource source files. But MSBuild didn’t know this. It still had to run the GenResources target. However, it is possible to provide MSBuild with enough information to reason about which targets need executing and which do not and thus perform incremental builds. By specifying the items that form the inputs to and outputs from a target it is possible for MSBuild to compare date/time stamps of items and skip targets that are up to date and don’t need building. Consider the following example:
<Target Name = “GenResources”
    Inputs=”@(ResourceFiles)”
    Outputs=”@(ResourceFiles
    	->’%(Filename).resources’)”>
    <GenerateResource
    	Sources = “@(ResourceFiles)” />
</Target>
<Target Name = “Build”
    DependsOnTargets=
    ”Prepare;GenResources”
    Inputs=”@(FilesToCompile);
    @(ResourceFiles
    	->’%(Filename).resources’)”
    	Outputs=”$(OutputAssembly)” >
    <Csc Sources=”@(FilesToCompile)”
    	Optimize=”$(Optimize)”
    	TargetType=”exe”
    	Resources = “@(ResourceFiles
    		->’%(Filename).resources’)”
OutputAssembly=”$(OutputAssembly)” />
</Target>
The Inputs and Outputs attributes define the items that form the inputs to and the outputs from the two targets. MSBuild can now figure out which targets need executing as shown in Figure 4.
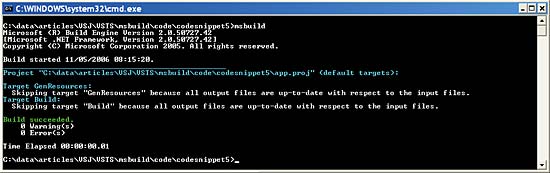
Figure 4
Item metadata
In the above example, note the
@(ResourceFiles->
    ’%(Filename).resources’)
…syntax. It turns out that all items have some metadata implicitly associated with them that can be referenced with the –>%(Metadata name) syntax. For instance, %(FullPath) contains the full path of the item, %(FileName) contains the file name of the item, without the extension, %(Extension) contains the file extension of the item, and so on. Items actually have an open content model allowing additional custom metadata to be contained within the item definition and referenced using the same syntax.
In this case, it is possible to transform the GenResources target’s Inputs item collection into its Outputs item collection using the metadata transform:
@(ResourceFiles->
    ’%(Filename).resources’)
This deduces the item collection representing the compiled binary resource files from the item collection containing the source resource files.
Structuring project files
As you work with MSBuild you will start to build up targets and tasks that you consider reusable by others in your organisation. Happily, MSBuild allows you to define these in common project files and have others reference them using the Import syntax. Imagine the targets we have defined up to now, such as Build, are now placed in a separate project file called MyCommon.Targets. We would reference them as shown below.
<Project DefaultTargets=”Build”
xmlns=”http://schemas.microsoft.com/
    	developer/msbuild/2003”>
    <ItemGroup>
    <FilesToCompile Include=”app.cs”/>
    <FilesToCompile Include=”util.cs”/>
    </ItemGroup>
    <! – Other items and properties
    		elided for clarity —>
<Import Project=”MyCommon.Targets” />
</Project>
In fact, MSBuild ships with several .Targets files in .NET framework directory – such as Microsoft.CSharp.Targets and Microsoft.Common.Targets – that contain build targets for common build scenarios like Build, Rebuild, Clean etc. These .Targets files are just MSBuild project files themselves.
Visual Studio 2005 integration
It turns out that Visual Studio 2005 project files are just MSBuild project files. They actually import the MSBuild common target files, which essentially define the Visual Studio build process for these projects. If you open up a Visual Studio 2005 C# console application project file in an XML text editor, you will see something like the following.
<Project DefaultTargets=”Build”
xmlns=”http://schemas.microsoft.com/
    	developer/msbuild/2003”>
    <! – Items and properties needed
    by targets/tasks in
    Microsoft.CSharp.targets go here —>
    <Import Project=”$(MSBuildBinPath)\
    		Microsoft.CSharp.Targets” />
</Project>
Visual Studio 2005 provides a view onto this file. Its properties are viewed and edited via Visual Studio. Its items provide the project manifest. It also allows certain targets to be executed. In Visual Studio 2005, the “Clean” menu option invokes the target named Clean, the “Rebuild” menu option invokes the Rebuild target and the “Build” menu option invokes the targets specified in the Project’s DefaultTargets attribute (or the first target it finds if there isn’t one).
Of course, Visual Studio 2005 creates MSBuild project files with a particular structure and it is expecting certain contents to be present. However, it will happily take a stab at loading up any valid MSBuild project it did not create and do its best with it. Having said that, a few changes to our project file, shown below, mean that it integrates much better with Visual Studio, as shown in Figure 5.
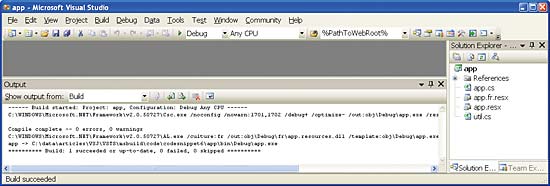
Figure 5
<Project DefaultTargets=”Build”
xmlns=”http://schemas.microsoft.com/
    	developer/msbuild/2003”>
    <PropertyGroup>
    	<Configuration
Condition=”’$(Configuration)’ == ‘’”>
    		Debug
    	</Configuration>
    	<OutputType>Exe</OutputType>
    <AssemblyName>app</AssemblyName>
    </PropertyGroup>
    <PropertyGroup
    	Condition=”’$(Configuration)’ ==
    		‘Debug’”>
    	<Optimize>false</Optimize>
    <OutputPath>bin\Debug\</OutputPath>
    </PropertyGroup>
    <PropertyGroup
    	Condition=”’$(Configuration)’
    		== ‘Release’”>
    	<Optimize>true</Optimize>
<OutputPath>bin\Release\</OutputPath>
    </PropertyGroup>
    <ItemGroup>
    	<Compile Include=”app.cs” />
    	<Compile Include=”util.cs” />
    </ItemGroup>
    <ItemGroup>
    	<EmbeddedResource
    		Include=”app.fr.resx”/>
    	<EmbeddedResource
    		Include=”app.resx”/>
    </ItemGroup>
    <Import Project=”$(MSBuildBinPath)\
    	Microsoft.CSharp.targets” />
</Project>
Build process extensibility points
As we’ve seen, by editing an MSBuild file it is possible to customise the build process any way you want. If you want to change the way Visual Studio is building your code, you can go and edit the Visual Studio project file (or one of the MSBuild common target files it imports). However, the MSBuild common target files do include empty targets that are designed for you to replace with your own that contain the tasks you want to execute. These empty targets, and where they are called as part of the build process, are shown in the table below:
Table 2: Empty targets |
|
| BeforeBuild, AfterBuild | Build target invoked |
| BeforeRebuild, AfterRebuild | Rebuild target invoked (Calls Clean and Build targets) |
| BeforeClean, AfterClean | Clean target invoked |
| BeforePublish, AfterPublish | Publish invoked (Calls Build target) |
| BeforeResolveReferences, AfterResolveReferences | ResolveReferences target invoked (called by Build target) |
| BeforeCompile, AfterCompile | Compile target invoked (called by Build target) |
| BeforeResGen, AfterResGen | PrepareResources target invoked (called by Build target) |
For instance, if you wanted to deploy some related files alongside the assembly once it was built, overriding the AfterBuild target would be the way to go, as shown below.
<Project DefaultTargets=”Build”
xmlns=”http://schemas.microsoft.com/
    developer/msbuild/2003”>
    <! – Properties and items elided
    		for clarity —>
    <Import Project=”$(MSBuildBinPath)\
    	Microsoft.CSharp.targets” />
    <ItemGroup>
    	<ConfigFile Include=
“$(MSBuildProjectName).exe.config” />
    </ItemGroup>
    <Target Name=”AfterBuild”>
    <Copy SourceFiles=”@(ConfigFile)”
DestinationFolder=”$(OutputPath)” />
    </Target>
</Project>
In this case, it is important to place the replacement AfterBuild target after the common target file that defines the empty AfterBuild target, or else it won’t override (mask) it.
Custom Tasks
Another useful extensibility point is the ability to write your own custom tasks. A custom task is a.NET type that implements the Microsoft.Build.Framework.ITask interface. The easiest way to write a custom task, though, is to derive from the helper class Microsoft.Build.Utilities.Task and override its virtual Execute method. Additionally, you need to provide any input and/or output properties that are necessary for the task to do its job.
The following example of a custom task will parse an application configuration file and output any dependent files that it relies on by looking for use of the configSource attribution on configuration elements. The first job is to create a library project (C# in this case) that contains references to the Microsoft.Build.Framework and Microsoft.Build.Utilities assemblies in the .NET framework directory. Then author a class that derives from Task and provides suitable input and output properties as shown below.
using Microsoft.Build.Utilities;
using Microsoft.Build.Framework;
public class FindDependantConfigFiles :
    Task {
    private ITaskItem _configfile;
    private string[] _depconfigfiles;
// Name of configuration file to parse
    [Required]
    public ITaskItem ConfigFile {
    	get { return _configfile; }
    	set { _configfile = value; }
    }
// Name of configuration files found
    [Output]
public string[] DependentConfigFiles {
    	get { return _depconfigfiles; }
    	set { _depconfigfiles = value; }
    }
    ...
}
Notice how the name of the configuration file to parse – the ConfigFile property – is marked as [Required] which means MSBuild will complain if this property is missing when this task is used in a project file. Also, it is typed as an ItaskItem, which provides us with access to any metadata attached to that item (particularly well-known metadata such as the file’s full path name). The list of configuration files found – the DependentConfigFiles property – is marked as an [Output] property, which means that it can be used with the Output element we saw earlier when we looked at task communication.
The next step is to override the Task class’s Execute method and do the work of the task. This just performs a simple parse of the file looking for dependent files:
public class FindDependantConfigFiles :
    Task {
    ...
    public override bool Execute() {
    if (ConfigFile==null)Log.LogError(
    “ConfigFile attribute must be set”);
    XmlDocument d = new XmlDocument();
    	d.Load(ConfigFile.GetMetadata(
    		“FullPath”));
    	XmlNodeList nl = d.SelectNodes(
    		“//@configSource”);
    	DependentConfigFiles =
    		new string[nl.Count];
    	for (int i=0; i<nl.Count; i++)
    		DependentConfigFiles[i] =
    MyGetFullPathMethod(nl[i].Value);
    	return true;
    }
}
Notice here how the metadata associated with the ConfigFile property can be found with the ITaskItem’s GetMetadata method. Note also that the base class Task has a Log property that allows the custom task to log errors, warnings and messages to MSBuild. By default, this output is sent to the console, but an alternative logger can be configured, such as the file logger bundled with MSBuild or your own custom logger.
To use the task MSBuild needs to know about it and, in particular, what assembly it lives in. This is achieved with the UsingTask syntax as shown in the project file below. The output from the DependentConfigFiles property of the FindDependantConfigFiles task – the dependent configuration file names – is put into the DependentFiles item collection and those files are then copied to the assembly’s output directory along with the configuration file.
<Project DefaultTargets=”Build”
xmlns=”http://schemas.microsoft.com/
    	developer/msbuild/2003”>
    <! – items and properties elided
    		for clarity —>
    <Import Project=”$(MSBuildBinPath)\
    	Microsoft.CSharp.targets” />
    <ItemGroup>
    	<ConfigFile Include=
“$(MSBuildProjectName).exe.config” />
    </ItemGroup>
    <UsingTask
    TaskName=”FindDependantConfigFiles”
    AssemblyFile=”mycustomtasks.dll”/>
    <Target Name=”AfterBuild”>
    	<FindDependantConfigFiles
    		ConfigFile=”@(ConfigFile)”>
    	<Output TaskParameter =
    		“DependentConfigFiles”
    	ItemName = “DependentFiles” />
    	</FindDependantConfigFiles>
    <Copy SourceFiles=”@(ConfigFile)”
DestinationFolder=”$(OutputPath)” />
<Copy SourceFiles=”@(DependentFiles)”
DestinationFolder=”$(OutputPath)” />
    </Target>
</Project>
Conclusion
MSBuild is Microsoft’s build tool that ships with the .NET 2.0 framework. It uses an XML description of what is to be built and how it is to be built that is fully customisable. You can use it to run automated builds from the command-line or interactive builds as part of Visual Studio 2005 which now uses MSBuild project file format natively. Learn to use MSBuild today and take control of your build process.
Simon Horrell is an author and instructor at DevelopMentor, where he develops and delivers .NET courses. He can be reached at [email protected].
Comments