Start a new VB Windows form project and place a button and two PictureBoxes on the form. All of the code described in the rest of this article can be placed in the button’s click event handler for testing.
The first task is to load an image. This is just a matter of using one of the appropriate constructors for the Bitmap object. For example:
Dim Original As New _
	Bitmap("C:\Mypic.jpg")
Replace the file name with a picture in the format of your choice – JPEG, GIF, BMP, WMP or PNG. To display the image you can simply assign it to the Image property of the first PictureBox:
PictureBox1.Image = OriginalYou can set the PictureBox properties so that it autosizes to fit the image, or autosizes the image to fit it. For the moment we are going to ignore this useful facility and examine how to scale and crop the image to a given size.
Drawing bitmaps
The key to most of the more advanced image manipulation is deriving a suitable graphics object and then using its DrawImage method to render the bitmap on a drawing surface. For example, to scale the image to the size of the second Picturebox but into a new bitmap, we first need the new bitmap at the correct size and format:Dim Processed As New _ Bitmap(PictureBox2.Width, _ PictureBox2.Height, _ Original.PixelFormat)Then we need a graphics object which we can use to draw on the bitmap:
Dim g As Graphics = _
	Graphics.FromImage(Processed)
There are many versions of the DrawImage method, but the simplest draws the specified bitmap at a location and size given by a destination rectangle:
g.DrawImage(Original, _
	New Rectangle(0, 0, _
	PictureBox2.Width, _
	PictureBox2.Height))
Using this you can scale the entire image to any size you like. Only slightly more complicated is the combined scale and crop provided by the alternative DrawImage using two rectangles – a destination rectangle that specifies the size and position of the image as before, and a source rectangle that specifies the area of the original bitmap to be sampled. For example, to scale a small part of the image 200 by 200 pixels at (1000,500) into the entire PictureBox you would use:
g.DrawImage(Original, _
	New Rectangle(0, 0, _
	PictureBox2.Width, _
	PictureBox2.Height), _
	New Rectangle(1000, 500, 200, 200),
	GraphicsUnit.Pixel)
In this case you also have to specify the graphics units because there isn’t a method that just accepts two rectangles.
Yet another alternative version of the DrawImage method gives you the ability to perform a completely general transformation of the bitmap – including scale, rotate, skew and crop. This uses a rectangle to specify the source location and an array of three points to specify the destination. The three points specify the top left, bottom left and top right corner of the source region – the fourth corner is worked out to make the shape a parallelogram. The source rectangle is distorted to fit the destination parallelogram (see Figure 1).
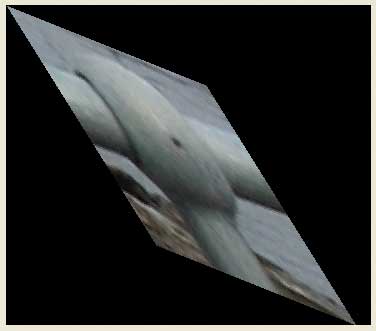
Figure 1: A general skew
For example, to perform a general skew you can use on a small area of the original image:
Dim DestPoints As Point() = { _
	New Point(0, 0), _
	New Point(200, 80), _
	New Point(150, 240)}
g.DrawImage(Original, DestPoints, _
New Rectangle(1375, 850, 100, 100), _
	GraphicsUnit.Pixel)
Notice that once you have a graphics object derived from a bitmap you can use this to draw on the bitmap just as you would on (say) a form or other control. For example:
g.DrawLine(Pens.Black, 0, 0, 150, 150)…draws a diagonal black line. You can also use the Bitmap’s GetPixel and SetPixel methods to work with individual pixels.
Transformations
You can use this method to implement a rotation or a reflection, and this is what the documentation suggests, but there are much easier ways of achieving the same results. For example, the bitmap has a RotateFlip method, which can be used to perform rotations through “easy” angles like 90 degrees and reflections in the X, Y and XY axes. For example, to flip the image about the Y axis you would use:Processed.RotateFlip( _ RotateFlipType.RotateNoneFlipY)This simple method is often all you need. For general rotations we can make use of the graphics transformation facilities. The graphics class allows you to specify a transformation matrix, which is applied to the co-ordinates of anything you draw – including bitmaps. The general transformation facility is fairly easy to use – create a transformation matrix and apply it – but for many simple transformations there are specific methods that will build and apply the appropriate matrix for you. For example, to rotate the bitmap around the top left hand corner by 45 degrees simply use:
g.RotateTransform(45)…before the DrawImage method.
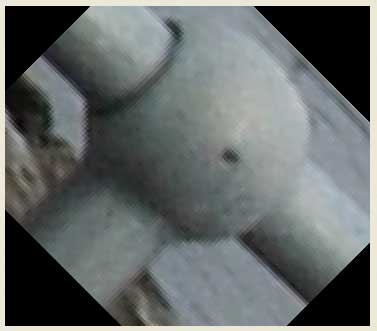
Figure 2: A general rotation
If you want to rotate about another point, the centre of the destination area for example, you would use the TranslateTransform to move the origin. For example, to rotate about the centre of the PictureBox (see Figure 2) you would use:
Dim dx As Single = PictureBox2.Width
Dim dy As Single = PictureBox2.Height
g.TranslateTransform(dx / 2, dy / 2)
g.RotateTransform(45)
g.TranslateTransform(-dx / 2, -dy / 2)
If you are puzzled about the order of the transformations, it’s worth knowing that the default is to “prepend” the matrices specifying the operations to the overall transformation matrix used by the graphics object.
An alternative way of doing the same job is to build the transformation matrices explicitly. For example, to perform the previous rotation about the centre you would use:
Dim M As New _
System.Drawing.Drawing2D.Matrix()
M.Translate(dx / 2, dy / 2)
M.Rotate(45)
M.Translate(-dx / 2, -dy / 2)
g.Transform = M
There are lots of reasons why you might want to use a matrix, but one is that it has a RotateAt method which simplifies the last example to:
M.RotateAt(45, New PointF( _
	dx / 2, dy / 2))
g.Transform = M
There are also Scale and Shear methods, which simplify standard transformations.
Resample quality
Whenever you manipulate a bitmap there is the problem of working out how the old pixels should determine the colour of the new pixels. For example, if you reduce the resolution of a bitmap, how should the set of pixels that are now being replaced by a single pixel determine the colour of that pixel? There are many algorithms for doing this, and they all produce different quality results. You can set the method used to “interpolate” new pixel colours from old pixel colours using the InterpolationMode property of the graphics object. For example:g.InterpolationMode = _ System.Drawing.Drawing2D. _ InterpolationMode.NearestNeighbor…produces a very low-quality but fast result compared to:
g.InterpolationMode = _
	System.Drawing.Drawing2D. _
InterpolationMode.HighQualityBicubic
You can see that the HighQualityBicubic method produces a significantly smoother and more acceptable image. The image on the left in Figure 3 uses NearestNeighbor interpolation, and the one on the right HighQualityBicubic – in both cases a small area has been extracted and enlarged to make the difference clear.
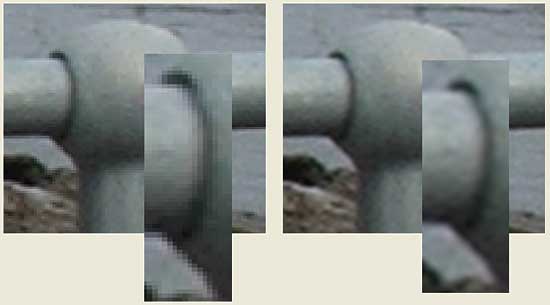
Figure 3: NearestNeighbor v HighQualityBicubic
As an example of using InterpolationMode, consider the problem of creating a thumbnail. The usual approach is to use the GetThumbnailImage method or to rely on the rescaling provided automatically by a PictureBox. However, both of these methods produce substandard thumbnails. To produce the highest quality thumbnail you need to do the job yourself. First set the size of the thumbnail you require:
Dim m As Int32 = 256
Dim n As Int32 = m * _
	Original.Height / Original.Width
Notice that this preserves the aspect ratio of the original image. Next we create a bitmap suitable for holding a thumbnail of the required size. We also need to set the pixel format and resolution to be the same as the original bitmap.
Dim Thumb As New Bitmap(m, n, _
	Original.PixelFormat)
Thumb.SetResolution( _
	Original.HorizontalResolution, _
	Original.VerticalResolution)
Finally we get a graphics object, set its InterpolationMode and draw the bitmap at its new resampled size:
Dim g As Graphics = _
	Graphics.FromImage(Thumb)
g.InterpolationMode = _
	System.Drawing.Drawing2D. _
InterpolationMode.HighQualityBicubic
g.DrawImage(Original, _
	New Rectangle(0, 0, m, n))
g.Dispose()
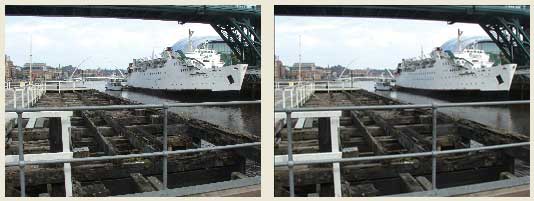
Figure 4: Two ways of making a thumbnail image
At this point we have a high quality thumbnail stored in Thumb and this can be saved to disk or displayed in a PictureBox. If you compare the results (see Figure 4) of a default rescaling using a PictureBox, the image on the left, to the HighQualityBicubic version you should agree that the extra effort is well worth it – look carefully at the railings!
David Conrad has worked in the graphics industry for most of his programming career, using C, C++ and now C#.
Comments