Extensibility and technology
DNN serves most content using modules, with a text module and many more for common tasks being supplied as standard. Custom modules are written as a set of standard ASP.NET user controls, using extra DNN APIs as needed, with the end result bundled into a ZIP for distribution. Custom modules are usually written in Visual Basic like DNN itself, but C# is possible.DNN’s presentation is determined by skins which define the appearance of the whole site and each module container. Various skins are provided for free and you can author your own relatively easily.
DNN is almost entirely database and ASP.NET driven. All DNN output is generated from a single ASP.NET page that dynamically loads whatever content needs to be shown, using many levels of ASP.NET .ascx user controls, hence it might be slow.
Although all DNN requests are run through the root default.aspx, it has a friendly-URL HttpModule that shows a unique URL with pertinent text for each page. Note that the standard menu system is implemented in JavaScript so it does not provide hard links and you need to provide hard links somewhere for search engines to use. The database can be in SQL Server Express, the full SQL Server or in theory but rarely in practice some other database.
DNN uses standard ASP.NET forms authentication to handle its users (recently, Windows LiveID as well). After a fresh install, the ‘host’ account lets you configure the entire site, while the ‘admin’ account has a reduced set of permissions that is suitable to give to a non-technical site administrator. One “host” DNN instance can have one or more “portals” (one for each site/domain name), so there is one admin account for each portal. Things go wrong if you attempt to run DNN from a sub-directory, so always make sure that it runs at the root of a domain name.
It is helpful to understand a little of the DNN directory structure. As well as /bin/ and /App_Code/ directories, each supported site has a directory, so the first site portal (with a programmer PortalID of zero) has its file store at /Portals/0/. [Admin][File Manager] opens at this directory. If you FTP a new file into this directory, then some of the DNN code may not initially see it. There is an option in File Manager to synchronize with the actual files present. You can also synchronise programmatically using the DNN FileSystemUtils.Synchronize method. Finally, the directory /Portals/_default/ contains definitions that are available for all portal sites, e.g. skins and containers.
Downloads
You can get the latest version of DNN, now 4.8.2, from www.dotnetnuke.com once you have registered. The “Install” package is for production use. Get the “Starter Kit” and “Documentation” packages if you are doing module development – there is a full “Source” release as well. For installation, your primary requirement is a connection string for a database, and you will need to make sure that DNN ASP.NET has full read, write and delete access to the file system. An installation wizard will take you through these options and set up the host and admin accounts.Using DNN
DNN supports various roles that determine which users can do what. Roles can be assigned to the view and edit visibility permissions for each page and module; the File Manager can set up view and write permissions for portal directories. Users who have the Administrators’ role can access everything. The other standard roles are ‘All Users’, ‘Registered Users’, ‘Subscribers’ and ‘Unauthenticated Users’. You can set up new roles including a fee-paying role using the built in support for several payment providers, including PayPal.DNN maintains a profile for each registered user, i.e. a set of properties of various types which you can edit and add to. At program level, each user has a unique UserID.
Writing Skins
Figure 1 shows a typical DNN layout: the skin defines the page layout, including one or more panes. An admin user can place one or more modules in a pane, with each module wrapped in a container.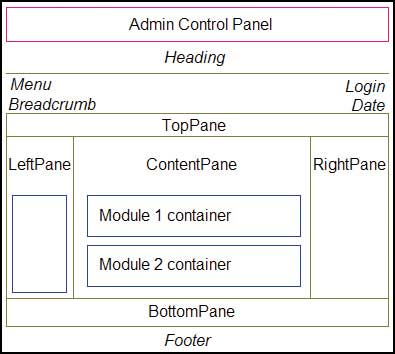
Figure 1: Typical DNN page layout
A skin package defines how DNN presents its content, i.e. the overall HTML of the page, all the CSS styles, and various parameters for the breadcrumb and menu screen elements. A container package defines how each module container looks in a similar way. If you install a ‘skin’ it typically contains both skin and container packages. An individual skin package may contain several different layouts, e.g. fixed width and full-screen instances.
DNN seems to have a preference for fixed-width skins and fixed size fonts. I presume that this is an attempt to achieve a perfect appearance on the page. However, it is best to make use of all the screen width and make the page work well as font sizes are changed by the user.
These CSS files are used by DNN, in this order, with the Portal CSS included last so its definitions take precedence over any earlier ones.
- Portal default CSS (in /portals/_default/default.css)
- Current skin CSS
- Current container CSS
- Portal CSS (e.g. in /Portals/0/portal.css)
The ‘portal CSS file’ contains blank elements to let you know what the standard definitions are – this file can be updated in the [Admin][Site Settings] menu.
Skin and container development
If you have installed the DNN Starter Kit into Visual Studio, you can create a skin and container using [File][New][File] – “DotNetNuke Skin” template. However, to illustrate a basic skin and container, I have developed a simple example which you can download. These are the files that I used to create the example:skins/simpleskin.htm skins/skin.css skins/skin.xml containers/simplecontainer.htm containers/container.css containers/container.xmlThe files in the skins directory are zipped up to make skins.zip, ditto for containers. Then these two are zipped together to make simple.zip that contains both the skin and container packages.
Each site has one current skin and one current container. When you install a skin, the files are unzipped and a skin user control is created – when chosen as the current skin, this user control is inserted into the main page output. A skin has pane elements – DNN inserts the right modules into each pane, each wrapped in a container. The current container is also a user control with a ContentPane that contains the actual module output.
If you install a skin from the [Admin] menu, then the packages will be installed in directory \portals\0\skins\simple\ and \portals\0\containers\simple\. The file simpleskin.htm contains various template tokens, such as [LOGO], that are expanded on installation into file simpleskin.ascx – the ASP.NET user control that is included in the DNN output. If you update the in-situ simpleskin.htm, then click on “Parse Skin Package” in [Admin][Skins] to recreate simpleskin.ascx to see your changes. (Don’t include any ascx files in your final skin/container zip package.)
The SimpleSkin.htm skin template defines the basic HTML of the main DNN output, typically using tables for layout. Various tokens appear in square brackets, replaced by DNN at install/runtime. The main output panes are defined in this example as table cells with the predefined correct id names. If you object to tables then you don’t have to use them.
<table class="ss_header" width="100%">
	<tr>
		<td>[LOGO]</td>
	</tr>
</table>

<table class="ss_menurow" width="100%">
	<tr>
		<td class="ss_menu">
			[SOLPARTMENU]
		</td>
		<td class="ss_menu_user">
			[USER] [LOGIN]
		</td>
	</tr>
</table>

<table class="ss_main" width="100%">
	<tr>
	<td class="ss_crumb">[BREADCRUMB]</td>
	<td class="ss_date">[CURRENTDATE]</td>
	</tr>
</table>

<table class="ss_content" width="100%">
	<tr>
		<td id="LeftPane" runat="server" />
	<td id="ContentPane" runat="server" />
	</tr>
</table>
The skin.css file contains all the definitions you want (not forgetting to override the DNN defaults if required), e.g. simply:
.ss_date,.ss_menu_user
{
	text-align:right;
}
The skin.xml file defines parameters that are used by DNN. The first one shown tells DNN to use the È character as a separator between the breadcrumb page names. The second set of parameters makes the menu horizontal, etc.
<Objects> <Object> <Token>[BREADCRUMB]</Token> <Settings> <Setting> <Name>Separator</Name> <Value> <![CDATA[ » ]]> </Value> </Setting> </Settings> </Object> <Object> <Token>[SOLPARTMENU]</Token> <Settings> <Setting> <Name>display</Name> <Value>horizontal</Value> </Setting> ...The SkinContainer.htm container template looks similar to the skin template, with tokens replaced when the container is rendered. The main module output is in the ContentPane. The container.css file contains definitions for the CSS classes used in the container template. Similarly, container.xml defines various container-level parameters.
<table width="100%" class="c_all">
	<tr>
		<td class="c_header" colspan="2">
			<table width="100%">
				<tr>
						<td>[SOLPARTACTIONS]</td>
						<td>[ICON]</td>
						<td style="width:100%;"
							class="c_header_title">
							[TITLE]</td>
				</tr>
			</table>
		</td>
	</tr>
	<tr>
		<td class="c_content"
			id="ContentPane"
			runat="server" colspan="2" />
	</tr>
	<tr>
		<td>[ACTIONBUTTON:1]</td>
		<td>[ACTIONBUTTON:2]</td>
	</tr>
</table>
There are many more tokens and options that you can use. Ideally you should also include a preview of your skin and container by including in each zip a JPG with same name as your template file.
Writing Modules
Custom DNN modules can be as complex as you want. I want to get started by analysing our freeware phdcc.CodeModule module which is available at dnn.phdcc.com and contains the full source. This module makes it easier to add your own functionality without having to write a whole new module. The module simply renders your own user control. Once it is installed, write your own code, e.g. in file intro.ascx. Upload the file to the DesktopModules/phdcc.CodeModule/ directory. Add an instance of the phdcc.CodeModule module to the desired DNN page and configure it to use intro.ascx. intro.ascx can contain normal HTML, ASP.NET code and DNN calls – the new module will display this whenever requested.Suppose intro.ascx contains this HTML and code to say hello to the current user:
<%@ Control Language="VB"
	ClassName="intro" %>
<%@ Import Namespace=
	"DotNetNuke.Entities.Users" %>
Hello <% =UserController.
	GetCurrentUserInfo.Username%>
…then Figure 2 shows the output, within the SimpleContainer that we made earlier.
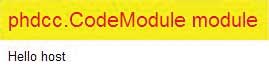
Figure 2: phdcc.CodeModule’s example output
As stated earlier, you can switch off the container header so it simply says “Hello host”.
Development environment
To develop for DNN, download and install the latest Starter kit vsi file for Visual Web Developer Express or Visual Studio 2005. To create a whole new DNN site, select [File][New][Web site…], “Visual Basic” and the “DotNetNuke Web Application Framework” template. After the site has been created, an instructions page is shown. You can simply compile and run it if you have SQL Server 2005 Express installed. To use the full version of SQL Server, create an empty new database, typically with a SQL Server owner login, and put the connection string in Web.Config in two places as instructed. Then compile and run. With all the above already set up, you can select the “Auto” install option instead of the “Typical” wizard. If installed using “Auto”, your first task will be to login as host and admin to change the passwords. Then go to [Host][Host Settings] e.g. to set the SMTP Server, and then set up the site/portal using [Admin][Site Settings]. Go back to Home and delete all the module instances – then off you go.The created project has the ‘code’ half of DNN supplied as DLLs in the /bin/ directory. The web pages, controls, their code-behind and other resources are installed as web site source.
Using the module
Use [Host][Module Definitions] then “Install New Module”. Browse to find phdccCodeModule_01_00_02.zip and click “Install New Module”. Check the installation log for errors then press “Return”. The following files will have been installed under the existing root DesktopModules directory.DesktopModules + phdcc.CodeModule + App_LocalResources + Edit.ascx.resx + Settings.ascx.resx + View.ascx.resx Edit.ascx, Edit.ascx.vb Settings.ascx, Settings.ascx.vb View.ascx, View.ascx.vbThe module zip also contains a manifest file phdcc.CodeModule.dnn that tells DNN where to install each file – in addition, it says that there are three controls: a View, Edit and Settings.
The View control displays the normal module output to users. The Settings control is at the bottom of the module settings page – visible to admin users. The Edit control is not used by phdcc.CodeModule yet but will typically be shown to admin users to set up the module content. You can have more user controls if need be.
View
View.ascx primarily contains the following placeholder into which your user control will be inserted. The view contains additional elements which are used to give instructions and show errors.<asp:PlaceHolder ID="ViewControl" runat="server" />The View.ascx.vb codebehind class is based on DotNetNuke.Entities.Modules.PortalModuleBase which is in turn derived from DotNetNuke.Framework.UserControlBase and eventually System.Web.UI.UserControl. These base classes contain many crucial DNN properties and objects, ranging from the PortalId to the current UserId. The View Page_Load uses PortalModuleBase.Settings to retrieve your control filename before adding it to the ViewControl PlaceHolder:
Dim ControlName =
	CStr(Settings("control"))
ViewControl.Controls.
	Add(LoadControl(ControlName))
If you have not specified your control yet, the code shows an asp:label and a “Settings” asp:button. If this button is clicked then you are redirected to the module’s Settings – the DNN NavigateURL global method is used to create the correct URL to see the Settings. In DNN parlance, each page is called a “tab” so the TabID selects the page; there may be more than one module on a page, so the correct one is selected using the ModuleId:
Response.Redirect(
	DotNetNuke.Common.Globals.
		NavigateURL(PortalSettings.
		ActiveTab.TabID,
		"Module", "moduleid",
		ModuleId.ToString()), False)
Settings
The module settings page has a common user interface at the top of the page – our content is shown lower down, as per Figure 1. The Settings.ascx user control primarily shows a labeled text box for you to type in your control filename.<asp:textbox id="txtControlName" cssclass="NormalTextBox" width="200" runat="server" />The codebehind Settings class is derived from DotNetNuke.Entities.Modules.ModuleSettingsBase. The LoadSettings method fills the text box with the current setting on first entry. ModuleSettingsBase.TabModuleSettings gets the same information that is retrieved by the view using PortalModuleBase.Settings.
If Not Page.IsPostBack Then
	Dim ControlName =
		TabModuleSettings("control")
	txtControlName.Text = ControlName
End If
When the Settings page Update button is pressed, the UpdateSettings method is called to store the new control filename and refresh the DNN in-memory cache:
Dim objModules As New
	DotNetNuke.Entities.
		Modules.ModuleController
objModules.UpdateTabModuleSetting(
		TabModuleId, "control",
		txtControlName.Text)
SynchronizeModule()
Localisation
The only remaining element of phdcc.CodeModule is the localisation files in the App_LocalResources directory. In this module, only the Settings.ascx.resx file is used. In Settings.ascx, the dnn:label control is used for the filename prompt:<dnn:label id="lblControlName" runat="server" controlname="txtControlName" suffix=":">This shows a help question mark followed by a label, with the actual text picked up from the resource file “lblControlName.Text” and “lblControlName.Help” strings. Within DNN you can edit these strings or create a new resource file for a different locale. DNN looks at the logged-in user’s UserInfo.Profile.PreferredLocale property to determine which resource to use.
Database Modules
More substantial modules will typically want to store their own information in the database. The following example module shows a list of Text/HTML items (in an asp:datalist data bound list). There are admin options to Add Content items and define a template in Settings.In Visual Studio, right click on the project name and select [Add New Item…], choose “DotNetNuke Dynamic Module” for VB or C#, enter a name such as “TestMod”, then press OK. You will have to do two directory renames as per the shown instructions. If you chose C# then you will have to add to the main Web.Config <codeSubDirectories> element.
In [Host][Module Definitions] click on “Import Module Definition”. In the Manifest list, select “TestMod.dnn” and click “Import Manifest”. The TestMod module can now be put on a page but will show a ModuleLoadException until the database has been set up.
The new module will have code classes created in the \App_Code\TestMod\ directory. File TestModController.vb represents your business logic and provides access to the database from your user controls. The Text/HTML items are each represented by a TestModInfo.vb object, each of which is stored as a row in a database table. File DataProvider.vb describes a generic database interface, while SqlDataProvider.vb proves an actual implementation of this interface.
Controller
The generated TestModController class has a GetTestMods method that returns a list of TestModInfo objects. It finds the current data provider and calls its GetTestMods method, passing the current module instance id ModuleId. The data provider GetTestMods returns an IDataReader. The DNN Custom Business Object utility class CBO method FillCollection is used to create the TestModInfo list – it sees what fields have been returned in each IDataReader record and fills the corresponding properties in each TestModInfo instance automatically. There is a similar method CBO.FillObject to fill just one object.Public Function GetTestMods( ByVal ModuleId As Integer) As List(Of TestModInfo) Return CBO.FillCollection( Of TestModInfo) (DataProvider.Instance(). GetTestMods(ModuleId)) End FunctionThe controller also contains further methods GetTestMod, AddTestMod and UpdateTestMod which work with a single TestModInfo object, using matching functionality in the data provider.
The controller class also implements the DNN ISearchable and IPortable interfaces, to support searching and import/export of the module content into XML.
Database SQL
When a module is installed, DNN looks at the manifest version number and compares it to certain filenames in the zip. File 01.00.00.SqlDataProvider contains the SQL instructions to create any tables, stored procedures etc required to bring the database up to version 01.00.00. A script 01.01.03.SqlDataProvider would take the database to version 01.01.03. When installing as new, then both scripts will be run. If you are upgrading from say version 01.00.01 then only the second one is run.Because you have created a module from a template, the database has not been created. To set this up, you need to run the 01.00.00.SqlDataProvider script in SQL Server Management Studio, though you may want to rename some of the tables etc first. You should also first replace {databaseOwner} with “dbo.” and {objectQualifier} with the “objectQualifier” that you used, i.e. nothing by default.
The generated TestMod SQL script creates a table called YourCompany_TestMod (for TestModInfo objects) and various stored procedures that correspond to the data provider GetTestMods, GetTestMod, AddTestMod and UpdateTestMod methods. The YourCompany_TestMod table contains a ModuleId field that corresponds to the unique module identifier with the same name in the DNN Modules table.
When you add a TestMod module instance to a page, no event is raised to let you populate the database. The View code knows its ModuleId, so it calls GetTestMods to obtain all TestModInfo objects for the current module instance. If it finds that there are no such objects, then it creates a default TestModInfo and adds it to the database.
Dim objTestMods As
	New TestModController
Dim colTestMods As
	List(Of TestModInfo)
colTestMods = objTestMods.
	GetTestMods(ModuleId)
If colTestMods.Count = 0 Then
	Dim objTestMod As
		TestModInfo = New TestModInfo
	objTestMods.AddTestMod(objTestMod)
	colTestMods = objTestMods.
		GetTestMods(ModuleId)
End If
There is also no event raised when a module is deleted from a page. So when is your per-module-instance data deleted? DNN has a Recycle Bin for pages and modules that have been deleted. When a module is finally deleted from this bin, the module instance row in the Modules tables is deleted – our YourCompany_TestMod table has a cascade delete relation on this row, thereby deleting the right rows in our table. Unfortunately, there is no programmer event that corresponds to this final delete.
Finally, the generated module also contains another SQL script file Uninstall.SqlDataProvider that is run if the module is uninstalled from the system in [Host][Module Definitions…]. The SQL in there naturally deletes all tables etc that were created in the database.
There are no imposed limitations on how you use the database, so you can create whatever tables you want. Your code has access to all DNN and ASP.NET data, not to mention standard Session variables etc., so the world is your oyster.
Chris Cant is director of PHD Computer Consultants Ltd, a company that sells its own software and undertakes software projects and consultancy. You can learn more at his blog, or contact him at [email protected].
DotNetNuke Tips
Tip 1
We recently wrote a simple phdcc.CodeModule user control that would not save its ViewState, e.g.:
<% If Not IsPostBack Then lblGiven.Text = "init" %>
<asp:Label ID="lblGiven" runat="server" />
If a button was pressed then lblGiven would not contain “init” on postback. The problem turned out to be that embedded code blocks <% %> are run in the PreRender phase, after the ViewState had been saved. The solution was to set the label in the Page_Load method.
Tip 2
In a phdcc.CodeModule control, it is useful to have access to the current DNN PortalModuleBase instance. The following code achieves this:
Private Sub Page_Load(ByVal sender As System.Object,
	ByVal e As System.EventArgs) Handles MyBase.Load
	Dim ViewControl As Control = Me.TemplateControl.Parent
	Dim View As Control = ViewControl.Parent
	If TypeOf (View) Is PortalModuleBase Then
		Dim pmb As PortalModuleBase = CType(View, PortalModuleBase)
		Dim ps As PortalSettings = pmb.PortalSettings
	End If
End Sub
Tip 3
Sometimes it is not clear whether to use DNN or ASP.NET functions. If in doubt, rummage around in the DNN source to see how they do it. For example, to determine if the user is logged in, I use ASP.NET Request.IsAuthenticated. In another case, I wanted to get someone’s password given their UserId. After getting the Username using DNN APIs, I used the ASP.NET GetUser method to return a MembershipUser that is used to get the password.
UserInfo ui = UserController.GetUser( PortalId, UserId, true);
MembershipUser user = Membership.GetUser(ui.Username);
string pwd = user.GetPassword();
Comments