Windows Azure has seen a lot of growth over the last year. Microsoft is either adding completely new services, or updating existing features, every few months. Two of the most impactful recent Windows Azure platform updates were announced in June 2012 with Windows Azure Web Sites and Windows Azure Virtual Machines. Developers can start creating applications for free with a Windows Azure Web Site, evolve into a more robust Cloud Service, and potentially take the leap to leverage a customized Virtual Machine. When combining Web Sites and Virtual Machines with the rich features already available in Cloud Services, the Windows Azure platform offers application owners, developers, and architects the flexibility and breadth of choices that not many other cloud platforms can offer.
The Prerequisites
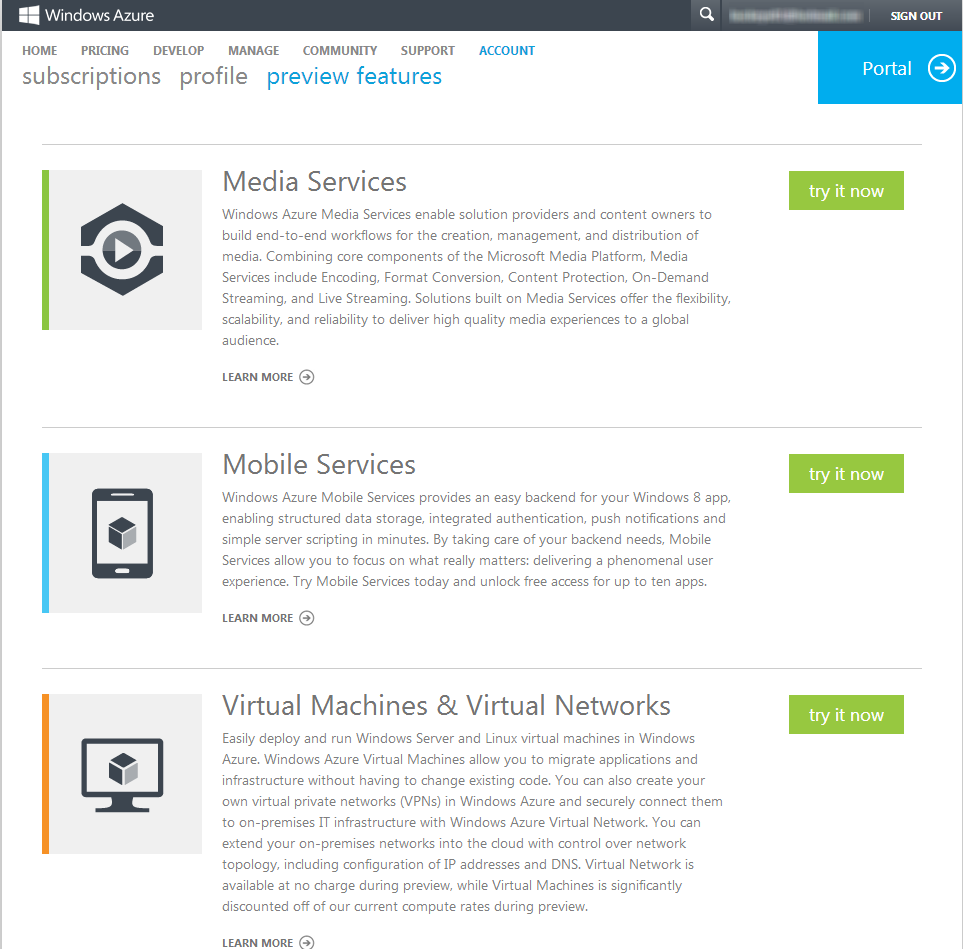
If you don’t already have a Windows Azure account, you can sign up for a free 90-day trial account. You will need a credit card – this is to prove you’re a human and allows you the option to easily extend your usage beyond what is available in the trial. Alternatively, if you have MSDN, or are a BizSpark or WebsiteSpark member, then you already have Windows Azure benefits as part of your member benefits (more details here). Once the account is created, or if one already exists, activate the Windows Azure Web Site and Virtual Machines preview features. Windows Azure Web Sites and Virtual Machines are at the time of this writing still in a “preview” mode – meaning Microsoft is still adjusting features, pricing, stability, etc. (“preview” has essentially replaced “beta”). All Windows Azure preview features (Web Sites, Virtual Machines, Media Services, and Mobile Services), can be activated by going to the Windows Azure preview features activation page (sign-in with your Microsoft Account / Live ID). Then simply activate the desired features by pressing the “try it now” button.
Starting with a Windows Azure Web Site
Windows Azure Web Sites (WAWS) provide a free, fast, and flexible option for hosting web applications with Windows Azure. WAWS supports “Classic” ASP, ASP.NET, PHP, node.js, and Python – great for application developers that use the Microsoft stack, or those that don’t. One of the main attractions of WAWS is the speed with which new web solutions can be developed and deployed. WAWS allows developers to get started for free and scale out, or up, as their application needs grow. As more resources are used, you start to pay a fee to use those resources.
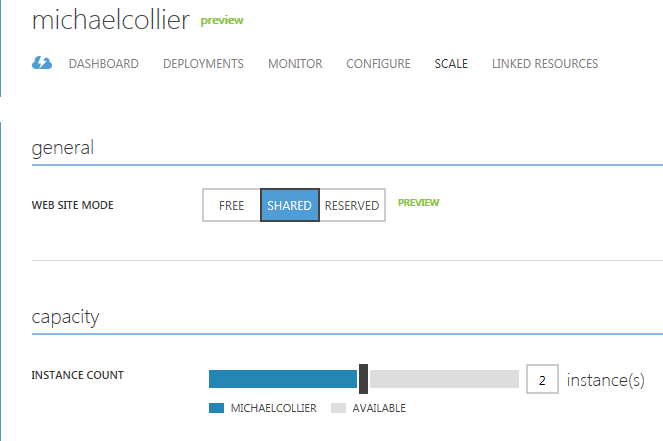
WAWS currently supports three modes – Free Shared, Paid Shared, and Reserved. With the Free Shared mode, you can create up to 10 web sites for free in a shared hosting environment. This is really intended for those relatively small web applications that don’t need a high level of performance (i.e. not compute intensive, don’t store a lot of data on the file system, low memory consumption, and not a Facebook scale user load). That makes it perfect for many personal blogs, quick test or proof-of-concept sites, etc. The Paid Shared mode increases a few resource usages quotas and allows for the use of a custom domain name (http://www.michaelscollier.com vs. http://michaelscollier.azurewebsites.net). Both the Free and Paid Shared modes allow you to control how many instances of your web site are running. By default, you start with a single instance, but can scale out to 2 or 3 instances in seconds (with zero down time). By scaling out, the application is able to handle more requests. The machines aren’t getting more powerful (same CPU and memory), instead there are just more of those machines.
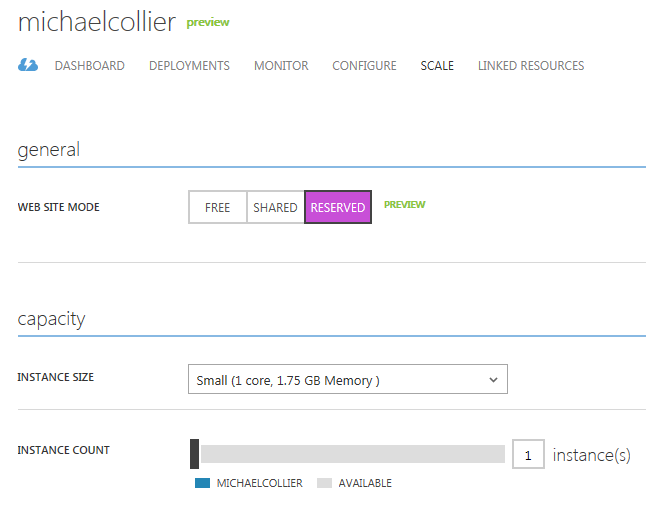
If the application grows to a point where it bumps into the resource limits for a Paid Shared instance (e.g. uses more than 240 minutes of CPU time per day), or the application needs higher performance (more allocated memory or CPU cores), Windows Azure Web Sites provides a Reserved mode. With Reserved mode, all your WAWS in a subscription in a sub-region (datacenter such as ‘East US’) are moved to a dedicated virtual machine. Your applications are the only ones running on this machine. The only thing sharing the machine resources are your other WAWS solutions. With a Reserved instance in place, you can decide what size virtual machine is needed, and how many instances (up to 3) are needed. With Reserved, you can scale out and scale up, or equally as important, scale back down too (saving money).
Microsoft has provided a few excellent Getting Started tutorials for .NET, PHP, and Node.js. These tutorials are a great way to get started creating a web solution, deploying and hosting it on Windows Azure Web Sites, and learning how to manage your solution.
Rich Solutions with Windows Azure Cloud Services
Windows Azure Web Sites are a great way to get started with Windows Azure! This article touched on just a few possibilities and scenarios. As fantastic as WAWS can be, they are not a fit for every solution. Sometimes a more robust (rich, complicated, enterprise – pick your word) solution is needed. This is where Windows Azure Cloud Services (formerly called “Hosted Services”) comes in. In fact, you can easily “grow up” your application from a Windows Azure Web Site to a Cloud Service.
One of the role types within a Cloud Service is a Web Role (the other being a Worker Role). In short, a Web Role is ideal for any web facing application that would run in IIS. That makes a Web Role a perfect fit to host what started out as a Windows Azure Web Site. As a Web Role, the application can take advantage of several Cloud Service features, including:
- Automated Management. Windows Azure will automatically recover instances that fail (i.e. hardware failure like a CPU melting). Windows Azure will also keep the system updated with the most recent OS patches (enabled by default, but you have the ability to disable this feature).
- Install additional components or make system changes. Additional components and system changes can be made via Startup Tasks. These tasks (often a .cmd file that runs an executable or PowerShell script) have the ability to make system level changes to the machine. Since they run on system startup, you can be assured each instance will be as desired each time the system is started.
- Remote Desktop support. By enabling Remote Desktop, you can easily log into your Windows Azure machine to see what’s going on. This could be a great way to debug or get a better understanding of the system.
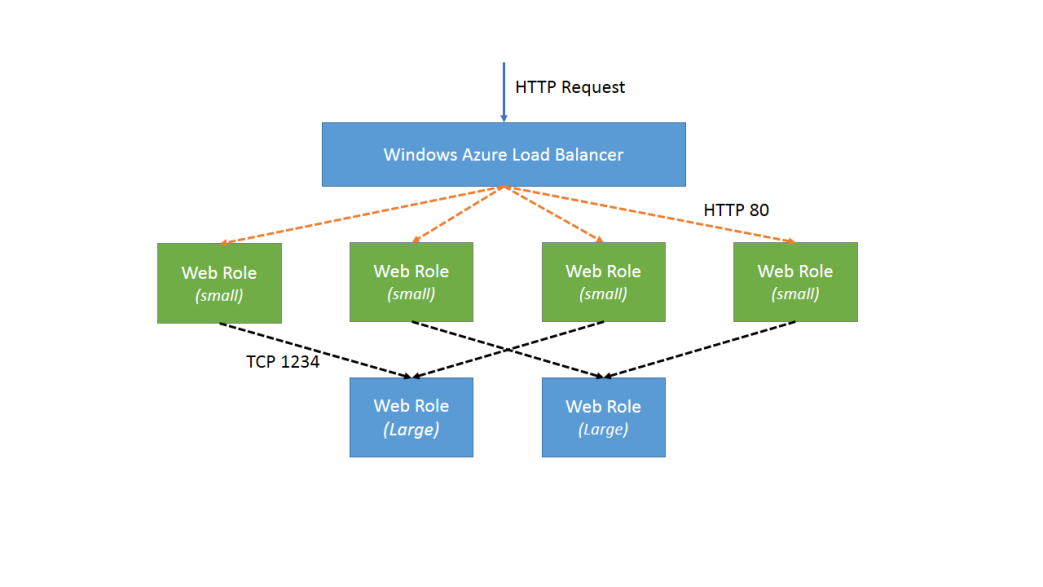
- Independently scale web and worker roles. This provides the ability to individually scale out (or as equally important, to scale in) or scale up the roles. For instance, having 10 instances of a Small-sized web role and 3 instance of a Large-sized worker role.
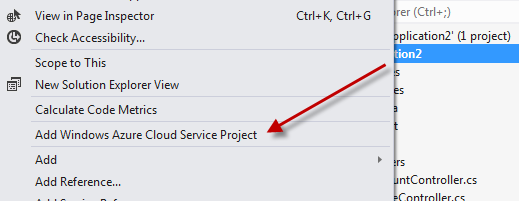
To create a Web Role from an existing web project (e.g. ASP.NET MVC project), we can easily add a Windows Azure Cloud Service Project (a special deployment project for Windows Azure Cloud Services) to an existing solution. Right-click on desired the web project and select “Add Windows Azure Cloud Service Project” (you’ll need the Windows Azure SDK installed first). This will create a new Windows Azure deployment project in the current solution and add the selected web project as a new Web Role.
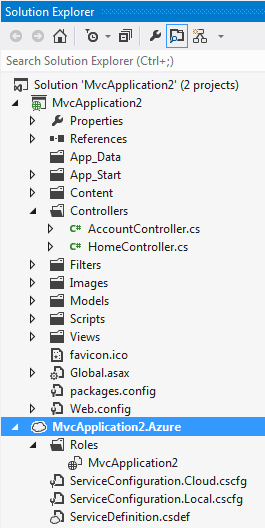
This new Web Role, part of a Windows Azure deployment project, could now be deployed to Windows Azure as a new Cloud Service. It’s also possible to add additional functionality to the solution fairly easily. For instance, perhaps the solution calls for decomposing pieces into distinct application tiers/components. With a Cloud Service, we could have a few Web Roles handle the web-facing part of the solution, and other Web (or Worker) Roles handle the non-web facing aspects, such as hosting a WCF service or ASP.NET Web API. There are many ways to decompose an application – this is just one possible approach.
Gaining More Control with Windows Azure Virtual Machines
So far we’ve seen how easy it can be to start hosting and managing web solutions with Windows Azure Web Sites and then converting them to Windows Azure Cloud Services for additional functionality and control. While Cloud Services provide a fantastic value in terms of price, management, flexibility, etc., there are certainly situations in which the Platform-as-a-Service approach of Cloud Services doesn’t fit. What if the solution requires a higher degree of control? Perhaps there is a need to install third-party components that are difficult or impossible to install via the automated service model used by Cloud Services. Or, maybe there is a need to integrate with server-based solutions such as SharePoint, BizTalk, or SQL Server. This is where Windows Azure Virtual Machines can be very helpful.
Windows Azure Virtual Machines provide Infrastructure-as-a-Service (IaaS), thus nicely complementing the Platform-as-a-Service provided by Web Sites and Cloud Services. While there is no magic wizard to convert a Cloud Service to run in a Virtual Machine, the process is fairly straight forward.
When it comes to setting up an application on a Virtual Machine, it’s important to not overcomplicate the matter. A Windows Azure Virtual Machine is actually quite simple – it’s a Windows Server 2008 or Windows Server 2012 machine that you control. Do with it as you would any other machine you control. It is your responsibility to configure IIS, open ports in Windows Firewall, install and configure software, etc. In general, the steps are:
- Provision the new Windows Azure Virtual Machines.
- Configure the machine
- Configure IIS (if applicable)
- Update Windows Firewall settings to enable any required ports and protocols.
- Install and configure required software.
- Install and configure your application
While a Windows Azure Virtual Machine is a server that can be used for a wide number of purposes, it’s important to note there are some things that are currently not supported – BitLocker, Failover Clustering, and Network Load Balancing. For the latest details on what is, and what is not supported, please visit this KB article.
An optional step would be to save the machine as an image for future use. This essentially clones the machine image and saves it in your Virtual Machine gallery. If you need to scale out or use that image again, you have a ready-to-go image available. You can learn more about saving a machine image in the gallery here.
Now, continuing with the scenario of moving the application to Windows Azure Virtual Machines, we could easily set up a deployment that looks like this:
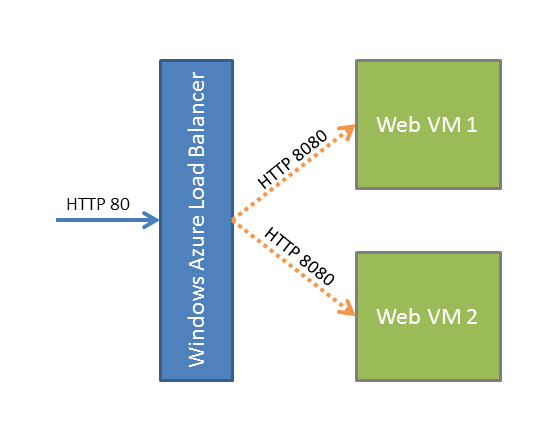
In the above diagram we can point out several interesting features:
- The Windows Azure load balancer automatically provides a round-robin distribution of requests.
- Incoming requests on HTTP port 80 are forwarded to internal/private port 8080 on the Virtual Machines. You will need to configure Windows Firewall to allow inbound traffic on port 8080 as it is prevented by default.
If necessary, we could easily add a full SQL Server 2012 instance to this picture as well. The possibilities with this approach are pretty wide open. After all, it’s your infrastructure – do with it as you need.
Putting it All Together
With Windows Azure, the choice is yours on how to build, deploy, and manage a solution. It’s easy to get started with a Window Azure Web Site, convert to a Cloud Service to include additional platform features, and gain a high level of control and flexibility by moving the application to a Virtual Machine. There are multiple choices, and each work together to provide a solution that fits the needs of virtually any application. Choose wisely.

Comments