This article shows how to write interactive games using the MIDP 2.0 game API. The complete code for an arcade-style game is presented.
Games creation 101 – back to basics
Computer games have always been a mainstream application for personal computers. Since the very early days of the microcomputer revolution, enthusiasts have created entertaining interactive games on 8- and 16-bit systems such as the Commodore 64, Apple II, TRS-80, and the original IBM PC. In some ways, their primitive hardware and limited programming language support, made writing games simple. As a result, thousands of great games were written and shared by hobbyists.Then the souped-up PC came along, with its Gigahertz CPUs, graphics acceleration hardware, gigabytes of memory, huge storage, and complex operating systems. On these high-powered systems complex APIs and the tricky programming involved in game writing has kept the enthusiast at bay. The market’s attention is drawn to features specific to high-end hardware such as 3-D realism, game complexity, and networked play. The proliferation of mobile phones running mobile Java (J2ME) is ushering in a renaissance for simple game writing. The limited CPU, graphics display, and memory of the typical mobile device restrict the type, size, and sophistication of games that can be written.
Figuring out J2ME profiles and configurations
Most phones supporting Java will support the combination of MIDP 2.0 and Connected Limited Device Configuration (CLDC 1.0, JSR-30). Many also implement the Java Technology for the Wireless Industry standard (JTWI 1.0, JSR-185), which guarantees a minimum of MIDP 2.0 and CLDC 1.0 compatibility. See my article in the December 2004 issue of VSJ for more details (www.vsj.co.uk) of MIDP, CLDC, and JTWI in specific; and J2ME development in general.If your phone has MIDP 2.0 or is JTWI 1.0 compliant, it has the game API built in. This article will make use of the phone emulator that is part of the J2ME Wireless Toolkit 2.2 (commonly called WTK 2.2) and that can be download from Sun’s J2ME tools area.
The MIDP 2.0 game API
The game API in MIDP 2.0 is contained within the javax.microedition.lcdui.game package. Instead of working on a pixel level, you can work in terms of graphical objects and layers. There are five classes in this package:- GameCanvas – A specialized Canvas class for games, includes many features such as the polling of key states, mapping of game keys, and off screen buffering for smooth animations.
- Layer – Either a pane of graphics, or a graphical object. It can have a size and an (x,y) position, and can be made visible or invisible. A layer can have pixels that are transparent. Layers can be stacked on top of one another. Any layer below will “show through” transparent pixels of higher layers.
- LayerManager – A helper class to manage layers. Allows the insertion and removal of layers, and allows them to be rendered according to their ordering. This help to keep certain objects or panes on top of one another.
- TiledLayer – A specialized Layer, typically used for creating background or landscape. Allow you to create a layer out of small rectangular images (called tiles). Each tile can be used many times in a TiledLayer, alleviating the need to create huge images, and reducing the storage requirement for large backgrounds.
- Sprite – A specialized “single tile” layer – it appears to be a single graphical object in appearance. However, sequences of tiles can be defined for animation. A Sprite will help in cycling through the sequences of tiles. 2-D transformation (rotation, flip, etc) can be performed quickly using Sprites. It is also possible to check for collision between a sprite and another layer, sprite, or offscreen image.
Creating a classic-side scrolling arcade game
VSJFlyerMIDlet is an arcade style game, modelled on the ‘side scroller’ game genre. This style of game is well-known to any vintage arcade junkies, and familiar to most modern gaming enthusiasts. Figure 1 tells the story.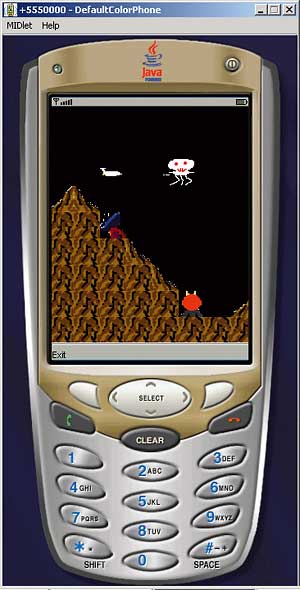
Figure 1: VSJFlyerMIDlet Running in WTK 2.2 Emulator
In Figure 1, you pilot the plane – VSJFlyer – through a large mountainous terrain. You need to navigate yourself around the landscape and not crash into some of the higher peaks. Meanwhile, alien foes will appear from time to time, and your mission is to shoot them down.
This version of the game does not implement scoring but this would make an excellent exercise for the reader.
Thinking in terms of layers and sprites
You may have written Java games by blitting (bit transferring) images to a Canvas. The MIDP 2 game API allows you to work at a significantly higher level. To use this API, you need to think of your game in terms of layers and sprites.The design of this game boils down to the following activities:
- create a very long TiledLayer that contains the gaming world (landscape), and move it to the left continuously throughout the duration of the game
- create a Sprite that represents the flyer, read the key presses from the user and animate the flyer sprite accordingly
- create a Sprite that contains the bullet and associated animation as it flies through the air, keep this sprite invisible until the user press the fire button. When the fire button is pressed, launch the bullet from the position of the flyer and keep moving it to the right of the screen
- create multiple sprites that contains the alien foes, animates the sprites, and make them visible as the flyer moves through various point in the gaming world
- detect collisions between the flyer sprite and the landscape elements in the TiledLayer. Explode the flyer and restart the game if a collision is detected
- detect collisions between the bullet sprite and any alien foes, explode and destroy the alien (and tally the score, if you are implementing scoring) if collision is detected
- detect collisions between the bullet and the landscape elements. Explode the bullet if a collision is detected
- detect when the bullet has travelled outside the visible range of the display, cancel the bullet when this happens
Construction of a classic arcade game
The classes used in this example and their primary functions are:- VSJFlyerCanvas – The main game management class, responsible for rendering the frames in the game, handling user keystrokes; additionally handles the game world landscape TiledLayer, the flyer Sprite, as well as the current bullet Sprite.
- VSJFlyerMIDlet – A MIDlet to contain the game’s VSJFlyerCanvas instance.
- FoesManager – A helper class to manage the alien foes that appear during the game.
- ExplosionManager – A helper class to manage the explosions that occur during game play.
The VSJFlyerCanvas Class
VSJFlyerCanvas inherits from GameCanvas, and utilizes its improved game key mapping and handling, as well as the tight graphics rendering provided. Unlike Canvas, the graphics rendering does not have to be done on an event-driven paint() callback. Since rendering is done to a secondary graphics buffer, it can be done repeatedly on its own thread. VSJFlyerCanvas implements the Runnable interface and has the rendering logic in the run() method.import java.io.IOException;
import javax.microedition.lcdui.*;
import javax.microedition.lcdui.game.*;
public class VSJFlyerCanvas
extends GameCanvas
implements Runnable {
private static final int TILE_SIZE
= 32;
private boolean mGameRunning;
private boolean flyerHit = false;
private boolean isFiring = false;
The mGameRunning flag is used to stop the rendering thread. flyerHit indicates that the flyer has collided with either the landscape or a foe, and that the game will restart soon. isFiring is a flag to indicate if a bullet is travelling through the air at the time of rendering.
	private LayerManager mLayerManager;
	private TiledLayer mBackground;
	private Sprite mFlyer, mBullet;
	private FoesManager mFoesManager;
	private ExplosionManager
		mExplosionManager;
The above are the definitions of the core gaming API elements. mLayerManager manages all the sprites and TiledLayers. mBackground is our gaming world landscape. mFlyer and mBullet represents flyer and bullet respectively. mFoesManager manages multiple alien foe sprites, covered later. mExplosionManager manages multiple explosion sprites, covered later.
	private int minY = 0;
	private int flyerPosX, flyerPosY,
		flyerRegX, flyerRegY;
	private int bulletPosX, bulletPosY;
	private int explosionCounter = 0;
VSJFlyerCanvas manages the landscape, the flyer, and a single bullet. The above variables help in tracking these managed objects.
Defining sprite frame sequences
Next, the sprite tile sequences for the flyer and the bullet are defined: private static final int[]
backSequence = { 0 };
private static final int[]
upSequence = { 2};
private static final int[]
downSequence = { 2};
private static final int[]
forwardSequence = { 0,1 };
private static final int[]
explosionSequence =
{3, 4 ,5, 4, 5};
To better understand this, see Figure 2 which shows the tiles for the flyer sprite,
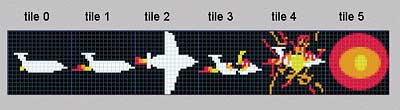
Figure 2: The Sprite Tiles for the flyer
Each tile is numbered in order. When the flyer sprite is displayed, the image displayed will depend on the sequence selected. For example, if the forwardSequence is selected for the sprite, then the tiles displayed will alternate between tile 0 and tile 1. This will show the flyer moving forward, with a flickering afterburn.
Constructing the game layers
In the constructor of the VSJFlyerCanvas, mLayerManager is created, and the ViewWindow is set. It also creates the following layers in order:- the landscape of the gaming world, via createLandscape()
- the sprite for the flyer, via createFlyer()
- the sprites for the alien foes, by instantiating mFoesManager
- the sprites for explosions, by instantiating mExplosionManager
private static final int[]
	bulletSequence = {0,1};
public VSJFlyerCanvas(String
	flyerImageName, String
	enemyImageName, String
	backgroundImageName, String
	bulletImageName, String
	explosionImageName) throws
	IOException {
	super(true);
	mLayerManager = new LayerManager();
	int w = getWidth();
	int h = getHeight();
	mLayerManager.setViewWindow(
		0, 0, w, h);
	createLandscape(
		backgroundImageName);
	createFlyer(flyerImageName);
	mFoesManager = new FoesManager(
		this, mLayerManager,
		enemyImageName );
	createBullet(bulletImageName);
	mExplosionManager = new
		ExplosionManager(this,
		mLayerManager,
		explosionImageName,
		BACKGROUND_DELTA);
}
Restarting the game from the beginning
The resetGame() method is called after the flyer has exploded. The game starts from the beginning again after a call to resetGame(). Note that it calls mFoesManager and mExplosionManager to reset themselves.private void resetGame() {
isFiring = false;
flyerHit = false;
mBackground.setPosition(getWidth()
* 2, getHeight() - 6 *
TILE_SIZE);
flyerPosX = flyerRegX =
getWidth()/2 - 2 * TILE_SIZE;
flyerPosY = 2 * TILE_SIZE;
mFlyer.setFrameSequence(
forwardSequence);
mFlyer.setFrame(1);
mFlyer.setPosition(flyerPosX,
flyerPosY );
mBullet.setVisible(false);
mFoesManager.reset();
mExplosionManager.reset();
}
Creating the gaming world landscape with TiledLayer
mBackground is a very large TiledLayer that constitutes the gaming world. The createLandscape() method below creates this TiledLayer. When you are writing a production game, you are likely to plan the entire landscape of the level. Here, a small area is mapped out in the world array and repeated 10 times. The total horizontal size of this world is 10 x 17 x 32 or 5440 pixels wide.Figure 3 shows the tiles that are used to create this TiledLayer, and how they are tiled to create 1/10th of the gaming world.
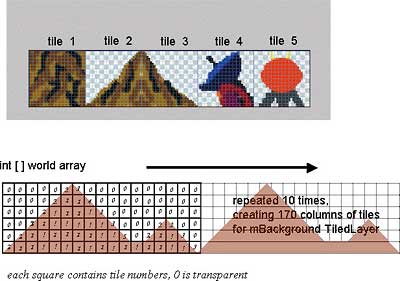
Figure 3: Tiles used to create the gaming world landscape
The code for createLandscape() is:
private static final int LANDSCAPE_REPS
	= 10;
private static final int WORLD_COLS
	= 17;
private static final int WORLD_ROWS
	= 6;
private void createLandscape(String
	landscapeImageName) throws
	IOException {
	Image landscapeImage =
		Image.createImage(
		landscapeImageName);
	int[] world = {
		0, 0, 0, 0, 0, 2, 3, 0, 0, 0,
		0, 0, 0, 0, 0, 0,0,
		0, 0, 0, 0, 2, 1, 1, 4, 0, 0,
		0, 0, 0, 0, 0, 0,0,
		0, 0, 0, 2, 1, 1, 1, 1, 3, 0,
		0, 0, 0, 0, 0, 0,0,
		0, 0, 2, 1, 1, 1, 1, 1, 1, 3,
		0, 0, 0, 2, 3, 0,0,
		0, 2, 1, 1, 1, 1, 1, 1, 1, 1,
		5, 0, 2, 1, 1, 3,0,
		2, 1, 1, 1, 1, 1, 1, 1, 1, 1,
		1, 1, 1, 1, 1, 1,3};
	mBackground = new
		TiledLayer(WORLD_COLS *
		LANDSCAPE_REPS,
		WORLD_ROWS, landscapeImage,
		TILE_SIZE, TILE_SIZE);
	mBackground.setPosition(
		getWidth() * 2 ,
		getHeight() - WORLD_ROWS *
		TILE_SIZE);
	for (int reps=0; reps<
		LANDSCAPE_REPS; reps++) {
		for (int i = 0; i <
			world.length; i++) {
			int column = i % WORLD_COLS;
			int row = (i – column) /
				WORLD_COLS;
			mBackground.setCell(column +
				(reps * WORLD_COLS),
				row, world[i]);
		}
	}
	mLayerManager.append(mBackground);
}
At any time, only a small portion of the gaming world is visible through the phone’s display. The area that is displayed is managed by the LayerManager and is called the ViewWindow. See the setViewWindow() call back in the constructor of VSJFlyerCanvas.
Creating the Flyer and Bullet Sprite
The flyer and bullet sprites are created in createFlyer() and createBullet() respectively, and their tile frame display sequences are set.private void createFlyer(
String flyerImageName)
throws IOException {
Image flyerImage =
Image.createImage(
flyerImageName);
mFlyer = new Sprite(
flyerImage,TILE_SIZE,
TILE_SIZE);
flyerPosX = flyerRegX = getWidth()/2
- 2 * TILE_SIZE;
flyerPosY = 2 * TILE_SIZE;
mFlyer.setPosition(
flyerPosX, flyerPosY );
mFlyer.setFrameSequence(
forwardSequence);
mLayerManager.insert(mFlyer, 0);
}
private void createBullet(String
bulletImageName) throws
IOException {
Image bulletImage =
Image.createImage(
bulletImageName);
mBullet = new Sprite(
bulletImage,8, 8);
mBullet.setVisible(false);
mLayerManager.insert(mBullet, 0);
}
Rendering the game world on an independent thread
The start() method creates and starts an independent thread to render the game graphics. The resulting thread will execute the logic in the run() method. BACKGROUND_DELTA is the number of pixels, along the x-axis, that the background will move with every iteration (1 iteration = 1 frame) of the rendering loop. In this case, it moves 3 pixels to the left. This creates the optical illusion that the flyer is moving to the right.public void start() {
mGameRunning = true;
Thread thrd = new Thread(this);
thrd.start();
}
private static final int
BACKGROUND_DELTA = -3;
public void run() {
int w = getWidth();
int h = getHeight();
Graphics g = getGraphics();
int frameCount = 0;
int factor = 2;
int animatedDelta = 0;
int backgroundDelta = 0;
boolean bulletHitLandscape = false;
This is the beginning of the rendering loop. Note that the Graphics instance associated with a GameCanvas can be obtained using the getGraphics() method. Each iteration corresponds to a frame being rendered. The mGameRunning flag will be checked every frame, and can be used to terminate the rendering.
In the code below, the state of the key is read directly (polled) using getKeyStates(). This is used later to determine how to display the flyer. checkCollision() will be used to check for a collision between the flyer and the landscape, or an alien foe. The flyerHit flag is set if a collision has occurred. After the flyer has collided, the explosionCounter is used to give some time for the explosion to display before the game resets.
while (mGameRunning) {
	backgroundDelta = BACKGROUND_DELTA;
	if (isShown()) {
		int keyStates = getKeyStates();
		if(!flyerHit)
			checkCollision();
		if (flyerHit) {
			mFlyer.nextFrame();
			explosionCounter --;
			if (explosionCounter <=0) {
				resetGame();
		}
	}
	else if ((keyStates & LEFT_PRESSED)
		!= 0) {
		backgroundDelta += 1;
		mFlyer.setFrameSequence(
			backSequence);
		mFlyer.nextFrame();
	}
	else if ((keyStates &
		RIGHT_PRESSED) != 0) {
		backgroundDelta -= 2;
		flyerPosX = flyerRegX + 8;
		mFlyer.setFrameSequence(
			forwardSequence);
		mFlyer.nextFrame();
	}
	else if ((keyStates & UP_PRESSED)
		!= 0) {
		flyerPosY -= 2;
		if (flyerPosY < 0) flyerPosY = 0;
		mFlyer.setFrameSequence(
			upSequence);
		mFlyer.nextFrame();
	}
	else if ((keyStates & DOWN_PRESSED)
		!= 0) {
		flyerPosY += 2;
		mFlyer.setFrameSequence(
			downSequence);
		mFlyer.nextFrame();
	}
	else if ((keyStates & FIRE_PRESSED)
		!= 0) {
		if (!isFiring) {
			mBullet.setPosition(
				mFlyer.getX() +32,
				mFlyer.getY() + 16);
			mBullet.setVisible(true);
			mBullet.setFrameSequence(
				bulletSequence);
			isFiring = true;
		}
		mFlyer.nextFrame();
	}
	else {
		flyerPosX = flyerRegX;
		mFlyer.setFrameSequence(
			forwardSequence);
	}
The GameCanvas maps the up, down, left, right, and fire keys to reasonable keys on the actual device. The exact keys mapped will depend on the MIDP implementation on your device. Note that the isFiring flag is set to true, if the bullet is not currently shown and the user clicked the fire key.
Positioning background and aliens
If the game is not waiting to reset (i.e. if the flyer is hit and an explosion is being displayed), then the background landscape will be moved, and the mFoesManager will be given a chance to position the alien foes that it manages. Note that the parameter that is passed into the renderEnemies() method is the (0,0) point of the background landscape, with respect to the current (0,0) of the ViewWindow. This gives mFoesManager an idea of how far into the game world the flyer is located.if (!flyerHit) {
mBackground.move(
backgroundDelta, 0);
mFoesManager.renderEnemies(
Math.abs(mBackground.getX()),
mFlyer, mBullet);
}
mExplosionManager.render();
mFlyer.setPosition(
flyerPosX, flyerPosY);
If a bullet has been fired, it will be moved to the right and collision will be checked. If a collision is detected, the bulletHitLandscape flag will be set. This flag is used to tell the mExplosionManager to render an explosion at the position of impact. This code also checks and deactivates the bullet if it has travelled outside of the ViewWindow.
if (isFiring) {
	mBullet.move(8, 0);
	mBullet.nextFrame();
	bulletHitLandscape =
		mBullet.collidesWith(
		mBackground, true);
	if ((mBullet.getX() >= getWidth())
		|| bulletHitLandscape) {
		isFiring = false;
		if (bulletHitLandscape)
	mExplosionManager.startExplosion(
			mBullet.getX(),
			mBullet.getY(),
			ExplosionManager.LANDSCAPE);
		mBullet.setVisible(false);
	}
The hitTest() method of the FoesManager is used to determine if the bullet has hit any active alien foes. This method will return true if an alien is hit. In this case, the notifyHit() method of the FoesManager is called. This method will make the associated alien foe sprite invisible and deactivate it. It will also call the ExplosionManager to start an alien explosion effect at the location of impact. Of course, the bullet sprite itself must be made invisible as well.
	if (mFoesManager.hitTest(mBullet))
		{
		mFoesManager.notifyHit(mBullet,
			mExplosionManager);
		isFiring = false;
		mBullet.setVisible(false);
	}
}
The final part of the rendering loop performs the actual rendering into the Graphics instance. First, the background is set to black. Then the mLayerManager is called to paint all its layers onto the ViewWindow. Note the call to flushGraphics() which tells the GameCanvas that it is now okay to move the rendered graphics from the buffer to the actual display.
// paint background
	g.setColor(0x0);
	g.fillRect(0, 0, w, h);
	mLayerManager.paint(g, 0, 0);
	flushGraphics();
}
Adjusting the delay between rendered frame
The rendering thread sleeps for 10 milliseconds between each frame. You may need to adjust this if you are running it on an actual device. The final check in the rendering loop will terminate the thread if the flyer has travelled the entire gaming world. The game display becomes frozen with the last frame rendered. If you are adding a scoring mechanism, you can tally up all the score and display them at this point. try { Thread.sleep(10); }
catch (InterruptedException ie)
{}
if (Math.abs(
mBackground.getX()) >
((LANDSCAPE_REPS *
WORLD_COLS * TILE_SIZE)
- getWidth())) {
stop();
}
} // of while
}
Checking for Flyer Sprite collisions
The checkCollision() method checks and see if the flyer has collided with any landscape element (via the mFlyer sprite’s collidesWith() method) or any foe (via the mFoesManager’s hitTest() method). In either case, this is fatal, and the game will reset after rendering the explosion effect. The second parameter of the collidesWith() method of a sprite indicates if collision should be checked on a per-pixel basis. If this is false, collision checking is performed against the containing square of the sprite. This is faster, but quite imprecise – and not too useful if the sprite is not rectangular in shape. private void checkCollision() {
if ((mFlyer.collidesWith(
mBackground, true)) ||
(mFoesManager.hitTest(
mFlyer))) {
flyerHit = true;
mFlyer.setFrameSequence(
explosionSequence);
mFlyer.setFrame(0);
explosionCounter = 15;
}
}
public void stop() {
mGameRunning = false;
}
}
Creating the Container MIDlet
You need to create a MIDlet to house the VSJFlyerCanvas instance. This code for this simple MIDlet is in the VSJFlyerMIDlet.java file, and reproduced below. It has a plain MIDlet application structure, with an exit command for graceful exit. In startApp(), the MIDlet constructs an instance of the VSJFlyerCanvas, and supplies the names of the PNG files containing the game’s sprite and layer images. When using WTK 2.2, these PNG files should be placed into the res directiory of the application.import java.io.IOException;
import javax.microedition.lcdui.*;
import javax.microedition.midlet.MIDlet;
public class VSJFlyerMIDlet extends MIDlet
implements CommandListener {
private Display mDisplay;
private VSJFlyerCanvas mVSJFlyerCanvas;
private Form mForm;
private Command mExitCommand;
public void startApp() {
if (mVSJFlyerCanvas == null) {
try {
mVSJFlyerCanvas = new VSJFlyerCanvas(
“/flyer.png”, “/enemy.png”,
“/landscape.png”, “/bullet.png”,
“/explosion.png”);
mVSJFlyerCanvas.start();
mExitCommand = new Command(“Exit”,
Command.EXIT, 0);
mVSJFlyerCanvas.addCommand(mExitCommand);
mVSJFlyerCanvas.setCommandListener(this);
}
catch (IOException ex) {
System.out.println(ex);
}
}
mDisplay = Display.getDisplay(this);
mDisplay.setCurrent(mVSJFlyerCanvas);
}
public void pauseApp() {}
public void destroyApp(boolean unconditional) {
mVSJFlyerCanvas.stop();
}
public void commandAction(Command c, Displayable s)
{
if (c.getCommandType() == Command.EXIT) {
destroyApp(true);
notifyDestroyed();
}
}
}
In the rendering thread, it was observed that alien foes are rendered via mFoesManager, and most explosions are rendered through mExplosionManager. These helper classes are created to keep VSJFlyerCanvas from cluttering up. Each of these helper classes adds multiple sprites to the game, and manages the sprites’ appearances as well as their logical lifetime.
Keeping track of alien foes with FoesManager
The FoesManager class manages a set of alien foes for the game. Management duties include the creation of the sprites, turning their visibility on and off, positioning them, and controlling their strategy during the game. The current version will display and manage 10 foes during the course of the game (change this by changing the NUM_FOES constant and the locations array). Each of these foes will appear on the ViewWindow when the flyer has covered a pre-determined distance into the gaming world. The locations int array is used to determine where the foes will appear.Of course, the strategy used in this implementation is only one possible (and rather lame) strategy of placing foes into the game world. You can change this logic completely without affecting the rest of the game.
import java.io.IOException;
import javax.microedition.lcdui.*;
import javax.microedition.lcdui.game.*;
public class FoesManager {
	private Sprite [] mEnemies;
	private boolean [] active;
	private int [] xpos;
	private int [] ypos;
	private static final int[] kEnemySequence = {2, 3};
	private LayerManager mLayerManager;
	private GameCanvas mCanvas;
	private static final int NUM_FOES = 10;
	private static final int TILE_SIZE = 32;
	private static final int MOVEMENT_DELTA = -1;
	private static final int[] locations
		= { 20, 30, 40, 50, 60, 70, 80,
		90, 100, 110};
	/** Creates a new instance of
		FoesManager */
	public FoesManager(GameCanvas
		canvas, LayerManager lm,
		String enemyFileName)
		throws IOException {
		mCanvas = canvas;
		mLayerManager = lm;
		createEnemies(enemyFileName);
	}
All the sprites for the foes are created during the call to createEnemies(), but they are made invisible until the flyer has triggered their appearance within the game world. This approach allows more than one alien foe to appear in the same ViewWindow at a time.
private void createEnemies(String
	enemyImageName) throws
	IOException {
	Image enemyImage =
		Image.createImage(
		enemyImageName);
	mEnemies = new Sprite[NUM_FOES];
	active = new boolean[NUM_FOES];
	xpos = new int[NUM_FOES];
	ypos = new int[NUM_FOES];
	for (int i=0; i < NUM_FOES; i++) {
		mEnemies[i] = new Sprite(
			enemyImage,32, 32);
		mEnemies[i].setVisible(false);
		mEnemies[i].setFrameSequence(
			kEnemySequence);
		mEnemies[i].setFrame(0);
		mLayerManager.insert(
			mEnemies[i], 0);
		}
	}
Trivial alien strategy
When rendered, an alien foe simply moves horizontally to the left. This strategic behaviour can be changed here to provide a more challenging play (for example, you may want to add a vertical movement).private int lastRendered = 0;
public void renderEnemies(int x,
Sprite flyer, Sprite bullet) {
for (int i=lastRendered;
i < locations.length; i++)
if (x > (locations[i] *
TILE_SIZE)) {
lastRendered = i+1;
xpos[i] = mCanvas.getWidth()
- TILE_SIZE;
ypos[i] = TILE_SIZE * 2;
mEnemies[i].setPosition(
xpos[i], ypos[i]);
active[i] = true;
mEnemies[i].setVisible(
true);
}
for (int i=0;
i < mEnemies.length; i++) {
if (active[i]) {
mEnemies[i].nextFrame();
mEnemies[i].move(
MOVEMENT_DELTA, 0);
if (mEnemies[i].getX()
< -1) {
active[i] = false;
mEnemies[i]
.setVisible(
false);
}
}
}
}
The reset() method is called when the game needs to be reset(). All foes are made invisible and inactive again.
public void reset() {
	for (int i=0; i< mEnemies.length;
		i ++) {
		active[i] = false;
		mEnemies[i].setVisible(false);
		lastRendered = 0;
	}
}
Assisting in Collision Detection
The hitTest() method enables the flyer and bullet to determine if they have collided with any of the managed alien foes. If a bullet has detected a collision with an alien an explosion must be rendered at the location of the alien (not that of the bullet). The notifyHit() method is used by the bullet to notify the FoesManager of such a hit. public void notifyHit(Sprite
inSprite, ExplosionManager mgr)
{
for (int i=0;
i < mEnemies.length; i++) {
if (active[i]) {
if (
inSprite.collidesWith(
mEnemies[i], true)) {
active[i] = false;
mgr.startExplosion(
mEnemies[i].getX(),
mEnemies[i].getY(),
ExplosionManager.FOE);
mEnemies[i].setVisible(false);
break;
}
}
}
}
public boolean hitTest(
Sprite inSprite) {
boolean retval = false;
for (int i=0;
i < mEnemies.length; i++) {
if (active[i]) {
if (inSprite.
collidesWith(
mEnemies[i], true)) {
retval = true;
break;
}
}
}
return retval;
}
}
While the FoesManager manages multiple alien foes, the ExplosionManager manages multiple explosion effects.
Displaying mulitiple simultaneous explosions
When a bullet hits an alien foe, or when it hits a landscape element, an explosion occurs. In addition, the player is able to fire again since the bullet has already been deactivated upon contact. This creates the possibility of having multiple simultaneous explosions occurring on the display. The role of the ExplosionManager is to manage these explosions. Of course, explosion effects are simply sprites. This implementation of the ExplosionManager can manage up to 3 simultaneous explosions. You can change the constant NUM_BLASTS to increase this number if necessary.Once an explosion starts, it will last through a number of rendered frames. This is controlled by the BLAST_LATENCY constant, and is set to 9 frames to correspond to the number of frames required to render an exploding foe. The images tiles used in the frame sequence for the exploding foe are depicted in Figure_4.
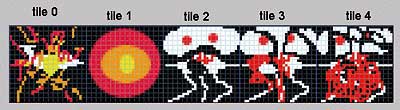
Figure 4: ExplosionManager Tiles for Rendering Explosion
import java.io.IOException;
import javax.microedition.lcdui.*;
import
	javax.microedition.lcdui.game.*;
public class ExplosionManager {
	private Sprite [] mExplosions;
	private boolean [] active;
	private int [] xpos;
	private int [] ypos;
	private int [] renderCounter;
	private int mBackgroundDelta = 0;
	private static final int[]
		landscapeBlastSequence =
		{0, 1};
	private static final int[]
		foeBlastSequence =
		{2,3,4,3,4,0,1,0,1};
	private LayerManager mLayerManager;
	private GameCanvas mCanvas;
	private static final int
		NUM_BLASTS = 3;
	private static final int
		TILE_SIZE = 32;
	private static final int
		BLAST_LATENCY = 9;
	/** Creates a new instance of
		FoesManager */
	public ExplosionManager(GameCanvas
		canvas, LayerManager lm, String
		explosionFileName, int delta)
		throws IOException {
		mCanvas = canvas;
		mLayerManager = lm;
		mBackgroundDelta = delta;
		createExplosions(
			explosionFileName);
	}
	private void createExplosions(
		String explosionImageName)
		throws IOException {
	// Create the sprite.
		Image blastImage =
			Image.createImage(
			explosionImageName);
		mExplosions =
			new Sprite[NUM_BLASTS];
		active =
			new boolean[NUM_BLASTS];
		xpos = new int[NUM_BLASTS];
		ypos = new int[NUM_BLASTS];
		renderCounter =
			new int[NUM_BLASTS];
		for (int i=0; i < NUM_BLASTS;
			i++) {
			mExplosions[i] = new
				Sprite(blastImage,
					32, 32);
			mExplosions[i].setVisible(
				false);
			mExplosions[i].
				setFrameSequence(
				foeBlastSequence);
			mExplosions[i].setFrame(0);
			mLayerManager.insert(
				mExplosions[i], 0);
		}
	}
	public void render() {
		for (int i=0; i <
			mExplosions.length; i++) {
			if (active[i]) {
				mExplosions[i].
					nextFrame();
				renderCounter[i]--;
				mExplosions[i].move(
					mBackgroundDelta, 0);
				if (renderCounter[i]<=0){
					active[i] = false;
					mExplosions[i].
						setVisible(false);
					renderCounter[i] = 0;
				}
			}
		}
	}
Starting an explosion
When the game logic requires an explosion, the startExplosion() method is call. The x and y position specified is where the explosion will occur. Since the entire landscape moves to the left, the explosion must also move with it in order to appear still. This is why the movement delta must be supplied when creating an instance of an ExplosionManager. This implementation of the ExplosionManager supports two different types of explosions, each distinct due to the different frame sequences. When startExplosion() is called, the caller must specify either ExplosionManager.FOE for a foe explosion, or ExplosionManager.LANDSCAPE for a landscape explosion.public static final int LANDSCAPE = 0;
public static final int FOE = 1;
public void startExplosion(int startx,
int starty, int type) {
for (int i=0;
i< mExplosions.length; i ++) {
if (!active[i]) {
xpos[i] = startx;
ypos[i] = starty;
active[i] = true;
mExplosions[i].setPosition(
xpos[i], ypos[i]);
mExplosions[i].setVisible(
true);
switch(type) {
case LANDSCAPE:
mExplosions[i].
setFrameSequence(
landscapeBlastSequence);
break;
case FOE:
mExplosions[i].
setFrameSequence(
foeBlastSequence);
break;
} // switch
renderCounter[i] =
BLAST_LATENCY;
break;
} // if active
} // for
}
public void reset() {
for (int i=0;
i< mExplosions.length; i ++) {
active[i] = false;
mExplosions[i].setVisible(
false);
renderCounter[i] = 0;
}
}
}
Running VSJFlyerMIDlet on WTK 2.2
To try out VSJFlyerMIDlet, first create a new project (using the New Project… button) called VSJFlyerMIDlet using the kToolbar. Next, copy the four Java source files into the src directory of the project. In addition, copy all the PNG graphical files into the res directory of the new project. Click the Build button on the kToolbar. This will build the project. Finally, click Run and start playing the game on the phone emulator.Conclusions
Using the MIDP 2.0 Game API, it is easy to write arcade games. In particular, the support for layers and sprites greatly simplify the work of the game programmer.Sing Li is a consultant, trainer and freelance writer specialising in Java, Windows NT and distributed object technologies. Li’s most recent publication is Early Adopter JXTA: Peer-to-Peer Computing with Java from Wrox Press.
Fixed arrays instead of objects – a conscious design choiceThe choice of fixed arrays, such as mEnemies[], xpos[], ypos[], and active[] are intentional. While combining them into a custom object type would provide a better object oriented design, it would also result in a larger body of code (property accessors, etc) and more dynamic runtime behaviours. These are things that you want to avoid when programming for a limited J2ME platform, such as a mobile phone. |
Comments