The ability to play back and record sound has become a requirement of any personal computer or workstation. Earlier incarnations of the PC had to work with a seemingly infinite variety of sound hardware, thanks to the popularity of ISA, MicroChannel, VESA, and PCI plug-in cards and associated driver software. The Java platform, with its “write once, run anywhere” mantra, struggled during this period of time to provide the Java developer with a workable low-level audio control API. This API is called JavaSound. Available since JDK 1.1, implementations of the JavaSound API have matured considerably. The new JavaSound implementation in JDK 1.5 brings with it significant ease-of-use and performance enhancements.
This article introduces the basic concepts of the JavaSound API, discusses the JDK 1.5 changes, and applies the API in a hands-on example which enables you to play a background music file (such as an MP3), pick up the microphone and start to sing along, recording your performance as an audio file.
A JavaSound Primer
JavaSound is a low-level Java API for manipulation of audio playback, audio recording, and MIDI music synthesisers (MIDI will not be covered in this article). Low level, because you have direct access to the bits that represent the audio data, and you can directly control many features of the underlying sound hardware. SUN provides a default implementation of this API, but alternative implementations exist.
The most popular alternative implementation has been Tritonus. For a significant period of time in the past, the Tritonus JavaSound implementation has been the only workable JavaSound implementation for the Linux operating system.
Fundamental JavaSound Objects
To understand the JavaSound API, we must first gain an appreciation of the following fundamental JavaSound objects:
- Mixer
- Port
- SourceDataLine
- TargetDataLine
- AudioSystem
Let’s take a look at the PC sound processing hardware to see how these objects fit in. Figure 1 illustrates the components and connections that are used to perform audio playback in a typical computer system.
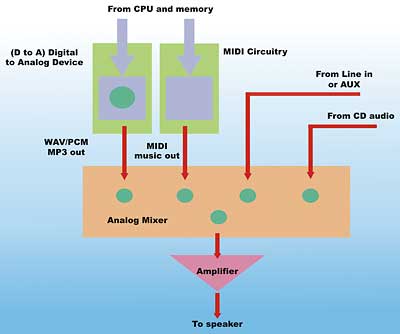
Figure 1: The Architecture of PC Sound Playback Hardware
In Figure 1, the blue paths are digital paths. This means that audio data travel along these paths as numerical values. The red paths in Figure 1 are analog signal paths. That is, hardware wires are carrying fluctuating voltage signals that represent the sound itself. The hardware component that converts the digital value to analog voltage level is called a D to A (Digital to Analog) converter.
The green circles in Figure 1 are control points. These control points are digitally operated – meaning that the CPU can issue commands to control them. However, the actual signals that they control may be analog in nature. They are special circuits in the path that provide control over signal properties such as volume, balance, pan, muting, etc.
Notice at the centre of Figure 1 is a hardware mixer. This mixer is used to combine all the analog audio signals and then send the combined signal to an analog amplifier. The amplifier in turn feeds speakers, headphones, or the line out jack.
When an audio file is played, the data is being pushed from the CPU and memory to the D to A converter. The resulting analog signal is then fed into one of the inputs of the analog audio mixer (called WAV/PCM or MP3 in Figure 1 – corresponding to popular digital audio formats for the PC). Other inputs to the same analog mixer may include output from the MIDI synthesiser hardware, audio from the AUX or Line In jack, analog signals from the playback of a CD, and other analog signals. Note that while this mixer is combining analog signals, we can have control over the mix (i.e. adjust volume of each of the incoming signals) using digital means.
Now, consider the PC hardware involved when recording audio.
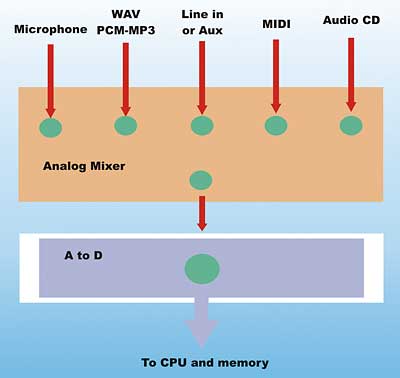
Figure 2: Architecture of PC Sound Recording Hardware
Figure 2 illustrates the hardware components and connections that are involved when recording audio on a PC. Again, an analog mixer is at the centre of it all. This mixer can select amongst incoming analog signals from the microphone, Line in or AUX, MIDI music generated by the PC, and the PC generated wave output (from the circuit in Figure 1).
The selected analog output of this mixer is fed into an A to D device (analog to digital). The output of the A to D device are digital values representing the combined analog signal. This output is read by the CPU and audio processing software. Note again that the analog mixer is controlled by the PC and can be used to adjust the volume, balance, etc. of the individual incoming analog signals.
Identifying the hardware pieces that control audio playback and recording will enable us to make sense of the JavaSound objects. JavaSound has its own unique view of an audio system. It corresponds to the working components in Figure 1 and 2, but the perspective is turned “inside out”. This is because the view is from the digital “inner world” of the computer, instead of the analog outside world.
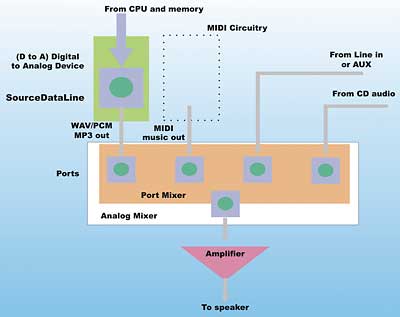
Figure 3: Audio playback in JavaSound
Figure 3 overlays this unique JavaSound perspective over the physical view from Figure 1. This shows the JavaSound objects that are involved in audio playback.
In Figure 3, the blue digital path that connects from the CPU to the D to A device, including the control circuitry (the green circle), has become a SourceDataLine. In JavaSound, digital audio data can be sent to a SourceDataLine for playback. Note that the controls in the analog audio mixer are collected within a Port Mixer object. The controls themselves are grouped according to the lines that they are associated with; this grouping is called a Port in JavaSound. They are represented as blue squares under the green circle. In JavaSound, controls associated with a Port object can typically be used to control the properties (volume, balance, etc) of an associated Line.
The situation with audio recording is quite similar. Figure 4 superimposes the JavaSound perspective over the physical audio capture components of Figure 2.
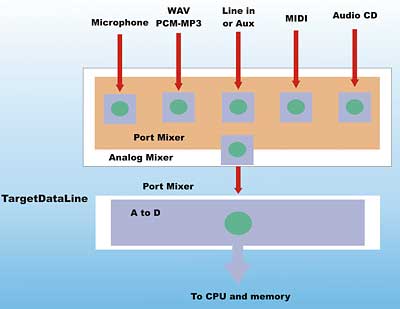
Figure 4: Audio recording (capture) in JavaSound
In Figure 4, the controls for the analog mixer are again collected into a JavaSound Port Mixer object. The Port objects within this Port Mixer and their associated controls can be used to modify the properties of the incoming lines (volume, balance, etc.) and select the line from which the audio is being captured.
The blue circuitry, going from the A to D device to the processor and including the control (green circle), forms a TargetDataLine. In JavaSound, TargetDataLines are used to capture incoming analog audio signal.
Therefore, in the JavaSound world, we have the set of objects shown in Figure 5 for audio playback and capture.
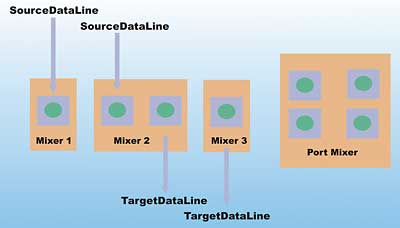
Figure 5: JavaSound audio system objects
Figure 5 shows groupings of SourceDataLine, TargetDataLine, and/or Port. These groupings are, unfortunately, encapsulated in objects called Mixers in JavaSound. Mixer objects are shown as orange-coloured blocks in Figures 3, 4 and 5. From our discussion, it should be clear that a JavaSound Mixer has no relation to the hardware analog mixer that we saw in Figure 1 and 2. A JavaSound Mixer is a logical container object, or grouping mechanism, for Lines (SourceDataLine, TargetDataLine, or Port). Typically, a JavaSound Mixer corresponds to a specific audio hardware component or device (for example, a D to A circuitry for playback of audio data in our figures).
JavaSound inheritance hierarchy
The inheritance relationship between the different JavaSound object types is shown in Figure 6. Object types are represented by Java interfaces in this case. This relationship is slightly different from the containment relationship that we have shown thus far.
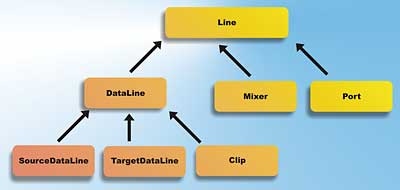
Figure 6: Inheritance relationship between JavaSound object types
In Figure 6, note that Line, Mixer, Clip, SourceDataLine, TargetDataLine and Port are specified as Java interfaces in the javax.sound.sampled package. This package is the one in JavaSound that deals with audio capture and playback (the other major package in JavaSound works with MIDI).
A Clip is an audio file that is loaded completely into memory, and is typically played in a loop (i.e. as background sound for a game). The DataLine interface factors out some of the commonalities of its sub-interfaces, including transport control (starting and stopping) and buffering.
A Line can have associated Control objects. Controls are objects that are used to control volume, balance, etc. They were represented by green circles in earlier figures. This means that all of SourceDataLine, TargetDataLine, Clip, Mixer, and Port can have associated Control objects (since they are all sub-interfaces of Line). However, in a typical implementation, only the Controls on the Port object (and SourceDataLine if available) are used.
The versatile AudioSystem
At the centre of the javax.sound.sampled package is a utility JavaSound object called AudioSystem. AudioSystem is the “Swiss army knife” class in JavaSound. It is not a traditional object in the sense that you would never explicitly create an instance of the class. Instead, it is a holding bin for global static methods. Here, you will find an assortment of frequently used static methods. Some of the most frequently used methods in AudioSystem are shown in Table 1.
Table 1: Frequently used AudioSystem methods |
|
| Static Method Name | Description |
| getMixerInfo() | Obtains information on all the Mixer objects supported on this system |
| getMixer() | Obtains a Mixer instance and its specific information. This information can be obtained by getMixerInfo(). Using these two methods allows your application to select a specific Mixer at runtime |
| getLine() | A shortcut method to obtain either a SourceDataLine or TargetDataLine satisfying an application’s requirements (i.e. specific sampling rate, bit resolution, and compression requirement). While logically SourceDataLine and TargetDataLine should be fetched from a Mixer, this shortcut method will search across Mixers on a system to find the matching Line. |
| getAudioInputStream() | Obtains an AudioInputStream to work with. The source of this stream can be a file, url, a Java InputStream or another AudioInputStream. See article text for more description of an AudioInputStream. |
| write() | Write an AudioInputStream to a Java File or OutputStream |
| getAudioFileTypes() | Obtains a list of file types (for example .wav, .au, .aif, .mp3) supported when writing a specific AudioInputStream, or that the system is capable of writing. |
The JavaSound AudioSystem object provides a set of utility methods to work with AudioInputStream. AudioInputStream is a logic object (i.e. no hardware underneath) that is used to handle and manipulate streams of audio data.
Audio data conversion via AudioInputStream
AudioInputStream is subclass of Java’s InputStream. The most common operation performed by AudioInputStream is audio data conversion. By supplying specific audio format requirements to the AudioSystem.getAudioInputStream() method, it is possible to change the audio format of a stream. Depending on the capability of the system, both rate and encoding conversion may be possible. For example, you may be able to convert a 16-bit, 44.1kHz sampled PCM (pulse code modulation – a standard way of digitising the signal value of sound) stereo stream to an 8-bit, 8kHz PCM stream (rate conversion). Encoding conversion may also include compression if supported by the system. For example, you may be able to pass in a 16-bit 44.1kHz sampled PCM stereo AudioInputStream and obtain an MP3 compressed AudioInputStream.
Other than using the getAudioInputStream() method, you can construct an AudioInputStream instance directly by using the new operator in Java. AudioInputStream’s constructors allow you to wrap an AudioInputStream around an incoming TargetDataLine. It is also possible to instantiate an AudioInputStream around an arbitrary InputStream instance. This constructor will be useful, for example, when you are creating network audio streaming application. In this case, the InputStream supplied can be obtained from the network transport.
Note: Up to JDK 1.4.2, JavaSound uses a Mixer called “JavaSound Audio Engine” as its default Mixer. This is a pure software implementation of a digital mixer. The input from multiple SourceDataLines are mixed (digital values added together) and then send to the default sound card hardware. It is not possible to obtain a TargetDataLine from this engine, since it does not support capture. JDK 1.5 continues to support this software Mixer, but it may not be the system default.
Programming JavaSound
Let’s put some of this knowledge to work. You will first get acquainted with your own audio system. The first example, VSJQueryMixers.java, shows all the JavaSound Mixers available on your system. With JDK 1.5, this corresponds to the hardware sound devices available through JavaSound. Basically, the code must perform these steps:
- Call AudioSystem.getMixerInfo() to obtain information on the available Mixers
- Iterate through them and print out some of their information
The code for VSJQueryMixers.java is reproduced below, with the above two steps highlighted in blue.
import java.util.*;
import javax.sound.sampled.*;

public class VSJQueryMixers {
    public VSJQueryMixers() {}
    public static void main(String[]
    	args)throws Exception {
    	showMixers();
    	}
    public static void showMixers() {
   	ArrayList<Mixer.Info>
    		mixInfos =
    		new ArrayList<Mixer.Info>(
    		Arrays.asList(
    		AudioSystem.getMixerInfo(
    		)));
    	Line.Info sourceDLInfo =
    		new Line.Info(
    		SourceDataLine.class);
    	Line.Info targetDLInfo =
    		new Line.Info(
    		TargetDataLine.class);
    	Line.Info clipInfo =
    		new Line.Info(Clip.class);
    	Line.Info portInfo =
    		new Line.Info(Port.class);
    	String support;
    	for (Mixer.Info mixInfo:
    		mixInfos) {
   		Mixer mixer =
    			AudioSystem.getMixer(
    			mixInfo);
    		support = “, supports “;
    		if (mixer.isLineSupported(
    			sourceDLInfo))
    			support +=
    				“SourceDataLine “;
    		if (mixer.isLineSupported(
    			clipInfo))
    			support += “Clip “;
    		if (mixer.isLineSupported(
    			targetDLInfo))
    			support +=
    				“TargetDataLine “;
    		if (mixer.isLineSupported(
    			portInfo))
    			support += “Port “;
    		System.out.println(“Mixer: “
    			+ mixInfo.getName() +
    			support + “, “ +
    			mixInfo.getDescription(
    			));
    } } }
Note that we call Mixer.isLineSupported() to discover the type of Lines supported by each of the Mixer. This is displayed on the output, along with the name and description of the Mixer.
Line.Info and Mixer.Info are data structure objects that contains information (metadata) describing a Line and a Mixer respectively. Once you have a Line.Info or Mixer.Info structure, you can obtain the associated Line or Mixer via the AudioSystem’s getLine() or getMixer() method.
To compile, use the compile.bat batch file provided in the source distribution, or the following command line:
java –source 1.5 VSJQueryMixers.java
The –source 1.5 switch is necessary to ensure that our code using the enhanced loop and generics will compile correctly (JDK 1.5 syntax).
Discovering Mixers
When executed on my machine, with XP professional and a SoundBlaster Audigy sound card, the Mixers showin in Table 2 are found. Your display will be different depending on the sound hardware available on your system.
Table 2: Mixers |
||
| Mixer Name | Lines Supported | Description |
| Primary Sound Driver | SourceDataLine, Clip | Direct Audio Device: DirectSound Playback |
| SB Audigy Audio [C400] | SourceDataLine, Clip | Direct Audio Device: DirectSound Playback |
| Primary Sound Capture Driver | TargetDataLine | Direct Audio Device: DirectSound Capture |
| SB Audigy Audio [C400] | TargetDataLine | Direct Audio Device: DirectSound Capture |
| Java Sound Audio Engine | SourceDataLine, Clip | Software Mixer and Synthesiser |
| Port SB Audigy Audio [C400] | Port | Port Mixer |
The JDK 1.5 JavaSound implementation on my machine has provided access to the Audigy sound card through Microsoft’s DirectSound driver. This is reflected in the “Direct Audio Device” Mixers. Note that the hardware mixer of the sound card is accessible through the Port Mixer: we can retrieve this Port Mixer and discover the Ports and Controls that are available. They should correspond to the controls available with the sound card’s hardware mixer.
Discovering Port Mixer and Controls
The VSJQueryPort.java program can be used to get information on the controls available with the Port Mixer. Following is the annotated code to VSJQueryPort.java:
import java.util.*;
import javax.sound.sampled.*;
public class VSJQueryPort {
    public VSJQueryPort() {}
    public static void main(String[]
    	args) throws Exception {
    	probePort();
    }
The probePort() method first goes through the Mixers on the system and find the Port Mixer.
public static void probePort()
    throws Exception {
    ArrayList<Mixer.Info> mixerInfos =
    	new ArrayList<Mixer.Info>(
    	Arrays.asList(
    	AudioSystem.getMixerInfo()));
    Line.Info portInfo =
    	new Line.Info(Port.class);
    for (Mixer.Info mixerInfo:
    	mixerInfos) {
    	Mixer mixer =
    		AudioSystem.getMixer(
    		mixerInfo);
Once the Port Mixer is located, it is probed for all the Ports that it has. Recall that a Port is a subclass of Line. Ports can be located using the getSourceLineInfo() call (on the Mixer interface). Note that Ports are separated into source (for recording) and target (for playback). The source/target sense here is from the perspective of the Mixer. For every Line (Port) that is located, the showControls() method is called.
   if (mixer.isLineSupported(
    	portInfo)) {
    	// found a Port Mixer
    	disp(“Found mixer: “ +
    		mixerInfo.getName());
    	disp(“\t” +
    		mixerInfo.getDescription());
    	disp(“Source Line Supported:”);
    	ArrayList<Line.Info> srcInfos =
    		new ArrayList<Line.Info>(
    		Arrays.asList(
    		mixer.getSourceLineInfo()));
    	for (Line.Info srcInfo:
    		srcInfos) {
    		Port.Info pi =
    			(Port.Info) srcInfo;
    		disp(“\t” + pi.getName() +
    			“, “ + (pi.isSource()?
    			“source” : “target”));
    		showControls(mixer.getLine(
    			srcInfo));
    		} // of for Line.Info
    	disp(“Target Line Supported:”);
    	ArrayList<Line.Info>
    		targetInfos =
    		new ArrayList<Line.Info> (
    		Arrays.asList(
    		mixer.getTargetLineInfo()));
    	for (Line.Info targetInfo:
    		targetInfos) {
    		Port.Info pi =
    			(Port.Info) targetInfo;
    		disp(“\t” + pi.getName()
    			+ “, “ +
    			(pi.isSource()?
    			“source” : “taget”));
    		showControls(mixer.getLine(
    			targetInfo));
    		}
    	} // of if
    	// (mixer.isLineSupported)
    } // of for (Mixer.Info)
}
The showControls() method first opens the Line. Note that you have to open the line in order to access controls on the line. It then iterates through the controls on the line and print information. Many controls are of the CompoundControl type. This means that it in turn contains other controls.
private static void showControls(
    Line inLine) throws Exception {
    // must open the line to get
    // at controls
    inLine.open();
    disp(“\t\tAvailable controls:”);
    ArrayList<Control> ctrls =
    	new ArrayList<Control>(
    	Arrays.asList(
    	inLine.getControls()));
    for (Control ctrl: ctrls) {
    	disp( “\t\t\t” +
    		ctrl.toString());
    	if (ctrl instanceof
    		CompoundControl) {
    		CompoundControl cc =
    			((CompoundControl) ctrl);
    		ArrayList<Control> ictrls =
    			new ArrayList<Control>(
    			Arrays.asList(
    			cc.getMemberControls()));
    		for(Control ictrl : ictrls)
    			disp(“\t\t\t\t” +
    				ictrl.toString());
    		} // of if (ctrl instanceof)
    	} // of for(Control ctrl)
    	inLine.close();
    }
private static void disp(String msg) {
    System.out.println(msg);
    }
You can now compile and run VSJQueryPort. When it is ran on my system, it revealed the lines and associated controls show in in Table 3.
Table 3: Compilation results |
||
| Line/Port Name | Type | Controls |
| MIDI Synth, source | source | Select, Volume, and Balance |
| Analog Mix (Line/CD/Aux/TAD/PC) | source | Select, Volume, and Balance |
| CD Digital, source | source | Select, Volume, and Balance |
| “What U Hear” | source | Select, Volume, and Balance |
| MICROPHONE | source | Microphone +20db Boost, Select, Volume, and Balance |
| Wave/MP3 | source | Select, Volume, and Balance |
| SPEAKER | target | Volume, Balance, Mute, Bass, Treble, Compound control for WAV/MP3, MIDI Synth, CD Digital, Auxiliary, CD Audio, Line-in, PC Speaker, TAD-in, and Microphone (allowing all of these signals to be mixed for playback to the speaker) |
Your system may have a different hardware mixer configuration. In Table 3, the Select control is boolean “true” or “false”, and will determine if the signal will be the signal recorded during capture. Most sound card hardware allows the selection of only one single source. This Audigy sound card provides a “What U Hear” Port, essentially allowing you to record whatever is being played back on the speaker. The Microphone +20db Boost Control is a BooleanControl that boosts the gain to accommodate some low signal level microphones.
Creating a Sing-along Recorder
Our final example is a Sing-along recorder. This recorder will:
- Play an audio file, potentially in a compressed format such as MP3
- Select a recording source and adjust its volume
- Record the performance to a file
You can find the source code to this recorder in the KokRecorder.java file of the source distribution. We will examine the code fragments that performs the steps 1–3 detailed above. KokRecorder runs two threads. The thread in the main() method will be playing back the audio, while a background thread will perform the audio capture. The main() method of KokRecorder.java orchestrates this entire process. To keep things relatively uncluttered and focus our attention on the JavaSound code, Exceptions are not handled in-line.
public static void main(String[] args)
    throws Exception {
    File outputFile =
    	new File(OUTPUT_FILE);
    AudioFormat recordingFormat =
    	new AudioFormat(
    	AudioFormat.Encoding.PCM_SIGNED,
    	44100.0F, 16, 2, 4, 44100.0F,
    	false);
    	TargetDataLine recordLine =
    		null;
    	recordLine = (TargetDataLine)
   	AudioSystem.getTargetDataLine(
    		recordingFormat);
    	recordLine.open(
    		recordingFormat);
   	adjustRecordingVolume();
    	AudioFileFormat.Type fileType =
    		AudioFileFormat.Type.WAVE;
    	KokRecorder recorder =
    		new KokRecorder(
    		recordLine, fileType,
    		outputFile);
    	recorder.start();
    	System.out.println(“Playing
    		Song and Recording...”);
    	playAudio(SONG_FILE);
    	recorder.stopRecording();
    	System.out.println(
    		“Recording stopped.”);
    }
Note the use of AudioSystem.getTargetDataLine(recordingFormat) to obtain a recording line. The recordingFormat specified is 44.1kHz 16-bit PCM recording – this is supported by most modern sound cards. adjustRecordingVolume() will select the recording source and set the recording level. recorder.start() will start the background recording thread. playAudio() will play our song file.
Recording Audio
The KokRecorder class is a subclass of Thread. The run() method contains the logic to be executed by the background thread.
Selecting Recording Source and Setting Volume
Using the Port Mixer, we can select the recording source and set its volume. This is preformed by the adjustRecordingVolume() and its helper methods.
public static void
    adjustRecordingVolume()
    throws Exception {
    Port.Info recPortInfo =
    	new Port.Info(Port.class,
    	RECORD_PORT_SELECT, true);
  Port recPort = (Port)
    	AudioSystem.getLine(
    	recPortInfo);
    setRecControlValue(recPort);
    }
The AudioSystem.getLine() method is used to quickly obtain the Port Mixer.
Note: With JDK 1.5, it is possible to use a sound.properties file in the JRE\lib directory of your JDK installation. This sound.properties file can be used to specify the default Mixer that will be used when AudioSystem.getLine() is called for the various type of Line. In my case, the sound.properties file contains:
javax.sound.sampled.Port=#Port
    SB Audigy Audio [C400]
javax.sound.sampled.Sourc#SB
    Audigy Audio [C400]
javax.sound.sampled.TargetDataLine=
    #SB Audigy Audio [C400]
The mixer name is placed after the # sign. These are actually the defaults for my machine, so this file is not strictly necessary.
The controls in the Port may be singular or compound. If it is a CompoundControl, we need to navigate it to the member controls. This is done by the setRecControlValue() helper method.
private static void
    setRecControlValue(Port inPort)
    throws Exception {
    inPort.open();
    Control [] controls =
    	inPort.getControls();
for(int i=0; i<controls.length; i++) {
  if(controls[i] instanceof
    	CompoundControl) {
    	Control[] members =
    		((CompoundControl)
    		controls[i]).
    		getMemberControls();
    for(int j=0; j<members.length; j++) {
    		setCtrl(members[j]);
    		} // for int j
    	} // if
    else
    	setCtrl(controls[i]);
    } // for i
    inPort.close();
    }
The Port is selected for recording using the Select BooleanControl, and its volume set using the Volume FloatControl. This is performed by the setCtrl() helper method.
private static void setCtrl(
    Control ctl) {
  if(ctl.getType().toString(
    	).equals(“Select”)) {
    	((BooleanControl)
    		ctl).setValue(true);
    	}
    if(ctl.getType().toString(
    	).equals(“Volume”)) {
    	FloatControl vol =
    		(FloatControl) ctl;
    	float setVal = vol.getMinimum()
    		+ (vol.getMaximum()
    		- vol.getMinimum())
    		* RECORD_VOLUME_LEVEL;
  	vol.setValue(setVal);
    } }
Playing Back Audio
Almost all modern sound hardware is full duplex now, enabling recording and playback to occur simultaneously. If you have very old hardware, this may not be possible. The playAudio() method is used to play the song file. Note that if the file format is natively supported (i.e. .wav format), the highlighted code is not necessary. In this case, playback is simply a loop that reads from the file’s AudioInputStream and write to the SourceDataLine.
public static void playAudio(String
    audioFile) throws Exception {
    File songFile =
    	new File(audioFile);
    AudioInputStream	AIS = null;
    AIS = AudioSystem.
    	getAudioInputStream(songFile);
    AudioFormat myFormat =
    	AIS.getFormat();
    DataLine.Info info =
    	new DataLine.Info(
    	SourceDataLine.class, myFormat,
    	AudioSystem.NOT_SPECIFIED);
  if (!AudioSystem.isLineSupported(
    	info)) {
    	// mp3 will go through here
    	// – decoded to PCM
    	AudioFormat decodedFormat =
    		new AudioFormat(
    		AudioFormat.Encoding.
    		PCM_SIGNED,
    		myFormat.getSampleRate(),
    		16, // sample size in bits
    		myFormat.getChannels(),
    		myFormat.getChannels() * 2,
    		myFormat.getSampleRate(),
    		false); // big endian?
    		// new stream is decoded
    	AIS = AudioSystem.
    		getAudioInputStream(
    		decodedFormat, AIS);
    	myFormat = AIS.getFormat();
    					// new format
    	SourceDataLine playbackLine =
    		null;
    	playbackLine = AudioSystem.
    		getSourceDataLine(
    		myFormat);
    				// get default line
    	playbackLine.open(myFormat);
    	playbackLine.start();
    	int bytesRead = 0;
    	byte[] buffer =
    		new byte[128000];
    	while (bytesRead != -1) {
    		bytesRead = AIS.read(buffer,
    		0, buffer.length);
    		if (bytesRead >= 0)
    			playbackLine.write(
    			buffer, 0, bytesRead);
    		}
    		playbackLine.drain();
    		playbackLine.close();
    } }
The highlighted code shows that if the file format is not handled natively by the JavaSound implementation, it will attempt a conversion. This conversion is done via the AudioInpuStream supporting methods in AudioSystem. Typically, this will involve plug-in providers from SUN or third parties.
Note: The batch file used to test this recorder assumes that you have downloaded additional plug-ins for decoding MP3 and Ogg Vorbis files. You can download the MP3 decoder and the Ogg Vorbis decoder. Follow their included instructions to properly install the plug-ins.
Testing the Sing-along Recorder
Examine the KokRecorder.java source, you will need to customise the following constants for your own system.
private static String SONG_FILE =
    “song.mp3”;
private static String OUTPUT_FILE =
    “perform.wav”;
// private static String
// RECORD_PORT_SELECT =
// “\”What U Hear\””;
private static String
    RECORD_PORT_SELECT = “MICROPHONE”;
private static float
    RECORD_VOLUME_LEVEL = 0.8f;
If your system’s microphone source Port is not called “MICROPHONE”, you will need to change to the specific name of your microphone Port (discovered using the VSJQueryPort example earlier).
Note: If you have a headset connected, and your sound hardware has a “What U Hear” source Port, you can record a mix of your voice and the background music by enabling microphone playback. This needs to be done using the sound mixer utility that comes with your sound card (and not through JavaSound). Recompile KokRecorder using “What U Hear” as RECORDPORTSELECT. IMPORTANT: you should not try this if you have separate microphone and speaker because audio feedback may damage your sound card.
To test the recorder, use the compile.bat file to compile the source, and then kok.bat batch file to run it. Make sure you have a background music file placed in song.mp3. The resulting perform.wav file can be played using any media player.
JDK 1.5 Enhancements
For those who had attempted (and may have been frustrated by) sound programming with prior versions of JavaSound, JDK 1.5 brings a lot of good news. Older versions suffered from a parade of critical bugs, lacklustre performance, no support for evolving or new hardware, lack of consistency between different JavaSound implementations, lagging support for new audio compression formats, and uneven support for different system platforms (Windows v Solaris v Linux).
The main performance improvement comes in the form of Direct Audio Mixers. All the supported platforms – Windows, Linux, Solaris – now support a Direct Audio Mixer. This allows you to go down to the bare metal, with minimal JavaSound wrapper, and work with the system’s native hardware and/or optimised sound drivers. Instead of using the all software “JavaSound Audio Engine” as default, JDK 1.5 will attempt to use the higher performance Direct Audio Mixer if possible.
Another major improvement is the implementation of Ports across all the platforms. This means that the hardware analog mixer on your sound card is finally controllable through JavaSound. The volume and balance of incoming audio signals can now be controlled from JavaSound.
One important ease-of-use enhancement with JDK 1.5 is the ability to specify, via a sound.properties file, the default Lines returned when AudioSystem.getLine() is used. This particular feature is covered earlier in the article. Since many legacy applications may be written using this method call, there is now a way of configuring them.
Third party support for JavaSound has also matured. Plugins for playback of the latest modern audio formats, including Oggs Vorbis and MP3 are now available.
Finally, many serious bugs have been fixed with JDK 1.5. One of particular note is that the old JavaSound subsystem had a daemon thread running that will prevent the main application from shutting down gracefully. This is no longer a problem.
Conclusion
The JavaSound API attempts the Herculean task of unifying highly dissimilar sound hardware and operating system drivers, across the Windows, Linux, and Solaris operating systems. Moving further towards this goal, the JDK 1.5 JavaSound implementation takes advantage of the maturing and converging sound hardware architecture to provide a higher-performance, low-level API access, experience.
Sing Li is a consultant, system architect, open source software contributor, and freelance writer specialising in Java technology, embedded and distributed systems design. He has authored or co-authored several books on the topic, including Professional Apache Tomcat (Wrox), Professional JSP 2 (Apress), Early Adopter JXTA (Wrox), and Professional Jini (Wrox).
Comments