In this article, we will see how NetBeans assists in development of RMI and CORBA code modules. We will walk through an actual hands-on example. The major features of this example include:
- initial definition of an Java remote interface (RMI based) using NetBeans
- creation of a server side implementation of the interface
- creation of an RMI client that consumes the service provided by the server
- actual RMI code testing using the RMI registry as an object lookup
- working with the NetBeans RMI registry browser
- creation of an rmi-iiop server implementation of the remote interface
- generation of a CORBA IDL based on the rmi-iiop server
- creation of a CORBA client based on the IDL
- actual CORBA code testing using the CORBA Naming Service as an object lookup
- working with the NetBeans CORBA Naming Service browser
The code distribution includes all the source code in this article. However, as much of the code is generated using NetBeans as you follow through the text, the code distribution best serves as a reference.
A quick RMI and CORBA refresher
RMI and CORBA programming have great similarity, since they achieve the same thing on the conceptual level. The basic end result is the ability to invoke the features of an object server remotely, over a network. Yet, they each carry with them their own vocabulary for describing the pieces that make thing work and differ greatly in actual implementation details. Let us begin with a brief revisit to some of these details. Figure 1 illustrates the basic concepts that we will be reviewing.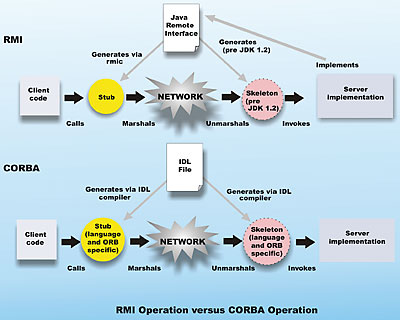
Figure 1: RMI v CORBA operation
In both RMI and CORBA, a distributed application is segregated into a server side and a client side that agree on how to communicate through a common interface (or set of common interfaces). In RMI, this common interface is expressed in terms of a Java language interface that extends the java.rmi.Remote interface. In CORBA, this common interface is expressed inside an Interface Description Language (IDL) file (see Figure 1). Using this common interface, it is possible to use software tools to generate glue code that makes the method invocation across the network relatively transparent to the application developer. The glue code on the client side takes a method call, together with all its arguments, and writes it down onto the network stack in a known format (known as marshaling) and sends that to the server. On the server side, the glue code receives the information from the network stack and then decodes the call and arguments (known as unmarshaling) and finally performs the actual invocation of the method on the server object. Return values are pushed back from the server to the client in a similar fashion.
In CORBA, an IDL compiler (see Figure 1) is used to create bindings that are language and ORB specific (since CORBA works across different programming languages). The IDL compiler generates the glue code “binding” in the form of client side stubs and server side skeletons source code. In RMI, the RMI Compiler (rmic) is used to create Java specific binary glue code from the server binary class(es); the glue code generated is also called client side stubs and server side skeletons. Server side RMI skeletons are no longer required for JDK 1.2 or later, the RMI runtime can create skeletons dynamically.
One common problem that occurs during the design of distributed applications is how the clients should locate the available distributed objects and services that may be available on a network. Both RMI and CORBA provide a solution that is based on well-known lookup servers. In the case of RMI, the RMI registry can be used to look up the RMI server objects available. In the case of CORBA, a naming service can be used to look up the server side objects available. Figure 2 illustrates the role of RMI registry and the CORBA naming service.
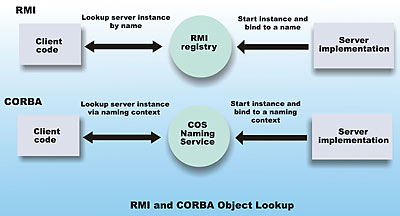
Figure 2: RMI and CORBA use of lookup servers
With these basic concepts in our mind, we are ready to create networking clients and servers using the NetBeans IDE.
Enabling NetBeans RMI and CORBA modules
Depending on how you’ve installed NetBeans, the RMI and CORBA modules may or may not be enabled. To follow the rest of the article, you will need to make sure they are enabled.To check to see what modules are enabled, go to Tools->Setup Wizard, and when the General NetBeans Settings screen shows up on the wizard, click on the Next button. This will bring you to the Module Installation screen of the wizard. Here you should see categories of modules, similar to Figure 3.

Figure 3: the categories of modules
Expand the Distributed Application Support category to expose the CORBA and RMI modules. The Enabled field needs to be True for both. If they are not already set to True, change their values now. Finally, click the Finish button to save the setting and exit the wizard.
First, create the following directories on your system:
- src
- classes
- idl
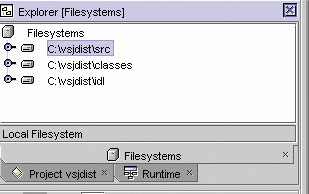
Figure 4: the filesystem pane
Next, edit the options to point the Java compiler output to the classes directory. From top menu, select Tools->Options, in the Options editor set the Target field of the Internal, External, and FastJavac compilers to the mounted classes directory.
Creating an RMI interface from scratch
Now, we are ready to create the RMI interface. First, we will create the Java package that it will reside in. Highlight the mounted src directory, right click and select New->Java Package. In the wizard, type in:uk.co.vsj.nb.rmi.intfAfter you click the Next button, the package’s subdirectories will be created for you automatically. Now, highlight the intf node, right click and select New->All Templates. In the Choose Template Wizard, expand the RMI node. You should see something similar to Figure 5.
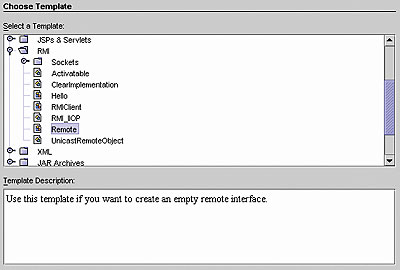
Figure 5: the Choose Template Wizard
There are a variety of possible RMI templates to choose from, we will only need the Remote one at this time (we will use a couple of other RMI templates later).
For our purpose select the “Remote” template and click Next. You are asked for the name of the interface so enter:
RemoteAdder…and click the Finish button. This will create a skeletal RMI interface, and bring up the editing pane for you to fill out the method details. The generated code together with code that we need to add is listed below. Add the blue code to the uk.co.vsj.nb.rmi.intf.RemoteAdder interface:
package uk.co.vsj.nb.rmi.intf;
import java.rmi.*;

public interface RemoteAdder
	extends java.rmi.Remote {
		public void reset()
			throws RemoteException;
		public long addInt(long inc)
			throws RemoteException;
		public long add(long op1,
			long op2)
			throws RemoteException;
}
This is a very simple interface, which just activates the remote call mechanism. The functions reset() and addInt() are used to manage a running sum that is kept on the server (similar to other common server side state maintenance scenarios), while the add() method will simply add two numbers on the server. You can compile this interface to make sure everything has been entered correctly and there is no error.
Creating a server-side RMI interface
To create a server-side implementation for the RMI interface, first highlight the rmi folder in the expanded package tree, right click and select Folder, enter “server” for the name.Highlight the newly created “server” folder, right click and select New->All Templates. Expand the RMI templates set and select the UnicastRemoteObject template. This will create a standard server that uses the native JRMP protocol of RMI. Click Next. Advanced RMI developers may want or need other templates, please consult the NetBeans RMI module documentation for more details.
When prompted for Name, enter “RmiAdderImpl”, and click Next. The next screen of the wizard asks for a Remote Interface to be specified. Click the Use an Existing Remote Interface radio button, and browse to or enter the uk.co.vsj.nb.rmi.intf.RemoteAdder interface. Click Next.
The final screen of this wizard asks for Implementation Name, leave it as the default RemoteAdderImpl and click Finish. This will generate the code for the uk.co.vsj.nb.rmi.server.RemoteAdderImpl class, together with skeletal implementation for the methods of the RemoteAdder interface. Modify the last part of the code to add in our implementation. The blue code below needs to be added to provide the server-side functionality.
...
public static void
	main(String[] args) {
	System.setSecurityManager(
		new RMISecurityManager());
	try{
		RemoteAdderImpl obj =
			new RemoteAdderImpl();
		registerToRegistry(
			“RemoteAdderImpl”,
			obj, true);
	} catch (RemoteException ex) {
		ex.printStackTrace();
	} catch (MalformedURLException
		ex) {
		ex.printStackTrace();
	}
}
...
private long runningSum = 0;
public void reset() throws
	RemoteException {
	runningSum = 0;
}

public long addInt(long inc)
	throws RemoteException {
	runningSum += inc;
	return runningSum;
}

public long add(long op1, long op2)
	throws RemoteException {
	return op1 + op2;
}
Try to compile the class. It should compile with no errors. This completes our RMI server-side implementation of the interface.
NetBean’s RMI registry and browser
In the next step, we will start the RMI server object and leave it waiting for incoming requests from clients. To do this, we need to bind an instance of the server to a RMI registry. JDK 1.4 has an implementation of an RMI registry, and NetBeans has the functionality built-in. Take a look at the Runtime Explorer of NetBeans (click on the Runtime tab). You will see an RMI Registry node, right click and select Local Registry. A dialog box pops up, click Start to start the registry running on the default port. Looking back at the Runtime Explorer, you should see the RMI registry instance running as localhost:1099. This RMI registry browser can be used to browse any RMI running registry instances over the network.Next, we need to start our server instance. Look back at the code of the server side RmiAdderImpl, and note the generated registerToRegistry() method:
public static void registerToRegistry(
		String name, Remote obj,
		boolean create) throws
		RemoteException,
		MalformedURLException {
	if (name == null)
		throw new
		IllegalArgumentException(
		“registration name cannot
		be null”);
	try {
		Naming.rebind(name, obj);
	} catch (RemoteException ex) {
		if (create) {
			Registry r =
		LocateRegistry.createRegistry(
			Registry.REGISTRY_PORT);
			r.rebind(name, obj);
		} else throw ex;
	}
}
The highlighted lines (blue) are responsible for locating and binding to the RMI registry at the default port.
Highlight the RmiAdderImpl node in the FileSystem Explorer, right click and select Execute. This will start the server running. Go back to the Runtime Explorer, expand the localhost:1099 instance of the RMI Registry, and you should see the server instance waiting for incoming client calls (see Figure 6) via the RMI registry browser.
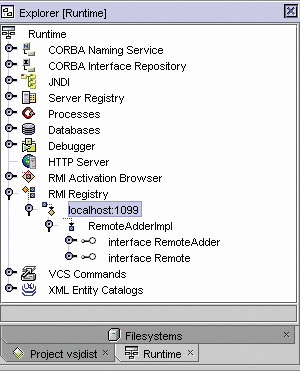
Figure 6: Waiting for incoming client calls
Creating an RMI client
Let’s not keep the server waiting too long; we’re now off to create an RMI client that will connect to and exercise our server. Using the Filesystem Explorer, create a new directory at the same level as the server directory, just below the rmi directory and name it “client”. Right-click on this new client directory and select a new RMI template, using the RMIClient template this time. When it prompts for the name, enter “RmiAdderConsumer”. This should generate skeletal code for the co.uk.vsj.nb.rmi.client.RmiAdderConsumer class.To fill in the code for the client, go to the Runtime Explorer and expand the localhost:1099 registry instance, highlight the interface RemoteAdder node (part of the server instance) and right click, select Copy Client Code. This will generate code into the system clipboard. This technique can be used to generate client lookup and binding code for any server instance on any RMI registry instance that can be viewed via this registry browser.
Return to the editor pane for the RmiAdderConsumer class, and paste the generated code into the main() method. The listing below shows the main() method with the pasted code (blue).
public static void
	main(String args[]) {
	System.setSecurityManager(
		new RMISecurityManager());
	try {
		uk.co.vsj.nb.rmi.intf.
		RemoteAdder obj =
		(uk.co.vsj.nb.rmi.intf.
		RemoteAdder)
		Naming.lookup(
		“//localhost:1099/
		RemoteAdderImpl”);
	} catch (Exception ex) {
		ex.printStackTrace();
	}
}
After this lookup, the obj variable can be used to access the remote server. Add the following client code inside the try… catch construct.
try {
	uk.co.vsj.nb.rmi.intf.RemoteAdder
		obj = (uk.co.vsj.nb.rmi.
		intf.RemoteAdder)
		Naming.lookup(
		“//localhost:1099/
		RemoteAdderImpl”);
	obj.reset();
	long baseNum = 3;
	long inc = 7;
	obj.addInt(baseNum);
	System.out.println( “” + baseNum +
		“ plus “ + inc + “ is “ +
		obj.addInt(inc));
	System.out.println(
		“adding another “ + inc +
		“ makes it “ +
		obj.addInt(inc));
	System.out.println(“but “ + inc +
		“ plus “ + inc + “ is simply “
		+ obj.add(inc, inc));
	} catch (Exception ex) {
	ex.printStackTrace();
}
Testing the RMI client and RMI server
Right click on the RmiAdderConsumer node and select Execute. This will compile and execute the client.During execution, the client will look up the waiting RMI server via the RMI registry, and call its methods remotely, over the loop-back network via RMI, to print out the following:
3 plus 7 is 10
adding another 7 makes it 17
but 7 plus 7 is simply 14
Creating an RMI-IIOP server for CORBA
Next, we will re-create the server, but this time using the RMI-IIOP protocol support. RMI-IIOP support enables CORBA clients to access Java RMI servers.In the Filesystems Explorer, create an iiop directory under the nb directory, at the same level as the rmi directory. With the iiop directory highlighted, select a new template in the RMI templates collection. This time, create an RMI_IIOP template. This will create a server that extends javax.rmi.PortableRemoteObject. Using the wizard, name it “IiopAdderImpl”, and select the Use an Existing Remote Interface option and specify the uk.co.vsj.nb.rmi.intf.RemoteAdder as before. Use the implementation name of “IiopAdderImpl”. These steps should be familiar by now, as they are identical to the steps in creating the RMI server code earlier. As a result, the code skeleton for uk.co.vsj.iiop.IiopAdderImpl will be generated.
Next, copy the declaration for the runningSum variable, and the implementations of the reset(), addInt() and add() methods from the RemoteAdderImpl.java to the new IiopAdderImpl.java. Check the source code distribution if you need help on this. Compile the completed IiopAdderImpl.java. There should be no compilation errors. This completes the server side of our CORBA compatible server.
Generating an IDL file from a Java remote interface using NetBeans
For a CORBA client to access the RMI-IIOP server, it requires an IDL file describing the interface. The default compilation of an RMI-IIOP server object such as IiopAdderImpl.java does not generate the required IDL file. This generation is typically not required in production scenarios because the server providers are typically third parties and they can supply the required IDL.In our case, we are both the service provider and the consumer and need to generate the IDL file. To achieve this, we need to make a small change to the options specified.
From top level menu, select Tools->Options; in the options manager expand to Building->Compiler Types-> RMI Stub Compiler (IIOP). Edit the External Compiler field on the right-hand pane to include the “-idl” switch, leaving everything else as is. An example of the modification is highlighted below.
{jdk.home}{/}bin{/}rmic -idl
	–classpath
	“{java.home}{/}..{/}lib{/}
	rt.jar”{:}{filesystems}
	{iiop} {version} {keepgenerated}
	{outputdir} {files}
Close the options manager and return to the FileSystem Explorer and compile the IiopAdderImpl source again. This time, expand the classes directory until you get to the intf subdirectory under the rmi directory, and notice that a CORBA IDL file (RemoteAdder.idl) has been created.
This standard IDL file can now be used by any CORBA client to access our Java RMI based server. For example, if a C/C++ user has a hold of the IDL and has access to our network, they can write a C or C++ client to use the service provided by our RMI server.
In our case, we are going to create a CORBA client in Java. Note that the steps we take here are the same regardless of where we obtain the IDL file. For instance, another development shop may have implemented CORBA objects that we’d like to use, and we may want to write a client to use the provided services. In such cases, we will build the client using their IDL.
Creating a CORBA client from an IDL file
Let us create a Java CORBA client based solely on the IDL file. First, go to the idl directory that you’ve created and run the getidl.bat batch file in it (see code distribution for getidl.bat). This will copy the two required IDL files from the lib directory of your JDK, as well as the server’s IDL file into the idl directory.From the Filesystem Explorer in NetBeans, expand the idl directory, highlight the RemoteAdder.idl file, right-click and select Compile. This will generate all the CORBA client-side support and helper files and place them in the IDL directory (leaving them independent of the main source tree).
Now, using the FileSystem Explorer, create a directory at the same level as rmi, and call it corba. Highlight the newly created corba directory, and right-click select All Templates. From the CORBA collection, select the ClientMain target.and click Next. When prompted for the name, enter “CorbaAdderConsumer”. This will create the source for a skeletal uk.co.vsj.nb.corba.CorbaAdderConsumer class.
There are many ways to locate a CORBA server object. In our case, we will look it up from a CORBA naming service (similar to what we did with RMI). The code generated with the ClientMain target assumes this form of lookup. Modify the CorbaAdderConsumer.java file and add the following highlighted code to the main() method:
public static void
		main(String args[]) {
	try {
		ORB orb = ORB.init(args, null);
		org.omg.CORBA.Object ns =
		orb.resolve_initial_references(
			“NameService”);
		if (ns == null)
			throw new
			RuntimeException();
		NamingContext nc =
		NamingContextHelper.narrow(ns);
		if (nc == null)
			throw new
			RuntimeException();
		String[] client_name_hierarchy
			= new String []
			{“IiopAdderImpl”, “”};
		NameComponent[] aName =
			new NameComponent[
			client_name_hierarchy.length
			/ 2];
		for (int i=0;
		i<(client_name_hierarchy.length
		/ 2); i++) {
			aName[i] =
			new NameComponent();
			aName[i].id =
			client_name_hierarchy[i*2];
			aName[i].kind =
		client_name_hierarchy[i*2+1];
		}
		org.omg.CORBA.Object obj =
			nc.resolve(aName);
		uk.co.vsj.nb.rmi.intf.
			RemoteAdder srv =
			uk.co.vsj.nb.rmi.intf.
			RemoteAdderHelper.
			narrow(obj);
		srv.reset();
		long baseNum = 3;
		long inc = 7;
		srv.addInt(baseNum);
		System.out.println( “” +
			baseNum + “ plus “ +
			inc + “ is “ +
			srv.addInt(inc));
		System.out.println(“adding
			another “ + inc +
			“ makes it “ +
			srv.addInt(inc));
		System.out.println(“but “ + inc
			+ “ plus “ + inc +
			“ is simply “ +
			srv.add(inc, inc));
		if (srv == null)
			throw new
			RuntimeException();
	} catch (Exception ex) {
		ex.printStackTrace();
	}
}
The first line added above provides the context name for the CORBA naming service to look up. This is set by the RMI-IIOP server to be “IiopAdderImpl” when binding to the naming service.
The second set of lines consists of first “casting” (in CORBA lingo, narrowing) the object received from the naming service to an instance of the Java uk.co.vsj.nb.rmi.intf.RemoteAdder interface. The rest of the added lines are exactly the same server-exercising logic as the RmiAdderConsumer.
Testing the CORBA client with the RMI-IIOP server
Before testing our CORBA client and RMI-IIOP server, we need to start an instance of the CORBA naming service. Fortunately, NetBeans has one as part of the CORBA support. Go to the Runtime Explorer, highlight the CORBA Naming Service node, right click and select Start Local…. Then click OK on the popup dialog to start the local naming service running on the default port of 900.We can now start the IiopAdderImpl RMI-IIOP server. Highlight IiopAdderImpl, right click and select Execute. This will start our server and it will locate the naming service and then bind to it. Check to verify the server instance under the newly created naming service instance by browsing the Runtime Explorer.
Finally, to run the client, highlight CorbaAdderConsumer, right click and select Execute. This will compile the source and execute it. This CORBA client will locate the naming service, lookup the RMI-IIOP server, and make CORBA calls to its methods. The resulting output is identical to the former RMI case:
3 plus 7 is 10
adding another 7 makes it 17
but 7 plus 7 is simply 14
Conclusions
Development of RMI or CORBA distributed applications can be a complex task, given the number of interfaces, stubs, and skeleton files that need to be created and managed. Careful organization and strict discipline must be exercised. NetBeans provides assistance in this area by facilitating the creation of client and server-side code for both RMI and CORBA applications.The templates and wizards provided by NetBean’s RMI and CORBA modules understand the typical network software development task flow. Its design aims to facilitate development without hindering the process, or dictating specific policies.
Integrated tools such as the local RMI registry and its registry browser, or the local CORBA naming service, and its naming service browser supplement the developer’s arsenal of essential development tools for RMI and CORBA development.
Sing Li is a consultant, system architect, open source software contributor, and freelance writer specialising in Java technology, embedded and distributed systems design. He has authored or co-authored several books on the topic, including Professional Apache Tomcat (Wrox), Professional JSP 2 (Apress), Early Adopter JXTA (Wrox) and Professional Jini (Wrox).
An RMI development “gotcha”If you’ve changed or recompiled any code for the server, don’t forget that the code will not be in effect until you run it again. This is because the NetBeans local RMI registry still has a reference to your old implementation, and any lookup by the client will get the old instance. Running your newly recompiled server will call the registry with:Naming.rebind()This will ensure that any older reference will be replaced with an instance of the newly compiled code. |
Comments