The code here is based on the GWTFlyer application discussed in last month’s VSJ. The original version of this web application that displays personal contact information for a mobile device had an interactive user interface, but it did not contain any mechanism to fetch data remotely. In this article, we’ll make some changes to GWTFlyer’s architecture to create a new version that uses GWT’s RPC’s support to fetch data from a remote servlet running on a Tomcat server. You will create a standard Java EE WAR file with the application that can be deployed on any compliant server. In addition, you will enhance its user interface to flexibly display the list of contacts fetched from the remote server.
Enhancing GWTFlyer to retrieve contact information
The original architecture of GWTFlyer focused on the design of the user interface, and not the flow of data as illustrated in Figure 1, where the contact information (the Contact objects containing information for Sing Li and Robert Smart) is hard-coded in Java.
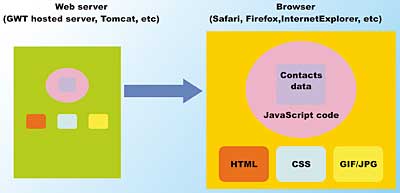
Figure 1: Original GWTFlyer with contact data hard-coded in JavaScript
This Java is compiled to JavaScript by GWT and thus essentially hard-coded in JavaScript and there is no need for the JavaScript code to fetch data from the server at all. This is how the GWTFlyer implementation presented in October’s VSJ worked. This time around, the code will be upgraded to make an actual across-the-network AJAX call to fetch the data from the server – see Figure 2.

Figure 2: Revised GWTFlyer fetching data via AJAX RPC request from remote servlet
Notice in this figure that the contact information is not hard-coded in the JavaScript at all. Instead, the server runs a bona-fide Servlet. The JavaScript code in GWTFlyer makes an asynchronous call to retrieve the contact information from the Servlet. In fact, the GWTFlyer uses the simple RPC API mechanism that is provided by GWT to make such a call. Figure 2 is a substantially more realistic scenario than the old GWTFlyer. In most production scenarios, the server contains or has access to the data. While on the server, that data can be simultaneously accessed or modified by other systems.
Instead of using a locally hard-wired array of contacts, you will see how to make calls across the network to obtain contact information from a server. This server can provide the data information directly or act as a mid-tier server and obtain data from yet another server (perhaps an RDBMS).
The GWT RPC mechanism
GWT provides a set of RPC support classes that makes over-the-network retrieval of data (contacts in our case) straightforward to implement. To take advantage of the GWT RPC support classes, the following steps are taken:- Add a server-side servlet to handle the contact retrieval requests
- Define the client-side interfaces used
- Implement the asynchronous call handling on the client-side
Adding servlet handling to GWT module
The GWT shell can start and run a servlet via its own embedded Tomcat server. To hook a servlet into this mechanism, you need to update the GWTFlyer module definition file where you first defined the EntryPoint for your module, the GWTFlyer.gwt.xml file located in the uk.co.vsj.gwt package directory.You need to add a <servlet> tag into this file:
<module>
	<inherits name=’com.google.gwt.user.User’/>
	<entry-point class=’uk.co.vsj.gwt.client.GWTFlyer’/>
	<servlet path=”/ContactsRetriever”
		class=”uk.co.vsj.gwt.server.ContactManagerImpl” />
</module>
The <servlet> tag maps a URL path, in this case “/ContactsRetriever”, to a server-side class that will be executed as a servlet inside the embedded Tomcat. In this case, the servlet class running in the server-side will be uk.co.vsj.gwt.server.ContactManagerImpl.
During server startup, the embedded Tomcat server makes the servlet available at the URL:
http://localhost:8888/uk.co.vsj.gwt.GWTFlyer/
	ContactsRetriever
However, this URL is used internally by the GWT RPC mechanism, so you don’t need to be concerned with this low level detail while using the GWT hosted mode operations. You can focus on programming RPC at the Java interface level – making method calls directly on the interfaces.
Defining client side interfaces
The server side method to retrieve contacts is exposed on the client side via standard Java interfaces. This interface is in Java on the server-side, but gets compiled down to JavaScript on the client-side. In this case, a ContactManager interface is required, providing one single method called getContacts() that returns an array of Contact objects.To make asynchronous call (via GWT AJAX RPC support) possible, two different interfaces must be defined. Both of these interfaces must be declared within the client package (to be compiled down to JavaScript). The first interface defined (ContactManager) is as expected an interface that defines the getContacts() method that you need to call remotely:
package uk.co.vsj.gwt.client;
import com.google.gwt.user.client.
	rpc.RemoteService;
public interface ContactManager
		extends RemoteService {
	public Contact [] getContacts();
}
Note that this interface must inherit from:
com.google.gwt.user.client.rpc.
	RemoteService
The second, asynchronous, interface is necessary because JavaScript code is executed single threaded – and the request to the server to obtain data is always performed asynchronously by GWT.
Performing time-consuming actions, such as data fetches across the network, asynchronously enables the user interface to remain responsive even while blocking operation is taking place:
package uk.co.vsj.gwt.client;
import com.google.gwt.user.client.
	rpc.AsyncCallback;
public interface ContactManagerAsync {
	 void getContacts(
		AsyncCallback callback);
}
The name of the interface must be formed by appending the “Async” suffix to its associated interface, to form in this case ContactManagerAsync as the completed name. On this interface, there must be the same methods with the same names as its non-asynchronous counterpart. In this case, the getContacts() method exists in both the ContactManager and ContactManagerAsync interfaces.
The methods in this interface are called asynchronously and must not return any value. Because of this, the methods defined must have return type void. If you input arguments to the method, they must be specified in the same order as the original (non-async) method. At the end of the argument list, however, you must add an AsyncCallBack instance. In the case of ContactManagerAsync’s getContacts() method, only the AsyncCallback instance is required because the method does not have any input arguments.
Making contacts serializable
To make RPC possible, the GWT support library must take the contacts that you supply in Java, transmit them across the network, convert them into JavaScript objects, and then provide them to the calling JavaScript code in the browser. To assist GWT in this work, you need to make sure that the data type(s) that your are passing across the network is serializable in the GWT sense (not the Java language sense, although requirements are similar).Since all the fields in the Contact class are of String type, it is quite straightforward for GWT to serialize the contacts and send them from the server to the client. To make the Contact class (the data elements that are transmitted over the network) GWT-serializable, you need to make sure the class implements a marker com.google.gwt.user.client.rpc.IsSerializable interface, and implement a trivial constructor. The code to this GWT-serializable Contact class is:
package uk.co.vsj.gwt.client;
import com.google.gwt.user.client.
	rpc.IsSerializable;

public class Contact implements
	IsSerializable {
	private String firstName;
	private String lastName;
	private String phoneNumber;
	private String address1;
	private String address2;
	private String photoFile;
	public String getAddress1() {
		return address1;
	}
	…
	public Contact(String firstName,
		String lastName, String
		phoneNumber, String address1,
		String address2, String
		photoFile) {
		super();
		this.firstName = firstName;
		this.lastName = lastName;
		this.phoneNumber = phoneNumber;
		this.address1 = address1;
		this.address2 = address2;
		this.photoFile = photoFile;
	}
	// a trivial constructor is
	// required
	public Contact() {}
}
Coding the asynchronous call
Calling an asynchronous method is slightly different than conventional method calling. The idea to keep in mind is that while the call itself returns immediately, the actual return values and data is available only sometimes later.In this case, the call to the ContactManagerAsync’s getContacts() method is made in the GWTFlyer class. To handle the asynchronous return of the data values, the calling class should implement the com.google.gwt.user.client.rpc.AsyncCallback interface. The relevant code is highlighted in the following listing of GWTFlyer code, in which you can see the setup required for the asynchronous call:
public class GWTFlyer implements
	EntryPoint, ClickListener,
	AsyncCallback {
	private static int IP_WIDTH = 360;
	private static int IP_HEIGHT = 420;
	private static boolean contactReady
		= false;
	private static Contact[] contacts
		= null;
	final AbsolutePanel dp =
		new AbsolutePanel();
	final FlyinPanelManager flyin =
		new FlyinPanelManager(
		“FlyinManager”, dp);
	AddressPanel ap;
	public void onModuleLoad() {
	// load the contacts from the
	// server
		ContactManagerAsync
			contactManager =
			(ContactManagerAsync)
			GWT.create(
			ContactManager.class);
		ServiceDefTarget ep =
			(ServiceDefTarget)
			contactManager;
		ep.setServiceEntryPoint(
			“/uk.co.vsj.gwt.GWTFlyer/
			ContactsRetriever”);
		contactManager.getContacts(
			this);
		dp.setSize(Utils.
			getPixelPositionString(
			IP_WIDTH),
		Utils.getPixelPositionString(
			IP_HEIGHT));
…
	}
…
} // of GWTFlyer class
Note the path (“/uk.co.vsj.gwt.GWTFlyer/ContactsRetriever”) used in the call to setServiceEntryPoint(), this must match the path in the module definition that you have set previously for the server-side servlet. This is how the client code locates the contacts retrieval servlet across the network.
Handling asynchronous call failures
Any asynchronous call, and for that matter any network call, can fail. The GWT RPC support runtime calls back through the com.google.gwt.user.client.rpc.AsyncCallback interface, which GWTFlyer implements, to notify of the status of the asynchronous call. There are two methods that it may call back on:- onFailure()
- nSuccess(Object result)
	public void onFailure(Throwable
		caught) {
		contactReady = false;
	}

	public void onSuccess(
		Object result) {
		// one shot remote call to load
		// contact
		contacts = (Contact []) result;
		contactReady = true;
	}
GWTFlyer sets the state variable contactReady to false if the call fails. This tells the GWTFlyer not to display any contact, preventing operational problems. If the call is successful, however, the onSuccess() callback is made by GWT. In this case, the result is the delayed return value of the method call itself. In the case of the asynchronous getContacts() call that you’ve made earlier, this is an array of Contact elements. A reference to this array is assigned to GWTFlyer’s contact’s member variable – ready for presentation to the user. To create a more flexible presentation of the contact information in GWTFlyer, several user interface changes need to be made.
Making ContactTab clickable
The first change you need to make is to make each of the contact tabs responsible for handling mouse clicks. The details of this change are illustrated in Figure 3. The pink areas are those that are sensitive to mouse clicks.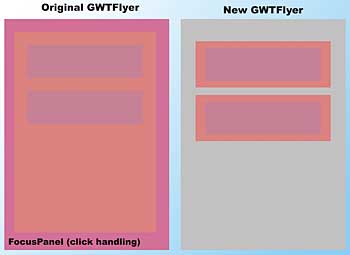
Figure 3. Enabling each ContactTab to handle mouse clicks
In the original GWTFlyer design (left-hand side of Figure 3), the clickable area is over the entire GWTFlyer application. This is accomplished through a FocusPanel that is attached at to the RootPanel, and then making the other GWTFlyer windows the child of this FocusPanel. This design worked to demonstrate the GWT graphics concept, but has too coarse a granularity – you cannot tell which of the contacts is actually clicked. This is why the original GWTFlyer always shows the first contact in the fly-in panel.
You now implement the design on the right-hand side of Figure 3. In this design, there is no overall FocusPanel parent to the application. Instead, each of the ContactTabs shown has its own smaller FocusPanel to handle mouse clicks. This means that a ContactTab knows when it is clicked. When a ContactTab gets a mouse click, it can react to it visually (providing feedback to the user), and it can forward that click to the GWTFlyer application. In this case, it sends the click event along with the associated contact information to the GWTFlyer, enabling it to display the associated contact’s detailed information on a fly-in.
Each ContactTab is actually an instance of an AbsolutePanel. The AbsolutePanel enables you to position child widgets at absolute positions within its own display area. Since the AbsolutePanel class does not intercept mouse clicks, you need to wrap the AbsolutePanel inside a FocusPanel – which can process mouse clicks and keyboard input. This means that ContactTab now extends a FocusPanel instead of an AbsolutePanel:
package uk.co.vsj.gwt.client;
import com.google.gwt.user.client.ui.
	AbsolutePanel;
import com.google.gwt.user.client.ui.
	ClickListener;
import com.google.gwt.user.client.ui.
	FocusPanel;
import com.google.gwt.user.client.ui.
	Image;
import com.google.gwt.user.client.ui.
	Label;
import com.google.gwt.user.client.ui.
	VerticalPanel;
import com.google.gwt.user.client.ui.
	Widget;
public class ContactTab extends
	FocusPanel implements
	ClickListener {
	private static int IP_WIDTH = 330;
	private static int IP_HEIGHT = 70;
	private Image photo = null;
	private Image img =
		new Image(“conttab.bmp”);
	private String m_Title;
	final AbsolutePanel ap =
		new AbsolutePanel();
	final VerticalPanel textInfo =
		new VerticalPanel();
	final Label nameLabel = new Label();
	final Label phoneLabel =
		new Label();
	final Label statusLabel =
		new Label();
	private Contact m_Contact;
	private ClickListener m_Listener;
	public ContactTab(Contact contact,
		String title, ClickListener
		listener) {
		m_Listener = listener;
		m_Contact = contact;
		m_Title = title;
		nameLabel.setText(
			contact.getFirstName() +
		 “ “ + contact.getLastName());
		nameLabel.setStyleName(
			“gwtflyer-contactName”);
		phoneLabel.setText(
			contact.getPhoneNumber());
		phoneLabel.setStyleName(
			“gwtflyer-contactPhone”);
		photo = new Image(
			contact.getPhotoFile());
		textInfo.add(nameLabel);
		textInfo.add(phoneLabel);
		textInfo.setStyleName(
			“gwtflyer-contacttab”);
		textInfo.setVisible(true);
		if (photo == null) {
			photo = new Image(
				“nopix.bmp”);
		}
		ap.add(img, 0, 0);
		ap.add(textInfo, 10, 10);
		ap.add(photo, 280, 10);
		ap.setSize(Utils.
			getPixelPositionString(
			IP_WIDTH),
		Utils.getPixelPositionString(
			IP_HEIGHT));
		add(ap);
		super.addClickListener(this);
		ap.setVisible(true);
	}
	public Contact getContact() {
	 return m_Contact;
	}
	public void onClick(Widget sender){
		// nameLabel.setText(“CLICK”);
		m_Listener.onClick(this);
	}
}
In the above listing, takes a look at the ContactTab constructor. When you create each ContactTab, you pass in a pointer to the parent, a GWTFlyer instance. This GWTFlyer instance is assigned to the m_Listener member, and is used to handle mouse clicks. The onClick() method is called whenever the user clicks the ContactTab instance.
Any mouse click is handled by the parent GWTFlyer, passing a reference to the ContactTab itself. The calling ContactTab has a getContact() method that supplies the contact information, and the parent GWTFlyer uses this information to show the contact in the fly-in AddressPanel. This code is shown later.
Creating multiple ContactTabs
Unlike the code from the first example where only two contacts are displayed, this code flexibly displays as many contacts as available from the server, and fit them into the visible part of the GWTFlyer’s display. In addition, the array of contacts is not initially available to the display code. Instead, it is made available some indeterminate time later. If the network call fails altogether, the contacts may not be available at all. The code to display the list of contacts must therefore retry periodically to see if the contacts are available yet and update the visual set of contact tabs accordingly.The populatePanelAsync() method uses a timer to periodically poll for the availability of the contacts information:
	private void populatePanelAsync() {
		final GWTFlyer myself = this;
	 if (t != null) {
		 t.cancel();
	 }
	 if (flyin.getManagedPanelsCount()
		<= 0) {
		 // poll again if flyin not yet
		// populated
		 t = new Timer() {
			public void run() {
				if (contactReady) {
				ap= new AddressPanel(
					“first address”);
				for (int i=0;
					i< contacts.length;
					i++) {
					flyin.addPanel(new
						ContactTab(
						contacts[i],
						“item” + i,
						myself), 10, 50 +
						(i * 70));
				}
				flyin.addPanel(
					ap, 0, 450);
				}
			}
		};
		t.scheduleRepeating(
		DATA_AVAILABLE_POLL_INTERVAL);
	 }
	}
Note the use of flyin.getManagedpanelCount() to determine if the FlyinPanelManager already has any panels under its management. This new method is a signal that the panels required for presentation are already populated.
FlyinPanelManager uses an ArrayList to keep track of the number of contact tabs that it is managing. The following highlighted code adds a getManagedPanelsCount() method to provide the currently managed number of panels.
package uk.co.vsj.gwt.client;
import java.util.ArrayList;
import java.util.List;
import com.google.gwt.user.client.
	Timer;
import com.google.gwt.user.client.ui.
	AbsolutePanel;
import com.google.gwt.user.client.ui.
	Image;
import com.google.gwt.user.client.ui.
	Panel;
public class FlyinPanelManager extends
	AbsolutePanel {
	private List panels =
		new ArrayList();
	private Image img =
		new Image(“background.bmp”);
	private static int IP_WIDTH = 360;
	private static int IP_HEIGHT = 420;
…
	// tells caller how many panels are
	// under management
	public int getManagedPanelsCount(){
	 return panels.size();
	}
…
}
This getManagedPanelsCount() method is useful to determine if the FlyinPanelManager’s list has already been populated.
As you learnt earlier, when any of the displayed contact tabs is clicked the onClick() method of the ContactTab actually calls the OnClick() of the GWTFlyer instance. This is why GWTFlyer needs to implement the ClickListener interface. When the mouse click is forwarded from the ContactTab to GWTFlyer, GWTFlyer will determine if a flyin is currently in place. If so, then it is asked to fly itself out. If there is no flyin in place, then the contact from the ContactTab is passed into the AddressPanel for display. The AddressPanel is also flown into position by the FlyinPanelManager. This ensures that the contact that the user clicked on is the contact that is displayed by the AddressPanel. The code for GWTFlyer’s onClick() is:
public void onClick(Widget sender) {
// we know that the sender is a
// ContactTab
		if (flyin.isFlyInPlace()) {
			flyin.flyOut();
		} else {
			ContactTab ct =
				(ContactTab) sender;
			ap.ResetContactInformation(
				ct.getContact());
			flyin.flyIn(ap);
		}
	}
Refactoring the AddressPanel Class
The AddressPanel class needs to be refactored to change displayed contact information whenenver a ContactTab is clicked. The ResetContactInformation() method is now responsible for setting the data on the panel, and can be reset at any time. In the old version, the name and address labels were fixed placeholders. In this new AddressPanel class, you need to change the information each time a different ContactTab is clicked. In addition, the constructor for AddressPanel is no longer needed to pass a Contact – since the Contact to display is not determined when the AddressPanel is first created. Internally, a dummy contact is created and used as a placeholder.When a ContactTab is clicked, the AddressPanel will be passed the contact to displayed via the ResetContactInformation() method, before the panel is flown-in. This refactored AddressPanel class is:
package uk.co.vsj.gwt.client;
import com.google.gwt.user.client.ui.
	AbsolutePanel;
import com.google.gwt.user.client.ui.
	Image;
import com.google.gwt.user.client.ui.
	Label;
public class AddressPanel extends
	AbsolutePanel {
	private static int IP_WIDTH = 360;
	private static int IP_HEIGHT = 250;
	private Image img =
		new Image(“addrback.bmp”);
	private String m_Title;
	private Label nameLabel =
		new Label();
	private Label phoneLabel =
		new Label();
	private Label addr1Label =
		new Label();
	private Label addr2Label =
		new Label();
	private Image photo;
	public AddressPanel(String title) {
		super();
		m_Title = title;
		ResetContactInformation(
			new Contact(“”, “”, “”,
			“”, “”, “nopix.bmp”));
		setSize(Utils.
			getPixelPositionString(
			IP_WIDTH), Utils.
			getPixelPositionString(
			IP_HEIGHT));
		add(img, 0, 0);
		add(photo, 130, 10);
		add(nameLabel, 50, 70);
		add(phoneLabel, 50, 100);
		add(addr1Label, 50, 140);
		add(addr2Label, 50, 160);
		setVisible(true);
	}
The AddressPanel also shows the photo of a contact, in an Image instance. When you change the text of a label, that information is immediately changed. However, with Image, it is slightly more difficult. You can first remove() the old Image from the panel, then add the new one. The ResetContactInformation() code in AddressPanel does exactly this:
		public void
			ResetContactInformation(
			Contact contact) {
		if (photo != null ) {
		 remove(photo);
		}
		photo = new Image(
			contact.getPhotoFile());
		add(photo, 130, 10);
		setStyleName(
			“gwtflyer-addressPanel”);
		nameLabel.setText(
			contact.getLastName() + “, “
			+ contact.getFirstName());
		nameLabel.setStyleName(
		“gwtflyer-addressPanel-Name”);
		phoneLabel.setText(
			contact.getPhoneNumber());
		phoneLabel.setStyleName(
		“gwtflyer-addressPanel-Phone”);
		addr1Label.setText(
			contact.getAddress1());
		addr2Label.setText(
			contact.getAddress2());
		addr1Label.setStyleName(
	“gwtflyer-addressPanel-Address”);
		addr2Label.setStyleName(
	“gwtflyer-addressPanel-Address”);
	}
}
If you run GWTFlyer now, you will notice another user interface problem. When the AddressPanel flies in with the contact information, it is displayed underneath the ContactTabs as shown in Figure_4.
Figure 4: The AddressPanel Flown in under the ContactTabs
The sequence of events that results in the ContactTabs appearing above the fly-in AddressPanel is:
- the AddressPanel is added first to the FlyinPanelManager
- the ContactTabs are added dynamically later, after the data has arrived asynchronously from the remote server
In CSS, the z-index property controls the stacking orders of elements displayed on a web page. The larger the z-index value, the higher up the element displays. Armed with this knowledge, you can simply edit the GWTFlyer.css file and increase the z-index property value of the AddressPanel by adding one line:
.gwtflyer-addressPanel {
	color: white;
	z-index: 5;
}
The style used by the AddressPanel is set in its constructor, as highlighted here:
public AddressPanel(String title) {
	super();
	m_Title = title;
	…
	add(addr1Label, 50, 140);
	add(addr2Label, 50, 160);
	setStyleName(
		“gwtflyer-addressPanel”);
	setVisible(true);
}
When using CSS, the default value of an element’s z-index, if left unspecified, is 0. Setting the z-index of the AddressPanel to 5 ensures that it is displayed in front of any other element on the page. If you now try the GWTFlyer application again, the AddressPanel now flies up in front of all the ContactTabs.
Testing GWTFlyer across a network
You can build and run the project either in hosted mode from within Eclipse as detailed last month or over a real network. You will need two machines available to attempt this operation, which will help you to better understand the actual data flow involved within the application. In particular, you can see that:- The GWTFlyer application is actually 100% JavaScript after GWT has finished compiling it
- The JavaScript GWTFlyer HTML/JavaScript page is fetched from a web server and executed on the client’s browser
- The servlet runs on the server-side, on a Tomcat instance, takes GWT RPC calls from the JavaScript code running on the browser
- The JavaScript code uses AJAX, by way of GWT RPC, to asynchronous fetch the data from the server
- Create a WAR file with the GWTFlyer application
- Download and run a Tomcat Server Instance
- Deploy the WAR file to Tomcat
Assembly of a deployable GWTFlyer WAR File
You need to make changes to the standalone version of GWTFlyer, before it will work within a WAR file. First, in the onModuleLoad() method of GWTFlyer, you need to change the path for the endpoint’s service entry point as highlighted in the following listing. This is necessary because the WAR file will be called gwtflyer.war, and the URL to access the contact information must include the base name:public void onModuleLoad() {
// load the contacts from the
// server
ContactManagerAsync contactManager
= (ContactManagerAsync)
GWT.create(ContactManager.class);
ServiceDefTarget ep =
(ServiceDefTarget) contactManager;
ep.setServiceEntryPoint(
“/gwtflyer/uk.co.vsj.gwt.
GWTFlyer/ContactsRetriever”);
contactManager.getContacts(this);
dp.setSize(Utils.
getPixelPositionString(
IP_WIDTH), Utils.
getPixelPositionString(
IP_HEIGHT));
// wait for synch call
populatePanelAsync();
To configure the servlet that will be running in Tomcat, you need to create a web.xml deployment descriptor file:
<?xml version=”1.0” encoding=”UTF-8”?>
<web-app>
	<servlet>
		<servlet-name>
		contactsmanager</servlet-name>
		<servlet-class>
			uk.co.vsj.gwt.server.
			ContactManagerImpl
		</servlet-class>
	</servlet>
	<servlet-mapping>
		<servlet-name>
		contactsmanager</servlet-name>
		<url-pattern>
			/uk.co.vsj.gwt.GWTFlyer/
			ContactsRetriever/*
		</url-pattern>
	</servlet-mapping>
</web-app>
Run the GWTFlyer-compile.cmd command file, included with the source bundle, to compile the Java classes into JavaScript code. You should edit this file first, to reflect where you have installed GWT. The following listing shows such a run.
C:\> GWTFlyer-compile.cmd

Output will be written into
C:\WORKSP~3\GWTFlyer\www\uk.co.vsj.
gwt.GWTFlyer
Compilation succeeded
If you now look into the www\uk.co.vsj.gwt.GWTFlyer directory, you will see all the js (JavaScript) files, the HTML files, CSS files, and all the application’s resource. This set of files, all in one directory, is enough to deploy the client-side of the GWTFlyer application.
NOTE: If you are migrating from an earlier version of GWT to 1.4.60 release and you are getting some error that complains about ArrayList and Clonify() method not implemented, be sure you have added gwt-dev-windows.jar to your class path (by editing the cmd file). This is a new library that must be found in your path for things to work properly.
Putting the WAR file together takes some care. The manual assembly procedure is covered here in detail. You can write a batch file, or Ant script to automate this if you wish.
First create a directory called gwtflyer and a WEB-INF subdirectory and copy web.xml into it. Create a lib directory and a classes directory within the WEB-INF directory and copy the gwt-servlet.jar file from the GWT distribution into the lib directory. Copy the Java compiled output from your project into the WEB-INF\classes directory. Make sure you have uk.co.vsj.gwt.client.* classes and the uk.co.vsj.gwt.server.* classes copied into this directory. You really only need the server interface and any other interfaces or types that the server interface references, but copying them all is simpler in this case. Finally, create a subdirectory named uk.co.vsj.gwt.GWTFlyer under the gwtflyer directory, and copy all your compiled GWTFlyer JavaScript files (generated in the www directory) into it. You can then create the WAR file by making sure you in the gwtflyer directory, and typing in the command:
jar cvf gwtflyer.war .On another machine, make sure you have Java SE 6 or later installed and tested. The Java VM on this second machine must be the same version or later than your GWT development machine. Also make sure that you can indeed communicate between the two machines over the TCP/IP network without blocking firewalls, and so on.
Download and unzip the latest version of Tomcat 6 into an installation directory of your choice. If you don’t have it already, download it from .
Select the ZIP download. I used version 6.0.14 to test in this article, but any recent version should work fine.
Once you have Tomcat installed, copy the gwtflyer.war file into the webapps directory of the Tomcat installation. Finally, start Tomcat by going into the bin directory and running the script:
startupThe Tomcat server listens on port 8080 by default. To access the GWTFlyer application running on Tomcat across the network, open a browser and point it to the URL:
http://<ip addr >:8080/gwtflyer/uk.co.
	vsj.gwt.GWTFlyer/GWTFlyer.html
You should now have the GWTFlyer JavaScript code executing in your browser, and fetching the contacts information across the network via AJAX RPC from the servlet running in Tomcat.
Conclusion
Using GWT’s RPC support, you can write AJAX applications that fetch data from a server across the network. Java objects are shuttled across the network by GWT and converted into JavaScript objects for display and manipulation on the web browser. GWT-based AJAX applications, including both the JavaScript client code and the Java-based server-code, can be readily bundled into a WAR file for simple deployment to Java EE compatible web tier servers.Sing Li has been writing software, and writing about software, for twenty plus years. His areas of interest include scalable distributed computing systems and peer-to-peer technologies. He now spends a lot of time working with open source Java technologies. Sing’s most recent publications include Professional Geronimo and Professional Apache Tomcat, both published by Wrox Press.
Comments