The IDE comes of age
Integrated Development Environments, or IDEs, are typically huge programs that are designed to assist developers in the development task. They have intimate knowledge of the programming language and tools that they support, right down to detailed compiler switches and operational nuances. Their feature sets are tailored to the development tasks undertaken by their intended developer audience. For example, some IDEs excel in drag-and-drop GUI design and code generation (for desktop client developers) while others excel in integrated web application development (for server-based developers).The code base of an IDE must track the evolution of the supported language(s) and tools closely. Developers expect support for the latest language and programming features as soon as they are announced. Because of the dynamic requirements, stringent time-to-market demand, and innate complexity of IDEs, most IDE code bases are crafted and maintained by commercial entities. In the last couple of years, a wave of major acquisitions, followed by open-source donations and contributions by SUN (NetBeans) and IBM (Eclipse) to the open source software world, has changed this landscape forever.
Both vendors have started open source community sites where the core source code of their flagship IDEs can be accessed. Both vendors continue to commit resources to evolve and develop the code base with the open source community, while continuing to market tightly integrated, fully value-added versions of their IDEs in their product offerings.
The NetBeans IDE
SUN Microsystems has created and sponsored the NetBeans IDE community. They seeded the community with the source code that their commercial product Forte was initially based on. With time and community participation, NetBeans has grown into a comprehensive, open source, freely available IDE that can facilitate the development of large and complex Java software projects. The highly modular architecture of NetBeans enables open source community members to create extension modules for the IDE without having to tackle the huge code base. The proliferation of community-created modules has benefited the IDE greatly, providing it with an up-to-date résumé of features that even closed-source commercial IDEs often find challenging to keep up with.Changing IDE habits
If you're already using an IDE in your everyday Java development activities, chances are that it is a commercial closed-source IDE, since open source IDEs are a relatively recent phenomenon. It is also a time-tested observation that old developer habits are very difficult to change – witness the immense popularity of legacy text editors such as vi and emacs in this day and age of graphical intelligent editors. Unfortunately, or fortunately depending on your viewpoint, adopting a new IDE such as NetBeans will necessarily require a change in the mental model used in your everyday development task. However, for many developers, this change will be most rewarding. This is especially true if you're developing for open source projects, and/or you're developing software that relates to open source projects. For one thing, most commercial IDE licensing fees are prohibitive if your projects are not directly sponsored.Another major benefit of switching over is the ready availability of features that are typically only associated with the high-end versions of commercial IDEs. If you want a visual explorer/designer for your corporate relational JDBC data sources, support for team-based version control systems, or a WYSIWYG editor for componentised web applications, you will need to purchase the top-end commercial IDE to get these features – while open source IDE such as NetBeans support the features as native or via community modules.
Assuming that you will give NetBeans a try, the rest of this article will put you on the fast track to mastering the IDE by providing the specifics on how NetBeans is different from familiar traditional commercial IDEs.
Object-based representation
As per its namesake, the number one hurdle that a developer must first overcome before becoming comfortable with NetBeans is the slightly different model of what represents a project. With popular legacy IDEs, a project is collection of files that certain operations can be performed upon (i.e. compilation, execution, validation, parsing, rendering). This is a function-centric view that most developers are comfortable with. The concern is action-oriented with "compile this source file" and "build that package".With NetBeans, the representation is significantly more object-based. As a result, we will often find the set of actions (which may change with the different objects we are dealing with) varies greatly between different object types. Once acclimatised, most developers will find the NetBeans model more powerful when working with highly object-oriented object types such as Java source trees and API libraries.
The most evident difference in the model is the need to first identify and mount filesystems. Filesystems are containers for other objects, such as a Java source tree, an API library, or a set of documentation files. Without mounting filesystems, you cannot work with your development projects in NetBeans. It is not possible to just select a file and compile it, as in legacy IDEs. NetBeans will only compile files residing on mounted filesystems. Any dependent source or binaries, or library archives that your project depends on must also reside on mounted filesystems. Binaries are generated onto mounted filesystems.
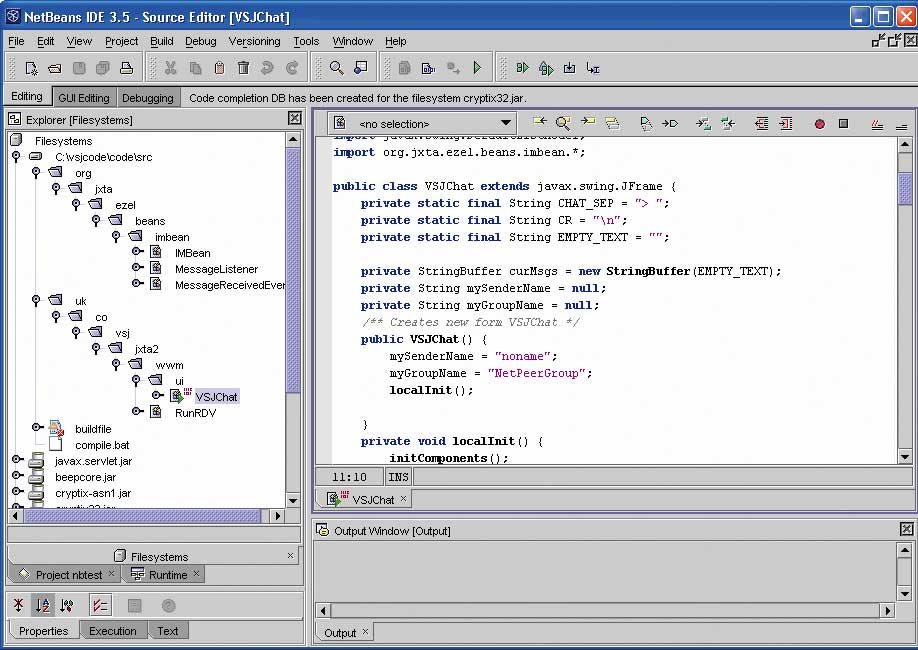
Figure 1: The NetBeans IDE [Click to enlarge]
Figure 1 shows the NetBeans IDE. The panes that are displayed are configurable and Figure 1 shows a layout typically used during coding and testing. The left hand "Explorer" pane shows all the files and dependencies in the project, residing on mounted filesystems. The top right pane can display different editors, in this case the text editor with the Java source file being worked on. An output pane is tiled below the editor pane, providing a window to capture any output from programs being executed.
Mounting filesystems
Every file that you create, work on, generate, or transform must reside in a mounted filesystem when using NetBeans. Generally speaking, for the most common Java projects, this equates to:- Mount the source tree(s) that you're working on
- Mount the JAR files that you're using as API libraries
- Mount the output binary directory where you want the .class files generated
- Mount the documentation directory where you want the JavaDocs generated
- A simple, but multi-file, multi-directory source structure for VSJChat
- Dependency on a library that we have source code to: the IMBean
- Dependency on standard JXTA library binaries with no source code
- An Ant-based buildfile
- JavaDoc generated HTML documentation for the IMBean library
Downloading and Installing NetBeans
You can download the latest version of NetBeans from www.netbeans.org. There is also a library of community contribution modules that you can install and use. At the time of writing, October 2003, the latest version is NetBeans 3.51. The NetBeans installations comes with their own installer, be sure to read the instruction for your specific operating system. Another way to get the latest version of NetBeans is to get it co-bundled with the latest release version of the J2SE SDK from Sun at java.sun.com/j2se/downloads.html. Once you have installed NetBeans for the first time, it is configured to check for updates over the Internet occasionally by default.Creating a project
Before we can start using NetBeans, we must first create a project. Projects are managed by NetBean's Project Manager. The details of all the projects are maintained under the user's home directory, under a .netbeans directory by default. On a Windows XP or Windows 2000 system, it is placed under:Documents and Settings/<user name>/.netbeansUnder the .netbeans directory, project information are kept in the subdirectory:
<NetBeans version
	number>/system/Projects
To create our project, select Project->Project Manager from the NetBeans menu. Click on the new button on the Project Manager. Enter the project name "nbtest". This will create a brand new project for us to experiment with.
Mounting the source tree
To mount the source tree, right-click on the FileSystems icon in the Explorer pane, select the action Mount…, and then Local Directory as source. Figure 2 shows the other possible mount sources: Archive Files (library JARs), or via Version Control (CVS or other version control systems).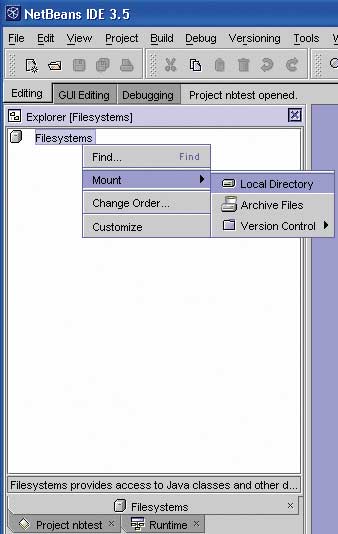
Figure 2: Mounting the source tree
For the developer more comfortable with menu-based interfaces, you can also do the same thing via File->Mount FileSystems from the menu. This will start the Mount Filesystem Wizard.
Selecting Multiple Filesystems to Mount
The Mount Filesystem Wizard allows you to select multiple directories to mount in one step (by clicking, shift-select, and ctrl-clicking additional selections). If you are transferring an existing code base to NetBeans, and you need to mount multiple directories, this is the fastest way to do multiple mounts.Either way, select the c:\vsjcode\code\src directory to mount. Since our source tree descends from this directory, NetBeans is able to recursively descend the directory and automatically select the source files to include in the project. Having expanded the mounted filesystem in the Explorer pane, the source filesystem should look like Figure 3.
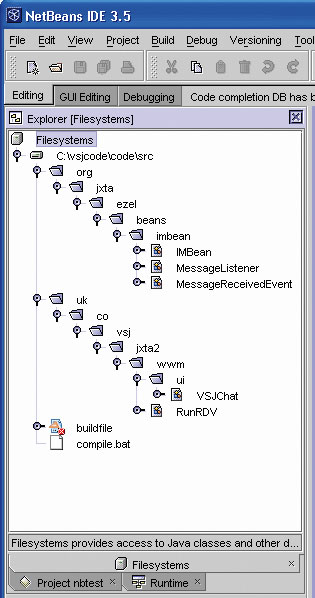
Figure 3: The mounted filesystem
When you double click on the VSJChat source file, the text editor will open the file for editing. You can readily browse or edit any source file this way. To create a new source file, right-click on the folder/package where you want to add the file and use one of the "New…" submenu options.
Mount the required API Libraries
JAR files can also be a source for a filesystem mount. This is useful for API libraries. Assuming that you have copied all the required JXTA libraries to the c:\vsjcode\code\lib directory of the distribution as per the instruction of the README.TXT file, they can now be mounted as filesystems. Mounting these JAR file will enable NetBeans to find the required library class during compilation.Start the Mount Filesystems wizard again (right-click on Filesystems->Mount… ->Archive Files), now go to the c:\vsjcode\code\lib directory and select all the JARs there (shift click to select all). Figure 4 shows all the JXTA JAR files selected in the wizard.
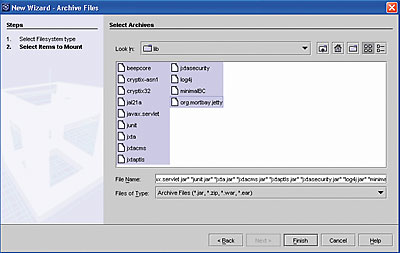
Figure 4: Click on the “Finish” button and you will see all the JAR files mounted as filestystems
Mount the Output Directory
The c:\vsjcode\code\classes directory is where we want NetBeans to place the compiled binary .class files. For NetBeans to work with this directory, you must first mount this filesystem. Next, it is necessary to configure the compiler to place the targets in this directory.Once you have mounted the output filesystem. The supported compilers need to be configured to place binaries into it. This is called setting the compilation target in NetBeans. NetBeans supports multiple compiler types, and the target can be set for each compiler type, on a per project basis. To set the target, select from the menu:
Tools->OptionsThe options editor will be displayed. Set the target properties of both:
Options->Building->Compiler
	Types->External Compilation
Options->Building->Compiler
	Types->Internal Compilation
Set this target to the mounted c:\vsjcode\code\classes filesystem. Figure 5 shows the setting of Target for External Compilation using the Options editor.

Figure 5: Using the Options editor [Click to enlarge]
Setting the documentation output directory
Javadocs can be automatically generated using the JDK's javadoc tool. Mount the filesystem c:\vsjcode\code\doc so you can see the HTML pages after generation. After mounting, we need to indicate to NetBeans that this directory should be where to place the generated documentation.First, start the Options editor via the menu:
Tools->OptionsNext, select options:
Code Documentation->Doclets->Standard
	Doclet
Set the Destination property to c:\vsjcode\code\doc as shown in Figure 6.
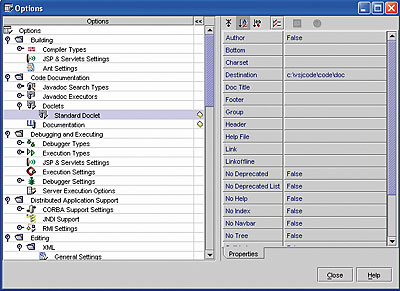
Figure 6: Setting a directory for Javadoc generation
Building the project
We have completed the definition of the project by mounting the above filesystems. In fact, NetBeans now has enough information to build the project.To build our project, from the left-hand Explorer pane, highlight the uk directory, right-click and select build. This tells NetBeans to recursively compile all the packages underneath the uk directory. You can also selectively compile or build another directory, package, or source file using this method.
After a build, if you examine the formerly empty mounted c:\vsjcode\code\classes filesystem, you will see the compiled binary. Any errors during compilation will be displayed in the output window on the lower right.
Running and debugging code
To run your compiled code, right-click on the class to run and select execute from the context menu. Note that only classes that have a main() method will have this option. The icons of such classes are tagged with a small green triangle in the Explorer pane to show they are executable.Supplying Arguments to an Executable Class
Right-click on the class and select property. In the property editor, select the Execution tab. Set the Argument property to the arguments you need.NetBeans also includes a complete interactive debugger that can be used to debug your code. We will not go into the details of the debugger here, it is similar in operation to other interactive Java debugger (setting breakpoints, variable watch, single stepping, etc). The interested reader should consult the documentation.
Creating a JAR file for Distribution
If you need to create an archive JAR file of the compiled class files, you can use the JAR archive wizard. Let us create a JAR file for the imbean package, and place it in the c:\vsjcode\code\bean filesystem. First, mount this directory as filesystem.Next, right-click on the mounted filesystem and select "New…", then select "All Templates…" menu option. Expand the JAR Archive template option and select JAR Recipe.
Enter the recipe file name and the generated JAR file name, in our case we can use "imbean" for both of them (with an additional .jar extension for the generated JAR name). The JAR recipe filter option selected here will control which files are included in the final JAR archive when wildcard or recursive matching occurs. Then click "Next", and the wizard will prompt for the content of the JAR file as in Figure 7.
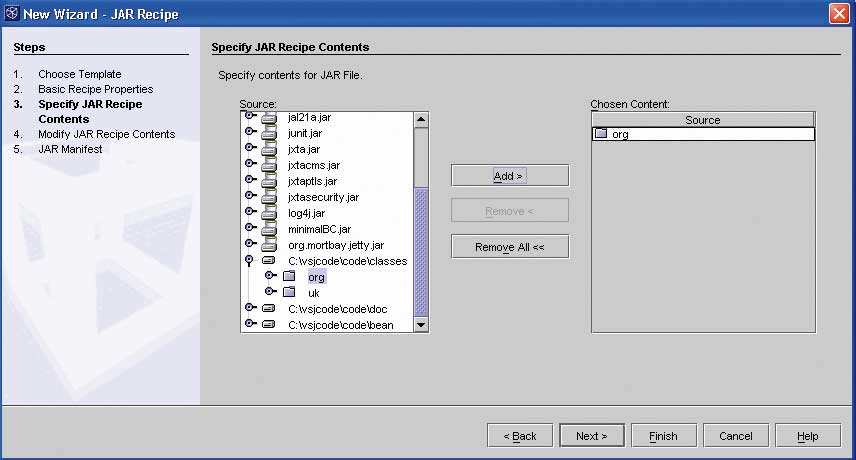
Figure 7: Using the JAR Recipe filter [Click to enlarge]
Note that any directories that you add here will include all the contents of that directory, and recursively in any subdirectories (subject to the matching filter specified), even though the wizard may not show this explicitly. The example above shows that we should include everything below the package org (all the imbean classes).
The wizard also allows you to modify the recipe content, as well as customise the manifest. Use the manifest.txt file supplied in the directory for the bean manifest. Finally, click "Finish". This will create a JAR recipe file that you can use to re-create the JAR at any time. To create or refresh the content of this JAR, simply highlight the JAR recipe file, right-click, and select "compile".
Generating documentation
You may already be using the command line JDK Javadoc tool to generate HTML based documentation. Even if you have not used Javadoc before, NetBean's Auto Comment Tool makes creating documentation easy. You can Javadoc the org.jxta.ezel.beans.imbean.IMBean source as a test. Right-click on the file and select Tools->Auto Comment… The Auto Comment Tool will be displayed as in Figure 8.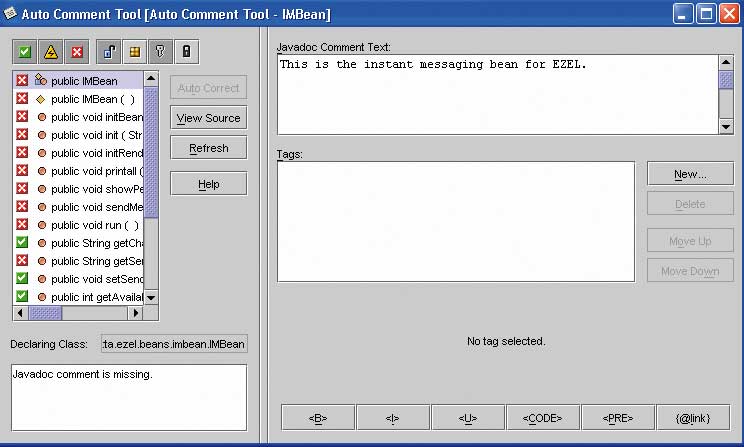
Figure 8: The Auto Comment tool [Click to enlarge]
The list on the left shows each source element that can be annotated with Javadoc comments. This includes all methods and fields. The icon next to the element shows that the element either already has Javadoc (green check mark) or has partial/error Javadoc comment (yellow yield sign), or has no JavaDoc (red box with white cross).
Correct all the ones with the red cross. Most of the fixes can be done by adding descriptive Javadoc Comment Text in the box on the right (see Figure 8). Some situations can be remedied using the Auto Correct button. However, automatically generated comments are often generic and meaningless. You can see how the comment is added to the source at any time by clicking the "View Source" button. HTML tags can be added to the Javadoc comments (see javadoc documentation in JDK for more details).
Once you have completed all of the javadoc comments in the package using the tool, you can generate the HTML documentation pages by selecting the package (say from the org directory) and right-click, and selecting the Tools->Generate JavaDoc. The documentation will be placed into the c:\vsjcode\code\doc documentation filesystem as previously configured.
Working with Ant
Even though NetBeans can manage the compilation and build process using any configured and supported compiler, there is often a requirement to support a command line based (non-GUI) build tool. Without doubt, Ant is the most popular command line build tool for complex Java projects (see the March and April 2003 issues of VSJ for our coverage of Ant). Because of this duality, NetBeans has been designed to work very well with Ant-based projects. Ant support is provided by an extension module in NetBeans.When working with Ant-based projects, features of Ant are used to build and manage the project – rather than the NetBeans IDE management capability. We have supplied an Ant buildfile.xml for our project. If you expand the build file in the NetBeans Explorer, you can see that NetBeans recognises all the Ant elements. NetBeans will allow you to execute (build) Ant targets directly from the IDE when you right-click on the target and select "Execute". Figure 9 shows how NetBeans recognises the Ant elements, allows editing, and supports directly execution of Ant targets.
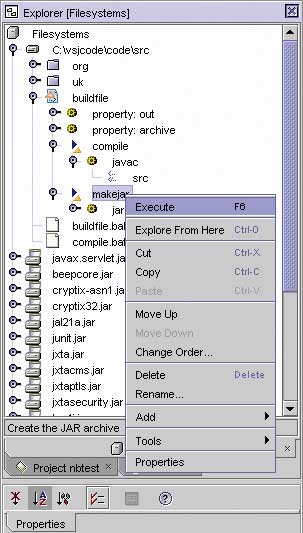
Figure 9: Working with Ant
Of course, nothing prevents you from setting up equivalent build rules in NetBeans to mirror the Ant build process. However, due to the complexity inherent in most production build processes (even for small-sized projects), most production teams choose to standardise on one single build tool to facilitate maintenance of the build scripts. In the case of NetBeans, you are free to select either Ant or the IDE's capabilities without compromise.
Conclusions
The competition between leading Java software vendors in the open source IDE arena has benefited the Java developer community greatly. NetBeans is a comprehensive, highly functional IDE that can be used in the development and management of complex Java projects. Although the object-based operational model may take a little getting used to, the developer will be rewarded for the effort with the rich feature set and on-going enhancements. Using the code base from the P2P instant messaging article (VSJ November 2003), we have covered the "how to" of all the essentials for you to start using NetBeans for your Java projects today. In future articles, we will explore other advanced features of the NetBeans IDE.Sing Li is a consultant, system architect, open source software contributor, and freelance writer specialising in Java technology, embedded and distributed systems design. He has authored or co-authored serveral books on the topic, including Professional Apache Tomcat (Wrox), Professional JSP 2 (Apress), Early Adopter JXTA (Wrox), and Professional Jini (Wrox).
Comments