In practice, the object-oriented nature of Java simplifies the design, coding and maintenance of interactive gaming projects. The rich connectivity, networking and data access APIs open new possibilities for these applications. This article shows how to use a subset of the Java 2D API for interactive animations. You will design and create a complete working game using these API calls. It will also provide you with a framework of code that you can extend and use in creating other interactive animation applications.
Creating animations
Animations are displayed by rapidly drawing a series of images on a portion of the display screen. Each of the images being drawn can be slightly different, giving the illusion that something has moved or changed in the image. Each complete redraw of the image is called a frame. Most people see animation as “smooth” when you animate images at 15–30 frames a second. With today’s PC hardware and the Java SE 6 platform, you have more than enough computing power to animate multiple images at a smooth frame rate.To work with images, Java provides the java.awt.Image class to contain images. To create an instance of an image based on a GIF file, for example – you can use the convenience class javax.imageio.ImageIO. The following code constructs an Image from a GIF file.
Image myGif =
	ImageIO.read(gifFileName);
Other variations of the ImageIO.read() method can read from an InputStream or a URL. The URL variation is especially useful when the animation image is part of the application’s distribution JAR file – it enables images resource loading from the classpath.
Optimize with Double Buffering
You can draw an Image to a java.awt.Canvas instance. For this game the game graphics are all animated on a Canvas of 640 by 480 pixels (although the size can be readily changed in the code). The code manages optimized painting of the Canvas explicitly, and you can tell a Canvas to give you control over painting using the method call:setIgnoreRepaint(true);To get the smoothest possible animation, you can use a technique called double buffering. The image is drawn first to an invisible copy of the bitmap, and then the entire bitmap is made visible at once on the Canvas. This ensures that partially drawn images are never shown to the user – resulting in smooth animation. The Canvas will attempt to use the best strategy available based on the hardware it detects on your machine – it may use more than two buffers if that is appropriate for your hardware. To use double buffering, you can obtain a Graphic2D context from the Canvas’ associated java.awt.image.BufferStrategy object, and then draw an image of the game animation directly to it. Calling the show() method on the BufferStrategy object transfers the buffered image to the Canvas. Figure 1 shows the double buffering technique in action.
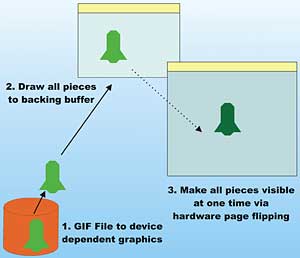
Figure 1: Double buffering used for smooth 2D animation
Planning an interactive game
The game we are going to create is shown in Figure 2. In it, you control the base on the bottom of the screen.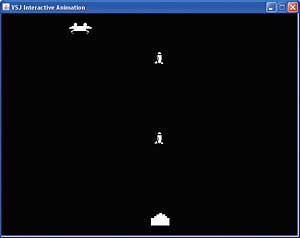
Figure 2: Our game
Using the left and right arrow keys on the keyboard, you can manoeuvre the base from one side of the screen to the other. Whenever you hit the space bar a bullet is fired upwards from the base. A bug is constantly patrolling from one side of the screen to the other, and your mission is to hit the bug.
One good way to break down a complex game is to consider each of the game pieces (or group of game pieces) and their behaviours separately. For this simple game, the pieces and their expected behaviours are tabulated in Table 1 and illustrated in Figure 3.

Figure 3: The game pieces and their behaviours
| Table 1: The game pieces and their behaviours | |
| Game Piece | Behaviour |
| Base | Allows horizontal movement using the left and right arrow key. When space bar is pressed, a bullet is fired. To make the game a little more difficult, there is a small delay after firing when additional bullets cannot be fired. Bullet should not fire if the bug is already killed. |
| Bullet | Bullet travels from the position of the base upwards. When a bullet reaches the top of the screen it is eliminated. If the bullet hits the bug, the bug explodes. |
| Bug | The bug travels automatically from one side of the screen to the next, and moves its legs rapidly. This bug cannot fight back. It is destroyed if one of the fired bullet hits it. |
| Explosion | When the bug is hit by a bullet, both the bug and the bullet are eliminated from the game. An animated explosion is shown at the location where the bullet hits the bug. |
Having figured out the behaviour of each piece, the code to be written becomes clear.
Managing Game Piece Animation
A couple of the game pieces, the Bug and Explosion, have additional animation other than movement. This can be achieved by associating multiple instances of Images with each piece, and then painting them to the Canvas in sequence. Most of today’s processors are so fast that, as you will see in the code shortly, it is necessary to purposely insert delays between the drawing of the images in order for the animation to look reasonable.For example, the two GIF Images that are drawn in sequence for the Bug are shown in Figure 4.

Figure 4: The GIF files for the animated bug piece
The explosion is also animated, and comprised of four different GIF Images, shown in Figure 5.

Figure 5: The GIF files for the animated explosion
The main game loop
Now that you have some idea of how to display the game pieces, you need to consider what the main loop within the game must do. At a high level, after the initial setup, the loop must:- Draw each of the pieces in the game
- Determine if a bullet has hit the bug; if so, eliminate both pieces and put an explosion in their place
- Check if the arrow keys are pressed and reposition the base accordingly
- Check if the space bar is pressed and create a new bullet
- Reposition the bullets and the bug, get ready for the next drawing
The initial game setup will need to:
- clear the game screen
- load and create the game pieces
- setup keyboard monitoring
- load the images for the game pieces
- draw the Base and the Bug in place
Working on the code
With this high level design in mind, you can examine the code which is in the src directory of the code distribution.The GIF images used by the game are maintained in the gifs directory.
To compile the game, from the src directory, execute the command:
javac -d . *.javaTo run the game, from the src directory, execute the command:
java -classpath . uk.co.vsj.animation.
	GameController
The game has nine classes and one interface that can be classified in three categories: Game Image Management (GameGraphics, GameGraphicsManager); Keyboard Handling (KeyManager) and Game Pieces (Base, Bullet, Bug, Explosion, GameObjHelper, GameController and the GameObject interface).
Game Image Management
Each game piece is associated with one or more GIF files. The game pieces that are associated with multiple GIF files are animated game pieces.The GameGraphics class is a simple wrapper around a single AWT image:
package uk.co.vsj.animation;
import java.awt.Graphics2D;
import java.awt.Image;
public class GameGraphics {
	private Image img;
	private int width;
	private int height;
	public GameGraphics(Image image) {
		img = image;
		width = img.getWidth(null);
		height = img.getHeight(null);
	}
	public int getWidth() {
		return width;
	}
	public int getHeight() {
		return height;
	}
	public void renderAtLocation(
			Graphics2D g,int x,int y) {
		g.drawImage(img,x,y,null);
	}
}
The GameGraphics class maintains the following information:
- a reference to the Image instance
- the image’s width in pixels
- the image’s height in pixels
Each game piece contains its own reference to one or more of the GameGraphics classes. Note that the GameGraphics class is not concerned with where the AWT image actually originates from. This is managed by another class, GameGraphicsManager.
Loading images from GIF files
The GameGraphicsManager class manages all the low-level details of loading and working with images within the game. It hides the details from the other game components, allowing them to work with GameGraphics object directly, and making their lives easier:package uk.co.vsj.animation;
import java.awt.GraphicsConfiguration;
import java.awt.GraphicsEnvironment;
import java.awt.Image;
import java.awt.Transparency;
import java.awt.image.BufferedImage;
import java.io.IOException;
import java.net.URL;
import java.util.HashMap;
import javax.imageio.ImageIO;
public class GameGraphicsManager {
// single manager instance
private static GameGraphicsManager instance = new GameGraphicsManager();
// location of images and file extension
private static final String PATH_TO_GRAPHICS = “gifs/”;
private static final String GRAPHICS_FILE_EXTENSION = “.gif”;
// keep a cache of images
private HashMap <String, GameGraphics> cache = new
HashMap<String, GameGraphics>();
public static GameGraphicsManager getInstance() {
return instance;
}
public GameGraphics getGameGraphics( String graphicsLocation) {
String fullLocation = PATH_TO_GRAPHICS + graphicsLocation
+ GRAPHICS_FILE_EXTENSION;
// return from cache if already loaded
if (cache.get(fullLocation) != null) {
return cache.get(fullLocation);
}
// load image from resource otherwise
BufferedImage img = null;
try {
URL url = this.getClass().getClassLoader().getResource(fullLocation);
if (url == null) {
throw new IOException(“cannot load “ +
fullLocation + “ from resource”);
}
img = ImageIO.read(url);
} catch (IOException e) {
System.err.println(“Exception while loading “ + fullLocation + “ ->”
+ e.getMessage());
System.exit(1);
}
// optimize by drawing into device dependent graphics
GraphicsConfiguration gc = GraphicsEnvironment
.getLocalGraphicsEnvironment().getDefaultScreenDevice()
.getDefaultConfiguration();
Image image = gc.createCompatibleImage(img.getWidth(),
img.getHeight(), Transparency.BITMASK);
image.getGraphics().drawImage(img, 0, 0, null);
// cache any image keyed by full location path in resource
GameGraphics retval = new GameGraphics(image);
cache.put(fullLocation, retval);
return retval;
}
}
Maintaining a singleton instance
The GameGraphicsManager is a singleton, meaning that there is only one instance of it used in the entire game. Even though this instance may be obtained by different parts of the game, only one instance of GameGraphicsManager is ever created. This is a sensible approach since you really don’t want to be loading and managing multiple copies of the same game images. The singleton is implemented using a private static variable and a static getInstance() method:// single manager instance
private static GameGraphicsManager
instance = new
GameGraphicsManager();
...
public static GameGraphicsManager
getInstance() {
return instance;
}
A user of the GameGraphicsManager never instantiates it directly using the new operator, but instead always call the static method to obtain the instance. Typical usage is:
GameGraphicsManager gamemgr =
	GameGraphicsManager.getInstance();
The getInstance() method is often called a class factory method, since it provide instances of a class without revealing the details of how the class is manufactured.
Mapping names to GIF files
The GIF file associated with each game piece being managed is located under the gifs directory. The GameGraphicsManager class needs to construct the actual file name of the GIF file in order to load it into a BufferedImage instance. The algorithm used is to add the “gifs/” prefix to the name supplied, and then add the “.gif” file extension to the name. For example, if the Base piece supplies a name of “base”, then the “gifs/base.gif” file will be loaded. This approach is flexible because if you were to change the directory where the images are stored, or use a file format other than GIF, only the GameGraphicsManager class needs to change.The following code loads the GIF images from the resource URL.
// location of images and file
// extension
	private static final String
		PATH_TO_GRAPHICS = “gifs/”;
	private static final String
	GRAPHICS_FILE_EXTENSION = “.gif”;
...
	public GameGraphics
		getGameGraphics(
		String graphicsLocation) {
		String fullLocation =
			PATH_TO_GRAPHICS +
			graphicsLocation +
			GRAPHICS_FILE_EXTENSION;
...
		URL url = this.getClass().
			getClassLoader()
			.getResource(fullLocation);
	...
		img = ImageIO.read(url);
Optimizing images for display
An image in GIF format needs to be decoded, and then matched to the display hardware before it is rendered to the canvas and made visible. It is possible to optimize this process by maintaining images in a format that is already matched to the display hardware. This graphics-card-dependent image format allows for a very fast draw to the canvas. Every BufferedImage loaded by the GameGraphicsManager class is transformed into this hardware dependent format before it is passed to a GameGraphics instance. The GameGraphics instance does not know, and does not need to know, the actual format of the image. The following code creates the optimized hardware-dependent images:// optimize by drawing into device // dependent graphics GraphicsConfiguration gc = GraphicsEnvironment .getLocalGraphicsEnvironment() .getDefaultScreenDevice() .getDefaultConfiguration(); Image image = gc.createCompatibleImage( img.getWidth(),img.getHeight(), Transparency.BITMASK); image.getGraphics().drawImage( img, 0, 0, null); // cache any image keyed by full // location path in resource GameGraphics retval = new GameGraphics(image);Image loading and transformation from GIF to device dependent images can take a significant amount of time – if performed over a large set of images every time one is accessed. To optimise speed, GameGraphicsManager maintains a cache of images that have already been loaded. This means that the first time an application requests the “base” image, the GameGraphicsManager will store a reference to the image, keyed by the “gifs/base.gif” path. The next time the application requests the same image, the loaded and pre-transformed image is returned.
The cache is implemented using a HashMap:
// keep a cache of images
private HashMap <String, GameGraphics>
	cache = new HashMap
	<String,GameGraphics>();
...
public GameGraphics getGameGraphics(
	String graphicsLocation) {
	String fullLocation =
		PATH_TO_GRAPHICS
		+ graphicsLocation
		+ GRAPHICS_FILE_EXTENSION;
// return from cache if already loaded
if (cache.get(fullLocation) != null) {
		return cache.get(fullLocation);
	}
...
}
...
// cache any image keyed by full
// location path in resource
GameGraphics retval =
	new GameGraphics(image);
cache.put(fullLocation, retval);
Keyboard handling
All the low-level keyboard handling code is isolated in the KeyManager class used to handle the keyboard events received during game play. KeyManager maintains state of the keys pressed based on events received which allows the main loop of the game to poll for key information when it is convenient:package uk.co.vsj.animation;
import java.awt.event.KeyListener;
import java.awt.event.KeyEvent;
public class KeyManager implements
KeyListener {
private boolean left = false;
private boolean right = false;
private boolean fire = false;
public boolean isLeft() {
return left;
}
public boolean isRight() {
return right;
}
public boolean isFire() {
return fire;
}
public void keyPressed(KeyEvent e){
switch (e.getKeyCode()) {
case KeyEvent.VK_LEFT:
left = true;
break;
case KeyEvent.VK_RIGHT:
right = true;
break;
case KeyEvent.VK_SPACE:
fire = true;
break;
}
}
public void keyReleased(KeyEvent e) {
switch (e.getKeyCode()) {
case KeyEvent.VK_LEFT:
left = false;
break;
case KeyEvent.VK_RIGHT:
right = false;
break;
case KeyEvent.VK_SPACE:
fire = false;
break;
}
}
public void keyTyped(KeyEvent e) {
// check for escape to exit the game
if (e.getKeyChar() ==
KeyEvent.VK_ESCAPE) {
System.exit(0);
}
}
public KeyManager() {
}
}
An AWT component can listen for keyboard events by adding a KeyListener. When a listener is added, it will be called whenever a key is pressed. The KeyListener interface has three methods:
package java.awt.event;
public interface KeyListener extends
	EventListener {
	public void keyTyped(KeyEvent e);
	public void keyPressed(KeyEvent e);
public void keyReleased(KeyEvent e);
}
When a key is pressed and released, the method keyTyped() is called with a KeyEvent indicating the key typed. When a key is pressed down, the method keyPressed() is called. When the key is released, the method keyReleased() is called. In general, for each key stroke (press and release), there are three callbacks into the KeyListener.
In the KeyManager code, the state of the arrow keys (mapped by constants KeyEvent.VK_LEFT and KeyEvent.VK_RIGHT) must be tracked. The state of the firing key, the space (KeyEvent.VK_SPACE) must also be tracked. Three boolean flags – left, right, and fire – are used to track the state of these keys. These flags are true when the corresponding key is pressed down, and false when it is released. The KeyManager provides access methods isLeft(), isRight(), and isFire() to test for the state of these keys.
The only other key that is of interest in this game is the Escape key, used to terminate the game. In this case you are not interested in the key-down or key-up state but if it has been pressed, in which case KeyManager directly calls System.exit().
Managing Game Pieces
With the hassle of image handling taken care of by GameGraphicsManager, the management of game pieces boils down to:- managing the position of the game piece at any moment in time
- managing the movement logic of the game pieces
- determining which image needs to be drawn
- determining if the game piece has collided with another one
package uk.co.vsj.animation;
import java.awt.Graphics2D;
import java.awt.Rectangle;
public interface GameObject {
	public void move(long delta);
	public void render(Graphics2D g);
	public boolean hitTest(GameObject
		piece);
	public Rectangle
		getHitTestRectangle();
}
The methods of this interface and what must be implemented, is shown in Table 2.
| Table 2: The GameObject Interface | |
| Method | Description |
| move(long delta) | The game piece must determine the location of the piece after delta milliseconds have elapsed. The x and y co-ordinates of the piece should be updated internally when this is called, but the piece’s image is not redrawn at this time. The render() method will be called at the appropriate time to have the piece rendered. |
| render(Graphics2D g) | The game piece must render itself into the Graphics2D context at the correct location, using the correct image if animated, when this method is called. The rendering location should take into account of any movement that needs to take place. |
| hitTest(GameObject piece) | Performs a hit-test against the specified piece to determine if two pieces have collided by finding the rectangle area occupied by each piece, and then seeing if the two rectangles intersect with one another. |
| getHitTestRectangle() | Returns the current location of the piece on the screen. The rectangle information gives (x,y) location as well as the width and height of the piece. This information is useful in collision detection. |
Factoring common game piece logic
To make coding game pieces easier, a helper class is created. This class, GameObjHelper, factors out and implements the common default behaviours of a game piece – such as maintaining the (x,y) position, the GameGraphic instance(s), supplying the collision detection rectangle, and so on. This means that any game piece can simply subclass from GameObjHelper and implement only the behaviours that may be different. In fact, GameObjHelper completely implements the GameObject interface:package uk.co.vsj.animation;
import java.awt.Graphics2D;
import java.awt.Rectangle;
public class GameObjHelper implements GameObject {
protected double x;
protected double y;
protected int width;
protected int height;
protected GameGraphics image;
protected double dx;
protected double dy;
private static final int ANIMATION_RENDER_DELAY = 20;
protected int renderDelay = ANIMATION_RENDER_DELAY;
protected int renderCountdown = 0;
private boolean isAnimatedSprite = false;
private GameGraphics [] images;
private int numberOfImages = 0;
private int currentlyDisplayed = 0;
public GameObjHelper(String gname, int x,int y) {
this.image = GameGraphicsManager.getInstance()
.getGameGraphics(gname);
this.x = x;
this.y = y;
this.width = image.getWidth();
this.height = image.getHeight();
}
public GameObjHelper(String [] gnames,int x,int y ) {
isAnimatedSprite = true;
numberOfImages = gnames.length;
images = new GameGraphics[numberOfImages];
for (int i=0; i < numberOfImages; i++) {
this.images[i] = GameGraphicsManager.getInstance()
.getGameGraphics(gnames[i]);
}
this.width = images[0].getWidth();
this.height = images[0].getHeight();
this.x = x;
this.y = y;
}
public void move(long delta) {
x += (delta * dx) / 1000;
y += (delta * dy) / 1000;
}
public void render(Graphics2D g) {
GameGraphics imageToDisplay;
imageToDisplay = image;
if (isAnimatedSprite) {
imageToDisplay = images[currentlyDisplayed];
renderCountdown--;
if (renderCountdown < 1) {
currentlyDisplayed = (currentlyDisplayed + 1)
% numberOfImages;
renderCountdown = renderDelay;
}
}
imageToDisplay.renderAtLocation(g,(int) x,(int) y);
}
public boolean hitTest(GameObject piece) {
Rectangle src = new Rectangle(
(int) x, (int) y, width, height);
Rectangle dest = piece.getHitTestRectangle();
return src.intersects(dest);
}
public Rectangle getHitTestRectangle() {
return new Rectangle(
(int) x, (int) y, width, height);
}
}
Maintaining Game Piece Images, Position, and Size
GameObjHelper maintains the (x,y) location of the game piece. The Java2D co-ordinate system starts at the top left of the display area, and positive x values extend to the right while positive y values extend to the bottom of the window. GameObjHelper also maintains either a single GameGraphics image (for non-animated pieces) or an array of GameGraphics images (for animated pieces). A subclass of GameObjHelper only has to pass in the base name of the image(s) to load, and GameObjHelper takes care of the rest. The methods in the GameGraphicsManager make loading and maintaining images really simple.The following code excerpt shows the member variables of GameObjHelper that maintain this information:
public class GameObjHelper implements
	GameObject {
	protected double x;
	protected double y;
	protected int width;
	protected int height;
	protected GameGraphics image;
	...
	private boolean isAnimatedSprite =
		false;
	private GameGraphics [] images;
	private int numberOfImages = 0;
...
	public GameObjHelper(
		String gname,int x,int y) {
	this.image = GameGraphicsManager
			.getInstance()
			.getGameGraphics(gname);
		this.x = x;
		this.y = y;
		this.width = image.getWidth();
	this.height = image.getHeight();
	}
	public GameObjHelper(
	String [] gnames,int x,int y ) {
		isAnimatedSprite = true;
		numberOfImages = gnames.length;
		images = new GameGraphics[
			numberOfImages];
		for (int i=0;
			i < numberOfImages; i++) {
			this.images[i] =
				GameGraphicsManager
				.getInstance()
			.getGameGraphics(gnames[i]);
		}
	this.width = images[0].getWidth();
this.height = images[0].getHeight();
		this.x = x;
		this.y = y;
	}
Moving Game Pieces
Movement of the game pieces is handled by GameObjHelper, although a subclass is free to override it. The distance and direction to move is calculated by a call to the move() method. This call does not return any value, but it changes the internally maintained (x,y) position of the piece. The next call to the render() method of the piece will draw the piece at the newly calculated position.The dx and dy variables in GameObjHelper control the number of pixels and direction that a piece should move in a second. These variables are protected, and therefore can be set or changed easily by subclasses – a subclass completely controls how the piece will move. The “delta” that is passed in during a move() call is the number of milliseconds that have elapsed since the last call to move().
The following code excerpt shows the movement handling logic in GameObjHelper.
public class GameObjHelper implements
	GameObject {
	...
	protected double dx;
	protected double dy;
	...
	public void move(long delta) {
		x += (delta * dx) / 1000;
		y += (delta * dy) / 1000;
	}
A subclass of GameObjHelper, representing a game piece, will typically set its own dx and dy values to control its movement in the playing field.
Drawing the Game Piece Image
The render() method of the GameObject interface is a request from the main loop for the piece to draw itself in a Graphics2D context. This is exactly the same regardless of what game piece it is. GameObjHelper provides a full implementation of render(), freeing any subclasses from graphics rendering: public void render(Graphics2D g) {
GameGraphics imageToDisplay;
imageToDisplay = image;
if (isAnimatedSprite) {
imageToDisplay =
images[currentlyDisplayed];
renderCountdown--;
if (renderCountdown < 1) {
currentlyDisplayed =
(currentlyDisplayed + 1)
% numberOfImages;
renderCountdown = renderDelay;
}
}
imageToDisplay
.renderAtLocation(g,(int) x,(int) y);
}
Since each GraphicsObject (containing an image) knows how to render itself via its renderAtLocation() method, rendering translates to calling the renderAtLocation() method. However, since there may be multiple GraphicsObjects that need to be rendered in turn for animated graphics, it is necessary to use the currentlyDisplayed variable to track which GraphicsObject needs to be displayed.
A render delay is introduced here because modern processors are very fast. If you don’t provide a significant delay before you switch between the images of an animated piece, they will appear merged together. By adding sufficient delay via the renderDelay variable, you can ensure that every frame of the animation is visible to the user.
Collision detection
To determine if a piece has hit another on the screen (i.e. the Bullet hits the Bug), each piece must assist in the collision detection process. This assistance is provided through two methods: hitTest() and getHitTestRectangle(). When hitTest() is called, the reference to another game piece is passed. The piece being called is expected to see if its own rectangle intersects with the passed-in piece and to return True if they overlap. When the getHitTestRectangle() is called, the game piece only has to return its own rectangle in the current game:public boolean hitTest(GameObject
piece) {
Rectangle src = new Rectangle(
(int) x, (int) y, width, height);
Rectangle dest =
piece.getHitTestRectangle();
return src.intersects(dest);
}
public Rectangle getHitTestRectangle(){
return new Rectangle(
(int) x, (int) y, width, height);
}
Coding individual game pieces
With the GameObjHelper in place, handling most of the tough work of maintaining a game piece, creating the actual game pieces becomes quite straightforward. The code for the Base sets the name for the GameGraphics to “base”; its move() method checks to see if the base has reach the two sides of the screen; if it has, the move is cancelled which ensures the movement of the piece is constrained:package uk.co.vsj.animation;
import java.awt.Dimension;
public class Base extends
GameObjHelper {
private GameController game;
private static String name = “base”;
public Base(GameController game,
int x,int y) {
super(name,x,y);
this.game = game;
}
public void move(long delta) {
Dimension dim =
game.getGameDimension();
if ((dx < 0) && (x < 10)) {
return;
}
if ((dx > 0) && (
x > dim.width - width)) {
return;
}
super.move(delta);
}
}
In the Bullet’s move() method, the bullet is eliminated from the game pieces if it moves past the top of the screen:
package uk.co.vsj.animation;
public class Bullet extends
	GameObjHelper {
	private static final String name =
		“bullet”;
	private double moveSpeed = -300;
	private GameController game;
	public Bullet(GameController game,
		int x,int y) {
		super(name,x,y);
		this.game = game;
		dy = moveSpeed;
	}
	public void move(long delta) {
		super.move(delta);
		if (y < -100) {
			game.eliminatePiece(this);
		}
	}
}
The bug is an animated sprite and the GIF files have base names of bug, bug2, and so on, as the bug moves from one side of the screen to another. Once it reaches the end of the screen one way, the direction of movement is reversed – by setting dx to –dx:
public class Bug extends GameObjHelper{
	private final static String [] name =
		new String []{ “bug”, “bug2”};
	private double moveSpeed = 75;
private GameController gameController;
	public Bug(GameController
		gameController, int x,int y) {
		super(name,x,y);
this.gameController = gameController;
		dx = -moveSpeed;
	}
	public void move(long delta) {
		Dimension dim = gameController
			.getGameDimension();
		if ((dx < 0) && (x < 10)) {
			dx = -dx;
		}
		if ((dx > 0) && (
			x > dim.width - width)) {
			dx = -dx;
		}
		super.move(delta);
	}
}
Finally, the Explosion game piece does not move at all. Its code sets up the three GIF files used to display the animated sprite including explode, explode2, explode3, explode4. In the constructor, the renderDelay value is also set, and this needs to be large enough to keep all the animated images from blending together:
package uk.co.vsj.animation;
public class Explosion extends
	GameObjHelper {
	private final static String [] name =
		new String []{ “explode”,
		“explode2”, “explode3”,
		“explode4”};
private GameController gameController;
	public Explosion(GameController
		gameController,
		int x,int y) {
		super(name,x,y);
		this.gameController =
			gameController;
		renderDelay *= 10;
// extra slow animation
	}
	public void move(long delta) {
	}
}
Controlling game play
Putting everything together, the main loop of the game is in the GameController class which needs to initialize the game play field, manage lists of pieces in play, moves the pieces and switch to an explosion when the bug is dead. The high level logic can be tracked from the main() method:public static void main(String argv[]){
GameController g =
new GameController();
g.run();
}
Creating a new GameController, the constructor creates a Swing JFrame containing a JPanel. The size of the JPanel is set to the game’s bound size. This size remains flexible and can be changed by directly varying the two constants – GAME_WIDTH and GAME_HEIGHT. No layout manager is set for the JPanel – because you do the optimized drawing yourself. The GameController itself is the fixed optimized drawing canvas, and is added directly to the JPanel:
public class GameController extends
	Canvas {
	private static final int
		GAME_WIDTH = 640;
	private static final int
		GAME_HEIGHT = 480;	...
	public GameController() {
		JFrame container = new JFrame(
		“VSJ Interactive Animation”);
		JPanel panel = (JPanel)
			container.getContentPane();
		panel.setPreferredSize(
			new Dimension(GAME_WIDTH,
			GAME_HEIGHT));
		panel.setLayout(null);
setBounds(0,0,GAME_WIDTH,GAME_HEIGHT);
		panel.add(this);
		setIgnoreRepaint(true);
		container.pack();
		container.setResizable(false);
		container.setVisible(true);
		container.addWindowListener(
			new WindowAdapter() {
			public void windowClosing(
				WindowEvent e) {
					System.exit(0);
				}
		});
		keyMgr = new KeyManager();
		addKeyListener(keyMgr);
		requestFocus();
		createBufferStrategy(2);
		doubleBuffer = getBufferStrategy();
		setBugAndBase();
}
The following excerpt sets up the Canvas for optimized drawing using double buffers:
...
setIgnoreRepaint(true);
	...
createBufferStrategy(2);
doubleBuffer = getBufferStrategy();
Input handling is performed by creating an instance of the KeyManager class and adding it as a key listener for the JFrame. If the user clicks the close button, the application is terminated:
container.addWindowListener(
		new WindowAdapter() {
	public void windowClosing(
			WindowEvent e) {
				System.exit(0);
			}
		});
keyMgr = new KeyManager();
addKeyListener(keyMgr);
requestFocus();
The GameController tracks the game pieces in two lists, one tracks the in-play pieces that must be moved and rendered; and the other one tracks the pieces to be removed.
Two lists are used because the removal of pieces needs to be delayed. Typically, an iterator is used on the first list to determine the piece that needs to be removed (the bug if it is hit by a bullet). But when collision is detected there may be other pieces that still need to be checked for collision (for example if you have more than one bug in the game). If you simply remove the piece at the time, the iteration will end because the list has been modified. To get around this, you build a list of the pieces to be removed – and only remove the pieces after the iterator has completed. The following excerpt shows the management of pieces in play using the two lists:
public class GameController
	extends Canvas {
...
	private List <GameObject>
		gameObjHelpers = new
		ArrayList <GameObject>();
	private List <GameObject>
		deadObjects = new
		ArrayList<GameObject>();
...
	private void checkCollision() {
		for (GameObject piece:
			gameObjHelpers) {
			if (piece instanceof Bullet){
				if (piece.hitTest(myBug)){
					bugDead = true;
// don’t change gameObjects in list
// explode at bug location
					myExplosion.x =
						myBug.x;
					myExplosion.y =
						myBug.y;
				eliminatePiece(myBug);
				eliminatePiece(piece);
				}
			}
		}
		if (bugDead)
			gameObjHelpers.add(
				myExplosion);
	}
In the checkCollision() method above, when a bullet hits the bug, note the switch of myExplosion for the dead bug at the bug’s current position:
// explode at bug location
	myExplosion.x = myBug.x;
	myExplosion.y = myBug.y;
	eliminatePiece(myBug);
	...
	if (bugDead)
	gameObjHelpers.add(myExplosion);
The game pieces are moved by first calculating the new position of each piece, and then iterating through the list of in-play pieces and asking them to render themselves:
private void movePieces(long delta) {
	for (GameObject piece :
		gameObjHelpers)
		piece.move(delta);
}
private void renderPieces(
	Graphics2D g) {
	for (GameObject piece:
		gameObjHelpers)
		piece.render(g);
}
...
public void run() {
	long lastIteration =
		System.currentTimeMillis();
	while (true) {
// get delta time
	long delta =
		System.currentTimeMillis()
		- lastIteration;
	lastIteration =
		System.currentTimeMillis();
	Graphics2D g = (Graphics2D)
		doubleBuffer.getDrawGraphics();
	clearBackground(g);
	...
	movePieces(delta);
	renderPieces(g);
Conclusions
The Java SE platform comes with built-in support for the Java2D API, allowing you to manipulate graphical images and create animations. Combining the speed of modern day PC processors, hardware optimized Java2D API support, and the developer-friendly nature of the Java programming language, you have a formidable platform to create interactive animation.Sing Li has been writing software, and writing about software, for over twenty years. His areas of interest include scalable distributed computing systems and peer-to-peer technologies. He now spends a lot of time working with open source Java technologies. Sing’s most recent publications include Professional Geronimo and Professional Apache Tomcat from Wrox Press.
Comments