Looking at the technology beneath Windows is a really good idea. Programmers who started working with the early version of Windows will, if only vaguely, remember that the whole edifice is built on message passing. This is an elegant design in theory which was poorly implemented in Windows, but it works and it’s still what keeps the whole system running. Of course you could argue that a modern .NET programmer has no need to understand messaging because it is all contained within event handling. In this worldview a button is clicked and an event is raised and this is the “new thing” built on the “old thing” – message passing.
Sometimes however “the old thing” has quite a lot going for it, and understanding it can reward the inventive programmer. Even if you don’t subscribe to this “old new thing” point of view, you might be surprised to learn that there are public APIs that make use of Windows messaging – Skype for example.
If you want to work with Skype then you have to master messaging. Even if you don’t, Skype provides an interesting example of how something complex can be made very simple by the explicit use of message passing.
Windows everywhere
The key old fact is that everything was a window. A window is an entity that, as well as having a graphical appearance, has a window handle – hWnd – and a message handling procedure. The new fact is that this is still true today despite all of the improvements, the only exception being applications based on WPF. WPF applications have a main window which receives messages but then it takes over and implements its own event handling mechanism. For the sake of simplicity the remainder of this article ignores WPF applications.
Spy
All of the controls, buttons, textboxes and so on that you see are also just specialised windows, and these communicate with one another by sending messages. For example, when you click a button the button generates a message which is passed to its parent window which can then perform some action in response to the click. A message is specified by just four parameters:
- hWnd – the “handle” of the window that the message is to be sent to
- Msg – an unsigned 32-bit value indicating the type of message
- wParam – a 32-bit value usually but not always specifying the sender of the message
- lParam – a 32-bit value specifying other features of the message
When Windows was first introduced, programmers were given lists of the types of messages and what they were used for. You were expected to explicitly work with messages. Today, finding out what messages are generated when a button is clicked or whatever can be difficult – without the help of a Spy. In particular, all controls in an application have a control id which never changes and uniquely identifies the control. The problem is that control ids are set by the creator of the application, or automatically by the compiler, and not generally listed.
How can we find out what the id of a particular control is? The answer is that you can use a utility like Spy++ which is included with the full Visual Studio, or one of its downloadable equivalents. Even if you have Spy++ you might like to try Winspector – search the Web for a free download – which is slightly easier to use and has more features and a better user interface. By running Spy or Winspector you can discover the control id of any control hosted by a given window, as well as details of what messages are being passed between windows.
To get started with Winspector, open a copy of the standard Windows Calculator and use “Click and drag to select a window” to select it within Winspector. The first thing that you will notice is that every button, indeed every control, is listed as a window along with its current hwnd. Notice that a new hwnd is allocated every time the application is run. To find the control’s id you simply select the window, right-click, select properties and read off the id, and any other property you need, in the list that appears (see Figure 1).
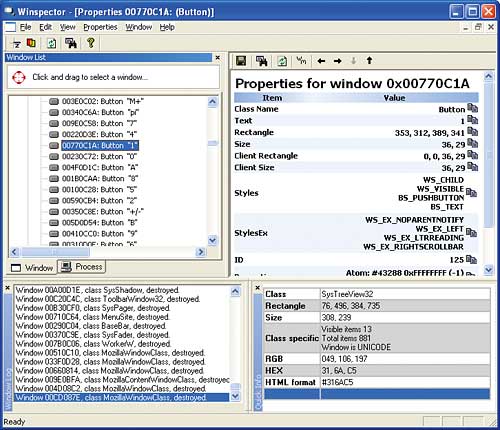
Figure 1: Winspector shows that the calculator’s 1 button has an id of 125
If you again select the “1” button window, right-click and select Messages, you will see a window appear that will list all the messages that the button receives. There are a number of things to notice. The first is that the button window receives no messages until the mouse hovers over it, and the second is that when the mouse hovers over it there is a constant and overwhelming stream of messages listed. Most of these are simply ignored, and indeed this is one problem with Windows message passing – it’s a mess. The only way you can make sense of it is to apply a filter. For example, if you want to know what messages the button receives when it is clicked you can first filter out all of the messages it receives while the mouse is just hovering over it. If you do this you will discover that you are still swamped with messages when you click the button, but eventually you can narrow down the list to the all-important WMLBUTTONDOWN and WMLBUTTONUP, which is how the button “knows” it has been clicked. You can explore how other user actions translate to messages in the same way.
Send a message
As a simple example of using messages to cross the process boundary let’s write a small application that clicks a button on the calculator. The message that we need to send is a WM_Command message, and we need to send it from the top-level window to the button that we want to press. You could find this out using Winspector, but most books on programming in the early days of Windows will explain this and contain a list of common messages. The first thing that we need to get started is to create an instance of Calc.exe, and the easiest way to do this is to use the Process class:
Process Calc=new Process();
Calc.StartInfo.FileName=
    @"C:\windows\system32\calc.exe";
Calc.Start();
Calc.WaitForInputIdle();
To make this work you need to add:
using System.Diagnostics;
In a more complex example we might want to use an existing instance of the application, but on this occasion all we need to do is locate the top window and retrieve its hwnd. In this case the Process class stores the hwnd we need in a suitable property when it creates the new instance:
IntPtr hwnd = Calc.MainWindowHandle;
When you send a WM_COMMAND the wParam is set to the id of the control and the lParam is set to the control’s hwnd. So not only do we need the top level window’s hwnd, we also need to find the button’s hwnd. The id of the 1 button is 125, as discovered earlier using Winspector, and there is an API call that will return the hwnd of a control given its id. You need to add:
using System.Runtime.InteropServices;
[DllImport("user32.dll")]
static extern IntPtr GetDlgItem(
    IntPtr hDlg, int nIDDlgItem);
Now we can add the button’s hwnd to our information:
IntPtr Button1Hwnd =
    GetDlgItem(hwnd, 125);
It has to be admitted that in most cases the message works even if you don’t send the hwnd of the target control – but the documentation says that this is how it is supposed to work. Finally we are ready to send the button the WM_Command message, but first we need to decide which of the many API calls to use to actually send the message. Overall SendMessageTimeout is perhaps the most flexible and so the best one to opt for:
[DllImport("user32.dll")]
public static extern IntPtr
    SendMessageTimeout(
    	IntPtr windowHandle,
    	uint Msg, IntPtr wParam,
    	IntPtr lParam,
    	SendMessageTimeoutFlags flags,
    	uint timeout, out IntPtr result);
How the message is sent depends on the TimeoutFlags and timeout specified:
public enum
    SendMessageTimeoutFlags:uint
{
    SMTO_NORMAL = 0x0000,
    SMTO_BLOCK = 0x0001,
    SMTO_ABORTIFHUNG = 0x0002,
    SMTO_NOTIMEOUTIFNOTHUNG = 0x0008
}
In most cases SMTO_NORMAL is what you need. It waits until the message is sent but also allows the thread to respond to other messages – which means that the user interface doesn’t freeze. Using this we can now send the message to the button:
IntPtr result;
IntPtr RetVal = SendMessageTimeout(
    hwnd, WM_COMMAND, new IntPtr(125),
    Button1Hwnd, SendMessageTimeoutFlags.
    SMTO_NORMAL, 100, out result);
With the addition of:
const uint WM_COMMAND = 0x111;
…we can now try the program out, and you should find that you have successfully pressed the calculator’s 1 button. It is just as easy to press any of the calculator’s other buttons, using Winspector to discover their ids and, when necessary, using GetDlgItem to find the corresponding hwnd. With just a little more work you can click menu items and even enter and retrieve data from text boxes. For example if you want to read the data in the calculator’s display, all you really need to know is its id, which you can easily discover to be 403 using Winspector. The only real difference here is that the lParam is used as a pointer to the start of a string buffer, and wParam is used as a count of the maximum number of characters to return. Notice that in this case we don’t use the control’s id, only the hwnd. The reason for this is that every window has associated window text which can be retrieved even if it doesn’t have an id set. To make use of the new message we need a new overloaded definition of SendMessageTimout:
[DllImport("user32.dll")]
public static extern IntPtr
    SendMessageTimeout(
    	IntPtr windowHandle,
    	uint Msg, IntPtr wParam,
    	[Out, In] StringBuilder lParam,
    	SendMessageTimeoutFlags flags,
    	uint timeout, out IntPtr result);
The only change is that now lParam is marshalled as a pointer to a StringBuilder. With this change we can now read out any numbers displayed on the calculator:
StringBuilder Text = new
    StringBuilder(1024);
IntPtr EditHwnd = GetDlgItem(hwnd, 403);
RetVal = SendMessageTimeout(EditHwnd,
    WM_GETTEXT, new IntPtr(1024), Text,
    SendMessageTimeoutFlags.SMTO_NORMAL,
    100, out result);
The WM_SETTEXT message works in more or less the same way.
Using these techniques you can build surprisingly robust interfaces with legacy Windows applications. And given that the messaging technology has evolved over the years, from simple to increasingly complex, the method works better the older the legacy application! To do the job correctly you often have to give the client application time to process the message by suspending your own application’s active thread and to make the interaction non-time critical you need to write a set of “state” interlocks. For example, if you set text in a control then, after a suitable pause, always read it back using a get text and check that the change has been made. There are lots of reasons why a control can ignore a message you send it, but the most common is that it simply hasn’t been created yet.
The Skype API
Windows messaging might be considered primitive, but message passing as a general technique has lots of good and quite sophisticated properties – it is inherently asynchronous, can easily be made thread safe, lends itself to distributed implementations, and is a natural fit to the object-oriented philosophy that objects communicate by sending messages. When you think of it in this light it’s surprising that we detoured into the overly complex world of COM, Corba and ActiveX when there was a ready-made solution to interprocess interfacing available.
As a demonstration of the idea, and because it’s incredibly useful in its own right, let’s look at the Skype API. Put simply, the Skype API is message based. To control Skype your application has to send particular messages containing commands in text form, and Skype sends messages back to your application that give its current status and the progress of any action you have asked it to perform.
Establishing a custom message
Given Skype is running, a complete application would have to check that it was, the first task is to make a connection between it and our application. To do this we need to use two custom messages that Skype registers with the system when it is first installed – one to make first contact with Skype and the second to make the actual connection. Any application can register a custom message, and given that a message is identified by a 16-bit value there has to be a way to stop two applications registering the same code. The solution is that Windows assigns a free message code when a custom message is registered. This means that the custom message will have different codes on different machines. To find out what code is actually in use you have to ask Windows to tell you what the custom message corresponds to using the RegisterWindowMessage API call. If the message isn’t already registered then Windows assigns a new unique code. If the message is already registered by another application it returns the code previously allocated. The API call is:
[DllImport("user32.dll")]
static extern uint
    RegisterWindowMessage(tring lpString);
UInt32 APIDiscover =
    RegisterWindowMessage(
    "SkypeControlAPIDiscover");
UInt32 APIAttach = RegisterWindowMessage(
    "SkypeControlAPIAttach");
As long as Skype is installed on the system we should now have the two custom message codes stored in the appropriate variables. We can now send the APIDiscover message to every window in the system and wait for Skype to send the APIAttach message back to us. In general, working with the Skype API is a matter of sending a message and then getting back a response. We need a general method of waiting for the response which sometimes has some associated text data. The simplest thing to do is to define a struct:
public struct databuffer
{
    public string data;
    public Boolean valid;
}
This has a field to hold the returned data and a Boolean field to indicate when the data is valid, i.e. a message has been sent back from Skype. We need a single global instance of this struct:
public databuffer skypedata;
We now need to invalidate the return data and use the API call SendMessageTimeout to send the APIDiscover message to all active windows:
skypedata.valid = false;
skypedata.data = string.Empty;
IntPtr result;
IntPtr aRetVal = SendMessageTimeout(
    HWND_BROADCAST, APIDiscover,
    this.Handle, IntPtr.Zero,
SendMessageTimeoutFlags.SMTO_NORMAL,
    100, out result);
The “broadcast” hwnd is defined as:
public static readonly IntPtr
    HWND_BROADCAST = new IntPtr(-1);
All we have to do now is wait for Skype to send a message back to us. We have to decide whether to work in a “blocking” or “asynchronous” way. We could wait until Skype responds and this would block any further processing by the application, or we could rely on some other part of the application to handle the response asynchronously. In most cases asynchronous operation is the more powerful, and if you take using the Skype API further you should implement an asynchronous approach by generating an event when the response arrives. However, blocking is simpler, and using it makes the way things work more obvious. So let’s implement a WaitForSkype method which does just that – waits until Skype sends back a response that contains a specified key word and simply use it:
WaitForSkype("");
If the target keyword is a null string then the method simply waits for any response from Skype. The code for the WaitForSkype function is fairly simple, just two nested loops, the outer one waiting for valid data from Skype and the inner one checking for the keyword:
private void WaitForSkype(string target)
{
    do{
    	do
    	{
    		Application.DoEvents();
    	} while (!skypedata.valid);
    }while(!skypedata.data.Contains(
    	target));
}
Receiving a message
The really new part of implementing the Skype API, as far as using messaging is concerned, is that after sending a message our application has to receive one or more that Skype sends back. How do we pick up a message that another application has sent? The answer is that we have to tap into the message loop, or “pump”, that every application has. In many cases the details of message processing are hidden deep within the language or framework, but .NET provides easy access. Every form has a virtual WndProc method that implements the message loop, and to process additional messages all you have to do is override it. In this case we simply add:
protected override void WndProc(
    ref Message m)
{
WndProc is called each time there is a message to process. The parameter m is a struct that contains the different portions of the message. Notice that the internal workings of Windows don’t use a struct or any sort of data structure to represent a message. This is just .NET wrapping the lower level functioning of the system for us. The Message struct includes fields for:
- hWnd
- Msg
- lParam
- wParam
- Result – Specifies the value that is returned to Windows in response to handling the message
If you want implement message passing in a more object-oriented way then you could define your own message class based on Message and implement a Send and WaitFor method complete with events that signal when a message that you want to handle arrives. While this is a good idea (and not difficult), doing so would obscure the simplicity of the example, so it’s left as a “reader exercise”.
The type of message is determined by the Msg property, and we know from the documentation that Skype will return the custom APIAttach message for which we retrieved the message code when we established the custom message. To process this we simply use an if statement to detect the message:
if ((UInt32)m.Msg==APIAttach)
{
Skype uses the lParam parameter in the message to send a status code along with the message. The easiest way to decode this is to declare an enumeration:
public enum SkypeAttachStatus : uint
{
    Success = 0,
    PendingAuthorizaion = 1,
    Refused = 2,
    NotAvailable = 3,
    Available = 0x8001
}
If you want to see the status, place a Textbox on the form and add:
SkypeAttachStatus Status =
    (SkypeAttachStatus)m.LParam;
textBox1.Text += "Status=" +
    Status.ToString() +
    Environment.NewLine;
If you run the completed program you will see that Skype generates a stream of messages in response to the APIDiscover message that you sent, each one with a different status. You can write code to react to each of the different status conditions, but the only one that really matters is “Success”, which means you have permission to use Skype further. In this case wParam is returned containing a handle to Skype’s main window which you use to send further messages to it.
We clearly need to store Skype’s window handle for further use, so we need an additional global variable:
private IntPtr HSkype = IntPtr.Zero;
Now we can test the status and store the window handle for later use:
if (Status == SkypeAttachStatus.Success)
{
    HSkype = m.WParam;
}
However this isn’t quite the end of the story. Skype sends a final message after the “success” message to say that it is available for use, and this is the one that, in a simple-minded blocking transaction, we should wait for:
if (Status ==
    SkypeAttachStatus.Available)
{
    skypedata.valid = true;
}
Notice that by setting the data buffer’s valid property to true we free up the WaitForSkype method to move on to the next operation. Finally we have to set a non-zero result to signify that the message has been processed – without this Skype closes the connection:
   m.Result = new IntPtr(1);
    return;
}
Finally we have to call the parent WndProc method if we haven’t handled the message, so that it can deal with all of the messages relating to button clicks and general user interaction. The rule is that when you override WndProc you handle the messages you want to handle but always call the parent WndProc to process any messages you don’t handle:
   base.WndProc(ref m);
}
If you now run the program you should see Skype status messages displayed in the Textbox until the “Available” status is reached and the connection made.
The Copydata message
Now we have Skype’s attention it’s time to send it some commands. Fortunately this is mostly more of the same. We send Skype a message and Skype sends us messages back letting us know what is happening. The new element is that the messages now contain commands and status information in the form of strings. To do this we need a slightly differently overloaded version of the SendMessageTimeout API call. The only difference is that the lParam parameter is used as a pointer to a CopyDataStruct:
[DllImport("user32.dll")]
public static extern IntPtr
    SendMessageTimeout(
    IntPtr windowHandle, uint Msg,
    IntPtr wParam,
    ref CopyDataStruct lParam,
    SendMessageTimeoutFlags flags,
    uint timeout, out IntPtr result);
Of course we also need a definition of CopyDataStruct, and this can be found in the standard Windows API documentation and translated to C#:
[StructLayout(LayoutKind.Sequential)]
public struct CopyDataStruct
{
    public string ID;
    public int Length;
    public string Data;
}
This struct is used to pass the combined Skype command and data string in the Data property as part of the content of a WMCOPYDATA message. Notice that WMCOPYDATA isn’t a custom message, it’s a perfectly standard Windows message and can be used by any application to transfer large amounts of data – the Skype API has just noticed that it exists and put it to use. The WM_COPYDATA message has to be defined as:
public static readonly uint
    WM_COPYDATA = 0x004a;
Now we have everything we need to send Skype a command. If you look at the documentation of the Skype API, all the commands take the form of text with parameters. For example, to dial a number you use the “Call” command followed by the number you want to call. To send a command to Skype it’s a good idea to implement a suitable method:
public IntPtr SendCommand(
    string Command)
{
    skypedata.valid = false;
    skypedata.data = string.Empty;
The Skypedata buffer has been invalidated to get ready for Skype to respond to the command. To send the command we have to initialise a suitable CopyDataStruct:
CopyDataStruct data =
    new CopyDataStruct();
data.ID = "1";
data.Data = Command;
data.Length = data.Data.Length + 1;
The ID property can be used to identify multiple commands of the same type but, as we are using a “blocking” approach to using Skype, one command at a time is the rule. Now we can send the command:
IntPtr result;
IntPtr RetVal = SendMessageTimeout(
    HSkype, WM_COPYDATA, this.Handle,
    ref data,
    SendMessageTimeoutFlags.SMTO_NORMAL,
    100, out result);
    return RetVal;
}
As soon as Skype gets the message it sends a WMCOPYDATA message back with the Data property of the CopyDataStruct full of text that gives the status and other information about what is happening. How do we deal with this return message? In the same way as the APIAttach message earlier, i.e. within the overridden WindProc method. We simply have to add another if statement that checks to see if the message is a WMCOPYDATA message:
if ((UInt32)m.Msg == WM_COPYDATA)
{
Next, check to make sure that the WMCOPYDATA message was sent by the Skype window to which we have attached – after all, other application windows can send WMCOPYDATA messages for a range of reasons:
   if (m.WParam == HSkype)
    {
As long as this is indeed a WM_COPYDATA message from Skype we can unpack the data it contains by casting the object returned by the GetLParam method:
CopyDataStruct data =
    (CopyDataStruct)m.GetLParam(
    typeof(CopyDataStruct));
To understand exactly what is going on here you need realise that the GetLParam method uses the Lparam value as a pointer to an area of memory which it then converts to an object of the type you specify. Finally we move the returned data into the Skypedata buffer, display it in the textbox and set the buffer valid indicator to true:
   skypedata.data = data.Data;
    m.Result = new IntPtr(1);
    textBox1.Text += "Skype data=" +
    	skypedata.data +
    	Environment.NewLine;
    	skypedata.valid = true;
    	return;
    }
}
Make the call
That’s all there is to it. We now have complete “send a message” and “get the response” mechanisms implemented. To see them in action the simplest thing to do is to use it to call the Skype testing service. In a button’s click handler enter the following code:
private void
    button1_Click(
    object sender,
    EventArgs e)
{
SkypeFirstConnect();
    IntPtr result =
    	SendCommand(
    	"CALL echo123");
    WaitForSkype(
    	"INPROGRESS");
}
If you run the program and click the button you will see the various Skype status messages scrolling past (see Figure 2), and you should successfully place the test call.
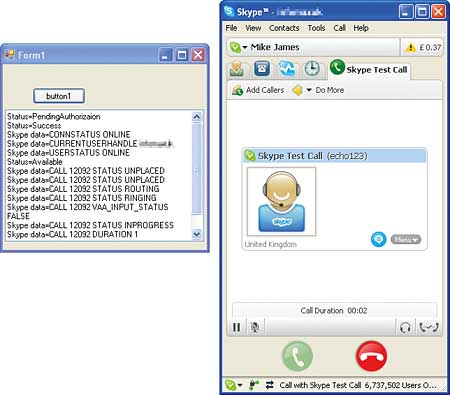
Figure 2: You can see the status messages scrolling past as the call progresses
The WaitForSkype allows the program to continue as soon as the call is actually connected. Of course you need to write some code that handles the possibility that the call will fail, but this at least gives you the overall principle of how things are done.
Now that we’ve implemented the basics, most of what remains to be done consists of finding out what commands Skype supports and how to use them. Sometimes you will need to add extra processing to the existing methods.
For an example of the sort of powerful things you can do easily, let’s record the incoming side of the call to a file. The command that does this job is the “ALTER CALL called SET OUTPUT destination” command. The problem is that to use it we need the call’s id, which is returned as part of status message during the call. Extracting the id from the status is fairly easy and we can create a method to do the job:
private string getCallId()
{
    string[] items =
    	skypedata.data.Split(' ');
    return items[1];
}
This simply splits the string into words separated by spaces and returns the second item which is always the call id in a call status message. Now all we have to do is to redefine the button’s click event handler:
private void button1_Click(
    object sender, EventArgs e)
{
    SkypeFirstConnect();
    IntPtr result = SendCommand(
    	"CALL echo123");
    WaitForSkype("INPROGRESS");
    string CallID = getCallId();
    string filename = @"""c:\test.wav"" ";
    string cmd = "ALTER CALL " + CallID +
    	" SET_OUTPUT file=" + filename;
    result = SendCommand(cmd);
    WaitForSkype("FINISHED");
}
Once we know that the call is in progress we get the call id, construct the text for the command to save the audio output in a file called test.wav and send the command. When the call is FINISHED you can open the test.wav file and hear the Skype testing service go through its usual script.
You can divert the input audio stream in exactly the same way to build an answering machine or automatic messaging system. If you are going to do something like this then don’t simply use the example program listed here. You need to implement a Skype object complete with asynchronous methods, events and lots of error checking and recovery.
The use of messaging by the Skype API is fairly impressive, and it would be relatively easy to write a small client/server pair to extend it to allow remote use, although it’s difficult to see why you would want to do this. Overall, as a messaging-based API it is surprisingly good.
Dr. Mike James’ programming career has spanned many languages, starting with Fortran. The author of Foundations of Programming, he has always been interested in the latest developments and the synergy between different languages.
Comments