The Engine behind the Fox
The Firefox browser uses the well-known Gecko engine from the Mozilla project – an open source spin-off of the former Netscape browser development. Chrome is part of Gecko, and is a user interface rendering technology used to generate everything surrounding the actual Firefox browser window. Figure 1 shows the visual elements that are rendered via Chrome.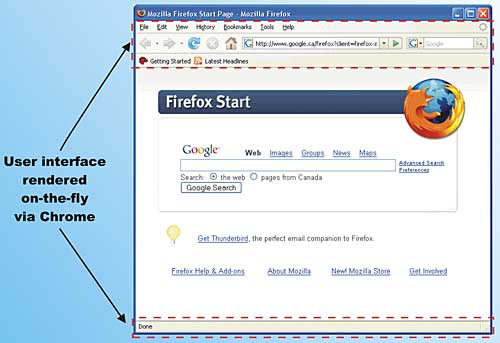
Figure 1: Most of the look and feel of the Firefox browser, including all the menus, toolbars, status bar etc., are rendered by Chrome
The unique thing about Chrome is that it supports on-the-fly interpretively generated user interface elements. Unlike user interfaces written in C#, Java, C++ or other programming language that require compilation, Chrome’s final appearance is not cast in stone and embedded in compiled code. Instead, the user interface elements are generated by Chrome as soon as you open the browser.
The browser generates this user interface dynamically, depending on instructions contained in a set of XML-based configuration files, scripts, stylesheets, and resources (such as bitmaps to generate the skin). Figure 2 illustrates the process behind the dynamic generation of user interface elements using Chrome.
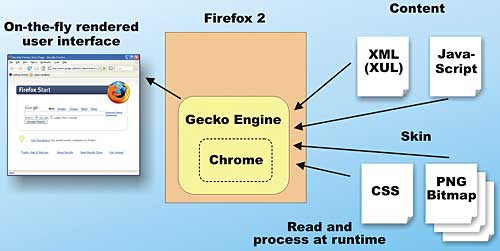
Figure 2: Dynamic generation of user interface elements using Chrome
In Figure 2 an XML file describes the user elements that need to be created – such as buttons, menus, edits, and so on; Javascript files contain the implementation of actions when the user interface elements are activated – for example, when a button is clicked or a menu is selected; and the CSS stylesheet and bitmap resource files are used to “skin” the user interface when rendering the visual appearance of the elements.
By modifying the content of these configuration files and scripts, and asking the Firefox browser to “reload-all”, it is possible to dynamically alter the appearance and behaviour of the browser. This is quite useful when you are developing Chrome-based Firefox add-ons.
A Firefox add-on is bundled up in an easy-to-install package. This package is a zip file with its extension renamed to xpi. This is pronounced “zippy”, and stands for “cross platform install”, since the add-on can be installed to Firefox running on any platform, including Windows, Mac OSX, and Linux.
Firefox users can install an add-on by simply opening an XPI file. If an XPI file is accessed over a network, Firefox will ask the user for permission before the add-on is installed – for obvious security reasons. Under the hood, the new interface contained in the XPI is added to an internal persistent Chrome registry maintained by Firefox’s Gecko engine. Once installed, the add-on becomes part of the browser’s look and feel.
There are a few new file types used in Firefox 2 add-ons that you are unlikely to be familiar with. Let’s take a look at them one at a time.
XUL – User Interface in XML
XUL, pronounced zool, is XML User interface Language. This language is XML-based, and used in describing user interface elements that need to be generated dynamically. Browsers and other products employing Mozilla technologies typically support user interface generation via XUL. The user interface elements of a Firefox 2 add-on are completely described using a XUL file. For example, to specify a toolbar in XUL, you can use the <toolbar> element:<toolbar id="vsjbar-Toolbar" toolbarname="VSJ Toolbar" accesskey="T" class="chromeclass-toolbar" context="toolbar-context-menu" hidden="false" persist="hidden"> ... </toolbar>To create a button on the toolbar, you can use the <toolbarbutton> element:
<toolbarbutton id=
	"vsjbar-Subscription"
	tooltiptext="Free subscription"
	label="Free subscription"
	oncommand="vsjbar_showLink(
		'http://www.wdis.co.uk/
		webreg-cgi-bin/regform_display?
		id=bear-vsj-eqrbmfg')"
	flex="0" />
When the button is clicked, the JavaScript code in the oncommand attribute is executed. In this case, the vsjbar_showLink()method is called with the VSJ subscription URL.
vsjbar_showLink() is a method from the vsjbar JavaScript library; this library of JavaScript methods is included in the add-on as an independent vsjbar.js file.
To take a comprehensive look at the breadth of possibilities with XUL, check out the XUL elements and attributes reference at the XUL Planet resource site.
RDF for Structured Information
RDF is Resource Description Framework. It is a special XML-based format for storing hierarchical data such as bookmarks and email. Mozilla-based technologies use RDF pervasively wherever complex data structures are persisted or transferred. For example, RDF is often used as the data source for tree user interface elements. In the case of Firefox 2 add-ons, the installation descriptor for the XPI installation bundle is created in an install.rdf file. To learn more about RDF, try this introduction at the XUL Planet site.File types in a Firefox add-on XPI
Table 1 summarises the file types that you will encounter when you create Firefox 2 extensions.| Table 1: Firefox extension file types | |
| File type | Description |
| XUL file Describes the structure and the user interface elements of the add-on. | |
| RDF file (install.rdf) | Provides a descriptor of information used during installation of the add-on. It includes add-on name, id, version, and also optionally creator’s information. |
| JS (JavaScript) file | Contains all the JavaScript code that is bound to the various actions of the user interface of the add-on. |
| CSS file | Contains the stylesheet for the layout and format of the XUL user interface elements. |
| chrome.manifest | Tells the engine where to find the various Chrome configuration files. |
The purpose of each of the files and hints on how to edit and create them is also included.
Creating the VSJ Toolbar
Let’s get hands-on and create a customized VSJ toolbar add-on for Firefox 2.0.Before you start, you’ll need to download and install Firefox 2.0.
Ready to go with Java Development Tools
As a Java developer, you have all of the tools for editing and packaging the extensions. You can use the Eclipse XML editor to create and edit XUL and RDF files (described shortly). You can use the Eclipse JavaScript editor to edit JavaScript, and the CSS editor to prepare the stylesheets. The JAR utility that comes with every JDK is perfect for creating JAR and XPI files. The following assumes that you have a JDK installed and ready.
Trying out the VSJ Toolbar
To install the VSJ toolbar as your first add-on, just open the vsjbar.xpi file supplied as part of the code download. From the Firefox 2 menu, select File->Open File…. Browse to the xpi\vsjbar directory and select vsjbar.xpi.
After you have selected the vsjbar.xpi installable bundle, the software installation wizard will ask you if you want to install this add on as shown in Figure 3.
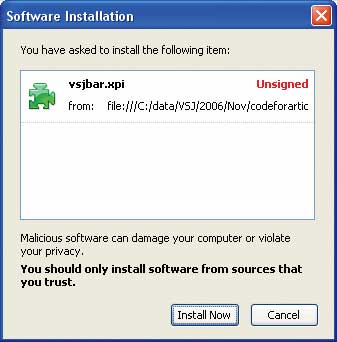
Figure 3: Are you sure?
Click the Install Now button, and the VSJ Toolbar will be installed. The installation wizard will ask you to restart Firefox for the add-on to take effect.
Click the Restart Firefox button, and the browser will restart with the VSJ Toolbar visible.
If you click on the VSJ logo button on the left of the toolbar, you will see the menu shown in Figure 4.
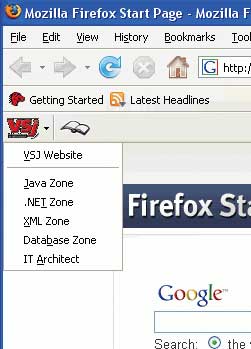
Figure 4: The new menu
Using this menu, you can quickly navigate to the VSJ home page, or any of the technology zones on the VSJ site. If you click on the Recent Articles… menu in the middle, you will see a list of articles. This list of articles is dynamically generated, the moment you click on the Recent Articles… menu. Selecting any of these dynamically generated articles links will take you immediately to the selected article.
Finally, on the right-hand side, there is the Free Subscription button. If you click this button, it will take you to the VSJ subscription form.
I hope you will agree that with the VSJ toolbar installed you will be able to access the valuable content with greater efficiency. It’s time to discover how things are done within the add-on.
Precise composition is everything
Every add-on is packaged within an easy to install XPI file. An XPI file is a zip file created using any zip utility, or in our case the JDK JAR utility. Within this JAR file, the precise placement and composition of required files is of paramount importance. A malfunctioning add-on is often a result of failing to place the required files at the right location. Generally, you need to have the files in XPI layout as shown in Figure 5.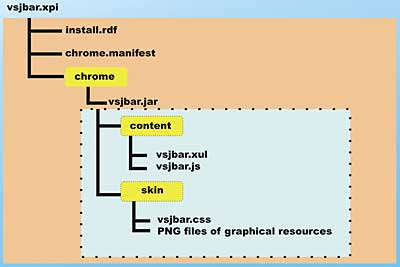
Figure 5: Layout of XPI files
You will note that there is a JAR file within the XPI. The JAR file itself must have a precise set of directories and required files; it basically contains all of the Chrome descriptors and resources. Figure 5 shows everything required for the add-on and where they should be placed. The following takes a look at each of the files.
The manifest reveals the Chrome resource locations
In the source code distribution, you will have two copies of the same development files. Table 2 explains the two branches of code.| Table 2: Code branches | |
| Directory Branch | Description |
| Vsjbar | A set of files that allows you to experiment with modifying the content of the add-on easily, without repackaging them every time. |
| Xpi | A set of files that allows you to create an installable XPI installation package. |
You only need one branch of code at any time. Use the vsjbar branch for exploration and modification, and use the xpi branch when you package the add-on. The two branches of code differ mainly in one key file – the chrome.manifest, which tells Mozilla Chrome where the elements of Chrome should be found. If you look under the vsjbar branch of files, you will see that it contains relative paths – shown in red below:
content vsjbar chrome/content/
overlay
chrome://browser/content/browser.xul
chrome://vsjbar/content/vsjbar.xul
skin vsjbar classic/1.0 chrome/skin/
The first line tells Chrome that the content for the add-on is located at path chrome/content/. More precisely, the next lines specify the XUL to be used is an overlay, it overlays Firefox’s own internal browser.xul, and that our customized XUL is located under the content directory as vsjbar.xul. The last line tells Chrome that skin (the outer appearance of the user interface) modifications should be performed to the Firefox internal classic/1.0 skin, and the elements are under the relative path chrome/skin/.
Under the xpi branch of code, the chrome directories are JARred up for the distribution, and the chrome.manifest will contain JAR specific paths instead of relative path. The chrome.manifest in the xpi branch contains:
content vsjbar
	jar:chrome/vsjbar.jar!/content/
overlay
chrome://browser/content/browser.xul
	chrome://vsjbar/content/vsjbar.xul
skin vsjbar classic/1.0
	jar:chrome/vsjbar.jar!/skin/
Note how the content and the skin directory map to a path inside the chrome/vsjbar file. You must use this placement when creating an XPI distribution.
The install.rdf installation descriptor
The install.rdf file is a descriptor for the XPInstall (Cross Platform Installer), providing information on your add-on. The content of install.rdf for this project is:<?xml version="1.0"?> <RDF xmlns="http://www.w3.org/ 1999/02/22-rdf-syntax-ns#" xmlns:em="http://www.mozilla.org/ 2004/em-rdf#"> <Description about="urn:mozilla: install-manifest"> <em:id>[email protected]</em:id> <em:name>VSJ Bar</em:name> <em:version>1.0</em:version> <em:targetApplication> <Description> <em:id> {ec8030f7-c20a-464f-9b0e -13a3a9e97384} </em:id> <em:minVersion> 1.5 </em:minVersion> <em:maxVersion> 2.0.0.* </em:maxVersion> </Description> </em:targetApplication> <em:creator>VSJ</em:creator> <em:description> VSJ Firefox 2 Add-on </em:description> <em:homepageURL> http://www.vsj.co.uk/ </em:homepageURL> </Description> </RDF>Note the tree of information provided. First, the name and version of the add-on is provided with a unique ID. This ID must be unique. The use of the <project>@<domain> format enables us to exploit a hook in the engine for live in-directory development without repackaging the add-on each time. This will be described in the next section. When packaging the add-on as an XPI, you can change this ID to a GUID (if you are paranoid about potential name conflicts) or keep it in the same format. The <em:targetApplication> tag provides information about the compatibility of the add-on. Here, we are saying that the add-on can be used on Firefox (indicated by the GUID id) version 1.5 to 2.0.0.*. The <em:creator> tags are optional, but provide information about the origin of the add-on.
Rapid iterative development without the pain
To facilitate rapid development of add-ons without having to repackage and install/uninstall every time you make a change to any file, Firefox supports a development hook that enables you to modify the content and skin dynamically in-directory and without repackaging.The trick here is to first locate the extensions directory of your profile in the Firefox 2 installation. In Windows, this is in a path similar to
C:\Documents and Settings\
	<your user name>\
	Application Data\
	Mozilla\
	Firefox\
	Profiles\
	<some unique letters>.default\
	extensions.
This is the directory where Firefox will look for installed extensions. If you place a file in here that points to the root directory of the add-on (containing a one-line OS-specific path), Firefox will take the files required for the add-on information from your directory instead of from an installed JAR. The file must be named the same as the add-on’s unique id. In our case, this id is in the install.rdf file, and is [email protected].
This means creating a file that contains a single path, such as c:\vsjcode\vsjbar, and name it [email protected], and place it under the C:\Documents and Settings\<your user name>\Application Data\Mozilla\Firefox\Profiles\<some unique letters>.default\extensions directory. Firefox will “pick up” the extension the next time it starts up – and you should see the toolbar in action. You can then make changes to the contents and skins and restart Firefox to see the changes.
Laying out the VSJ Toolbar
The layout of the VSJ Toolbar is shown in Figure 6. It basically consists of a set of <toolbarbutton> elements inside a <toolbar> XUL element.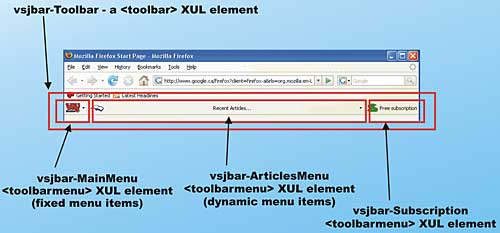
Figure 6: Layout of the VSJ Toolbar
The Chrome XUL description for the toolbar is contained in vsj.xul shown here:
<?xml version="1.0"?>
<?xml-stylesheet href="chrome://vsjbar/skin/vsjbar.css" type="text/css"?>
<overlay id="vsjbar-overlay"
	xmlns="http://www.mozilla.org/keymaster/gatekeeper/there.is.only.xul">
	<script type="application/x-javascript"
		src="chrome://vsjbar/content/vsjbar.js" />
	<toolbox id="navigator-toolbox">
		<toolbar id="vsjbar-Toolbar" toolbarname="VSJ Toolbar" accesskey="T"
			class="chromeclass-toolbar" context="toolbar-context-menu"
			hidden="false" persist="hidden">
			<toolbarbutton id="vsjbar-MainMenu" type="menu"
				tooltiptext="VSJ Toolbar" flex="0">
				<menupopup>
					<menuitem label="VSJ Website" accesskey="V"
						tooltiptext="Go to VSJ"
						oncommand="vsjbar_showLink('http://www.vsj.co.uk/')" />
					<menuseparator />
					<menuitem label="Java Zone" accesskey="J"
						tooltiptext="Navigate to VSJ Java Zone"
						oncommand="vsjbar_showLink('http://www.vsj.co.uk/java/')" />
					<menuitem label=".NET Zone" accesskey="T"
						tooltiptext="Navigate to VSJ .NET Zone"
					oncommand="vsjbar_showLink('http://www.vsj.co.uk/dotnet/')" />
					<menuitem label="XML Zone" accesskey="X"
						tooltiptext="Navigate to VSJ XML Zone"
						oncommand="vsjbar_showLink('http://www.vsj.co.uk/xml/')" />
					<menuitem label="Database Zone" accesskey="B"
						tooltiptext="Navigate to VSJ Database Zone"
				oncommand="vsjbar_showLink('http://www.vsj.co.uk/databases/')" />
					<menuitem label="IT Architect" accesskey="A"
						tooltiptext="Navigate to IT Architect"
					oncommand="vsjbar_showLink('http://www.itarchitect.co.uk/')" />
				</menupopup>
			</toolbarbutton>
			<toolbarseparator/>
			<toolbarbutton id="vsjbar-ArticlesMenu" label="Recent Articles..."
				type="menu" tooltiptext="Articles" flex="1">
				<menupopup id="vsjbar-ArticlesList"
					onpopupshowing="vsjbar_fillArticles()">
				</menupopup>
			</toolbarbutton>
			<toolbarseparator/>
			<toolbarbutton id="vsjbar-Subscription"
				tooltiptext="Free subscription" label="Free subscription"
				oncommand="vsjbar_showLink('http://www.wdis.co.uk/
					webreg-cgi-bin/regform_display?id=bear-vsj-eqrbmfg')"
				flex="0" />
		</toolbar>
	</toolbox>
</overlay>
You should be able to find the one-to-one correspondence between Figure 6 and the XUL elements in the listing. The flex=”1” attribute indicates that the specific element can stretch and shrink when the toolbar is resized; flex=”0” indicates that the element should stay fixed in size. The centre element of the toolbar, vsjbar-ArticlesMenu, contains no <menuitem> elements in the XUL description because the menu items are generated dynamically when the user clicks to popup the menu.
In the listing, note the general use of the oncommand and onpopupshowing attributes to trigger JavaScript coding. The JavaScript code is contained in vsjbar.js, described next.
The vsjbar.js JavaScript library
All of the JavaScript code referenced from vsjbar.xml is contained within vsjbar.js. This JavaScript library is shown here:// show a given URL on the browser
function vsjbar_showLink(url)
{
window._content.document.location = url;
window.content.focus();
}
// function that obtain a list of articles and associated links
// currently hardcoded, can be modified to read from a file on
// a server – or parse an RSS file
function vsjbar_getArticles(articles, links) {
articles[0] = "Back to square one with Ruby on Rails";
articles[1] = "Plug into JBI with ServiceMix";
articles[2] = "Shakespeare at your fingertips";
links[0] = "http://www.vsj.co.uk/java/display.asp?id=550";
links[1] = "http://www.vsj.co.uk/java/display.asp?id=503";
links[2] = "http://www.vsj.co.uk/java/display.asp?id=474";
}
// dynamically generate the list of articles to be selected
function vsjbar_fillArticles()
{
var menu = document.getElementById("vsjbar-ArticlesList");
for(var i=menu.childNodes.length - 1; i >= 0; i--)
{
menu.removeChild(menu.childNodes.item(i));
}
var articles = new Array()
var links = new Array()
vsjbar_getArticles(articles, links)
for(var i=0; i<articles.length; i++)
{
var mItem = document.createElement("menuitem");
mItem.setAttribute("label", articles[i]);
mItem.setAttribute("oncommand", "vsjbar_showLink('" + links[i] + "')");
menu.appendChild(mItem);
}
}
The vsjbar_showLink() function uses the browser’s DOM to show a specified URL within the Firefox 2 browser. This function is called when the user selects a specific menu item or clicks on the Free Subscription button.
The vsjbar_fillArticles() function dynamically creates the menu containing a list of articles whenever the popup is displayed. It calls vsjbar_getArticles() to accomplish this. The current implementation of vsjbar_getArticles() hard codes the articles list. However, this function can readily be modified to access an up-to-date list over the Internet.
Skinning the toolbar
Under the chrome/skin directory are the graphical resources that dress up the toolbar. In our case, they are the bitmap files. The bitmap format used here is the PNG format with transparency. You will need a graphics editor capable with working with PNG with transparency to create these bitmaps. It is also possible to create a GIF first, and then convert GIF to PNG with transparency; you can use the well-known irfanview graphics tool to accomplish this – try irfanview.In our case, the three bitmaps, from left to right for the toolbar are: vsj.png, articles.png, and free.png. The CSS stylesheet that tells the Chrome engine how to associate these bitmaps with the toolbar buttons is vsj.css and it contains:
#vsjbar-MainMenu {
	list-style-image:
url("chrome://vsjbar/skin/vsj.png");
}
#vsjbar-Subscription {
	list-style-image:
url("chrome://vsjbar/skin/free.png");
}
#vsjbar-ArticlesMenu {
	list-style-image:
		url("chrome://vsjbar/skin/
			articles.png");
}
This completes our examination of the content of the component inside the XPI. Next, you will see how to create an installable XPI bundle.
Creating the XPI Installation Package
You need to use the files under the xpi directory branch to create the XPI installation package. To create the XPI installation package, two batch files have been created to make life simple. You need to go into the xpi/vsjbar/chrome directory and run the makejar.bat. This will create a vsjbar.jar file in the Chrome directory. The batch file is quite simple, and contains the command:jar cvf vsjbar.jarThis will create a JAR file containing all contents of the content and skin directory under Chrome. Next, change directory to the xpi/vsjbar directory, and run the makexpi.bat file there. This batch file contains:
jar cvf vsjbar.xpi install.rdf
	chrome.manifest chrome/vsjbar.jar
Note that it creates a JAR(zip) file called vsjbar.xpi, with install.rdf, chrome.manifest, and the chrome/vsjbar.jar file that you’ve just created. The XPI file is all you need to distribute your Firefox 2 add-on!
Conclusions
The use of an on-the-fly rendered user interface technology greatly facilitates the customization of the Firefox 2 browser. Creating a custom add-on for Firefox 2 is a straightforward process that does not require the pre-compilation of any code. Exact placement of the various descriptors, scripts, stylesheets, and bitmap resources is vital for creating a working add-on. Firefox 2 add-ons expose a huge and hungry cross-platform audience for creative software developers.Sing Li has been writing software, and writing about software, for twenty plus years. His specialities include scalable distributed computing systems and peer-to-peer technologies. He now spends a lot of time working with open source Java technologies. Sing’s most recent publications include Professional Geronimo and Professional Apache Tomcat from Wrox Press.
Comments