To add a new typed DataSet class to your project all you have to do is use Project,Add New Item and select DataSet in the dialog box that appears. This works in all versions of Visual Studio including Express. We might as well accept the default DataSet name, DataSet1 (see Figure_1).
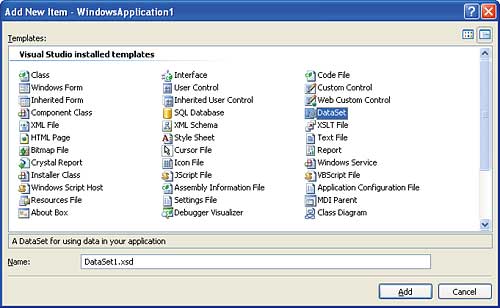
Figure 1: Add a DataSet
When the new DataSet class has been added you will see the DataSet Designer, and it invites you to click on a link to go to the Server Explorer where you can supply all of the details of the database that the DataSet is to be associated with. What isn’t clear is that you most definitely do not have to click the link and you don’t have to associate the DataSet with a database for the rest of the Designer to work. For example, let’s add a table with two columns – Event (String) and Date (Date). From the Toolbox simply drag and drop a DataTable and change its name in the Property window to ImportantDates. Next, right-click on the table in the designer and add the two columns, making sure to change their names and data types, again using the Property window. When you switch away from the Designer window it creates the code needed to implement a custom DataSet, complete with the data table and with typed properties corresponding to the columns you added. Notice that the typed DataSet inherits directly from the DataSet class and, apart from the strong typing, many of the ideas work with an instance of DataSet, as long as you cast from object to the correct data type as required. For an example of how this works see later.
Now that we have a strongly typed DataSet and a table we can start to work with it. For example, create an instance of the DataSet:
DataSet1 MyDataSet1 = new DataSet1();To add a row we first need a strongly typed row object:
DataSet1.ImportantDatesRow Row =
	MyDataSet1.ImportantDates.
	NewImportantDatesRow();
The only difficult thing about creating a row is working out exactly what the method is that creates the row object. In general, while the row data type belongs to the DataSet, the creation method belongs to the table that the row belongs to. Now that we have a strongly typed row we can add some data values:
Row.Event=”My Birthday”;
Row.Date=DateTime.Parse(“1/2/2001”);
Notice that the row object has properties that match the type of the columns and no type conversion is necessary – provided you are assigning compatible types. Finally we can add the row object to the table:
MyDataSet1.ImportantDates.Rows.Add(Row);If we have a DataSet containing some rows of data it can be accessed in the usual way:
String temp=MyDataSet1.
	ImportantDates[0].Event;
DateTime tempdate = MyDataSet1.
	ImportantDates[0].Date;
…which retrieves the column data in row zero in the table.
Notice that all of this has worked perfectly without any need for a Connection or a DataAdaptor let alone a database. You can treat the DataSet as just another data structure along with the array, the stack and struct.
Binding
The table in the DataSet we have created can be bound to a control just as if it was associated with a database – this is because data binding has absolutely nothing to do with database! To bind our DataSet, place a DataGridView control on the form. If you click on the control’s “Task List”, the small arrow icon in the top right-hand corner, you can select a data source from within Project Data Sources and in this case select ImportantDates within DataSet1. This causes the DataGridView to display two columns and a dummy row corresponding to the definition of ImportantDates within DataSet1. You should also notice that a DataSet control called dataSet1and a BindingSource control have been automatically added to the form (see Figure_2).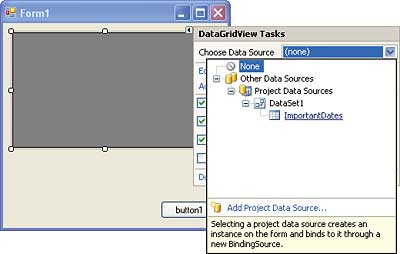
Figure 2: Binding the DataSet to the DataGridView
The dataSet1 control is the instance that the DataGridView is bound to, and to see some data appear we have to use this rather than the instance we created earlier:
DataSet1.ImportantDatesRow Row2 =
	dataSet1.ImportantDates.
	NewImportantDatesRow();
Row2.Event = “My Birthday”;
Row2.Date =
	DateTime.Parse(“1/2/2001”);
dataSet1.ImportantDates.Rows.Add(Row2);
As soon as you add a row to dataSet1.ImportantDates it will be displayed in the DataGridView. Similarly, and perhaps more surprisingly when you consider the work it entails, when the user adds or modifies data in the DataGridView this is automatically transferred to dataSet1.ImportantDates. It automatically conforms to the types defined in the table. So you might enter a string containing a date into the DataGridView but this is converted to a date when it’s stored in the table.
As well as creating tables with simple columns you can also add autonumbering and autocalculate columns. For example, add, using the DataSet designer, a new column called Counter and set it to autoincrement in the Properties window. Next add a column called Double and enter into its Expression property Counter*2. If you now select the DataMember property of the ImportantDatesBindingSource control you will see the new columns appear, and when you run the program the counter will increment every time you add a row and the count will automatically appear doubled in the Double column. You can even define index keys and relationships between tables, and these all work as if you had a database connected, even if there is none. In short the DataSet is a powerful data structure that you can use even if you don’t need a database.
Dynamic Database
There are times when you use something as if it was a database even if it really isn’t. There are a range of OLE DB connectors which access “live” data such as Exchange mail stores, ADSI, WMI, and Windows Desktop Search. These aren’t really databases in the usual sense, but they can be queried using SQL, and the results can be stored in DataSet objects. Working with these data sources in ADO .NET is fairly standard, and makes use of the usual three classes – a connection to define the data source, a dataadaptor to query and possibly update the data source, and a dataset to hold the data.For example, to connect to ADSI you would first create a connection:
string connectionString =
	“Provider=ADSDSOObject”;
OleDbConnection SearchConnect =
	new OleDbConnection();
SearchConnect.ConnectionString =
	connectionString;
In this case we are using the current user’s credentials for authentication, but you can specify a different user with:
“Provider=ADSDSOObject;
	User ID=MyUserID;
	Password=MyPassword;”
For any of the following queries to work the user must have access to the Active Directory. Once we have the connection we can create a DataAdaptor:
OleDbDataAdapter SearchAdpt = new
	OleDbDataAdapter(@”SELECT name From
	‘LDAP://dc=Mydomain,dc=co,dc=uk’
	WHERE objectClass=’user’ AND
	objectCategory=’Person’”,
	SearchConnect);
The SQL query is fairly standard but notice the use of LDAP path notation to specify which “table” to search. In this case it would be the Active Directory for the domain Mydomain.co.uk – change this to correspond to the domain you are working with. The query just returns the names of all of the users of the domain. You might be wondering if it is possible to use the Designer to create the DataAdaptor and connection. The answer is that in some cases it is but in most cases the result is an error message of some kind which you can usually ignore. It’s so easy to create both the connection and the DataAdaptor that it hardly seems worth trying to make the Designer work.
At this point we could use a strongly typed DataSet as before but it is worth doing things the “untyped” way just to see how it works. First we need an instance of DataSet:
DataSet ADSIdata = new DataSet();…which we can fill using the DataAdaptor:
SearchAdpt.Fill(ADSIdata);Following this the DataAdaptor contains a table confusingly named “Table” which has a single column called “name”.
To access the data in Table we need to use something like:
string temp = (string)
	ADSIdata.Tables[0].Rows[1][0]
This picks out the first table from the Tables collection and from this the second row and finally the data in the first column. All of the data in an untyped table is typed as object and it is up to you to cast it to something more useful – a string in this case. An alternative way of accessing the same data item is to use:
string temp = (string)ADSIdata.
	Tables[“Table”].Rows[1][“name”];
It depends on the situation which is more convenient.
To see how the same idea works with a strongly typed DataSet all we have to do is use the Project,Add New Item command and add a DataSet called ADSIdata2. Add a table called “Table” with a string column called “name”. Now we can do the job in more or less the same way by creating an instance of the new DataSet class:
ADSIdata2 oADSIdata2=new ADSIdata2();…and filling it with rows of data using the same DataAdaptor:
SearchAdpt.Fill(oADSIdata2);The big difference is how we can refer to the data contained in the DataSet. Now we can use typed properties:
string temp2 = oADSIdata2.Table[0].name;This is not only significantly simpler but it is type safe at compile time. Notice that “Table[0]” means “the first row of the table called Table” and not the first table in the Tables collection – naming can be confusing. You can, of course expand the definition of the typed DataSet to include as many columns of ADSI data as you might want to use – if you don’t return them in a query then they just remain empty.
It is also almost trivial to bind the result of an ADSI query to a control. For example, place a DataGridView control on the form and bind it to Table in ADSIdata2. Once again notice that you bind to the class and the IDE generates an instance of the DataSet, e.g. aDSIdata2 in this case. You now have to fill the new instance with ADSI data:
SearchAdpt.Fill(aDSIdata2);…which results in all of the user names appearing in the DataGridView control.
There are lots of other OLE DB connectors that can be used in the same way. The standard problem is that the documentation is usually incomplete or misleading. In many cases there are alternative ways of accessing the same data – for example the System.Directory classes provide a way of working with Active Directory. One data source that only has an OLE DB interface is Windows Desktop Search (WDS) so this is an even more valuable approach. To make this work you first need to make sure that at least WDS version 3.0 is installed – it is standard on Vista, but has to be downloaded and installed under XP. To work with it first create another typed DataSet using the Designer called SearchResults. Add a single table called Table and a single column called System.FileName.
The Connection is fairly easy to make:
string connectionString =
	“Provider=Search.
	CollatorDSO;Extended Properties=
	‘Application=Windows’”;
OleDbConnection SearchConnect = new
	OleDbConnection();
SearchConnect.ConnectionString =
	connectionString;
A DataAdaptor with a simple query is:
OleDbDataAdapter SearchAdpt = new
	OleDbDataAdapter(“SELECT Top 5
	System.FileName FROM SYSTEMINDEX”,
	SearchConnect);
The “Top 5” just returns the first five records and only the System.FileName column is returned from the table called SYTEMINDEX.
An instance of the SearchResults dataset is easy to create:
SearchResults SearchData =
	new SearchResults();
To fill it with data that matches the query specified in the DataAdaptor we use the Fill method:
SearchAdpt.Fill(SearchData);If you run the program now the query will be run on the index and the names of the first five folders/files returned. To access the name stored in the first record you would use something like:
string temp = SearchData.
	Table[0]._System_FileName;
Notice that the only complication is that the dots in the database column names have been replaced by an automatically generated property name with underscores – for fairly obvious reasons. Of course you can bind the DataSet to a control just as before to see the results of any search and you can simply add more columns to see more information about the files returned by the query.
The real power of the search engine is that it indexes the contents of a wide range of files, and to make use of this there are some additional predicates available for use within the query. If you want to search the contents of indexed files you need to know about FREETEXT and CONTAINS. FREETEXT is the simpler of the two and it enables you to search for a fixed phrase. For example:
WHERE FREETEXT(‘VSJ magazine’)…searches for any file that contains “VSJ” or “magazine” or both. You can also add a column specification so that properties are searched along with content. For example to search all of the properties and content use:
WHERE FREETEXT(All,’VSJ magazine’)FREETEXT uses a variety of matching algorithms and will return a measure of how well the document matches the search criteria in System.Search.Rank which you can retrieve and use. You can modify the way the rank is calculated using the RANK BY clause – see the documentation for more information.
The CONTAINS predicate is more suited to looking for exact matches. You can specify what you are looking for using AND, OR and NOT and use wildcards. For example, to find any word starting with “VS” you would use:
WHERE CONTAINS(‘VS*’)You can also use NEAR to find occurrences of one word near another, FORMSOF to match for words and inflections of the word. For example to find documents containing run, ran or running you would use:
CONTAINS(‘FORMSOF(INFLECTIONAL,run)’)Full text searches are clearly powerful, but a programmed search can generally do more by including conditions on properties such as System.Author or System.DateCreated.
To find out more about SQL and WDS, just search the MSDN website for WDS 3 and you will find a full list of predicates and column names.
Once you explore the idea you’ll discover that datasets, tables and ADO.NET in general can be surprisingly useful even when there isn’t a real database in sight.
Ian Elliot is a senior development programmer with I/O Workshops Ltd, a consultancy which solves real world problems for clients with widely varying requirements.
Comments