So in this article we’ll look at some of the issues that are involved with supporting the mouse in our Silverlight applications, and along the way revel in the fact that we can exploit features such as extension methods in our browser-based applications.
Hello, Logic Lab
Logic Lab is a prototypical Silverlight 1.1 application, whose objective is to enable electronics students to design and test circuits using standard logic gates, as shown in Figure 1.
Figure 1: The Logic Lab
As an aside, the circuit shown in Figure 1 is a simple adder that supports three inputs – A, B and a carry flag, C – and which produces a Sum and an output carry flag (C1).
So, why Silverlight?
Silverlight is ideally suited for creating this type of application, for a number of reasons:- The application is heavily interactive, with the student able to design the circuit by dragging the different gates into position and using the mouse to connect the outputs and inputs together.
- The application is designed with wide platform support in mind (who knows what sort of computing equipment the school might be using), and thus cannot be constrained to a Windows-based O/S, which would have been the case if WPF or Windows Forms had been adopted for the UI.
- Zooming in the application is easily catered for in a XAML-based UI, with the visual appearance being generated using Microsoft Expression Blend and Microsoft Expression Design.
- The functional coding aspects of the application were easy to implement by using C# and the .NET Framework, benefiting from such things as Design Patterns and easy to use collection types.
The mouse is paramount
As you can see from Figure 1, the mouse plays a huge role in the Logic Lab application, with support for selecting and drag/dropping the logic gates, building the connections between gates, and so on. Sadly, there’s not enough room in a single article to go into all of the implementation behind the application, but we can get a pretty good handle on how to manage the mouse just by looking at one small aspect of the Logic Lab UI: developing the Buttons that are used to select which type of gate should be added to the circuit.And to build Buttons, we need to understand what Silverlight offers by way of mouse events.
The core mouse events
There are a mere five mouse events that you can handle in Silverlight: MouseEnter, MouseLeave, MouseMove, MouseLeftButtonDown and MouseLeftButtonUp. All of these events use the MouseEventHandler delegate with the honourable exception of MouseLeave, which uses a standard EventHandler.The MouseEventHandler delegate utilises a MouseEventArgs type for its second parameter, which extends the standard EventArgs and offers support for stylus information; Boolean properties for checking to see whether the control or shift keys were pressed; and the handy GetPosition() method that can be used to find the position of the mouse relative to a UI element. You’ll see GetPosition() in action when we use it to determine whether the mouse is over an element.
Right mouse button support
At this point you might be wondering about support for the right mouse button. Well, there is no right mouse button support in Silverlight, as it’s reserved for showing a context sensitive menu relating to the plug-in itself.Implementing a Button
So how hard can implementing a Button really be?Well, truth be told, it’s not very difficult to create a Button. Typically, you will create a Silverlight user control using the supplied Visual Studio 2008 template, and add UI elements and mouse event handlers to taste. There are, however, a couple of minor wrinkles that you might need to iron out.
The first (and most important) thing that you need to decide upon is which user action will cause your Button to raise its Click event. The initial and most obvious choice is the MouseLeftButtonDown event handler:
<!-- The Button
<Canvas xmlns="..."
	MouseLeftButtonDown="OnMouseLeftButtonDown" >
	<!-- Button UI content goes here -->
	<Rectangle x:Name="rct" ... />
	<TextBlock x:Name="txt"... />
</Canvas>

public class Button : Control
{
	// Event handler for MouseLeftButtonDown
	void OnMouseLeftButtonDown(object sender,MouseEventArgs e )
	{
		OnClick( this, EventArgs.Empty );
	}
	...
	public event EventHandler Click;
	protected virtual void OnClick( EventArgs e )
	{
		if( Click != null ) Click( this, e );
	}
}
There is one problem with implementing a Button this way: it doesn’t behave in a manner that is consistent with standard Windows buttons, which raise their Click events when the user releases the mouse button, and then only if the mouse cursor is still over the Button. This means that if you want to emulate that behaviour in your own Button controls then you should be handling the MouseLeftButtonUp event to raise the Click event, not MouseLeftButtonDown.
Unfortunately, taking this approach is going to make things just a little bit more complicated.
A richer Button
Figure 2 shows the graphical states of the Button used to create Nor gates, which uses a slightly richer Button implementation than that proposed in the listing above.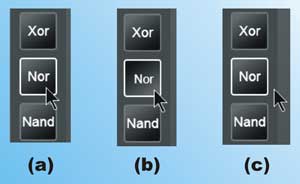
Figure 2: The richer Button
Remember, Silverlight is a cross-platform technology designed to support rich visual applications, so you’re by no means constrained to making your Button control look like a standard Windows Button: it’s just nice to make sure that it works like a standard Button.
The Logic Lab Button works as follows. When the user moves the mouse cursor over the Button it enters state (a) and the Button highlights its edge to draw the user’s attention to the fact that it is indeed an interactive element. Should the user then press and hold the left mouse button down it enters state (b): the Button’s caption is shrunk and offset slightly, and the gradient is reversed, hopefully giving the impression that the Button is in a pressed state.
If the user moves the mouse cursor away from the Button but continues to hold the left mouse button down, the Button updates its visuals so that it appears that the Button has popped back up (c). However, it retains its highlight to indicate that the Button is still the active item of interest. If they move the mouse cursor back over the Button whilst continuing to hold the left mouse button then it reverts to the active state shown in (b).
Finally, if the user releases the mouse button when the cursor is not over the control the highlight is removed and it reverts back to the normal state; the Click event is not raised.
This is all fairly standard functionality, but in order to implement this we need to remember one thing: Silverlight raises mouse events for the item that is under the current mouse cursor position. If the user moves the mouse away from the control whilst holding the left mouse button down, and then releases the mouse button, the control will not receive the MouseLeftButtonUp event.
In order to change this behaviour, the Button control has to capture the mouse. Let’s look at how you do that now.
Capturing the mouse
Capturing the mouse is straightforward(-ish) in Silverlight: you simply call the CaptureMouse() method for the FrameworkElement that should receive the mouse events, and then call ReleaseMouseCapture() when done. The following listing shows this in action for the richer Button:<Canvas ...
MouseLeftButtonDown =
"OnMouseLeftButtonDown"
MouseLeftButtonUp =
"OnMouseLeftButtonUp"
MouseEnter = "OnMouseEnter"
MouseLeave = "OnMouseLeave" >
<!-- Button UI -->
</Canvas>
public class Button : Control
{
// The Canvas for the control
FrameworkElement controlRoot;
// Fields for the other UI elements
Rectangle rct;
TextBlock caption;
public Button()
{
System.IO.Stream s =
GetType().Assembly.
GetManifestResourceStream("...");
controlRoot =
this.InitializeFromXaml(
new System.IO.StreamReader(s).
ReadToEnd());
// Initialise the fields
rct = controlRoot.GetChild<
Rectangle>("rct");
caption = controlRoot.GetChild<
TextBlock>("txt");
}
// Code for adjusting the visuals of
// the Button to reflect its current
// state
private enum VisualState { ... }
private void SetVisualState(
VisualState state )
{ ... }
bool isMouseCaptured = false;
void OnMouseEnter(object sender,
EventArgs e)
{
VisualState state =
VisualState.Active;
if( isMouseCaptured )
state |= VisualState.Pressed;
SetVisualState( state );
}
void OnMouseLeave(object sender,
EventArgs e)
{
VisualState state =
VisualState.Normal;
if( isMouseCaptured )
state |= VisualState.Active;
SetVisualState( state );
}
void OnMouseLeftButtonDown(
object sender, MouseEventArgs e )
{
isMouseCaptured =
controlRoot.CaptureMouse();
SetVisualState(VisualState.Active|
VisualState.Pressed);
}
void OnMouseLeftButtonUp(object
sender, MouseEventArgs e)
{
Point pt = e.GetPosition( rct );
bool isOverRectangle =
rct.Contains( pt );
VisualState state = isOverRectangle ?
VisualState.Active : VisualState.Normal;
SetVisualState( state );
if(isMouseCaptured &&
isOverRectangle )
OnClick(EventArgs.Empty);
if( isMouseCaptured )
controlRoot.ReleaseMouseCapture();
isMouseCaptured = false;
}
// other code elided for clarity
...
}
Having captured the mouse in the MouseLeftButtonDown event handler, mouse events will be routed to the control even though the user moves the mouse cursor outside of the Button. As you would expect, the code releases the mouse capture when the user releases the left mouse button. Note that we have to track the mouse capture ourselves.
The mouse capture gotcha
At this point you’re probably thinking that the Button functionality is done and dusted. Well, think again. There’s a gotcha that can scupper your mouse handling code: the mouse only remains captured only as long as the user doesn’t move the mouse outside of the bounds of the Silverlight control. This of course prevents an errant Silverlight application from freezing out the mouse for a user, but it does mean that your Button’s internal state can go out of kilter with what’s happening with the mouse, as you won’t get the MouseLeftButtonUp event if the mouse released outside of the plug-in.The fix (and this is something that you’ll definitely need to think about when implementing a drag ‘n’ drop system in Silverlight) is to handle the MouseLeave event of the ultimate root element for the application as well. Here’s how this can be done for our Button:
public class Button : Control
{
	...
	void OnMouseLeftButtonDown(
		object sender, MouseEventArgs e )
	{
		...
		controlRoot.GetRootNode().
			MouseLeave +=OnRootLeave;
	}
	void OnMouseLeftButtonUp(object
		sender, MouseEventArgs e)
	{
		...
		ResetMouseCapture();
	}
	void OnRootLeave( object sender,
		EventArgs e )
	{
		ResetMouseCapture();
	SetVisualState( VisualState.Normal );
	}

	void ResetMouseCapture()
	{
		if( isMouseCaptured )
			controlRoot.ReleaseMouseCapture();
		isMouseCaptured = false;
		controlRoot.GetRootNode().
			MouseLeave -= OnRootLeave;
	}
}
As you can see, the Button now dynamically hooks into the root’s MouseLeave event and resets the visual appearance of the Button accordingly. It also makes sure that it disconnects the event handler for the root’s MouseLeave event in both the normal MouseLeftButtonUp and the OnRootLeave event handlers.
An aside on extension methods
The code in the last two listings has made use of a couple of handy methods, such as GetRootNode() and GetChild<T>(). These are not defined on the FrameworkElement, but are in fact C# 3.0 extension methods, defined in the following helper class:public static class
FrameworkElementExtensions
{
public static FrameworkElement
GetRootNode(this FrameworkElement
elem)
{
while (elem.Parent != null)
{
elem = (FrameworkElement
)elem.Parent;
}
return elem;
}
public static T GetChild<T>(
this FrameworkElement ctrl,
string name)
where T : FrameworkElement
{
return ctrl.FindName(name) as T;
}
// other methods elided for clarity
...
}
Such extension methods can be handy for adding features such as BringToFront, SendToBack and type-safe wrappers around methods such as FindName() to your FrameworkElements. Again, it’s important to remember that you’ve access to the full feature set of C# 3.0 in your Silverlight 1.1 code.
Mouse event bubbling
Up to now, we’ve been focusing on handling mouse events, dealing with mouse capture and even checking the position of the mouse cursor relative to a FrameworkElement. However, there’s something else that you need to consider: how mouse events are bubbled up through the elements.You will remember from the very first listing that our Button is made up of nothing more than a Canvas containing a Rectangle and a TextBlock. Take a peek at the code again and you’ll notice one important thing about the Canvas: it has no Height or Width properties specified, which means that it is precisely zero pixels tall and wide.
So if that’s the case, how can we be handling the mouse events at the Canvas level in our control, because surely the mouse is never over the Canvas?
As you would expect, Silverlight is pretty smart when it comes to dealing with the mouse. When a mouse event is to be raised, Silverlight locates the element that is directly under the mouse cursor (or has the mouse captured), and directs the event to that element. However, it doesn’t stop there: the mouse events then bubble up through the element tree.
The next listing shows the significant section of the XAML that defines the Logic Lab user interface.
<Canvas xmlns="..." xmlns:llc="..."
... >
	<Canvas x:Name="toolCanvas">
		<Rectangle x:Name="toolBar"
				Width="74" Height="768"
				Fill="#FF414141" />
	<llc:Button llc:Caption="And" ... />
	<llc:Button llc:Caption="Or" ... />
		<!-- other buttons -->
	</Canvas>
</Canvas>
What this means is that when the user clicks the mouse over either the Rectangle or TextBlock for one of the buttons, the events are routed through the element tree as shown in Figure 3.
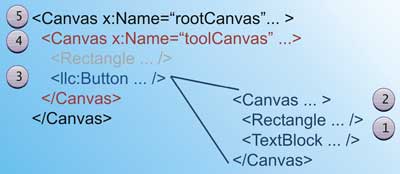
Figure 3: Mouse event routing
The relevant mouse event will begin (and can be handled, if you desire) at either the Rectangle or TextBlock in the Button. Note that it won’t occur on both Rectangle and TextBlock, as the events only bubble up to the parent, and not the peers, of the element that was the initial start point for the event. This is why it makes sense to handle all of the mouse events at the Canvas in our Button control, as it doesn’t matter whether the user clicks the text or the rectangle.
Bubbling all the way to the top of the tree!
Whilst mouse event bubbling is extremely useful, it does have one downside: the events bubble all the way to the top of the tree regardless of whether you handle them or not. In the current 1.1 alpha version (as at October 2007), there is no way of stopping them!So, what’s the big deal with that? Let’s say that you decide to add a handler for the MouseLeftButtonDown event to the root Canvas of the application to perform a task such as initiating a drag operation. Unfortunately, that handler will be invoked when the user clicks on one of the Button controls. This might not be what you’d either expect or desire.
One way to avoid the problem is to ensure that you never handle mouse events in any Canvas unless that Canvas is a completely self-contained user control, which can normally be achieved by careful structuring of the elements. Let’s look at a quick example.
Logic Lab has MessageBox control, which is shown in Figure 4.

Figure 4: The MessageBox
In order to allow the user to drag the MessageBox around, event handlers were added to the Rectangle that is used for the title bar:
<Canvas xmlns="http://schemas.
	microsoft.com/client/2007"
	xmlns:x="http://schemas.microsoft.
		com/winfx/2006/xaml"
	xmlns:llc="..." Width="0" Height="0"
	Background="Gray">
	<Rectangle Width="300"
		Height="30" Fill="#FF636363"
		MouseLeftButtonDown="..."
		MouseLeftButtonUp="..."
		MouseMove="..."
		...
		/>
	<!-- Other UI elements -->
	<llc:Button x:Name="button1" ... />
	<llc:Button x:Name="button2" ... />
	<llc:Button x:Name="button3" ... />
</Canvas>
Adding the event handlers to the Rectangle rather than the control or Canvas meant that there is no conflict with the events that are generated as part of the Button controls that are used in the dialog.
Marking events as being handled
However, whilst you can attempt to ensure that there is no overlap within the element tree, there will almost certainly come a time when it becomes unavoidable. Unfortunately, whilst you cannot currently modify or interfere with the way the events are bubbled, you can certainly deal with this situation.One of the easiest approaches to take is to set a global flag when you want to mark an event as being handled, and have all event handlers check the flag before performing their particular piece of functionality in their handlers. Of course, you need to reset the flag, which can be done by simply handling all of the mouse events on the root Canvas.
The following event handler helper class is an example of just such a flagging system:
public static class MouseEventManager
{
	static bool isHandled = false;
	public static bool IsHandled(
		this EventArgs e )
	{
		return isHandled;
	}
	public static void Handle(
		this EventArgs e )
	{
		isHandled = true;
	}
	private static void ResetHandler(
		object sender, EventArgs e )
	{
		isHandled = false;
	}
	public static void SetRootHandler(
		this Canvas e )
	{
		e.MouseMove += ResetHandler;
		e.MouseEnter += ResetHandler;
		e.MouseLeave += ResetHandler;
		e.MouseLeftButtonDown +=
			ResetHandler;
		e.MouseLeftButtonUp +=
			ResetHandler;
	}
}
The MouseEventManager class is divided into two parts. The top two methods, IsHandled() and Handle() are used in event handlers to check or set the global flag, which is implemented as a private static field.
The SetRootHandler() method, on the other hand, is called by the ultimate root canvas to connect up all of the mouse events to the ResetHandler() method which, as its name suggests, resets the “global” isHandled flag back to false.
Again, note that the MouseEventManager uses extension methods to make it as natural as possible for developers to use this mechanism. As you can see from Figure 5, Visual Studio 2008 adds the methods that pertain to the EventArgs type to IntelliSense, making it much easier for the developer to see how to use the methods.

Figure 5: IntelliSense and the extension methods
So how would you use such an extension mechanism? Picking on just one of our Button’s mouse events, we’d rewrite the code as follows:
void OnMouseLeftButtonDown( object
	sender, MouseEventArgs e )
{
	...
	e.Handle();
}
Similarly, in the relevant event handler at the higher level in the tree, we’d write:
void HigherLevelHandler( object sender,
	MouseEventArgs e )
{
	if( e.IsHandled() )
		return;
	// Higher level event handler code
}
Finally, in your ultimate root canvas, you would add the following line of code to its constructor or Loaded event handler that would ensure that the isHandled flag is reset by hooking all the mouse events at the root level:
this.SetRootHandler();This event management approach is a bit of a hack, I grant you, and if possible you should avoid constructing UI hierarchies where this can become a problem. One good piece of news is that it’s almost a certainty that by the time Silverlight 1.1 ships, marking events as being handled will be baked into the product.
Now you click me, now you don’t!
One final feature to understand is the IsHitTestVisible property. Note that you might have seen an IsHitTestable value in IntelliSense: ignore it, as the real name is IsHitTestVisible. As the (real) name suggests, Silverlight will check the value of this Boolean property and use it to determine whether the element should receive mouse events, based on whether the element is visible to hit tests.This is a good thing, as you can use it to improve performance on elements that really don’t care about mouse interaction. However, there are a couple of things to be aware of.
Firstly, if you set the value of IsHitTestVisible to false on a Canvas, Silverlight will ignore all descendant elements of that Canvas when determining who should receive the mouse events, even if the descendant elements have explicitly set their own IsHitTestVisible property to true.
The second thing to note is that Silverlight will send the mouse events to the first hit-testable element that it finds under the current mouse cursor position. If you look at Figure 6, Silverlight ignores both the orange and blue canvases, but will start routing the mouse event from the purple canvas as it expands to cover the point under which the mouse is positioned.
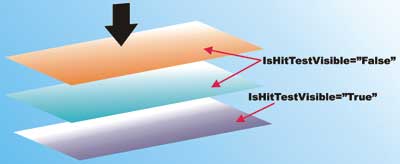
Figure 6: IsHitTestVisible
Conclusions
Most Silverlight applications will involve extensive mouse interaction, and on the whole working with the mouse is relatively straightforward. There are really only a few things to watch out for:- There’s no support for the right mouse button.
- Mouse capture only lasts until the mouse is moved out of the Silverlight plug-in. Therefore, make sure that if you’re capturing the mouse, you hook the root element’s MouseLeave event if you need to manage state: this is important for drag ‘n’ drop and “real” Button scenarios.
- Mouse events bubble up the element tree and can’t be stopped (at the time of writing). Either structure your elements accordingly, or write a simple event management type to provide some control over the process.
- Mark elements with the IsHitTestVisible property to opt in or out of mouse events, but remember that the entire set of child descendants will be affected if you turn off hit testing.
Dave Wheeler is a freelance consultant, who specialises in the various Microsoft.NET UI technologies. He also writes and delivers courses for DevelopMentor, and speaks at various industry conferences including DevWeek. You can contact him at [email protected].
Comments