You do Java – GWT does JavaScript
GWT is an open source toolkit and library released by Google under the Apache 2.0 open source licence. With this licence, you are free to use it for your own development and adapt it for your own use – commercial or otherwise. Note however that a number of third party libraries included within GWT, such as those originating from Eclipse, Mozilla and Webkit, are not Apache 2.0 licensed but have their own licence schemes.In this article, you get to work with GWT, building an AJAX user interface intended for a mobile communications device. The end result is an AJAX enabled web page that uses JavaScript and Dynamic HTML to implement a contact list and address book. The code you write, however, is all in Java. You don’t have to write a single line of JavaScript; instead the compiler included in GWT compiles your Java code into the required JavaScript code. In fact, you can use all the usual Java tools in creating your application – for example, the Eclispe IDE to simplify your development, and JUnit to manage and run your unit tests.
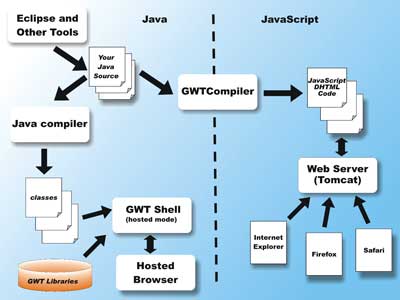
Figure 1: GWT workflow
Figure 1 shows how this works. First you write the Java code using the GWT API Java library. You then compile your Java code into binary classes using a standard Java compiler. After compilation, you can test the application in a tool called GWTShell without compiling to JavaScript. During this testing, referred to as Hosted Mode testing, GWT Java libraries are used to emulate AJAX JavaScript behaviours. In Hosted Mode, the GUI displayed in the Hosted Browser (a GWT code component) exists as Java code (not JavaScript). When running under Hosted Mode, you can use an IDE (such as Eclipse) and other tools to rapidly debug and test your application. In fact, you can keep everything in Java until deployment.
When you have finished debugging and testing your application, and want to compile to JavaScript code, you can use the GWTCompiler to compile your Java code into JavaScript. The resulting JavaScript code can be deployed to any web server. In addition, the Hosted Mode browser has a Compile/Browse button that can compile to JavaScript and start a real browser (such as Firefox) displaying the application with one single click.
Java developer-friendly class hierarchy
To make AJAX programming as simple to comprehend as possible for Java developers, the GWT designers have adopted a class hierarchy that is very similar to the two bread-and-butter Java GUI libraries – AWT and Swing. This similarity enables rapid transfer of skills and knowledge. Looking at Figure 2, a small portion of the GWT widget class hierarchy, you probably get a feeling of déjà vu.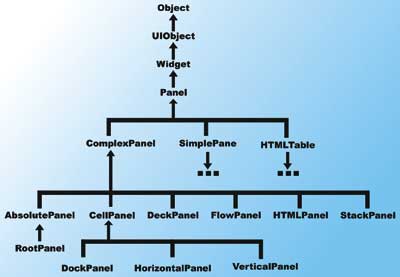
Figure 2: GWT’s Widget class hierarchy is similar to Java’s own AWT/Swing hierarchy
Figure 2 shows a very small sub-tree of the GWT Widget class hierarchy, focusing on classes derived from ComplexPanel. The large number of subclasses derived from ComplexPanel provides a wide choice of layout and user interaction handling for the creation of your own GWT application. The thing to note is how easy it is to understand and start using this class hierarchy for Java developers familiar with AWT or Swing.
Just like the other Java GUI libraries, Panels can contain other Widgets such as Label, Frame, MenuBar, Buttons, other Panels, and so on. In the GWT example later, you will work with several of these Panels.
JRE limitations
Of course, JavaScript is a scripting language, and as such is missing a lot of the rich language features and API support that Java enjoys. However, the GWT compiler handles a usable subset of the Java language itself. The following is a partial listing of some of the essential Java language features supported:- Intrinsic Data Type (including byte, char, int, long, float, Object, String, and arrays of these types)
- Exceptions (familiar try, catch, and finally but no stack trace)
- Assertions (only for debugging on the Java side, but very useful for development)
Table 1 shows some of the available JRE APIs when using GWT. The table is not a comprehensive list of the APIs supported – please consult the GWT reference documentation if you need such list. However, it gives you a feel for the rich support for Arrays, Collections, and Events. These are API classes that can help when designing and programming complex user interfaces.
| Table 1: JRE APIs when using GWT | |
| JRE Packages | Commonly used APIs supported by GWT |
| java.io | Serializable |
| java.lang | Boolean, Byte, Character, Class, Double, Exception, Error, Float, Integer, Long, math, Number, Object, RuntimeException, Short, String, StringBuffer, System, Throwable |
| java.util | ArrayList, Arrays, Collections, Date, EventObject, HashMap, HashSet, Stack, Vector; Collection, EventListener, Iterator, List, ListIterator, Map, Set |
Getting started with GWT
You now have enough knowledge about GWT to get started – download GWT.The latest available release at the time of writing is 1.4. This article assumes that you are using 1.4 or a later version, with Java SE 6 (JDK 1.6.0_02 or later) installed, and also Eclipse 3.3.0 (Europa) or later for your IDE.
Installing GWT is as simple as unzipping the downloaded ZIP file into a directory of your choice. You should then add this installation directory to your PATH environment variable. This allows you to run any command included in GWT.
Now, you need to first create a skeleton project for the AJAX application. In your working directory, create a directory called GWTFlyer, and then change directory into it. Then use the projectCreator command from GWT to create your project directories and Eclipse project files, with the command:
C:\project\GWTFlyer>
	projectCreator -eclipse GWTFlyer
The skeletal directories for the project and the Eclipse support files are generated, as shown in the status output:
Created directory
	C:\project\GWTFlyer\src
Created directory
	C:\project\GWTFlyer\test
Created file
	C:\project\GWTFlyer\.project
Created file
	C:\project\GWTFlyer\.classpath
The next step is to run the applicationCreator command. This creates a trivial GWT application that you can use as a base for your own. The command to run is:
C:\project\GWTFlyer>applicationCreator
	-eclipse GWTFlyer
	uk.co.vsj.gwt.client.GWTFlyer
Note that the last part of the package should always be client, signifying that this is GWT code. This command creates the Java package directory, the source code to the trivial GWT application, an Eclipse launch file, and two command files that can be used to run and compile the application on the command line.
The generated CMD batch files, and their usage, are tabulated in Table 2.
| Table 2: Generated CMD batch files | |
| Generated Batch File | Description |
| GWTFlyer-shell.cmd | When executed at the command line, starts the GWT Shell and runs the application in Hosted mode. In Hosted mode, the application is executed against the GWT Java support libraries. |
| GWTFlyer-compile.cmd | When executed at the command line, compiles the application source code into JavaScript and starts the application as a real AJAX application. After compilation, the set of JavaScript files can be moved to any web server for deployment. Any browser supporting AJAX can be used to view/test the application. |
Bringing the GWTFlyer Project into the Eclipse IDE
With the generated .classpath, .project, launch file, you can bring the GWTFlyer project into Eclipse by selecting File -> Import… from the menu. The Import wizard pops up, similar to Figure 3.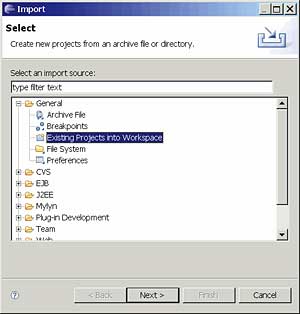
Figure 3: Importing the GWTFlyer project into Eclipse
Select the Existing Projects into Workspace option, and then click Next.
The next page of the wizard allows you to browse to the project directory. Make sure you check the box labeled Copy projects into workspace.
At this point, Eclipse creates the project by copying the generated files to your Eclipse workspace. After the import, you can see the structure of the generated project in Eclipse. Figure 4 shows the project imported, shown in the Eclipse Package Explorer pane.
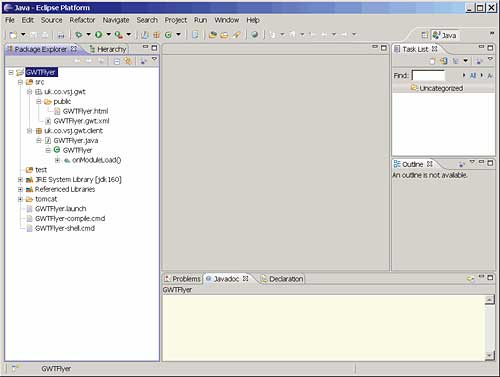
Figure 4: GWTFlyer project imported into Eclipse
Compiling and testing in Eclipse
To compile the Java source code, right click on the GWFlyer project title at the top of the tree in the Package Explorer, and select Build Project. To run the project in Hosted mode (100% Java), click on Run in the button bar.In Hosted mode, you can see the GWT Shell with a web server starting up, followed by a browser that displays the application output. The generated application shows only a web page with a button labelled Click me, as shown in Figure 5, where you can also see the GWT Shell/local web server running in the background.
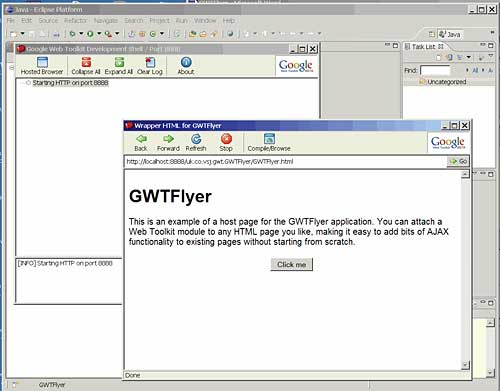
Figure 5: The GWT Shell running the generated GWTFlyer application
Modifying the generated GWTFlyer application
With the bare skeleton GWTFlyer running, it is time to add your own user interface widget. First, close down both of the GWT windows. In the Package Explorer, look under src\uk.co.vsj.gwt.public package and locate the generated HTML page GWTFlyer.html.This page controls where and how your user interface widget is going to be displayed. If you need to add borders, headers, footers, menus, corporate graphical assets, or additional JavaScript code to your pages, you can do it here.
For the GWTFlyer project, this page needs to be modified to show:
<html>
	<head>
		<title>Wrapper HTML for
			GWTFlyer</title>
		<link rel=”stylesheet”
			href=”GWTFlyer.css”
			type=”text/css”>
<script language=’javascript’ src=
’uk.co.vsj.gwt.GWTFlyer.nocache.js’>
		</script>
	</head>
	<body>
		<!-- OPTIONAL: include this if
			you want history support -->
		<iframe src=”javascript:’’”
			id=”__gwt_historyFrame”
	style=”width:0;height:0;border:0”>
		</iframe>
	</body>
</html>
The highlighted <script> line is a generated (during compilation) JavaScript file that loads your module when the page is displayed. Note that a CSS stylesheet called GWTFlyer.css is included and is used in stylizing the graphical components in GWTFlyer, see below for further information.
The module itself is described in an XML file placed at the specified package location, in this case this module description XML is in the uk.co.vsj.gwt package, and named GWTFlyer.gwt.xml. This file is shown below:
<module>
	<!-- Inherit the core Web Toolkit
	stuff. -->
	<inherits
	name=’com.google.gwt.user.User’/>
	<!-- Specify the app entry point
	class. -->
	<entry-point class=
	’uk.co.vsj.gwt.client.GWTFlyer’/>
</module>
The highlighted line tells GWT runtime the actual Java class to load and execute as the module. This class must extend the EntryPoint interface, and its associated onModuleLoad() method. This is how your user interface code gets bootstrapped in Java. Exactly the same behaviour is emulated in JavaScript when you compile your application to JavaScript.
Understanding the user interface widget
The AJAX user interface that you will build shows the user interface of a mobile communications device, see Figure 6.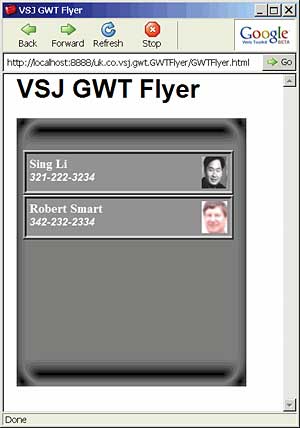
Figure 6: The GWTFlyer user interface
The user interface in Figure 6 displays the name, phone number, and picture of two contacts. If you click on any one of the contacts, a details panel containing more information will “fly in” smoothly from the bottom. Figure 7 shows the address panel partially flown in.
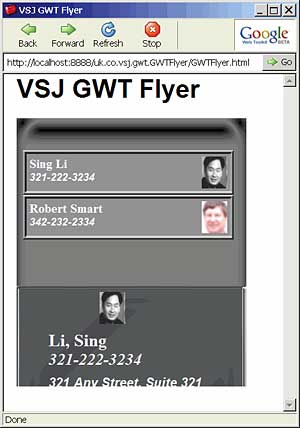
Figure 7: GWTFlyer with details panel partially flown in
Once the address panel is completely flown in, if you click again on the contacts, it will retract smoothly back to the bottom of the screen. This sort of data-driven immediate feedback is typical of AJAX-based applications, and usually not found in standard web-based applications.
Figure 8 shows how the GWTFlyer application is laid out from supporting component derived from classes of the GWT Widget library (shown partially in Figure 2 earlier).

Figure 8: Composition and containment relationships in the GWTFlyer application
In Figure 8, the bold class names are custom classes that you write in the GWTFlyer application and the italicized ones are GWT Widget class names that you instantiate or inherit from. Notice that it contains many uses of AbsolutePanel. This GWT Widget class is used frequently here because it allows you to place any contained Widget at absolute pixel locations. This is essential in planning user interface layout on mobile devices.
Coding up the GWTFlyer AJAX Application
The main class in the GWTFlyer application is GWTFlyer.java which implements the EntryPoint interface. The following is a line-by-line walkthrough of its code:package uk.co.vsj.gwt.client;
import
com.google.gwt.core.client.EntryPoint;
...
public class GWTFlyer implements
EntryPoint, ClickListener {
First, we set the width and height of the base display to match the size of the mobile device, in this case 360x420:
private static int IP_WIDTH = 360;
private static int IP_HEIGHT = 420;
To simulate data fetched from a server, two static Contact instances are part of the contacts array. GWT includes API classes for using simple RPC to fetch data from a server – however, actual use of these APIs is outside the scope of this article. In this application, you focus on the GUI, and use the following array to access the data:
private static Contact [] contacts =
	new Contact [] {
	new Contact(“Sing”, “Li”,
		“321-222-3234”,
		“321 Any Street, Suite 321”,
		“London, UK”, “joepix.bmp”),
		new Contact(“Robert”, “Smart”,
		“342-232-2334”,
		“321 Booth Avenue”,
		“Brooklyn, New York”,
		“jackpix.bmp”)
};
Next, the two top-level panels are created (see Figure 8). These are the AbsolutePanel named dp, and the FocusPanel called fp. dp is used to position the ContactTab instances and the AddressPanel. fp is necessary because an AbsolutePanel does not process mouse clicks. By wrapping an AbsolutePanel in a FocusPanel, you can process mouse clicks and keyboard events. This sort of composition is typical in AWT and Swing, and has identical features when using GWT:
final AbsolutePanel dp =
	new AbsolutePanel();
final Label label = new Label();
final FocusPanel fp = new FocusPanel();
An instance of the FlyinPanelManager and the AddressPanel are also created (see Figure 8 for layout reference).
final FlyinPanelManager flyin = new
	FlyinPanelManager(“FlyinManager”,
	dp);
final AddressPanel ap = new
	AddressPanel(“first address”,
	contacts[0]);
The onModuleLoad() method is the entry point called by GWT when the application starts. The panels are initialized, sized, and laid out in this method. Note that the FocusPanel’s mouse click listener is set to this same GWTFlyer.java class.
public void onModuleLoad() {
Note that size and position in GWT are specified as HTML compatible text strings (such as “120px”) instead of numbers. A Utils class and getPixelPositionString() method is included in the source code to convert integer to these “pixel strings”. This allows us to maintain size information in numerical values.
dp.setSize(
	Utils.getPixelPositionString(
	IP_WIDTH),
	Utils.getPixelPositionString(
	IP_HEIGHT));
flyin.addPanel(new ContactTab(
	contacts[0], “first”), 10, 50);
flyin.addPanel(new ContactTab(
	contacts[1], “second”), 10, 120);
flyin.addPanel(ap, 0, 450);
fp.add(flyin);
fp.addClickListener(this);
dp.add(fp);
dp.setStyleName(“basepanel”);
RootPanel.get().add(dp);
}
public int getHeight() {
	return 420;
}
public int getWidth() {
	return 360;
}
When the user clicks over the FocusPanel, the OnClick method is called. And GWTFlyer calls either flyIn() or flyOut() method of the FlyinPanelManager instance to fly in or fly out the contained AddressPanel.
public void onClick(Widget sender) {
	System.out.println(“clicked by “
		+ sender.toString());
	if (flyin.isFlyInPlace()) {
		flyin.flyOut();
	} else {
		flyin.flyIn(ap);
		}
	}
}
The Contact class contains the contact information, including the name of the photo bitmap file. The list of contacts is hard-coded in GWTFlyer to keep things simple, but can actually be data fetched from server-side databases if you extend the application.
package uk.co.vsj.gwt.client;
public class Contact {
	private String firstName;
	private String lastName;
	private String phoneNumber;
	private String address1;
	private String address2;
	private String photoFile;
public String getAddress1() {
	return address1;
}
public void setAddress1(String
	address1) {
	this.address1 = address1;
}
public String getAddress2() {
	return address2;
}
public void setAddress2(String
	address2) {
	this.address2 = address2;
}
public String getFirstName() {
	return firstName;
}
public void setFirstName(String
	firstName) {
	this.firstName = firstName;
}
public String getLastName() {
	return lastName;
}
public void setLastName(String
	lastName) {
	this.lastName = lastName;
}
public String getPhoneNumber() {
	return phoneNumber;
}
public void setPhoneNumber(String
	phoneNumber) {
	this.phoneNumber = phoneNumber;
}
public String getPhotoFile() {
	return photoFile;
}
public void setPhotoFile(String
	photoFile) {
	this.photoFile = photoFile;
}
public Contact(String firstName, String
	lastName, String phoneNumber,
	String address1, String address2,
	String photoFile) {
	super();
	this.firstName = firstName;
	this.lastName = lastName;
	this.phoneNumber = phoneNumber;
	this.address1 = address1;
	this.address2 = address2;
	this.photoFile = photoFile;
}
}
The FlyinPanelManager class is a subclass of AbsolutePanel and manages an array of sub-panels, including all the ContactTab panels and the single AddressPanel. The animation of the contained AddressPanel is handled completely within this class:
package uk.co.vsj.gwt.client;
import java.util.ArrayList;
...
public class FlyinPanelManager
	extends AbsolutePanel {
An ArrayList is used in managing the panels contained within FlyinPanelManager. Thanks to the support of the GWT support of this Java Runtime class, you can use ArrayList in your JavaScript code.
	private List panels =
		new ArrayList();
	private Image img =
		new Image(“background.bmp”);
	private static int IP_WIDTH = 360;
	private static int IP_HEIGHT = 420;
You can adjust the following two constants to make the panel fly in faster or slower.
private static int MOVE_STEP_SIZE = 2;
private static int MOVE_DELAY_MS = 10;
The currentFlyin variable keeps track of the state of the fly-in panel. It is null if the panel is not in place, otherwise it points to the panel that is flown into position.
	private Panel currentFlyin = null;
	private static int TOP_OF_FLYIN =
		IP_HEIGHT / 2;
	public FlyinPanelManager(String
		caption, AbsolutePanel parent){
		super();
		add(img, 0, 0);
		setStyleName(
			“gwtflyer-flypanel”);
		setSize(
		Utils.getPixelPositionString(
			IP_WIDTH), Utils
			.getPixelPositionString(
			IP_HEIGHT));
	}
	public void addPanel(Panel panel,
			int left, int top) {
		super.add(panel, left, top);
		panels.add(panel);
	}
The isFlyInPlace() method allows the parent class to test if a panel is currently flown into position or not.
	public boolean isFlyInPlace() {
		return (currentFlyin != null);
	}
To animate a fly-in panel, a timer is set. Each time the timer ticks, an event is generated. The handler of the event moves the panel incrementally. This is necessary because JavaScript code is essentially single threaded.
	static Timer t = null;
	public void flyIn(Panel panel) {
		assert
			(panels.contains(panel));
		final Panel pan = panel;
		currentFlyin = panel;
		if (t != null) {
			t.cancel();
		}
		t = new Timer() {
			public void run() {
				int cury =
					getWidgetTop(pan);
				if (cury > TOP_OF_FLYIN){
					setWidgetPosition(
						pan, 0, cury -
						MOVE_STEP_SIZE);
				}
			}
		};
		t.scheduleRepeating(
			MOVE_DELAY_MS);
	}
Flying out the panel is similar, a Timer is needed. Since JavaScript is single threaded, the same Timer variable can be used with new Timer instances.
// flyout the current flown-in panel
	public void flyOut() {
		assert (currentFlyin != null);
		final Panel pan = currentFlyin;
		if (t != null) {
			t.cancel();
		}
		t = new Timer() {
			public void run() {
				int cury =
					getWidgetTop(pan);
				if (cury < IP_HEIGHT) {
					setWidgetPosition(
						pan, 0, cury +
						MOVE_STEP_SIZE);
				} else {
				currentFlyin = null;
				}
			}
		};
		t.scheduleRepeating(
			MOVE_DELAY_MS);
	}
}
For a specified Contact, the ContactTab class simply displays the contact’s name, phone, and photo. It dose not have any built-in behaviours. The ContactTab class is a subclass of AbsolutePanel note the use of a GWT’s VerticalPanel to layout the name and phone number information:
package uk.co.vsj.gwt.client;

import com.google.gwt.user.client.ui.
	AbsolutePanel;
...
public class ContactTab extends
	AbsolutePanel {
	private static int IP_WIDTH = 330;
	private static int IP_HEIGHT = 70;
	private Image photo = null;
	private Image img = new
		Image(“conttab.bmp”);
	private String m_Title;
	final VerticalPanel textInfo= new
		VerticalPanel();
	final Label nameLabel = new Label();
	final Label phoneLabel = new
		Label();
	final Label statusLabel = new
		Label();
	public ContactTab(Contact contact,
		String title)
	{
		m_Title = title;
		nameLabel.setText(
			contact.getFirstName() + “ “
			+ contact.getLastName());
		nameLabel.setStyleName(
			“gwtflyer-contactName”);
		phoneLabel.setText(
			contact.getPhoneNumber());
		phoneLabel.setStyleName(
			“gwtflyer-contactPhone”);
		photo = new Image(
			contact.getPhotoFile());
		textInfo.add(nameLabel);
		textInfo.add(phoneLabel);
		textInfo.setStyleName(
			“gwtflyer-contacttab”);
		textInfo.setVisible(true);
		if (photo == null) {
			photo = new Image(
				“nopix.bmp”);
		}
		add(img,0,0);
		add(textInfo, 10, 10);
		add(photo, 280, 10);
		setSize(Utils.
			getPixelPositionString(
			IP_WIDTH),
		Utils.getPixelPositionString(
			IP_HEIGHT));
		setVisible(true);
	}
}
The AddressPanel class is another subclass of AbsolutePanel, and displays the complete contact information in detail. This panel does not have any built-in behaviours, but it is flown in and out by the FlyinPanelManager in GWTFlyer.
package uk.co.vsj.gwt.client;

import com.google.gwt.user.client.ui.
	AbsolutePanel;
...

public class AddressPanel extends
	AbsolutePanel {
	private static int IP_WIDTH = 360;
	private static int IP_HEIGHT = 250;
	private Image img = new
		Image(“addrback.bmp”);
	private String m_Title;
	final Label nameLabel = new Label();
	final Label phoneLabel = new
		Label();
	final Label addr1Label = new
		Label();
	final Label addr2Label = new
		Label();
	public AddressPanel(String title,
		Contact contact) {
		super();
		m_Title = title;
		Image photo = new Image(
			contact.getPhotoFile());
		setStyleName(
			“gwtflyer-addressPanel”);
		nameLabel.setText(
			contact.getLastName() + “,
			“ + contact.getFirstName());
		nameLabel.setStyleName(
		“gwtflyer-addressPanel-Name”);
		phoneLabel.setText(
			contact.getPhoneNumber());
		phoneLabel.setStyleName(
		“gwtflyer-addressPanel-Phone”);
		addr1Label.setText(
			contact.getAddress1());
		addr2Label.setText(
			contact.getAddress2());
		addr1Label.setStyleName(
	“gwtflyer-addressPanel-Address”);
		addr2Label.setStyleName(
	“gwtflyer-addressPanel-Address”);
		setSize(Utils.
			getPixelPositionString(
			IP_WIDTH),
		Utils.getPixelPositionString(
			IP_HEIGHT));
		add(img,0,0);
		add(photo, 130, 10);
		add(nameLabel, 50, 70);
		add(phoneLabel, 50, 100);
		add(addr1Label, 50, 140);
		add(addr2Label, 50, 160);
		setVisible(true);
		}
	}
Styling the GWTFlyer user interface
HTML pages use Cascading Style Sheets (CSS) to style contained elements. This enables the separation of presentation details from the structure of the HTML document itself. Since AJAX applications use the same mechanism to present styles, GWT must adopt it too. You will frequently see in the code statements similar to:addr1Label.setStyleName( “gwtflyer-addressPanel-Address”);The style name gwtflyer-addressPanel-Address here refers to a style in the application’s CSS stylesheet. In the public directory of the GWTFlyer project, you will find a Cascading Style Sheet (CSS) file that is used to format the elements. Some of the more interesting GWTFlyer specific elements in this file are shown in the following fragment:
.gwtflyer-contacttab {
	color: white;
}
.gwtflyer-contactName {
	font-family: Times, Times Roman,
		serif;
	font-size: 12pt;
	font-weight: bold;
	}
.gwtflyer-contactPhone {
	font-family: Helvetica, Arial,
		sans-serif;
	font-size: 10pt;
	font-weight: bold;
	font-style: italic;
	}
.gwtflyer-addressPanel {
	color: white;
}
.gwtflyer-addressPanel-Name {
	font-family: Times, Times Roman,
		serif;
	font-size: 16pt;
	font-weight: bold;
	}
.gwtflyer-addressPanel-Phone {
	font-family: Times, Times Roman,
		serif;
	font-size: 15pt;
	font-weight: bold;
	font-style: italic;
	}
.gwtflyer-addressPanel-Address {
	font-family: Helvetica, Arial,
		sans-serif;
	font-size: 12pt;
	font-weight: bold;
	font-style: italic;
	}
Other GWTFlyer Resources
The FlyinManager, AddressPanel, and ContactTab all use 3-D styled bitmap images for their background. These bitmaps, together with the photo files for the contacts, are all placed in the public directory (under the uk.co.vsj.gwt package) in the project. Table 3 describes these bitmap (BMP) files.| Table 3: BMP files | |
| BMP File Name | Description |
| addrback.bmp | The background for the AddressPanel |
| background.bmp | The background for the FlyinPanel |
| conttab.bmp | The background for a ContactTab |
| jackpix.bmp, joepix.bmp, and nopix.bmp | Small photographs used in the simulated display of contact information |
Running the Completed GWTFlyer
You can run the GWTFlyer from the source code download. Just run either the GWFlyer-shell.cmd batch file to start the application in Hosted mode in the GWT Shell, or run the GWTFlyer-compile.cmd to compile the application to JavaScript and run it on a regular browser. In Eclipse, you can also just press the Run button as detailed earlier to run GWTFlyer in Hosted mode.While the application is running in Hosted, you can click the Compile/Browse button on the hosted mode browser to compile the code and start the local machine’s browser to view the application as a full AJAX application.
Of course, once it is compiled and deployed to a web server, you can use any browser with GWTFlyer, including Internet Explorer and the Safari browser from Apple, which is also included in several mobile devices.
Conclusions
Java developers no longer need to fear AJAX application programming. GWT enables the use of mature and familiar Java development tools to design, code and test AJAX applications. GWT’s ability to distil the tested Java code into JavaScript enables final deployment of the application on a large variety of web servers, accessible by all modern browsers. If you are an avid Java developer, GWT is your shortest path when venturing into the Web 2.0 and AJAX world.Sing Li has been writing software, and writing about software for over twenty years. His specialities include scalable distributed computing systems and peer-to-peer technologies. He now spends a lot of time working with open source Java technologies. Sing’s most recent publications include Professional Geronimo and Professional Apache Tomcat from Wrox Press.
Comments