Firstly, Messenger does not usually have an icon in the task bar, nor can it be reached by Alt-Tabbing through the application list. This reflects the fact that it is ready, but not in use and therefore it should not impinge on the user’s consciousness. The second difference is that it has got an icon in the system tray. This icon is in many ways richer than a task bar icon, in that it offers status information and by right-clicking offers a menu of useful “quick access” commands. Another significant difference is that Messenger will, if it deems it necessary, create a piece of “toast” that pops up above the system tray to indicate an event which may be of interest to you has taken place. This might include another user logging on or sending you a message. Finally, Messenger can be invoked to run as a “normal” application by double-clicking on the system tray icon. This creates a normal application window with a task bar icon to present access to the full set of functionality.
These attributes are common to a whole class of applications, including other instant messaging agents, virus scanners, battery monitors, and status monitors for services or server applications such as databases. Even the Task Manager creates a system tray icon to display the current CPU load. Although the default Windows Forms application produced by Visual Studio doesn’t have these attributes, it is easy to modify it to create an invisible application.
A useful Invisible Application
In the course of my work I regularly run a Java application to test systems I am developing. It can be extremely CPU intensive, killing performance in my mail client, which I often wish to use while test runs complete. In order to make my mail client usable, I usually go into Task Manager and set the process priority to “Below Normal” – but it is easy to forget to do this!The solution is to have an application that is always running on my PC to detect the process starting and automatically change its priority for me (note that this isn’t advisable for all processes – system processes should be left well alone unless you really understand what you are doing!). I’ll never want to Alt-Tab to this application so it shouldn’t appear in the task bar, but it will need to be able to display some UI for me to configure and enable/disable it, or shut it down.
The UI requirements of this application are typical of Invisible Applications, and therefore I am going to use it as an example of how they can be developed. This application will stick to a minimal feature set, while at the same time demonstrating the principles involved.
The application framework
The first step is to create a new “Windows Application” project – I’m developing this example in C# in Visual Studio 2003 and have called my project “PriorityManager”. This is currently just a standard forms application, but we can add a system tray icon to it by adding a NotifyIcon component from the toolbox, and setting its icon property to point to the application icon file. Now when the application is launched it will have an icon in the system tray as well as a task bar entry. To make the application invisible we must next get rid of the main window, which can be accomplished by adding a handler for the forms Load event as follows:private void PriorityManager_Load(
object sender, System.EventArgs e)
{
TopLevel = false;
}
This tells Windows Forms that the window is not a top-level window, and thus should not appear on the task bar, or the Alt-Tab list. As a side effect of not being a top-level window, it is also invisible because it does not have a valid parent window to be visible in.
Even though this window is going to be invisible for the lifetime of our application, it still serves a very important purpose. It provides the handler for any messages generated by the system tray icon – or, if you know your Win32 programming outside of .NET, it provides the message loop that enables the system tray icon to interact with the GUI.
If you run the application in its present state you will find the first major weakness of not having a top-level window – there is no default way to shut it down other than to kill the process in Task Manager. Before adding the user interface to the application to fix this though, we will take a brief look at the application logic.
The application logic
For any application that wishes to perform work in the background (rather than in direct response to user interaction) there are two fundamentally different ways of working. The first is to have a separate thread explicitly created (and blocked awaiting some activity). The other option is to use components that invoke event handlers to allow the application to perform its work. The table below shows some of the components that can be used to trigger activity in a background application in this way.| Table 1: Triggering background activity | ||
| Class | Type | Notes |
| Timer | Event | Enables activity at timed intervals |
| FileSystemWatcher | Event | Monitors for changes in the file system of the host computer |
| ManagementEventWatcher | Event | Used to map WMI events into the .NET environment |
| Socket | Delegate | Used to manage incoming connections |
| NetworkStream | Delegate | Used to asynchronously read and write a network connection. |
In this application, we need to interact with Operating System processes that detect the creation of new processes and change their priority. .NET provides a “Process” class in the System.Diagnostics namespace. A brief look at the documentation will show you that it can be used to change the Priority Class of a process, and that there are static methods that allow you to retrieve a list of current OS processes. However, it does not provide any mechanism for detecting new processes as they are created.
One way to work around this omission would be to use a timer and simply poll the process list at a pre-determined interval, but in this case there is a better solution.
WMI provides the “Win32_Process” class, and using its eventing mechanism and the “ManagementEventWatcher” class we can hook into it to detect the creation of new processes.
I have designed the application logic to consist of three main functions, StartMonitoring and StopMonitoring to start and stop watching for changes, and ProcessWatcher_EventArrived to handle the events generated when a new process is created. The code to implement these functions is:
private ManagementEventWatcher ProcessWatcher = null;
private void StartMonitoring() {
	if ( ProcessWatcher == null ) {
		WqlEventQuery wmiQuery = new WqlEventQuery(“SELECT * FROM
				__InstanceCreationEvent WITHIN 5 WHERE TargetInstance ISA
				\”Win32_Process\”” );
		ProcessWatcher = new ManagementEventWatcher( wmiQuery );
		ProcessWatcher.EventArrived += new EventArrivedEventHandler(
				ProcessWatcher_EventArrived);
	}
	ProcessWatcher.Start();
}
private void StopMonitoring() {
	if ( ProcessWatcher == null ) return; // Stop not needed!
	ProcessWatcher.Stop();
}
private void ProcessWatcher_EventArrived(object sender,
	EventArrivedEventArgs e) {
	ROOT.CIMV2.Process wmiProcess = new ROOT.CIMV2.Process(
		(ManagementBaseObject)e.NewEvent[“TargetInstance”] );
	Process p = Process.GetProcessById( (int)wmiProcess.ProcessId );
	// Carry out any actions required for this process
	DoProcessAction( p );
}
Note that in the event handler, the WMI process object associated with the event is converted to a .NET Process object for convenience. This is done with the aid of the ROOT.CIMV2.Process WMI class wrapper, which was automatically generated with the aid of the WMI Server Explorer extension in Visual Studio. For more information on using WMI and the Server Explorer extension from .NET, see my April 2005 VSJ article: Unwrapping WMI.
Adding the User Interface
The user interface of this application will be accessed through a menu, activated by right-clicking on the system tray icon. To implement this, you first need to add a ContextMenu to the application main form by dragging it over from the toolbox. Figure 1 shows the menu editor with the entries I have created to quit, enable, and access the settings for the application.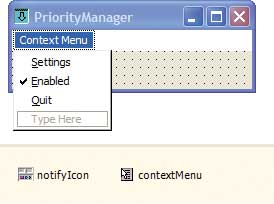
Figure 1: Context menu editor
Next you should create handlers for each of these menu items (double-clicking on the menu item in the menu editor will do it for you). You then need to go back to the properties page for the notify icon, and set its ContextMenu property to point to your newly created menu.
So that we don’t have to kill the application in Task Manager again, we need to add a call to Close to the Quit menu item handler. We also need to add some logic to start and stop the monitoring part of the application, which we will call from the handler for the “Enabled” menu item, as well as at startup and shutdown.
To allow the user to make changes to the application setting, we need a main window, or dialog box. Normally when you create a modal dialog box within an application, the parent window’s user interface is by definition disabled. However, this does not apply to our system tray context menu, so we must provide code to prevent the dialog box from being invoked more than once – which would almost certainly be confusing to the user. We also need to keep a reference to the dialog when it is open, so that we can activate it if the user tries to open it again. The dialog used to edit settings is shown in Figure 2.
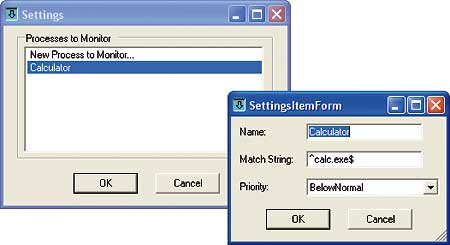
Figure 2: Settings dialogs
Note that I elected to use regular expressions for defining the process to modify, to allow greater control. The code for this dialog is provided in the code download for this article.
Changing the icon at runtime
Since for most of its life the application is visible only in the system tray, it is desirable that we should use the small UI space available to us as best we can. For this application the best way to do this is by changing the icon and tooltip to indicate whether the application is enabled or disabled. The tooltip can be changed easily at runtime simply by assigning to the Text property of the notifyIcon object, and the Icon property allows the icon to be changed.Of course, in order to set a new icon, you must have an Icon object – and these can be created in a number of ways. The simplest (adequate for this application) is to read the icon from a resource. I created two new icons in the project named “Enabled.ico” and “Disabled.ico”, and then included them as resources by setting the “Build Action” for the icon files to “Embedded Resource”. Once this has been done, Icon objects can be retrieved using the Icon class, specifying the assembly that contains the resource via a type that it provides, and the name of the resource:
new Icon(this.GetType(),
	“Enabled.ico”);
Several framework classes, including Icon and Bitmap can retrieve resources in this way, while the ResourceManager class provides a more general mechanism for accessing embedded resources. Using resources for the icons also allows for the possibility that our icons could be localized (necessary if they contain text). The main event handlers for the application are shown below. Note the references to the “SettingsManager” which is used to manage applications settings and is described fully later on.
private void PriorityManager_Load(object sender, System.EventArgs e) {
	SettingsManager.ReadSettings( ProcessActions );
	TopLevel = false;
	StartMonitoring();
}
private void menuItemQuit_Click(object sender, System.EventArgs e) {
	StopMonitoring();
	Close();
}
private void menuItemEnabled_Click(object sender, System.EventArgs e) {
	menuItemEnabled.Checked = !menuItemEnabled.Checked;
	if ( menuItemEnabled.Checked ) {
		StartMonitoring();
		notifyIcon.Icon = new Icon( this.GetType() , “Enabled.ico” );
		notifyIcon.Text = “PriorityMonitor (Enabled)”;
	} else {
		notifyIcon.Icon = new Icon( this.GetType(), “Disabled.ico” );
		notifyIcon.Text = “PriorityMonitor (Disabled)”;
		StopMonitoring();
	}
}
private SettingsForm ActiveSettingsForm = null;
private void menuItemSettings_Click(object sender, System.EventArgs e) {
	if ( ActiveSettingsForm == null ) {
		ActiveSettingsForm = new SettingsForm();
		if ( ActiveSettingsForm.ShowDialog() == DialogResult.OK ) {
				SettingsManager.ReadSettings( ProcessActions );
		}
		ActiveSettingsForm = null;
	} else {
		ActiveSettingsForm.Activate();
	}
}
Draw your own icon
Although not needed for this application, a more general solution to updating a system tray icon is to create the new icon programmatically. This allows the icon to represent more complex information, such as a graph (as used in Task Manager). To draw your own icon at runtime, you must first create a suitable Bitmap object:Bitmap b = new Bitmap( 16 , 16 );Then obtain a Graphics object with which to actually carry out drawing operations – here I show how to draw a simple circle on a transparent background:
Graphics g = Graphics.FromImage( b );
g.Clear( Color.Transparent );
SolidBrush sb = new
	SolidBrush( Color.Red );
g.FillEllipse( sb , 0 , 0 , 16 , 16 );
Once drawing is complete, the final step is to convert the bitmap to an icon for display. Somewhat confusingly, this is accomplished by getting an icon handle from the Bitmap object, then creating an Icon object using the static FromHandle member function:
notifyIcon.Icon = Icon.FromHandle(
	b.GetHicon() );
Persisting user settings
This application needs to be able to store a number of different settings, including whether it is enabled or not, and which processes are to be monitored and how their priority is to be altered. Storing settings is not a requirement unique to invisible applications, but there are very few useful invisible applications that do not require some form of configuration.For Win32 applications the normal solution to storing parameters is to use the registry, and this option is still available to us in .NET. However, our code will be simplified if we can access settings in a type-safe manner, and ideally we would like to be able to store collections – something the registry is very bad at doing. The XML serialisation and de-serialisation capabilities of the .NET framework provide a type-safe and collection-friendly means of storing configuration data, however it does raise the question of where to store the configuration file. Ideally it should be per-user, but this isn’t something that should appear in a “My Documents” folder. We also need to ensure that our users will have appropriate permissions to create a configuration file.
The Isolated Storage subsystem creates an isolated file system area for each user and assembly. Since the storage is isolated (e.g. from documents and system files), it can be accessed with fewer permissions than other areas of the file system, and there is no possibility of a file naming conflict. This makes it an ideal choice for storing configuration information.
The code for handling the settings in this application shows how simple classes can be used with XML serialisation, and how to connect to isolated storage:
public class ProcessAction {
	public string Name;
	public string MatchString;
	public ProcessPriorityClass PriorityClass = ProcessPriorityClass.Normal;
	public override string ToString() { return Name; }
}
public class PriorityManagerSettings {
	public bool Enabled;
	public ProcessAction [] ProcessActions;
}
public class SettingsManager {
	const string SettingsFileName = “PriorityManagerSettings.xml”;
	public static void WriteSettings(bool enabled, ArrayList processActions) {
		PriorityManagerSettings p = new PriorityManagerSettings();
		p.Enabled = enabled;
		p.ProcessActions = (ProcessAction [])processActions.ToArray(
				typeof(ProcessAction));
		XmlSerializer serialiser = new XmlSerializer(
				typeof(PriorityManagerSettings) );
		IsolatedStorageFileStream fileStream = new IsolatedStorageFileStream(
			SettingsFileName, FileMode.Create, FileAccess.Write, FileShare.None);
		System.IO.StreamWriter writer = new System.IO.StreamWriter(fileStream);
		serialiser.Serialize( writer , p );
		writer.Close();
	}
	public static void ReadSettings(out bool enabled,
		ArrayList processActions ) {
		PriorityManagerSettings p;
		XmlSerializer deSerialiser = new XmlSerializer(
				typeof(PriorityManagerSettings) );
		IsolatedStorageFileStream fileStream = new IsolatedStorageFileStream(
			SettingsFileName , FileMode.Open , FileAccess.Read , FileShare.None );
		System.IO.StreamReader reader = new System.IO.StreamReader(fileStream);
		p = (PriorityManagerSettings)deSerialiser.Deserialize( reader );
		enabled = p.Enabled;
		processActions.Clear();
		processActions.AddRange( p.ProcessActions );
		reader.Close();
	}
}
Preventing multiple instances
With most “invisible” applications there is no need to have more than one copy open, so the application must check at launch time whether it is already running. One way to do this would be to use Process.GetProcesses() to see if there is another instance running. Since the advent of Windows XP and “Fast User Switching”, this solution isn’t really adequate, because we need to limit the process to one instance per user, not one instance per machine.Nonetheless, the first stage is to use the Process class to check for processes with the same name but a different process ID as the current executing process. The Process class can’t tell us the user that owns a particular process however – for that we must turn once again to WMI, and to the ROOT.CIMV2.Process class. This still does not directly contain the information we need in its properties, but it does provide a GetOwner() function which will retrieve the domain and user associated with the process.
For the purposes of this example, the logic associated with detecting other instances of the application is wrapped in two functions: ThisProcessAlreadyExistsForThisUser handles the complete process of checking for duplicate processes, while GetProcessOwner retrieves the owner of a .NET Process object using WMI. This latter function could be re-used to ensure that the application only modifies the priority of processes owned by the logged-on user – probably desirable in a multi-user environment! The modified application startup code and the code for these functions is:
static void Main() {
	if ( !ThisProcessAlreadyExistsForUser() ) {
		Application.Run(new PriorityManager());
	}
}
private static bool ThisProcessAlreadyExistsForThisUser() {
	Process thisProcess = Process.GetCurrentProcess();
	string thisOwner = GetProcessOwner( thisProcess );
	Process [] pl = Process.GetProcesses();
	foreach ( Process p in pl ) {
		if ((thisProcess.ProcessName == p.ProcessName) &&
				(thisProcess.Id != p.Id)) {
				// Names match but IDs don't - check if user matches
				if ( thisOwner == GetProcessOwner( p ) ) {
					return true;
				}
		}
	}
	return false;
}
private static string GetProcessOwner( Process p ) {
	string s = “\\\\.\\root\\CIMV2:Win32_Process.Handle=\”” + p.Id + “\””;
	ManagementPath mp = new ManagementPath( s );
	ROOT.CIMV2.Process wmip = new ROOT.CIMV2.Process( mp );
	string domain,user;
	wmip.GetOwner( out domain , out user );
	return domain + “\\” + user;
}
Notifying the user of events
With an invisible application it can be very hard for the user to tell if it is working properly, or to communicate with the user if we need to convey more information than can be included in the system tray icon. One way around this is to display temporary panels above the system tray to give the user information, and possibly to allow them to interact with the application as well. This is sometimes known as “toast” because of the way it pops up.Applications such as Messenger use windows drawn entirely by the application to pass their messages, with custom design and animations to make the window appear and disappear. No such sophistication is necessary for this application, however, nor to demonstrate the principles of creating a notification window. Instead, we will create a standard Windows Form using the forms editor in Visual Studio, and modify its properties and behaviour to suit our needs. The following properties must be changed to remove unnecessary elements that we don’t need for a notification window:
this.MaximizeBox = false;
this.MinimizeBox = false;
this.ShowInTaskbar = false;
this.FormBorderStyle =
	FormBorderStyle.FixedToolWindow;
this.SizeGripStyle =
	SizeGripStyle.Hide;
We also need to ensure that the window is visible, on top of all others:
this.TopMost = true;The modified form is shown in Figure 3.
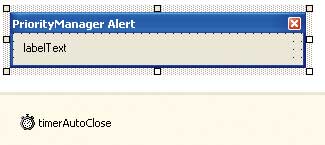
Figure 3: Notification form
When the notification form appears, we want it to be located at the bottom right of the screen, immediately above the system tray (unless, of course, the user has moved the task bar). We can achieve this with the help of the Screen.GetWorkingArea function. We also need to enable a timer to close the form automatically if the user doesn’t close it within a specified time.
In this application, the thread in which the WMI event handler is called (and thus where the toast must originate) is not the main application thread, and therefore is not running a message loop. Since our form must have a message loop in order to function, we must call the ShowModal function to invoke it. This will block the thread it is called on until the window is closed and it is not a good idea to block the thread the WMI call is invoked on for longer than is necessary. To work around this, the ToastForm class provides a static ShowToast function which invokes the toast window on its own thread.
The implementation code for this notification form is:
public static void AsyncShowToast( int seconds, string text ) {
	ToastForm toast = new ToastForm();
	toast.timerAutoClose.Interval = 1000 * seconds;
	toast.labelText.Text = text;
	Thread t = new Thread( new ThreadStart( toast.AsynchShowDialog ) );
	t.Start();
}
private void AsynchShowDialog() {
	ShowDialog();
}
private void ToastForm_Load( object sender, System.EventArgs e) {
	Rectangle workArea = Screen.GetWorkingArea( new Point( 0 , 0 ) );
	SetBounds( workArea.Right-Width, workArea.Bottom-Height , Width , Height );
	timerAutoClose.Enabled = true;
}
private void timerAutoClose_Tick(object sender, System.EventArgs e) {
	Close();
}
It would be straightforward to add other controls to this form to enhance its functionality, for example to add a hyperlink control for further information, or to open the settings dialog. Appearance could be modified with bitmap backgrounds, or by drawing the whole window in customised style. Animation or fade effects could be used instead of the window just appearing.
Conclusion
In this article I have demonstrated a number of techniques to meet common requirements for Invisible Applications. These include configuring the user interface, modifying the system tray icon at runtime, displaying notification messages, managing persistent settings, and preventing multiple instances from being executed. The example application also shows how the application logic and user interface can be integrated, although in the interests of readability much necessary error handling code has been omitted.The source code for the example application is available to download. I now have this application automatically running on my system, from the “Startup” folder of the start menu. It works perfectly, ensuring that my system is usable for editing documents or writing emails while my test runs complete in the background.
Ian Stevenson has been developing Windows software professionally for 10 years, in areas ranging from WDM device drivers through to rapid-prototyping of enterprise systems. Ian currently works as a consultant for The Generics Group.
Comments