Generally speaking multithreading can make a program more responsive to the user by splitting off worker threads that don’t block the UI thread. Multithreading can make a program actually run faster – although this is a much less common situation than you might think. The only gains in efficiency that are possible are if a single thread is repeatedly blocked waiting for something to happen and there is work that another thread could be getting on with. In this case however the single threaded version of the program could also be made more efficient by simply getting it to do work while it would otherwise be idle.
Until quite recently most multithreading was simulated by the operating system switching a single processor’s attention between a set of active threads. In this case there is only one thread actually being obeyed at any one time, but the rate of switching between threads is sufficiently high to give the impression that all of the threads are being run. Simulating multithreading is generally done by pre-emptive multitasking, this is certainly how modern versions of Window work, but there are other ways of doing it. With the rise of multicore processors the possibility of real multithreading – albeit limited to a small number of threads – has become possible, and in this case the potential for speed increases is more real. All in all threading is becoming increasingly important.
The good news is that .NET makes the creation of multithreaded programs very easy. And the bad news is that .NET makes the creation of multithreaded programs very easy. Using multiple threads properly is a very difficult and subtle task and not to be undertaken lightly. So while it is good that .NET makes it easy, this should not be taken as an encouragement to multithread without some careful thought. In this article you will discover how multithreading works, but more importantly how it can go very wrong. In particular we take a look at some of the more obscure ways in which threading can become part of your program via invoke and the background worker class – but first some standard threading.
Starting a thread
There is more than one way that you can enter the world of multithreaded programs – some of them are so simple that you might not even notice the transition. For example, when you employ an asynchronous call using BeginInvoke you use a separate thread to run the method. No matter how you create a new thread the same considerations apply. There are two ways of explicitly using a thread in your program. The first is to use one of the existing threads in the threadpool. This has the advantage that you don’t have the overhead of actually creating a new thread, but the number of threads available for use in the threadpool is limited. In general you should only use a threadpool thread for tasks that are short so that you can release the thread back to the threadpool as soon as possible. The same concerns apply to using a threadpool thread as one you create yourself.As long as the task that you want the thread to do is sufficiently long-lived you are advised to create a thread for it. To do this you need to use the Thread class in System.Threading. The Thread constructor accepts either a ThreadStart or a ParameterizedThreadStart delegate which wraps the method that will be executed by the new thread. For example, suppose we have a method like:
public void CountUp()
{
	for (int i = 0; i < 99; i++)
		MessageBox.Show(“Thread1” +
			 i.ToString());
}
…then this can be run as a new thread using:
Thread T1=new Thread(
	new ThreadStart(CountUp));
This creates the new thread object, but doesn’t actually start the thread running. To do this we have to use the Start method:
T1.Start();You will now see the messagebox appear, and as long as you keep clicking the OK button the thread will continue. There are a number of thread methods that can be used to stop and pause threads, but what these do and how they are used is fairly obvious. Here we will concentrate on more difficult aspects of threading.
Cross threading the UI
Even though the above example is very simple it already contains some interesting problems. The first is the use of the messagebox to display the result. Threads often have to interact with the UI and this presents some challenges. The new WPF classes work differently with respect to threads compared to the original Windows Forms classes, and explaining how WPF deals with threads would require another article so for the sake of simplicity let’s concentrate on how threads interact with a Windows Forms UI.You might wonder why you can’t just drop a multiline textbox onto the form and use that to display the progress of the thread in a much neater way. If you try to make this modification you will discover that a “cross threading” error message appears. In an attempt to protect you from some of the dangers of multithreading .NET introduced a test to make sure that only the thread that created UI components is allowed to work with them. You can switch this test off but it isn’t a good idea. However as an example of what can go wrong let’s do just that…
To turn off cross thread checking simply set the static CheckForIllegalCrossThreadCalls variable to false:
Contol.CheckForIllegalCrossThreadCalls =
	false;
Now you can write to any control on the form without any cross threaded errors which you can demonstrate by changing the method to:
public void CountUp()
{
	for (int i = 0; i < 99; i++)
		this.textBox1.Text +=
			i.ToString() +
				Environment.NewLine;
}
Now the list of numbers appears in the textbox with no errors. If you can cross thread the UI in this way with no real problems why not do it? To see that this isn’t quite as safe as it appears we need another thread:
public void CountDown()
{
	for (int i = 999; i >0; i-)
		this.textBox1.Text +=
			i.ToString() +
			Environment.NewLine;
}
Now starting both threads:
Thread T1=new Thread(
	new ThreadStart(CountUp));
T1.Start();
Thread T2 = new Thread(
	new ThreadStart(CountDown));
T2.Start();
You can see both threads getting turns to run and fill the textbox with data. However if you look carefully you will notice that every now and again a few values go missing after the changeover and, worse, occasionally you will see a strange character appear in the textbox – see Figure 1.
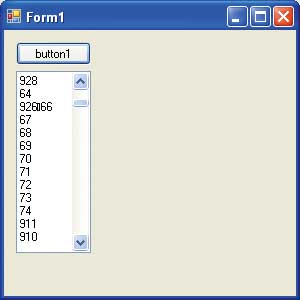
Figure 1: Strange things happen when two threads share a control
The reason for this is that none of the controls are “threadsafe”. Consider what happens if thread 1 is in the middle of printing 65 and thread 2 takes over in mid-process. The Textbox control will be in a half-used state and thread 2 will start to use it as if it was initialised in some way. The result of using such a control is unpredictable. A threadsafe control would have to reset its entire state when any of its methods were entered and this clearly isn’t useful. As a result no attempt has been made to make controls threadsafe and hence there is the need to restrict access to them to the UI thread that created them.
Things like this go wrong whenever threads share resources and it’s the big problem we have to solve. At this point most accounts of threading start to explain how to synchronise threads using locks of one sort or another. This is an important topic but before examining how locks work let’s take a look at the alternative .NET provides specifically for accessing the UI from another thread – Invoke.
In fact the mechanism using Invoke is a fairly general way of transferring calls to methods from one thread to another. Basically the idea is that thread 1 and thread 2 in our example should ask the UI thread to run a method which achieves the desired result. To do this we first need a new delegate type:
delegate void Delegate_addtext(string s);There are a number of ways of creating the delegate instance and an anonymous method is one way:
public void CountUp()
{
	Delegate_addtext addtext =
		delegate(string s)
	{
			textBox1.Text += s +
				Environment.NewLine;
	};
	for (int i = 0; i < 999; i++)
			addtext(i.ToString());
}
public void CountDown()
{
	Delegate_addtext addtext =
		delegate(string s)
	{
		textBox1.Text += s +
			Environment.NewLine;
	};
	for (int i = 999; i >0; i-)
		addtext(i.ToString());
}
Notice that the anonymous methods have to be defined within the form’s methods to give them the correct context and access to the form’s controls – don’t worry, there is a much better way to do the job which is explained later. Currently we are just using the delegates to do the same job as before and the Textbox is still being accessed by two threads. If you run the program you will see the same problems as before.
To run the delegate on the UI thread we need to change the calls to addtext to:
this.Invoke(addtext,
	new object[] {i.ToString()});
Again we are using another .NET 3.5 feature – object initialisers – to create an object used to pass the string parameter to the delegate. You have to pack all of the parameters in the correct order within an object array to be passed to the delegate which is involved on the UI thread. Now if you run the program you will discover that its behaviour is quite different. Instead of missing values and the occasional strange character you get a rock solid complete list of all of the numbers produced by each of the threads. After an initial burst the pattern of thread access also settles down to thread 1, then thread 2, then thread 1, and so on because of the need for each thread to wait for the UI thread to be ready to process the Invoke. The Invoke method is synchronous and blocking. That is when thread 1, say, does:
this.Invoke(addtext,
	new object[] {i.ToString()});
…it waits until the addtext delegate finishes running on the UI thread before proceeding. There is an asynchronous non-blocking form of the Invoke method – BeginInvoke. When called it starts the delegate running on the UI thread and returns immediately to allow the calling thread to continue. The calling thread can get on with other jobs until it detects that the delegate has finished its job. The simplest way of checking that the delegate has finished is to use EndInvoke to test the IAsynchResult object returned by the BeginInvoke. EndInvoke simply blocks until the delegate has finished. So, for example, you could use something like:
IAsyncResult dotext =
	this.BeginInvoke(addtext,
		new object[] { i.ToString() });
// ...get on with some other work
// ...
// ...when ready wait for addtext to end
this.EndInvoke(dotext);
Although this demonstrates the basic invoke mechanism there is a very sophisticated way of doing the same job which is described in the documentation as part of an overlong example. It is so good it’s worth repeating in case you miss it. The idea is that you make use of the InvokeRequired method which compares the thread ID of the calling thread to the ID of the creating thread. If they are different then an Invoke is required but the clever part is the way the same method is used but restarted on the UI thread. For example:
public void addtext2(string s)
{
First we check to see if an addtext2 is running on the UI thread.
if (this.textBox1.InvokeRequired)
{
If it isn’t we wrap in in a delegate and use invoke to call the addtext2 method again, but this time on the UI thread:
	Delegate_addtext d =
		new Delegate_addtext(addtext2);
	this.Invoke(d,
		new object[] { s });
}
If addtext2 was called on the UI thread, or has not been invoked on the UI thread, a simple assignment completes the task.
	else
	{
	this.textBox1.Text += s +
		Environment.NewLine;
	}
}
The For loop of each thread now just calls addtext2 without worrying about invoke or the UI thread:
addtext2(i.ToString());If you want to give the UI thread time to process events then it’s a good idea to add:
Application.DoEvents();…after updating the textbox.
Asynchronous calls
The BeginInvoke/EndInvoke methods of running a delegate on the thread that created the control are also available to run any delegate on a thread from the threadpool. All you have to do is wrap the method in a delegate and use the delegate class’s implementation of BeginInvoke/EndInvoke. For example, we can construct two delegates that do the same tasks as threads T1 and T2 defined earlier:delegate void asyncTask();
asyncTask T1 = delegate()
{
for (int i = 0; i < 999; i++)
addtext2(i.ToString()); ;
};
asyncTask T2 = delegate()
{
for (int i = 999; i > 0; i-)
addtext2(i.ToString());
};
We can use the Invoke method to run them sychronously, that is on the same thread that created them, the UI thread.
T1.Invoke();
T2.Invoke();
In this case T1 completes before T2 begins. To run them on separate threads, i.e. asynchronously, we change Invoke to BeginInvoke:
IAsyncResult R1 =
	T1.BeginInvoke(null, null);
IAsyncResult R2 =
	T2.BeginInvoke(null,null);
T1.EndInvoke(R1);
T2.EndInvoke(R2);
The EndInvoke methods simply wait for the delegates to finish. If you try this out you will discover it doesn’t work. All that happens is that the entire program hangs at the first EndInvoke – see if you can work out why before reading on.
The reason is that when a thread calls addText2 this switches execution to the UI thread – but the UI thread is blocked waiting for the tasks to end and so doesn’t process the delegate! This is a good example of deadlock – two threads, the UI and either of T1 or T2, waiting for each other to do something both blocked by the other. The solution is simple – don’t block the UI thread.
Unfortunately the simplest way of not blocking the UI thread is to use a callback method to clean up when the thread has finished and this is not always simple. For example, a suitable callback delegate that can clean up both of the threads is:
AsyncCallback C =
	delegate(IAsyncResult ar)
{
	asyncTask T = (asyncTask)ar.AsyncState;
	T.EndInvoke(ar);
};
To make this work we need to call the asynchronous delegates, passing both the callback and the delegate itself as the ar parameter:
IAsyncResult R1 = T1.BeginInvoke(C,T1);
IAsyncResult R2=T2.BeginInvoke(C,T2);
With this change it all works as advertised.
The Invoke pattern
You might be wondering why Invoke is used to run UI objects on the UI thread. Why not simply use locks to synchronise access to each control so that just one thread can be updating the control at a time? As long as each thread completes before the next one starts there is no danger of leaving the control in a strange, half-completed state. The reason for adopting the Invoke approach is simply that the UI thread accesses controls as and when it needs to and it isn’t going to play by the same rules as any threads that you create, and this means that you can’t limit access to controls to just one thread.This Invoke pattern is useful enough for us to want to know how to use it in our own classes. Put simply, how to you give a class an Invoke method that allows a thread to run a delegate on a thread of the class’s choice? The full answer is quite complicated and involves implementing the ISynchronizeInvoke Interface which includes Invoke, BeginInvoke, EndInvoke and Invoke required.
All Controls define the ISynchronizeInvoke Interface and these are the methods we have been using in this article. For simplicity let’s restrict ourselves to just an implementation of Invoke and also assume that any delegates to be so invoked have no parameters. The extension to parameters and to the other “invoke” methods isn’t easy but it is a lot easier after you have seen the example.
The class that implements the Invoke is a simple implementation of point with two properties, x and y.
public class point
{
	public int x;
	public int y;
We could store the details of the thread that created an instance of the point class, but for an example it’s easier to create a new thread to act as a “point worker thread”:
private Thread T;…that is, thread T is the one used to run any delegates that are invoked on the point instance. We need a member variable to hold the delegate to be invoked and an AutoResetEvent to use to start it when it has a delegate to invoke and to stop it when there is nothing to do:
Delegate _d;
static AutoResetEvent autoEvent;
We could have used the thread’s Suspend and Resume methods to start and stop the thread but in .NET 3.5 these are marked as obsolete.
The point constructor has to create a delegate doInvoke that will in turn run the invoked delegate:
public point()
{
	ThreadStart doInvoke=delegate ()
	{
		do
		{
			autoEvent.WaitOne();
			_d.DynamicInvoke(null);
		} while (true);
	};
What happens in the doInvoke is that with the thread running it is immediately suspended waiting to woken up by another thread setting the autoEvent object. When this happens there is a delegate stored in _d ready to be invoked. We have to use DynamicInvoke because we have no idea what the form of the delegate actually is and hence it has to be late bound. The rest of the constructor creates autoEvent in an unset state and then creates and starts the thread T giving it the doInvoke delegate to run:
	autoEvent = new AutoResetEvent(false);
	T=new Thread(doInvoke);
	T.Start();
}
You can now see how this is all going to work. The doInvoke delegate only ever runs on thread T and this is started and stopped as required by the point’s invoke method:
public void invoke(Delegate d)
{
	_d = d;
	autoEvent.Set();
	do
	{
		Application.DoEvents();
	} while (T.ThreadState ==
		ThreadState.Running);
}
The invoke method simply stores the delegate to be invoked and signals, using autoEvent, that thread T should start running. As invoke is blocking it then enters a loop to wait for the invoked delegate to complete and thread T to suspend itself again. You can see that to implement BeginInvoke as a non-blocking Invoke all you have to do is return immediately.
That’s all there is to the invoke implementation in the point class. All we need now is some code to try it out and this is very easy. First we create a point instance:
point p = new point();We also need a delegate to invoke:
asyncTask update = delegate()
{
	p.x = 10;
	p.y = 20;
};
Finally we invoke it:
p.invoke(update);When the invoke returns, the x and y properties of the point object are indeed set to 10 and 20 – and this has been done by thread T running the update delegate.
The extension of these ideas to delegates that pass parameters is easy enough – just pass an object array as in the case of the standard Invoke. The extension to non-blocking Invokes is more complicated because you have to allow for the possibility that multiple delegates will be queued for execution. Yes, you need to use a queue to store all of the pending delegates. This complicates matters because you have to control access to the queue and arrange for thread T to empty the queue each time it is woken up. It is more complicated in the details but the principles are the same.
Dr. Mike James’ programming career has spanned many languages, starting with Fortran. The author of Foundations of Programming, he has always been interested in the latest developments and the synergy between different languages.
Threading on the cheap – background workerThere is an easy way to implement a thread intended to do some background computation – the background worker. It attempts to make threading seem easy by making it look like event handling. The idea is that the average programmer understands how to write an event handler but isn’t an expert on threading. The background worker does indeed make things easier, but it still brings with it all of the problems of threading.The easiest way to create a background worker is to drag-and-drop it from the toolbox. This automatically generates the code needed for the event handler. If you don’t want to use a control then you can create the background worker in code, it’s only slightly more difficult. BackgroundWorker BW1 = new BackgroundWorker();The key to understanding the way the BackgroundWorker object implements threading for you is to realise that the DoWork event handler is run using a separate thread obtained from the threadpool. For example, define the event handler as: BW1.DoWork += delegate(object s, DoWorkEventArgs We)
{
// do something else
};
The event handler has been defined using an anonymous method but you can define it in the usual way via a named method wrapped in a DoWorkEventHandler delegate if you want to. Nothing happens until we use the command:
BW1.RunWorkerAsync();This gets a thread from the threadpool and uses it to run the method associated with the DoWork event. You can monitor the new thread using RunWorkerCompleted event and even get a result back in the RunWorkerCompletedEventsArg object which is passed back. There are a few potential well-documented pitfalls, but in the main BackgroundWorker is easy to use – except that you can’t access any of the UI components from the DoWork event handler, mand accessing shared resources is just as much a problem as if you had created the thread explicitly. The documentation simply says the equivalent of “don’t do it”. There is an argument for keeping BackgroundWorker threads simple, but if you understand threading you can use Invoke in the same way as described to allow UI interaction. For example, you can use the addtext2 method described earlier: addtext2(“thread ending”);…at the end of the DoWork event handler and it will display the message in the textbox without any danger. The BackgroundWorker control does make it possible to get some of the benefits of threading without having to worry about the problems. However if you know about threading there is little to be gained by using it. It may stop you worrying about the problems but they are still present. |
Comments