Most people are familiar with using PayPal to pay for transactions on eBay, where it is suitable for individuals to collect payments from others, made with credit or debit cards or by direct bank transfers. It also protects the buyer by ensuring that confidential information, such as credit card details, is never revealed directly to the seller. Historically this required the buyer to be a member of PayPal, but now the buyer can choose to just make a single payment without joining the service (if the seller allows this).
The key differences between PayPal and most other online payment systems are that it has no fixed (e.g. monthly) charges, no setup fees, and very little administrative overhead. It also allows you to manage security in such a way that you can use it with a shared web server (typically a hosted service) rather than needing to have a custom environment – e.g. with your own certificates installed. Of course, the quid pro quo is that the per-transaction charges are higher than with normal credit card processing systems. For full details of services and charges, and the terms and conditions, see PayPal.
These attributes make PayPal eminently suitable for any business, club or other organisation that wants to be able to be able to accept payments over the web, but for whom this is not a core activity.
An example that I have encountered in my professional activities is a microelectronics company that usually sells chips, minimum order quantity 10,000. However, they also sell demonstration kits, and accepting credit card payments for these through PayPal makes it easy for customers to purchase direct without creating a big administrative overhead.
Payment basics
The process used by any payment system starts with the seller instructing the payment system to carry out the transaction, including all the relevant details. The payment processing system must then carry out its own checks to ensure the transaction is valid, and then complete the transaction. The payment processing system must then confirm to the seller that the transaction has taken place.With PayPal, the information that must be sent to initiate the transaction consists of the seller’s registered email address to identify the PayPal account, the item name, the currency, and the value of the transaction. These may be submitted to PayPal either with an HTTP form POST, or as with a query string for an HTTP GET.
Either of these methods causes PayPal to display its own payment page. This is a secure page that enables the user to provide payment details to complete the transaction. Several different PayPal pages are used to collect information and confirm the transaction, and at the end of the process PayPal can return the user to your site.
If you are happy to process the order based on confirmation emails from PayPal, the transaction could be complete at this stage. Normally however you will wish to confirm the transaction details back to the user, which can be accomplished using a PayPal service called Payment Data Transfer (PDT). This allows you to retrieve the transaction details from PayPal using an HTTP request. At this stage, the transaction status may be set to Completed or Pending, and in the latter case you should not release goods to the buyer as the payment could still fail.
If you wish to automatically enable the release of goods, such as a download, information service, or software license, you should use the Instant Payment Notification (IPN) service. This will POST to your website when the transaction is created, and when the status changes from Pending to Completed if necessary.
Starting a simple transaction
The simplest possible type of transaction is a purchase of a single item, and the listing below shows two different ways in which the required information can be submitted to PayPal.<form action=”https://www.paypal.com/cgi-bin/webscr” method=”post”> <input type=”hidden” name=”cmd” value=”_xclick”> <input type=”hidden” name=”business” value=”[email protected]”> <input type=”hidden” name=”item_name” value=”My Item”> <input type=”hidden” name=”currency_code” value=”GBP”> <input type=”hidden” name=”amount” value=”5.99”> <input type=”image” src=”buy.gif” name=”submit” alt=”buy button”> </form> <a href=”https://www.paypal.com/cgi-bin/webscr?cmd= _xclick&business=sales%40seller%2ecom&item_name= My+Item¤cy_code=GBP&amount=5%2e99”> <img src=”buy.gif”></a>The first uses a form, with hidden input fields to contain the values. The second mechanism encodes the data values in the query string part of a URL. If you look closely, you can see that it contains the same fields, with the same values, in the same order. The business field contains the email address registered to the seller’s PayPal account, currency_code and amount describe what is to be charged, and item_name describes what is being purchased. The only difference is that the strings are URL-encoded as hexadecimal characters so they can be passed in the query string. If you add either of these HTML fragments to a web page and click the link, you will be taken to the PayPal site with the details filled in ready for you to make your purchase.
The second form – the query string appended to the URL – can be used in any situation where a URL launches a browser window. This includes email, documents (Word and PDF files), links embedded in applications, links in media files, etc.
Of course, either type of button can be generated programmatically within your own application. You can change the amount and item description to describe the transaction that you wish to process. If the development framework is ASP.NET, it may be easier to use the query string method. This is because ASP.NET controls usually only generate output within the context of the main ASP.NET form on the page, and HTML does not support nested forms. Of course, you could also generate PayPal links within a Windows Forms application, or within a client side script on a web page.
Whether statically or automatically generated, there are a many additional fields you can add to enable additional features on the PayPal site. The table below lists some of the more important additional fields and describes what they do – a full listing of fields can be found in the PayPal developer documentation.
Additional Request Fields |
|
| Field Name | Meaning |
| Quantity | The number of items being purchased. |
| item_number | Stock or part number – not displayed to the user. |
| Shipping | Cost of postage. |
| no_shipping | Set to “1” to stop PayPal asking for a shipping address – e.g. for goods that can be delivered electronically. |
| Cn | Description that appears above the “notes” field on the PayPal form |
| no_note | Set to “1” to stop PayPal displaying a “notes” field |
| on1/os1 | Option name / Option string 1. Used to specify options such as sizes or colours. |
| on2/os2 | Option name / Option string 2. |
| Custom | Can be used for additional data – not displayed to the user. |
| Invoice | Can be used for invoice number – not displayed to the user. |
| Return | URL for the page PayPal will display once payment is complete. |
| cancel_return | URL for the page PayPal will display if the transaction is cancelled. |
| image_url | URL for a sellers logo to be displayed on the PayPal pages. Note if this is not a https URL, the user may receive a warning. |
Submitting a basket
If you want to build an online shop, complete with a shopping basket, you can use the methods described above to submit the total of the basket to PayPal, with the item name set to something that indicates an aggregated transaction. Alternatively, you can submit the contents of the basket to PayPal, in which case it will add them up for you. The advantage of this is that the PDT or IPN then pass the individual item details back to you.Submitting basket contents works in exactly the same way as submitting a simple transaction. The only difference is that there are multiple fields describing the items, and the command is different. Once again, you can use either the form or query string method to pass the data to PayPal. The listing below shows a simple example of a form to submit a basket, followed by a table describing the fields you can use.
<form action=”https://www.paypal.com/cgi-bin/webscr”
	method=”post”>
	<input type=”hidden” name=”cmd” value=”_cart”>
	<input type=”hidden” name=”upload” value=”1”>
	<input type=”hidden” name=”business”
		value=”[email protected]”>
	<input type=”hidden” name=”currency_code” value=”GBP”>
	<input type=”hidden” name=”item_name_1”
		value=”My Item”>
	<input type=”hidden” name=”amount_1” value=”5.99”>
	<input type=”hidden” name=”item_name_2”
		value=”My Other Item”>
	<input type=”hidden” name=”amount_2” value=”1.99”>
	<input type=”image” src=”buy.gif” name=”submit”
		alt=”buy button”>
</form>
Cart Upload Fields |
|
| Field Name | Meaning |
| Item_name_x | The name or description of the item. |
| item_number_x | Stock or part number – not displayed to the user. |
| shipping_x | Cost of postage. |
| on1_x/os1_x | Option name / Option string 1. Used to specify options such as sizes or colours. |
| on2_x/os2_x | Option name / Option string 2. |
Note that the command is now _cart instead of _xclick and there is a new upload field.
Dynamic transactions
The previous sections showed how you could hard-code links or forms to initiate transactions on PayPal. In practice however, you usually wish to create a transaction based on a user’s selection or the contents of their shopping cart, rather than having a few hard-coded “buy” buttons.It is relatively easy to compile URL-style requests using string concatenation – for example in ASP.NET:
string url = “https://www.paypal.com/ cgi-bin/webscr?cmd= _xclick&business=” + HttpUtility.UrlEncode( “[email protected]”) + “&item_name=” + item + “¤cy_code=GBP&amount=” + price;This URL can then either be used to redirect the user:
Response.Redirect(url, true);…or be assigned to a hyperlink embedded in the page for the user to click:
HyperLink1.NavigateUrl = url;It is also possible write a custom form with the appropriate submit URL and hidden input fields containing the data to the output stream in ASP.NET, but this is a more complicated solution. This is the solution used by the ASP.NET controls provided by PayPal, available for download from its Developer Center.
Payment data transfer
Either by configuration on the PayPal site, or by passing the URL in the payment request, it is possible to specify the page to which the user is returned once the transaction is complete. At this point you will probably wish to display details of the transaction to the user. Furthermore, some transactions may actually be completed at this point if the payment method used is a type that transfers instantaneously. In this case, it may be possible to fulfil the transaction while the user is still logged into the site (e.g. by enabling a download).The URL that PayPal uses to return the user to the site has a transaction token in the variable tx, i.e. you will receive a HTTP GET something like the following:
http://www.seller.com/
	Return.aspx?tx=abcd1234
You can then use this transaction token to request details of the transaction back from PayPal using a HTTP GET request, although to make this request you must also include the Authentication Token that is displayed on the PDT setup page when you enable PDT. The process is shown in Figure 1.
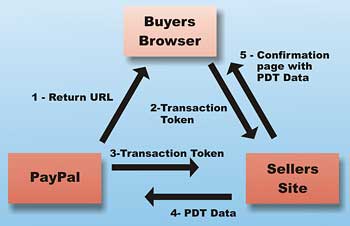
Figure 1: PDT Communications
The code below shows how to retrieve and extract PDT information in the Page_Load function of an ASP.NET form.
protected void Page_Load(object sender, EventArgs e)
{
	string tx = Request.QueryString[“tx”];

	// Create the request url
	string url = “https://www.sandbox.paypal.com/cgi-bin/
		webscr?cmd=_notify-synch&tx=” + tx +
		“&at=gqhVaMZIZ46H-
		h9Pn3j3t7mDF3p5iu62Dsaz1TQ5jtwX4S6zdOvVqC9XnYO”;
	// Create the request
	HttpWebRequest req =
		(HttpWebRequest)WebRequest.Create(url);
	// Issue the request
	WebResponse response = req.GetResponse();
	// Convert the response to a string and close it off
	StreamReader responseStream = new StreamReader(
		response.GetResponseStream());
	string responseString = responseStream.ReadToEnd();
	responseStream.Close();

	// Split the response into lines
	char[] separators = { ‘\n’, ‘\r’ };
	string[] lines = responseString.Split(separators,
		StringSplitOptions.RemoveEmptyEntries);

	// Check for success
	if (lines[0] != “SUCCESS”) throw new
		Exception(“PDT Failed”);

	// Separate out name value pairs
	System.Collections.Specialized.NameValueCollection values = new
	System.Collections.Specialized.NameValueCollection();
	for (int i = 1; i < lines.Length; i++)
	{
		string[] nv = lines[i].Split(‘=’);
		values.Add(nv[0], nv[1]);
	}

	// Update fields on the test page
	LabelStatus.Text = status;
	if (LabelStatus.Text == “Pending”)
	{
		LabelStatus.Text += “(“ + values[“pending_reason”]
			+ “)”;
	}
	else if (LabelStatus.Text == “Completed”)
	{
		LabelStatus.Text += “ -- your vouchers will be
			emailed to you at “ +
			HttpUtility.UrlDecode( values[“payer_email”] );
	}
	LabelItem.Text =
		HttpUtility.UrlDecode(values[“item_name”]);
	LabelPaid.Text = values[“mc_gross”] + “ “ +
		values[“mc_currency”];
}
The code uses the HttpWebRequest class to create a request, issue it, and obtain the response, and then assigns a some controls with information from retrieved variables. Descriptions of these commonly used variables are shown in the table below, but many more fields are available and are described in the PDT and IPN manual.
PDT and IPN Data Fields |
|
| Field Name | Meaning |
| payment_status | The status of the payment, usually Pending, Completed or Failed |
| item_name | The description of the item purchased |
| item_number | Stock or part number. |
| mc_gross | The total paid by the buyer |
| mc_currency | The currency used for mc_total |
| payer_email | The email address of the person who paid |
Instant Payment Notification
In PDT, the user’s browser is pointed to a URL on your website with a transaction token added to the query string. This means that PDT may not happen, for example if the user closes their browser window before the redirect takes place. It is also the case that when PDT takes place the transaction may only be Pending.IPN is a POST directly from PayPal to your site, and takes place asynchronously to the user’s actions, even if the user closes their browser prematurely. You will usually get the first IPN within a few seconds of the transaction being completed (although not necessarily before PDT). If this IPN has status Pending, you will get another IPN when the status is finalised (as Completed or Failed), even though this may be some days later for some payment methods such as eCheque.
IPN works slightly differently to PDT in that all of the information is sent in the initial POST from PayPal. To verify that it is correct and not generated by a malicious third party, you then fire an almost identical POST back to PayPal for verification. The variables used in IPN are identical to those used in PDT, and the mechanism used is similar, but the fields sent to PDT are encoded in the body of the request rather than the URL. Figure 2 shows the communications that take place during IPN – it emphasises that the buyer (or rather the buyer’s browser) is not involved in this communication!
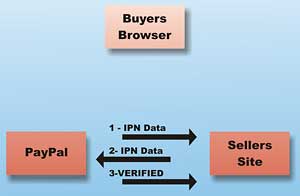
Figure 2: IPN Communications
The listing below shows a Page_Load function that carries out IPN verification and shows how to retrieve data from IPN variables.
protected void Page_Load(object sender, EventArgs e)
{
	// Create the data to post
	string formPostData = “cmd=_notify-validate”;
	foreach (String postKey in Request.Form)
	{
		string postValue = Encode(Request.Form[postKey]);
		formPostData += string.Format(“&{0}={1}”, postKey,
			postValue);
	}

	// Create the request
	HttpWebRequest req =
		(HttpWebRequest)HttpWebRequest.Create(
		“https://www.sandbox.paypal.com/cgi-bin/webscr”);
	req.Method = “POST”;
	req.ContentType = “application/x-www-form-urlencoded”;
	req.ContentLength = formPostData.Length;

	// Write the request post data
	StreamWriter stOut = new StreamWriter(
		req.GetRequestStream(), System.Text.Encoding.ASCII);
	stOut.Write(formPostData);
	stOut.Close();

	// Issue the request
	WebResponse response = req.GetResponse();

	// Convert the response to a string and close it off
	StreamReader responseStream = new
		StreamReader(response.GetResponseStream());
	string responseString = responseStream.ReadToEnd();
	responseStream.Close();

	// Check whether the data we received was genuine
	if ( responseString == “VERIFIED” )
	{
		// Response is genuine
		// Read any variables you like from the original
		// form data e.g.
		string item_name = Request.Form[“item_name”];
		// Update database with new transaction status
	}
	else
	{
		// Could be fraud...
	}
}
Security
The payment implementation described in this article is secure for the buyer even where your site is hosted on a shared server, in that the credit card details never come to your site and thus cannot be compromised by it. It also uses post-backs to PayPal to verify all the incoming requests it receives to ensure they are authentic.However, this system can only be as secure as your site. If someone is able to compromise your site implementation or database, adding fake transactions or removing security checks, then it is still possible they could deceive you into believing they have paid when in fact they have not. Security of your site can only ever be your responsibility!
If you are selling valuable items and you are in any doubt about your own security, then you will want to check the transaction log on the PayPal website to ensure payment has gone through before providing them to the buyer.
Alternatively if you are charging small amounts for downloads, then you may wish to unlock the download automatically on receiving a Completed PDT or IPN. After all, if someone hacks your site they can probably steal the download without going to the trouble of faking transaction data!
If your application is hosted on a dedicated server with its own certificate store, and you are confident in the security measures protecting your server, you can reduce the number of round-trips to PayPal somewhat by using “shared secrets” to verify the signatures of IPN and PDT data. Details are provided in the PayPal developer documentation.
Conclusions
This article demonstrates the principles used in implementing PayPal payments on a website. Of course, to use this in practice you will also need to implement a shop front, possibly with a shopping basket, and a back-end system for persisting and processing transactions.I hope this article has provided a useful introduction to the subject, and will save you a lot of time extracting the basics from the documentation if you come to create your own implementation. The source code for the example application is available to download.
More InformationThe PayPal “Developer Central” website developer.paypal.com offers a sandbox for testing applications, and downloads of documentation and samples including a set of ASP.NET controls for implementing PayPal payments on your website. It also includes details of the web service based payment services available from PayPal. |
Using the SandboxIn order to use the SandBox to test an application such as the sample in this article, you will then need to set your application up to use www.sandbox.paypal.com instead of www.paypal.com as the root URL for all of your communications with PayPal.You will also need to carry out all of the following steps:
|
Comments