The introduction of Silverlight 2, though, changes this position considerably. Silverlight 2 brings RIA development to the .NET developer, enabling you to leverage your existing skills and experience. Thus you can now create a RIA using C# or Visual Basic, whilst working with a class library and technologies that you’re already familiar with. All in all, this means that RIA development is now something that you can freely participate in without having to go through a lengthy re-skilling process.
One of the more interesting sub-genres of RIA is the Web-based game, and Silverlight 2 is a very capable platform for writing these games. So in this article I want to share with you a dozen or so tips that will help you to get started writing Web-based games.
Web-based games
So what is a Web-based game?Web-based games deploy in the browser, requiring little or no client installation; they often have rudimentary graphics, tinny soundtracks and simplistic game play – expect no Far Cry or World of WarCraft here – but they are nevertheless often highly addictive. Their main appeal is the sense of immediacy about them that enables you to get into the game and start enjoying yourself straight away, without waiting for long installations to complete, which means that you can find yourself wasting an hour or two without realising it. They appear all over the Web (check out Free Video Games Online or MiniClip for some examples), and in keeping with the modern Web 2.0 philosophy, links to good games spread quickly via email or IM. Consequently, this phenomenon has not been lost on marketing departments the world over, who have realised that placing a (typically) Flash-based advertorial game on the Web can keep their organisation’s logo or product firmly embedded in the minds of users, driving increased traffic to their Web site.
When all is said and done, though, the key to a successful Web-based game is that it installs quickly and is fun to play. So without further ado let’s dive in and look at the first tip: managing the installation experience.
The installation experience of a Silverlight application
There are a couple things that you have to accept when you create Web-based games: users might not have the Silverlight plug-in installed; and users are impatient. Consequently, the very first time that they come to the page that is hosting your game, they might need to download and install Silverlight; and even if they have Silverlight already installed, they won’t want to wait long while a large application is downloaded. You should therefore perform at least two actions to make the experience a little more enjoyable for the user.Tip #1: Improving the installation experience
One of the best ways of improving the installation experience is to display a background image in the <div> element that will be used to host the Silverlight control on the page. Typically, this will be an image of the final Silverlight application, plus possibly a message to indicate that the application requires Silverlight. Figure 1 shows a very crude example of how this might look for an application.
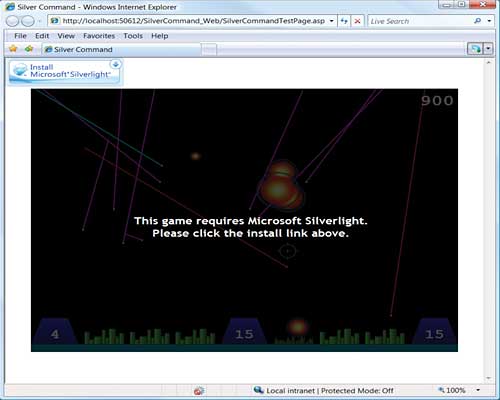
Figure 1: The installation experience
Achieving this effect typically involves tweaking a small amount of JavaScript to dynamically style the <div> element that is used to host your Silverlight control, based on whether Silverlight is installed or not. Fortunately, all of this has been covered in great detail elsewhere, so rather than regurgitate an already excellent document, I will instead urge you to look at the Silverlight Installation Experience Guide (October 2007).
This really is an essential read for developers creating any Silverlight application, and especially Web-based games, as it will show you how to minimise the friction between the Silverlight application and the rest of your Web site. So go download it now and then come back for the next tip.
Tip #2: Improving the application start-up time
So you’ve taken the trouble to create a large and exciting, multi-level game; it uses dozens of media files, graphic images and assemblies, all of which you package into Silverlight’s standard deployment package: a single .xap file. Unfortunately, the user will now have to wait until the entire set of content is downloaded to the client before the application will start, and that means that they will get a less than optimal user experience.
Where possible, therefore, you should separate your application into chunks that can be downloaded in the background. Let’s consider a small example application, SilverCommand, that emulates an old favourite arcade game of mine called Missile Command.
If you were to take a look in the .xap file for this application you would find that it only contains a single assembly. This initial loader assembly displays a simple (and fairly static) page of XAML that is shown in Figure 2.
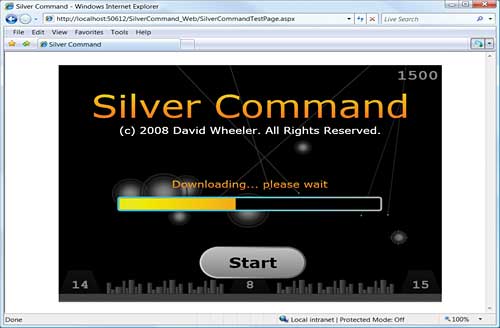
Figure 2: Provide a splash screen
What’s more interesting is the code behind the loader page:
public partial class LoaderPage :
	UserControl {
	public LoaderPage() {
		InitializeComponent();
		Loaded += OnLoaded;
	}
	private GameEngine gameEngine;
	void OnLoaded(object sender,
		RoutedEventArgs e) {
		WebClient wc = new WebClient();
		wc.DownloadProgressChanged +=
			OnDownloadProgressChanged;
		wc.OpenReadCompleted +=
			OnGameEngineDownloaded;
		wc.OpenReadAsync(
			new Uri( "SCGameEngine.dll",
			UriKind.Relative ) );
	}
	void OnGameEngineDownloaded(object
		sender, OpenReadCompletedEventArgs
		e) {
		if( e.Error != null ||
			e.Cancelled ) {
			DisplayErrorPage();
			return;
		}
		AssemblyPart ap =
			new AssemblyPart();
		Assembly asm = ap.Load( e.Result );
		foreach(Type t in asm.GetTypes()) {
			if( t.GetCustomAttributes(
				typeof( GameEngineAttribute ),
					false ).Length == 1 ) {
				gameEngine = (GameEngine)
					Activator.CreateInstance(t);
				HideProgressBar();
				EnableStartButton();
				break;
			}
		}
	}
	// These methods are elided for
	// brevity
	private void DisplayErrorPage() {...}
	void OnDownloadProgressChanged(
		object sender,
		DownloadProgressChangedEventArgs e)
		{ ... }
	void HideProgresBar() { ... }
	void EnableStartButton() { ... }
}
The exciting part about this listing is that it begins an asynchronous download of the main game engine as soon as the initial loader page has been displayed to the user. They therefore get to see a nice progress bar (and perhaps interesting game information) very quickly – the compiled DLL for this is only 12KB, after all – whilst the main portions of the game’s code and assets are downloaded in the background.
As you can see from the listing above, the main portion of the game is downloaded using a standard WebClient object, which can be used to download any asset – including assemblies – from the site. Once the game engine assembly is downloaded, standard .NET reflection techniques are used to find and instantiate the type that is decorated with a custom attribute. I used this attribute to mark the object to which control should be passed at the appropriate time, which in this case when the user clicks the (now enabled) Start button.
Of course, you can refine this further, creating and parsing your own manifest files which indicate when and how assets should be downloaded. You could also use the IsolatedStorage APIs available in Silverlight to cache the content on the client.
The point of the tip, though, is that you should factor your application out into parts that easily allow you to get something onto the screen quickly, in order to retain the user’s interest.
Tip #3: The “ZIP XAP” tip
A .xap file is just a standard .zip file with a different extension. Therefore, if you want to take a look at the contents of a .xap file, simply rename it to have a .zip extension and peruse it using your favourite .zip editing program. At run-time, you can use the StreamResourceInfo class and the Application.GetResourceStream method to crack open a .zip file and read out a specific part, as shown in the small code snippet below that extracts the welcome.png image out of a downloaded .xap file:
Stream str = ...;
// get stream using WebClient downloader
// str refers to a MemoryStream
// containing the ZIP file
// Use StreamResourceInfo to enable
// access to the ZIP file's
// individual elements
StreamResourceInfo zipSRI = new
	StreamResourceInfo( str, null );
// Specify using a relative URI
// the item in the ZIP file
Uri imageUri = new Uri(
	"welcome.png", UriKind.Relative );
// Obtain a new StreamResourceInfo
// object to the image file itself
StreamResourceInfo imageSRI =
	Application.GetResourceStream(
	zipSRI, imageUri );
// Display the image in the
// Image control named bimg
BitmapImage bimg = new BitmapImage();
bimg.SetSource( imageSRI.Stream );
Tip #4: The “Click to Start” tip
I find that there is actually another fringe benefit of having an initial downloader page, such as that shown in Figure 2, which has a big “Click to Start” button on it: by forcing the user to click on the Silverlight control, you ensure that it gains focus. This helps avoid the frustration that can occur if the main input to the game is the keyboard, and some other element in the browser has retained focus. At this point, the Click handler for the button will also typically engage your main game engine, whatever that might be. And that’s where the next tip comes into play: running a game loop.
Writing a game loop
The vast majority of games are based around a game loop. As its name suggests, this is a loop that runs for the duration of the game (or at least a level within the game), performing tasks such as responding to player input; moving sprites around the game; detecting collisions; and updating the score. Figure 3 highlights some of these tasks.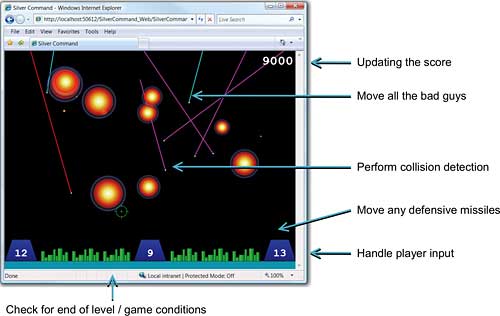
Figure 3: Tasks within the SilverCommand game loop
Of course, writing a game loop in Silverlight is slightly more complex than just writing a while {} statement. Silverlight has a very similar threading model to Windows Forms and WPF, which ensures that keyboard and mouse events, among others, are handled by a single UI thread. Additionally, any update to a UI element (technically anything deriving from DispatcherObject) must also occur on that same UI thread. This therefore precludes you writing a while {} statement, as doing so would prevent any messages from being handled and your game would be less than stellar in its user interaction. It also precludes you from running a game loop on a background thread, as this would require cross-thread marshalling to update the visual elements, which would in turn be incredibly slow. So the next tip in writing games in Silverlight is on writing game loops that are driven by timers.
Tip #5: Use a DispatcherTimer for your game loop
As their name suggests, timer-based game loops work on the principle of performing one game frame’s worth of activity in response to a timed event. In other words, you move all the pieces a little bit, check for collisions and handle input whenever the timer ticks. The important thing here is to choose the correct type of timer, which in the case of Silverlight is the DispatcherTimer.
DispatcherTimer is a thread-affinity aware timer, which raises its Tick event (based on an interval that you specify), on the UI thread. This listing shows the code that performs the setup and running of a level in SilverCommand:
public partial class GameLevel :
	UserControl
{
	private DispatcherTimer loopTimer;
	public GameLevel()
	{
		InitializeComponent();
		Loaded += OnLevelLoaded;
	}
	private void OnLevelLoaded(
		object sender, RoutedEventArgs e)
	{
		CreateCitiesAndBases();
		CreateAttackingMissiles();
		CreateGunsight();
		SetupKeyboard();
		RunGameLoop();
	}
	private void RunGameLoop()
	{
		loopTimer = new DispatcherTimer();
		loopTimer.Interval =
			TimeSpan.FromMilliseconds(10);
		loopTimer.Tick += DoGameFrame;
		loopTimer.Start();
	}
	// This method is called approx.
	// every 10 milliseconds
	// until the timer is stopped
	void DoGameFrame(object sender,
		EventArgs e)
	{
		MoveDefensiveMissiles();
		MoveAttackingMissiles();
		PerformCollisionDetection();
		PerformPlayerActions();
		UpdateScore();
		CheckForEndOfLevel();
	}
	// All remaining class members elided
	// for clarity
	...
}
The first thing to notice is that the GameLevel type is actually a UserControl, and is responsible for both the Canvas on which the game elements are displayed as well as the code to interact with those elements. This makes it very simple to manage the creation and removal of items, such as the explosions and incoming missiles, in the code as it has direct access to the root Canvas element which is the placeholder for everything that is displayed on screen. You might choose to use greater levels of separation, especially if the game logic becomes complex.
In SilverCommand, a GameLevel object is created and shown by the main game engine for each level, so the Loaded event is raised once per level. I always prefer to program against visual elements once I know that they’ve been fully created and rendered, so I tend to place my creational code in the Loaded event handler rather than in the user control’s constructor. This pattern of creating a new object for each level makes state management much simpler within the game, even if the game is essentially repetitive in structure, as is the case with SilverCommand (or Space Invaders, Pac Man and a host of other games).
Once all of the assets have been instantiated, it’s time to begin the game loop; which is what the RunGameLoop method does. Notice that RunGameLoop merely instantiates and starts the DispatcherTimer: there is no more to it than that.
Starting the timer gets the “game loop” up and running, with (in this example) the DoGameFrame method being called every 10ms or so. This does exactly what its name suggests: it steps through all of the operations that need to be performed for each “iteration” of the game loop. What’s so appealing with this code is that pausing or terminating the game loop merely involves calling the timer’s Stop method, which is something that occurs in the CheckForEndOfLevel method if there are no more cities left intact or no more incoming missiles. The end-of-level situation arises sooner or later depending on how wisely the player launches their defensive missiles wisely. In the case of SilverCommand, this is done by pressing the buttons Z, X and C (for the left, centre and right missile bases respectively). So let’s take a look at the next tips that relate to handling the keyboard.
Handling the keyboard
Choosing how to handle the keyboard is a critical part of any Silverlight game. Consider the two games in Figure 4.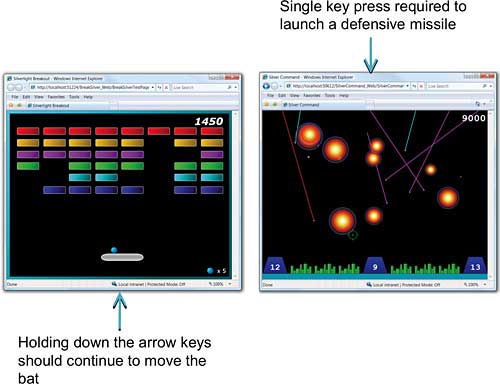
Figure 4: How you handle the keyboard is crucial
In the Silverlight Breakout game, the bat should move and continue to move while the user holds down a key (perhaps Z for left and X for right). In SilverCommand, on the other hand, missiles shouldn’t be launched while the user holds down one of the three fire keys (their limited stock would be depleted too quickly). Instead, the user should press and release the relevant key to fire a missile.
The Windows SDK has APIs that let you query the precise state of the keyboard at any time, as well as providing various keyboard events. Unfortunately, the only option in Silverlight is to handle the KeyDown and KeyUp events that are raised whenever the user presses (and holds) or releases a key. There is one piece of good news, though: these events bubble up through the element tree, which means that you can centralise the keyboard processing within the level’s UserControl.
Understanding the KeyDown and KeyUp events
The KeyDown event is raised whenever the user presses a key, which is what you would expect. If the user continues to hold down that key then KeyDown will continue to be raised on a regular basis. They KeyUp event is raised, of course, when they release the key. There is one thing to be aware of, though. If the user presses a second key whilst holding down the first key, then all KeyDown events for the first key stop. This behaviour is shown in Figure 5.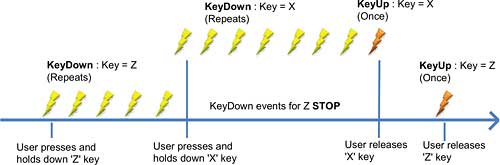
Figure 5: Pressing and holding multiple keys
This makes it quite difficult to introduce diagonal movement into your game, as this is often achieved by holding and pressing two keys at once.
The other factor to consider is that the KeyDown and KeyUp events occur “outside” of the game loop. This can pose problems, especially if you want to check for keyboard input “inside” of the game loop and perform actions based on what you find.
Tip #6: Basing an action on a KeyUp event
In the case of SilverCommand, I wanted the user to press and release the key to launch a missile. This is, of course, straightforward to accomplish by ignoring the KeyDown events completely. Instead, when a KeyUp event is raised, a method is called on the appropriate MissileBase object to indicate that it should create a new Missile object as part of its processing next time through the game loop.
This tip is therefore very simple: if you want single-click keyboard action, handle KeyUp rather than KeyDown events.
Tip #7: Building a KeyState mechanism
It wasn’t needed for SilverCommand, but one of the things that you will want to do if you need to support multi-key actions such as moving diagonally, or “hold down and repeat” actions such as moving the bat in a Breakout clone is to build an object to track the state of keys. This can be incredibly basic, such as the one shown here:
public static class KeyState
{
	// Only support the "standard" keys
	private const int MAX_KEYS = 256;
	// The state of each key is held in
	// this array
	private static bool[] states =
		new bool[MAX_KEYS];
	public static bool GetKeyState(
		Key key )
	{
		int index = (int) key;
		if( index < 0 ||
			index >= MAX_KEYS ) return false;
		return states[index];
	}
	public static void SetKeyState(
		Key key )
	{
		int index = (int) key;
		if( index < 0 ||
				index >= MAX_KEYS) return;
		states[index] = value;
	}
	public static void HookEvents(
		UIElement elem )
	{
		elem.KeyDown += OnKeyDown;
		elem.KeyUp += OnKeyUp;
	}
	public static void UnhookEvents(
		UIElement elem )
	{
		elem.KeyDown -= OnKeyDown;
		elem.KeyUp -= OnKeyUp;
	}
	private static void OnKeyUp(
		object sender, KeyEventArgs e)
	{
		states[e.Key] = false;
	}
	private static void OnKeyDown(
		object sender, KeyEventArgs e)
	{
		states[e.Key] = true;
	}
}
All you need to use the code in this listing is to call the KeyState.HookEvents method when the level UserControl is loaded (calling KeyState.UnhookEvents when the level is finished), passing in a reference to the user control itself. Thereafter, at any point in time you can determine whether a key is pressed (or not) by calling KeyState.GetKeyState, passing in the standard Key enum value for the specific key.
Note that this implementation ignores all the complexity of platform key codes, and thus is designed to work with all the common keys on the keyboard. In general, I’d always advise you to stick with simple numeric and letter keys, and the space bar, rather than use “advanced” keys such as the Windows, Control or Shift keys for your game input.
So now that you’ve got the keyboard under control, let’s consider how you construct the various graphical objects that the user will see on the screen.
Sprites
In the majority of cases, your game will have elements (characters) that move about and interact with other elements. These elements are known as sprites, and they can be as complex or simple as you like. In fact, SilverCommand is a game that doesn’t use many sprites: the cities and missile bases are implemented as sprites (even though they don’t move), as is the aiming reticule, but the incoming missiles are just Line elements.Tip #8: Sprite == UserControl
Constructing sprites in Silverlight is very simple: they are normally implemented as a UserControl, with their visual appearance defined in XAML and their behaviour defined in the code behind file. This is a simple and effective way to create a sprite. Of course, there’s nothing to stop you from adding extra functionality by providing an intermediate base class, as shown in the snippet below, or by having your sprite classes implement some interfaces (or use a combination of both):
public class Sprite : UserControl
{
// common sprite behaviour goes here
}
public class MissileBase : Sprite
{
// MissileBase specific overrides
// / behaviour
}
Building the visuals for a sprite
Constructing the visuals for your sprite can get quite interesting. For example, Figure 6 shows an exploded view of the MissileBase sprite.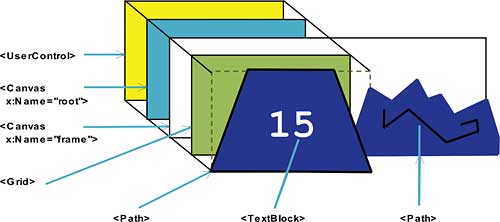
Figure 6: The MissileBase sprite exposed
There are a couple of important parts to this structure. The first is that the UserControl has an explicit size set for both its Width and Height. The reason for this is that it enables us to perform crude hit-testing just by checking whether a point lies within the UserControl’s rectangular area.
The second is the use of clipping regions to give the sprite different states, which is the next tip.
Tip #9: Use clipping to show a sprite in different states
The listing below shows an extract of the XAML for the MissileBase sprite:
<UserControl Width="90" Height="60">
	<Canvas x:Name="root">
		<Canvas x:Name="frame">
			<!- The "normal" missile base ->
			<Grid Width="90" Height="60">
				<Path ... />
			<TextBlock ... />
			</Grid>
		<!- The "destroyed" missile base ->
			<Path Canvas.Left="90" ... />
		</Canvas>
	</Canvas>
	<UserControl.Clip>
	<RectangleGeometry Rect="0,0,90,60" />
	</UserControl.Clip>
</UserControl>
The key thing to note is the use of a clipping rectangle, which clips the output to a 90 x 60 rectangle. When you look at the Path that is used to render the missile base in its destroyed state you will notice that it lays outside of the clipping region, and therefore isn’t rendered.
Toggling the visible state of the sprite can therefore be accomplished in one line of code, simply by adjusting the left hand position of the frame Canvas (which will move all of its children):
public bool State
{
	get { return Canvas.GetLeft(frame)
		== 0; }
	set {
Canvas.SetLeft(frame, value ? 0 : -90); }
}
Tip #10: Animated sprites
This simple clipping technique can also be used to create animated “walk characters”, using a repeating animation composed of DiscreteDoubleKeyFrames to reposition the frame. This is highlighted in Figure 7, which shows a Canvas containing three (of many) frames of a walking character, along with the clipping area.
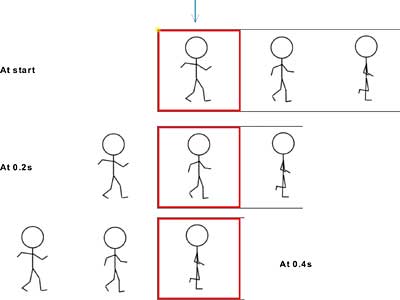
Figure 7: Walk animations
The animation that runs the walk is shown here:
<Storyboard x:Name="walkAnimation">
	<DoubleAnimationUsingKeyFrames
		Storyboard.TargetName="frame"
Storyboard.TargetProperty="(Canvas.Left)"
			BeginTime="00:00:00"
			RepeatBehavior="Forever">
		<DiscreteDoubleKeyFrame
			KeyTime="00:00:00" Value="0"/>
		<DiscreteDoubleKeyFrame
			KeyTime="00:00:00.2000000"
			Value="-100"/>
		<DiscreteDoubleKeyFrame
			KeyTime="00:00:00.4000000"
			Value="-200"/>
		... <!- other frames elided ->
		<DiscreteDoubleKeyFrame
			KeyTime="00:00:01" Value="0"/>
	</DoubleAnimationUsingKeyFrames>
</Storyboard>
One advantage of this technique is that it enables designers to create, visualise and play the animations in Microsoft Expression Blend.
Tip #11: Using bounding boxes to perform collision detection
Whether it’s a missile impacting with an explosion, or a bat hitting a ball, most games involve objects that collide into each other. This is an area that you need to get right, because it can be frustrating for a player when they can visibly see when contact has occurred, but the game doesn’t appear to register it. This means that you often need to determine pixel-by-pixel whether two objects have collided. Given that you also need to do this for all of your objects every iteration through the game loop, performance can suffer very quickly. However, if you stick to using UserControls for your sprites and you ensure that every UserControl always has an explicit Width and Height, then you will find that implementing an efficient collision detection mechanism can be relatively straightforward.
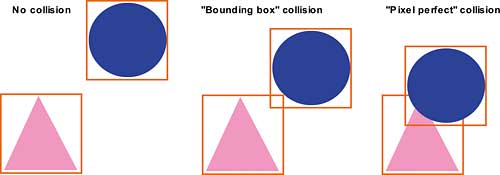
Figure 8: Hit testing
In Figure 8, you can see three different collision states between two objects. It shows both the rectangular area of each UserControl (picked out in red), as well as the visual element that the player sees. You can clearly see that you only need to perform pixel-perfect collision detection if the bounding boxes overlap, and then only for the area of the overlap (as opposed to the whole object). The listing here shows a very simple implementation of this approach:
public static bool AreInContact(
		Sprite s1, Sprite s2 )
{
	Rect r1 = new Rect(
		Canvas.GetLeft(s1),
		Canvas.GetTop(s1), s1.Width,
		s1.Height );
	Rect r2 = new Rect(Canvas.GetLeft(s2),
		Canvas.GetTop(s2), s2.Width,
		s2.Height);
	// Bounding box collision
	r1.Intersect( r2 );
	if( r1.IsEmpty )
		return false;
	Point ptToTest = new Point();
	int l = (int) r1.Left;
	int r = (int) r1.Right;
	int t = (int) r1.Top;
	int b = (int) r1.Bottom;
	// Now perform a pixel
	// perfection collision detection
	// by hit testing every point
	//	within the overlapping Rect
	for( int x = l; x <= r; x++ )
	{
		for( int y = t; y <= b; y++ )
		{
			pt.X = x;
			pt.Y = y;
			if(((List<UIElement>)
				s1.HitTest( pt )).Count != 0)
			{
				if(((List<UIElement>)
					s2.HitTest(pt)).Count != 0)
				{
					return true;
				}
			}
		}
	}
	return false;
}
In the first phase, bounding-box collision detection is performed by querying both sprites for their rectangular areas, which are then intersected. If this yields an empty Rect then we know that the sprites are not in contact. We only perform the pixel-perfect collision detection, which is achieved in Silverlight through the use of the UIElement.HitTest method, for those points that lie within the intersection rectangle. Note that the method shown in the listing above is not optimised for specific shapes, but will work for any two UserControls that have a properly specified Width and Height.
Tip #12: Bounding boxes are not the only way
Just for good measure, the SilverCommand game doesn’t use the techniques shown in Tip #11. This is simply because the game doesn’t need them. Simple rectangular collision detection is used for the incoming missiles hitting the cities and bases (further optimised by only performing hit testing if the missile is far enough down the screen). To see whether an incoming missile gets destroyed by an explosion, a simple Pythagoras calculation can be used as the explosions are circular. And speaking of Pythagoras, let’s finish with a quick look at movement and angles
Tip #13: Movement
Games involve movement. This is easy to achieve in Silverlight, especially if you use a Canvas as the root visual for your level as all you need to do to move an object is to update its Canvas.Top and Canvas.Left properties. You can do this using an animation, but given the large number of objects that you might be moving, this is not always the most efficient choice. Instead, you might need to calculate the new position yourself for each time through the game loop. This is easy when the object is moving horizontally or vertically, but it requires a tiny amount of maths when you want to move at an angle. Not only that, in a number of cases you will need to work out which angle you actually want to move the object along in the first place, as is the case when a missile is launched from a base at the aiming reticule. Both of these cases are highlighted in Figure 9.
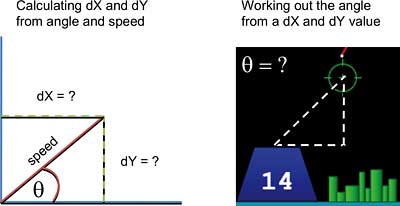
Figure 9: Pythagoras is your friend
So the final tip for this article is the small piece of code:
public struct MoveAmount
{
	public double DX;
	public double DY;
}
public static class MathHelper
{
	public static MoveAmount GetMovement(
		double angle, double speed )
	{
		double radians = angle *
			(Math.PI/180.0);
		MoveAmount ret = new MoveAmount() {
			DX = Math.Cos( radians ) * speed,
			DY = Math.Sin( radians ) * speed};
		return ret;
	}
	public static double GetAngle(
			double DX, double DY)
	{
		return Math.Atan2(DY, DX) *
			(180.0/Math.PI);
	}
}
The GetMovement method will create a MoveAmount object from an angle (in degrees, hence the adjustment using Pi/180 to convert it to radians) and a notional speed, which is the number of pixels to move the object each game loop frame. You can then apply the values of DX and DY to the sprite’s Canvas.Left and Canvas.Top properties respectively for each iteration through the game loop. The GetAngle method returns an angle (again in degrees, measured counter-clockwise from the horizontal X axis), given the difference in the X and Y coordinates of the two points. One thing to watch out for, of course, is that Atan2 takes the DY value as the first parameter.
Conclusion
Silverlight 2 is a neat platform for creating Web-based games. Hopefully this article will have given you some tips on how to implement some of the standard game programming features using Silverlight 2. And let’s be honest: writing games is just so much more fun than writing business applications, so why not head over to Silverlight.net and take a look at some of the community samples to get yourself started.Dave Wheeler is a freelance consultant, who specialises in the various UI technologies within Microsoft .NET. He also writes and delivers courses for DevelopMentor, including their new Essential Silverlight 2 course, and speaks at conferences including DevWeek and Software Architect. You can contact him at [email protected].
Comments