The Sidebar contains mini-applications called “Gadgets” that are built using HTML, XML and script. Vista comes with a range of pre-built Gadgets including weather, online news and a CPU monitor. If your memory goes back as far as Windows 98 you might remember an earlier attempt at providing similar facilities – Active Desktop. This sank without trace mainly due to worries about security and the lack of always-on Internet connection. This time around the idea looks a much better proposition, and I for one think that it’s worth creating Gadgets – and it isn’t difficult.
A basic Gadget
The first important thing to realise is that a Gadget is just an HTML page plus script run in the context of the Sidebar. However, the Sidebar does provide a range of functions and other facilities that are not standard in a browser window. It is mostly this “Gadget API” that makes Gadgets, and what you can do with them, more than just a web page. The simplest Gadget HTML file is:<html> <head> <title>My First Gadget</title> </head> <body> Gadget Starter </body> </html>You need to create a new directory in:
\Users\user name\AppData\Local\
Microsoft\Windows Sidebar\Gadgets\
Gadgets stored in this directory are only available to the named user. If you want your Gadget to be available to all users you need to create the directory in:
\Program Files\Windows Sidebar\GadgetsThe directory name has to take the form name.gadget. For our example, create a directory in the Gadget directory of your choice, called MyGadget1.gadget, and save into this directory the HTML listed above in a file called MyGadget1.HTML. All that we need to complete our first Gadget is an XML manifest file that describes the Gadget to the Sidebar so that it can load it and provide additional information to the user.
There are lots of optional XML tags that can be included in the manifest, but the simplest manifest for our Gadget is:
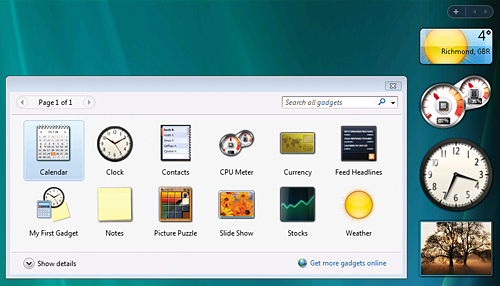
<?xml version=”1.0”
	encoding=”utf-8” ?>
<gadget>
	<name>My First Gadget </name>
	<version>1.0.0.0</version>
	<hosts>
		<host name=”sidebar”>
			<base type=”HTML”
				apiVersion=”1.0.0”
				src=”MyGadget1.html” />
			<permissions>Full
				</permissions>
			<platform
			minPlatformVersion=”1.0” />
		</host>
	</hosts>
</gadget>
The name tag is displayed in the Gadget Gallery and on the Sidebar window, and the version is used to check and resolve problems if different versions of the same Gadget are installed. The hosts section will in the future allow you to specify a range of possible hosts for the Gadget. At the moment the only possibility is the Sidebar. The base tag gives the type of the Gadget, always HTML, the name of the source file containing the HTML, and script for the Gadget – the file that is actually loaded if the user selects the Gadget. The manifest has to be stored in the same directory and it is always called gadget.xml. With these two files stored in the Gadget directory you can now click on the “plus” button at the top of the Sidebar and the Gadget Gallery will appear complete with My First Gadget, which will be installed if you double click on it.
It’s worth saying at this early stage that you can package a Gadget in a ZIP or CAB file. For example, if you place all of the Gadget’s files, not including the directory, into a ZIP and change the extension to .gadget, then your Gadget will be installed into the Gadget directory when the user double-clicks on it.
A simple settings box
My second Gadget
There is one big problem with the Gadget as it stands. Its display area is too small to show even its short message. You have to specify a display size using a Style attribute. Most of the examples of simple Gadgets make use of a separate style or even a style sheet, but all you really need to do is to change the <body> tag to read:<body style=”width:130; height:50 “ >Most Gadgets in the Sidebar are about 130 units wide and fit within it. If you make the width much larger the Gadget spills over onto the desktop. Gadgets can be detached from the Sidebar, and in this mode being wider than 130 is less of a problem. You can set any height you want, but of course you risk filling the Sidebar with a tall Gadget. With the change to the <body> tag the Gadget’s message is now fully visible.
So far so good, but where next? Some of the answer to “where next” is obvious if you know enough HTML. You can make the Gadget look impressive simply by using what you already know about layout plus a few tips and tricks. For example to create a non-rectangular Gadget you simply use a PNG or GIF with a transparent border and set this to be the background image.
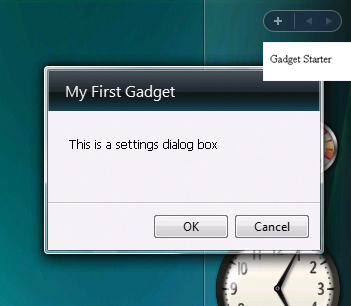
The new places that Gadgets can take you are really due to the availability of a Gadgets API. This provides a whole collection of new objects so that you can interact with the facilities of the Sidebar and with the wider system. For example, all Gadgets display a close box to the left of their display area. With the use of the API you can add a small spanner icon, which can be used to display a “settings” dialog box. The key to doing this is the System.Gadget object, which provides methods and properties to control and monitor the Gadget. In this case we need the SettingsUI property, which specifies another HTML file which is loaded into the Settings dialog box. For example, the simplest HTML file for a Settings dialog box is:
<html>
	<head></head>
	<body style=”width:250; height:75”>
		This is a settings dialog box
	</body>
</html>
Store this in a file called Settings.HTML. To make the “spanner” icon appear and to specify it as the HTML file to use we need some script. Change the header of the Gadget HTML to read:
<head><title>My First Gadget</title>
<script>
	System.Gadget.settingsUI=
		”settings.html”;
</script></head>
Now when you install the Gadget you will see a spanner icon on the right, and when you click the spanner your HTML file is displayed within a dialog box complete with OK and Cancel buttons.
My First Gadget ready for installation
Obviously we need to do a little more to make the settings box useful, but the new API provides properties that make persisting settings easy. The System.Gadget.Settings object provides a read and write method that will retrieve or store a named setting. To make use of this we also need to handle the events generated when the user clicks either the OK or Cancel button. In the Settings.HTML file we need to define two event handlers – one for System.Gadget.onSettingsClosing and one for window.onload:
<head>
<script>
window.onload=function()
{
	Text1.value=System.Gadget.
			Settings.read(“Time”);
}
The window.onload function simply reads the value of the Time setting and stores this in a textbox. The first time the Settings box appears there will be no value associated with Time and so the textbox will be empty.
The onSettingsClosing event passes an event object, which we can test to see which button has been clicked:
	System.Gadget.onSettingsClosing =
		function(event)
	{
		if (event.closeAction ==
				event.Action.commit)
		{
If it is the OK button we save the current time in the Time setting:
			d=new Date();
		System.Gadget.Settings.write(
				“Time”,d.getTime());
		}
		event.cancel = false;
	}
</script>
We also need a textbox so now the HTML file ends:
</head>
	<body style=”width:250; height:75”>
	<input id=”Text1” type=”text” />
	</body>
</html>
If you make these changes you will find that now when you first open the Settings dialog box the textbox is empty. If you then click OK the time is stored and the next time you open Settings this is what you see in the textbox. Each time you click OK the time is updated but if you click Cancel it is left unchanged. Notice that we used the JScript date object to retrieve the time. An alternative is to use the Time objects provided by the API:
LocalTime = System.Time.getLocalTime(
		System.Time.currentTimeZone);
		System.Gadget.Settings.write(
			“Time”,LocalTime);
Advanced Gadgets
As long as you know about HTML, the DOM and scripting then the only thing you need to concentrate on is the new API. It is worth mentioning, however, that many of the Windows scripting APIs and ActiveX objects are still available for you to use, and you shouldn’t forget about old favourites such as the WMI API. You also need to think in terms of Ajax and the HTTPRequest object to see how you might go about downloading live data from the Internet.The new API introduces many useful new objects and functions, but these are mainly about giving a web page script access to the local machine – much of the work of a Gadget is achieved using nothing really new. The sad part about Vista Gadgets is that with just a little more foresight Windows Live Gadgets could have been made compatible, and you could have written a single Gadget for both environments. At the moment this isn’t possible because the two environments use different Gadget APIs – but Microsoft are working on unifying them. For the moment just focus on all those new Sidebar Gadgets you can create!
More information from microsoftgadgets.com/Build
Ian Elliot is a Senior Developer with I/O Workshops Ltd, a consultancy which solves real world problems for clients with widely varying requirements.
Comments