Start a new VB Windows form-based project and add to it a new class called “DirCombo”. This generates the following code:
Public Class DirCombo
End Class
Add to this class declaration:
Public Class DirCombo
	Inherits ComboBox
This means that our new class inherits from the ComboBox class, which means that it has all of the properties, methods and events of a ComboBox class. This makes it an exact copy of the ComboBox. If you build the project you will discover that the DirCombo control appears, with a default icon, in the Toolbox. You can select it and place it on the form in the usual way to create a perfectly standard ComboBox.
Customising
The first thing we need to do is populate the ComboBox with a list of the available drives. This can be done in the control’s constructor. We can use the My.Computer.FileSystem object to return a collection of DriveInfo objects. A For Each loop then adds each Drive to the original ComboBox’s Items collection. Notice the use of MyBase to refer to the original ComboBox control that our class derives from:Public Sub New() Dim Drives As _ ReadOnlyCollection( _ Of DriveInfo) Drives = _ My.Computer.FileSystem.Drives For Each Drive As DriveInfo In _ Drives MyBase.Items.Add(Drive) Next MyBase.SelectedIndex = 1 End SubTo make all this work we also need to add to the start of the class definition:
Imports System.Collections.ObjectModel
Imports System.IO
Now if you build the project and try the new control out on a form you will discover that it does list the drive letters. Unfortunately it lists them at design time when you drop the control on the form, and it lists them twice at runtime because it doesn’t clear the set added at design time. The solution to this problem is to add an If statement that distinguishes between design and run time:
Public Sub New()
	If LicenseManager.UsageMode _
		= LicenseUsageMode.Runtime Then
			..code for constructor
	End If
End Sub
We also need to add:
Imports System.ComponentModelNow the control works as desired and is only activated when used at runtime.
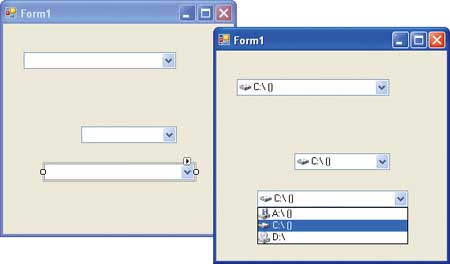
A reusable drive control
System Icons
The next step is to add icons that correspond to the type of drive. Before we can do this we need to gain access to the appropriate icons. Windows uses a wide range of “standard” icons, the location of which seem to be well hidden from the average application programmer. If you spend time searching the documentation you probably won’t find out much about how you can use these icons, but they aren’t deliberately hidden.The .NET framework does provide some access to standard system icons in the SystemIcons class. This returns an Icon object for any of the icons that you will find in a message box or dialog box – but not the wider range of drive and folder icons. To rectify this you need to know that these are stored within the Shell32.dll file in the windows\system32 directory. There is an ExtractAssociatedIcon method in the Icon class that will extract a single icon from a file, but it only returns the first icon found in the file. To pick an icon from the Shell32.dll file we have no real choice but to use an API call – ExtractIcon.
To make the shell icons look as much like the SystemIcon class as possible we need to create a new Module within the project, called ShellIcons. A Module is used because there is no need to have more than one instance of the ShellIcons class, and a Module is VB’s way of creating a static class. A static class is automatically instantiated by the system, and the resulting object has the same name as the class. The idea is that we are going to add static properties to the class that return each of the icons we want to use. For example, to get the “hard disk” icon you would use something like:
ic = ShellIcons.HardDiskWe also need some constants to specify which icon to obtain. The icons are stored in order, with the first icon having index 0. I don’t know of any documentation that gives the order of the icons in the file, but it is fairly easy to discover what you are looking for by enumeration. The following constants give the position of the device icons that we are specifically interested in – you can add more:
Private Const Floppy As Integer = 6
Private Const Hard As Integer = 8
Private Const Net As Integer = 9
Private Const CD As Integer = 11
Private Const RAM As Integer = 12
Private Const Unknown As Integer = 53
The API call is easy to translate to a VB declare:
Private Declare Function ExtractIcon _
	Lib "shell32.dll" Alias _
	"ExtractIconA" _
	(ByVal hInst As IntPtr, _
	ByVal lpszExeFileName As String, _
	ByVal nIconIndex As Integer) As _
	IntPtr
It returns a handle to the icon stored in the file given by the values of nIconIndex and lpszExeFileName. The hInst parameter is supposed to be set to the application’s handle, which is used by Windows to keep track of it. It is quite difficult to obtain the application instance handle and, after spending some time implementing other API calls to discover it, a programming error revealed that the ExtractIcon API call doesn’t actually seem to make use of it or need it. This is undocumented, so if you find it doesn’t work with another version of Windows (I used XP) you might have to implement the code needed to obtain the application handle.
As well as using constants for the icon indexes, it also makes good programming sense to use a constant for the location of the Shell32.dll file:
Const ShellIconsLib As String _
	= "C:\WINDOWS\System32\shell32.dll"
It is worth adding a public method that will return the icon corresponding to any index:
Public Function GetIcon( _
	ByVal index As Integer) As Icon
	Dim Hicon As IntPtr
	Hicon = ExtractIcon( _
		IntPtr.Zero, ShellIconsLib, _
		index)
	Dim ic As Icon
	ic = Icon.FromHandle(Hicon)
	Return ic
End Function
Notice the use of the FromHandle static method to create the icon object. Now we can add the properties to return the specific icons we are going to use. As there is no logical reason why the user should ever need to set these properties, we only define a get:
Public ReadOnly Property _
	FloppyDisk() As Icon
	Get
		Return GetIcon(Floppy)
	End Get
End Property

Public ReadOnly Property _
	HardDisk() As Icon
	Get
		Return GetIcon(Hard)
	End Get
End Property

Public ReadOnly Property _
	NetDisk() As Icon
	Get
		Return GetIcon(Net)
	End Get
End Property

Public ReadOnly Property _
	CDROM() As Icon
	Get
		Return GetIcon(CD)
	End Get
	End Property

Public ReadOnly Property _
	RamDisk() As Icon
	Get
		Return GetIcon(RAM)
	End Get
End Property

Public ReadOnly Property _
	UnknownDisk() As Icon
	Get
		Return GetIcon(Unknown)
	End Get
End Property
You can, of course, add further properties to return other icons – the only problem being thinking up a name for some of them!
OwnerDraw ComboBox
If we want to add icons to the drive listing we are going to have to modify the way the ComboBox is drawn. The designers of the .NET Framework have done their best to make such modifications easy. If the DrawMode property is set to either OwnerDrawFixed or OwnerDrawVariable, then rather than draw the items in the drop-down list, the ComboBox raises the DrawItem event. The DrawItem event handler is passed all of the information and objects it needs to actually draw the item. There is a small complication in that if you set DrawMode to OwnerDrawVariable, the ComboBox raises the MeasureItem event just before the DrawItem event. This allows you to tell the ComboBox how much space you need to draw the next item. In this case the icons are the same size, so we can use OwnerDrawFixed and ignore the need to handle the MeasureItem event – the ComboBox will work out how much space there is to draw an item.There is one final small detail before we implement the DrawItem event handler. The default mode of operation of a ComboBox is to allow the user to edit or enter the selected item. Clearly if the user can edit an item it cannot be shown graphically – it has to be text. What this means is that the DrawItem event is raised for each of the items in the drop-down list, which the user cannot edit, but the item displayed as selected is still drawn by the ComboBox as text. The solution to the problem is to force the ComboBox to stop the user editing or entering items by setting its DropDownStyle equal to DropDownList.
Thus we need to add to the end of the constructor:
MyBase.DropDownStyle = _
	ComboBoxStyle.DropDownList
MyBase.DrawMode = _
Windows.Forms.DrawMode.OwnerDrawFixed
If you now run the program the result will be a blank ComboBox because it doesn’t draw itself and neither do you. We now have to provide a custom DrawItem event handler, and this is best done by overriding the base ComboBox’s event handler. That is, when a ComboBox object wants to raise a DrawItem event, it calls its OnDrawItem method, which does the job of calling all of the methods that have subscribed to the event as event handlers. We can override the ComboBox OnDrawItem with our own code by adding to the new control class:
Protected Overrides Sub _
	OnDrawItem(ByVal e As _
	DrawItemEventArgs)
End Sub
The DrawItemEventArgs object passed into the routine contains a great deal of information concerning the drawing of the item. In particular if there is no item selected and the display area should be left blank it has an Index of –1 and we should do nothing:
If e.Index = -1 Then ReturnIf the Index corresponds to an item, then we have to acquire the icon appropriate to the drive type of the item we are drawing. The Index can be used to extract the DriveInfo item that we have to draw:
drive = MyBase.Items(e.Index)Notice the use of a MyBase to access the original ComboBox.
Now we have the DriveInfo object, we can use its DriveType to retrieve the appropriate icon using the ShellIcons module:
Dim ic As Icon
Select Case drive.DriveType
	Case DriveType.Fixed
		ic = ShellIcons.HardDisk
	Case (DriveType.CDRom)
		ic = ShellIcons.CDROM
	Case (DriveType.Network)
		ic = ShellIcons.NetDisk
	Case (DriveType.Removable)
	ic = ShellIcons.FloppyDisk
	Case Else
		ic = ShellIcons.UnknownDisk
End Select
The Select simply sets icon to the appropriate icon using ShellIcons. Whenever I see code like this I think that there should be a better way of doing it, but the fact of the matter is that there is no direct connection between DriveType and the specification for the icon, so you need to handle each case in turn. Sometimes you just have to write code!
Now we are ready to do the necessary drawing. The Bounds property, a Rectangle object, gives the co-ordinates of the area that we can draw in. We need to create a Rectangle object that specifies exactly where the icon is to be drawn from the Bounds Rectangle. We need a small square box – icons are always square – at the far left of the Bounds and filling the available height:
Dim iconbox As New Rectangle( _
	e.Bounds.X, e.Bounds.Y, _
	e.Bounds.Height, e.Bounds.Height)
You can add an offset to indent the icon if you want to. Now we can draw the background and then the icon in the area specified by the iconbox Rectangle using the Graphic object passed to the event handler:
e.DrawBackground()
e.Graphics.DrawIcon(ic, iconbox)
ic.Dispose()
Finally we have to draw the text that would otherwise be displayed automatically by the ComboBox – when you take over drawing a control you take over everything. This is quite easy as we can obtain the drive’s name and volume label if one exists from the DriveInfo object:
Dim text As String
Text = drive.Name
If drive.IsReady Then
	If drive.VolumeLabel = "" Then
		Text = Text + " (" _
			+ drive.VolumeLabel + ")"
	End If
End If
The text can be drawn onto the Graphics object using the DrawString method. The only complication is we have to specify the font, colour and location of the top left-hand corner of the text. All of this information can be derived from the values passed into the event handler:
e.Graphics.DrawString(text, _
	e.Font, _
	New SolidBrush(e.ForeColor), _
	e.Bounds.X + iconbox.Width + 1, _
	e.Bounds.Y)
At this point we could declare our work done, but the Status property tells us when the user has the mouse hovering over a selection and we can respond to this by drawing a “select frame”:
If e.State = DrawItemState.Focus Then
	e.DrawFocusRectangle()
End If
This now completes our modifications, and if you run the example you will see a list of the available drives with icons. You can select a drive and the control behaves in every other respect like a ComboBox.
There are still a few things left to do to tidy up the new control – a new toolbox icon for example – but we have something that works and can be used in other projects.
Ian Elliot is a development programmer with I/O Workshops Ltd, a consultancy which solves real world problems for clients with widely varying requirements.
Comments